Collect Datainterviewer online and offline workflows
Interviewer Online and Offline Workflows
Summary:
This tutorial covers in more detail the Interviewer online and offline workflows introduced in Protocol and Data Workflows: how to get your protocol onto every interview device, and how to get the data those devices collect back to you.
Prerequisites:
To follow along, you should:
- Be familiar with Interviewer or Interviewer Classic and how interviews are run.
- Have created or obtained the
.netcanvasprotocol file you want to deploy (see building a protocol). - Have access to the devices you will use to run interviews.
- For the online workflow, have an account with a cloud file sharing service — your institution's shared drive, or a third-party provider — that your whole team can use.
- For the offline workflow, have a USB flash drive or other external storage that both your computer and your interview devices can read.
Duration:
20 minutes
Introduction
Interviewer keeps everything it stores — protocols, interviews, and settings — on the device it runs on. That means two things to plan for:
- Protocol deployment — getting the protocol file onto each interview device before data collection begins.
- Data export — getting the data each device holds off it and back to a location you control.
How you bridge them depends on whether your interview devices can reach the internet. This tutorial describes both options:
- The online workflow — use a cloud file sharing service as the hub in both directions.
- The offline workflow — carry files in both directions on a USB flash drive or other external storage.
Good to know:
This page is about Interviewer and Interviewer Classic. If you are running your study in Fresco, neither workflow applies: protocols are uploaded once to your dashboard and all data is exported from it centrally. See Protocol and Data Workflows for the big-picture comparison.
The shape of each workflow is the same whichever version of Interviewer you run, but the in-app import and export steps differ. Choose your version below — the version-specific steps throughout this tutorial update to match.
The online workflow
If your interview devices can reach the internet — at least at the start and end of each field session — use a cloud file sharing service as the hub for both directions. It gives you one place to update the protocol, and one place where every interviewer's data lands.
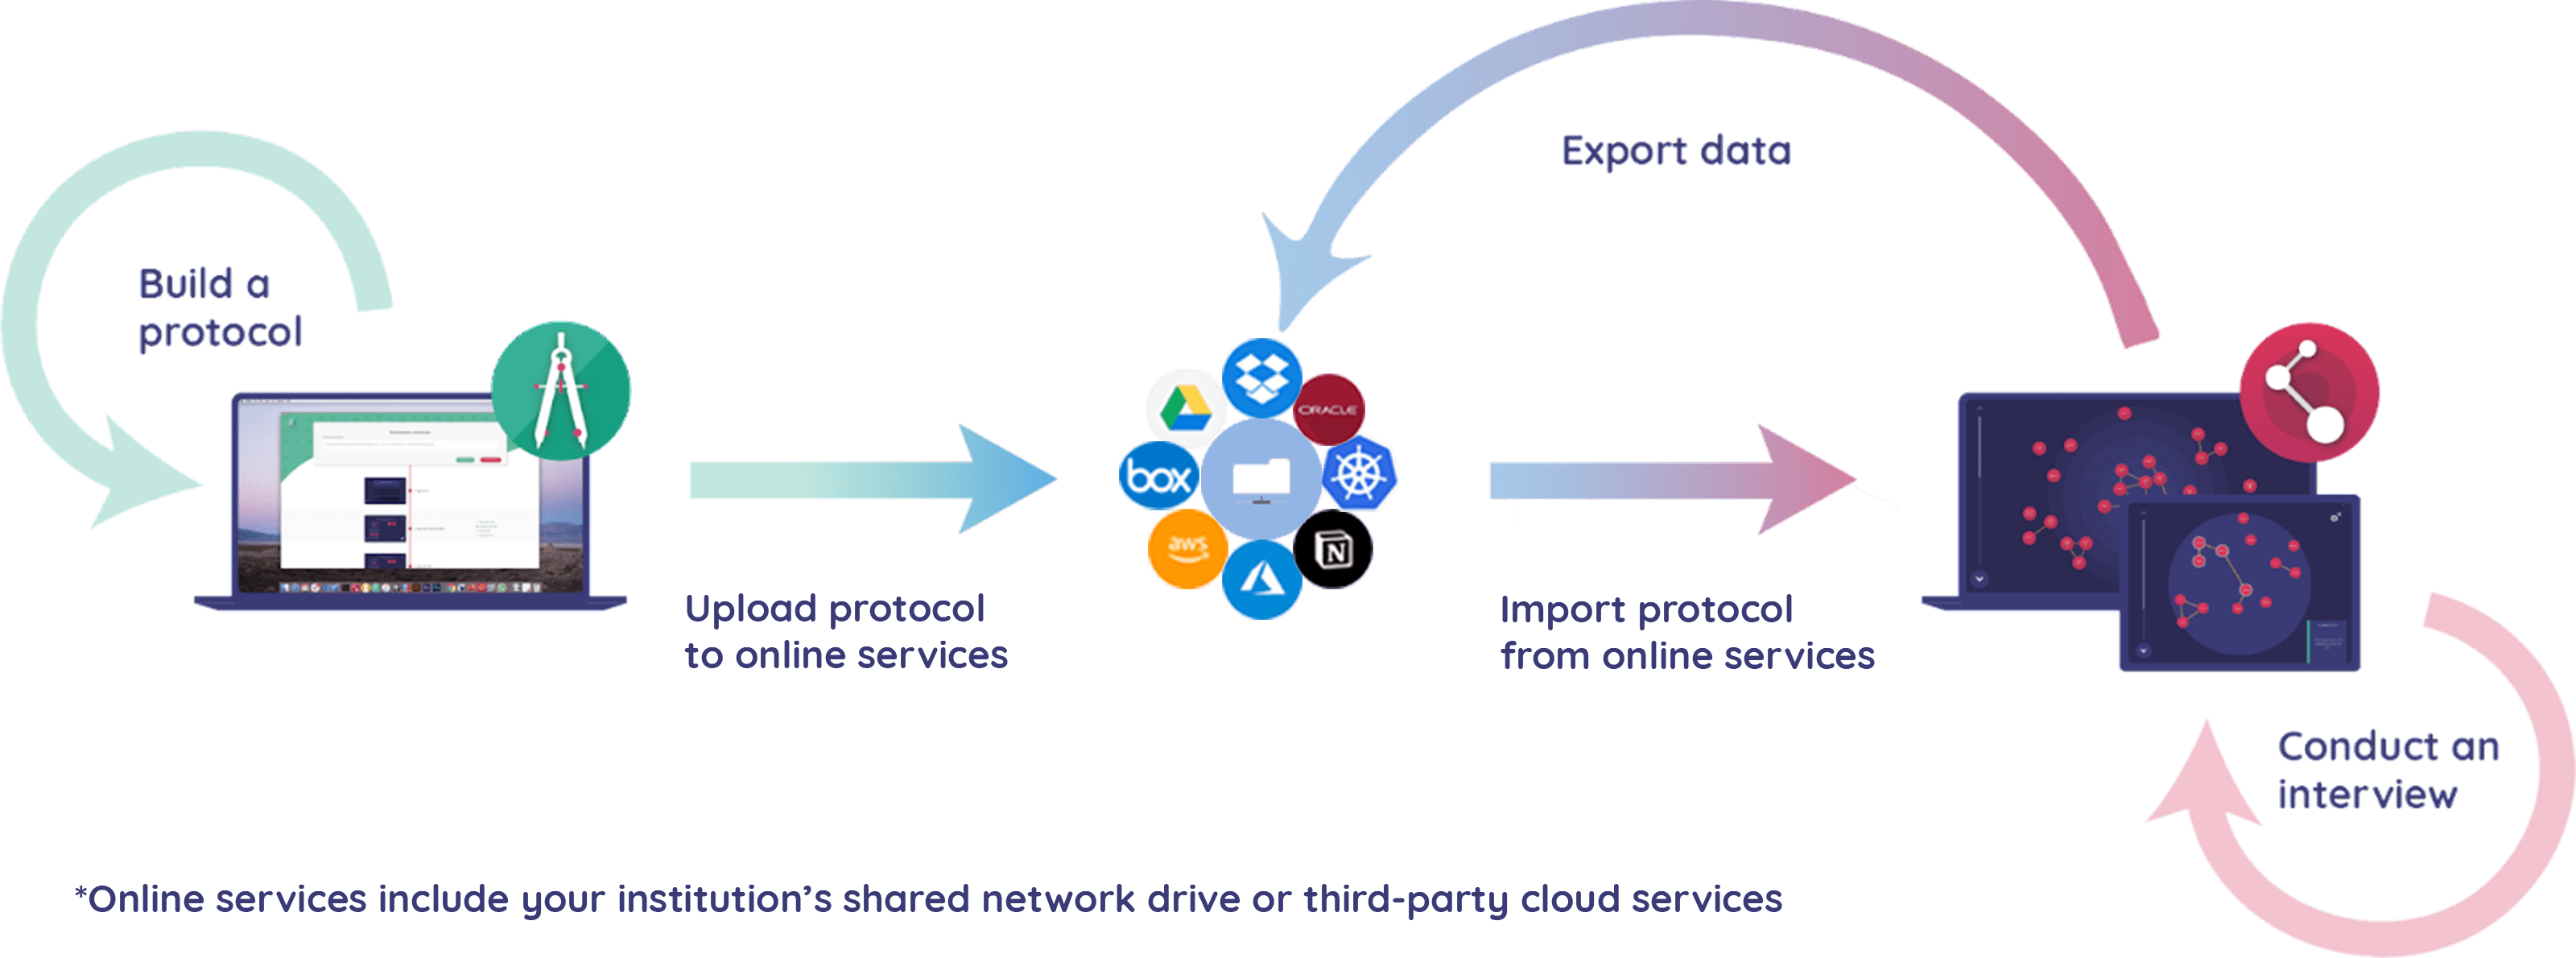
Deploying protocols with a cloud file sharing service
This is the preferred method for deploying protocols. It has the significant advantage of providing a single location for the protocol file that can be updated as needed and which can be accessed by multiple people at the same time.
- Place your
.netcanvasfile on a cloud storage service (e.g., Box, Dropbox, Google Drive). You can generally accomplish this by dragging and dropping the file into a dedicated folder on the computer you are using to author the protocol. Alternatively, many providers allow you to upload files via a web interface. - Install the cloud service's app on each interview device, or open the service in the device's web browser, and sign in.
- Import the protocol file on the interview device. Typically you accomplish this by browsing to a special location in the file browser that corresponds to the cloud storage provider (e.g., "Dropbox" or "Google Drive"). If your provider is not visible in the file browser, try to copy the protocol file to the storage of your device from within the provider's app.
Use the Import a protocol card on the start screen to open the file browser, or drag the .netcanvas file onto it. The protocol is validated on import, and any protocol built against an older schema is migrated to schema 8 automatically.
Exporting data to a cloud file sharing service
The same service can consolidate your interview data, by having each interviewer upload their exports directly to it.
- Create a dedicated folder on your cloud storage service to store the interview data. Choose a location that is easily accessible and organized. If you are operating within a large team, consider creating individual folders for each person conducting interviews, and consider setting permissions to "write only" (or similar) so that interviewers can only add files to their own folder.
- Install the cloud service's app on each interview device and ensure that the interviewer is logged in and has access to the folder you created in step 1.
- Export sessions from the device, saving the resulting
.ziparchive into that folder.
Select the sessions you want in the Interviews area and click Export selected. Interviewer builds the archive, then shows a Save export button — click that to save the file. The file formats and options are configured ahead of time in Settings → Data export, so nothing is chosen at export time. Where the .zip goes depends on the device and browser:
- In a desktop browser, you are usually prompted to choose a location — navigate to the cloud service's synced folder on the device.
- On a tablet, the system share sheet opens — choose the cloud service's app, then the folder you created in step 1.
- Otherwise the archive is saved to the browser's downloads folder, and you upload it to the cloud service yourself.
Sessions are marked as exported only once the file has actually been saved, so cancelling the save leaves them selectable for another attempt.
Other transfer methods
It is possible to transmit the zip files created by Interviewer through many other mechanisms than those described above. However, these are generally not recommended as a primary workflow as they can be more insecure and error-prone than using a cloud file sharing service, and may not be compatible with the Institutional Review Board (IRB) requirements of your research.
If you are comfortable with the potential risks, it should be possible to use the same approach as above to "share" your exported data to a number of apps and services, including via email, Slack, SharePoint, and so on.
The offline workflow
If your interview devices have no internet connection, use a USB flash drive or other external storage to carry files in both directions.
Take Care!
Interviewer runs in a web browser, so each device needs a connection once, before it goes offline: open Interviewer on the device — or install it as a Progressive Web App — while it is still connected. That first load is what stores the app on the device; after it, protocol import, interviews, and export all work with no connection at all. Every interface language is stored along with the app, so switching language works offline as well. A device that has never loaded Interviewer cannot open it in the field.
Good to know:
The offline workflow assumes every interface in your protocol works offline. Some schema-8 interfaces in Interviewer — notably Geospatial, which loads maps over the internet — require a connection during the interview, so a protocol that uses them cannot be run fully offline. Protocols that need a connection show a Requires internet indicator on their protocol card. Schema-7 protocols in Interviewer Classic are unaffected.
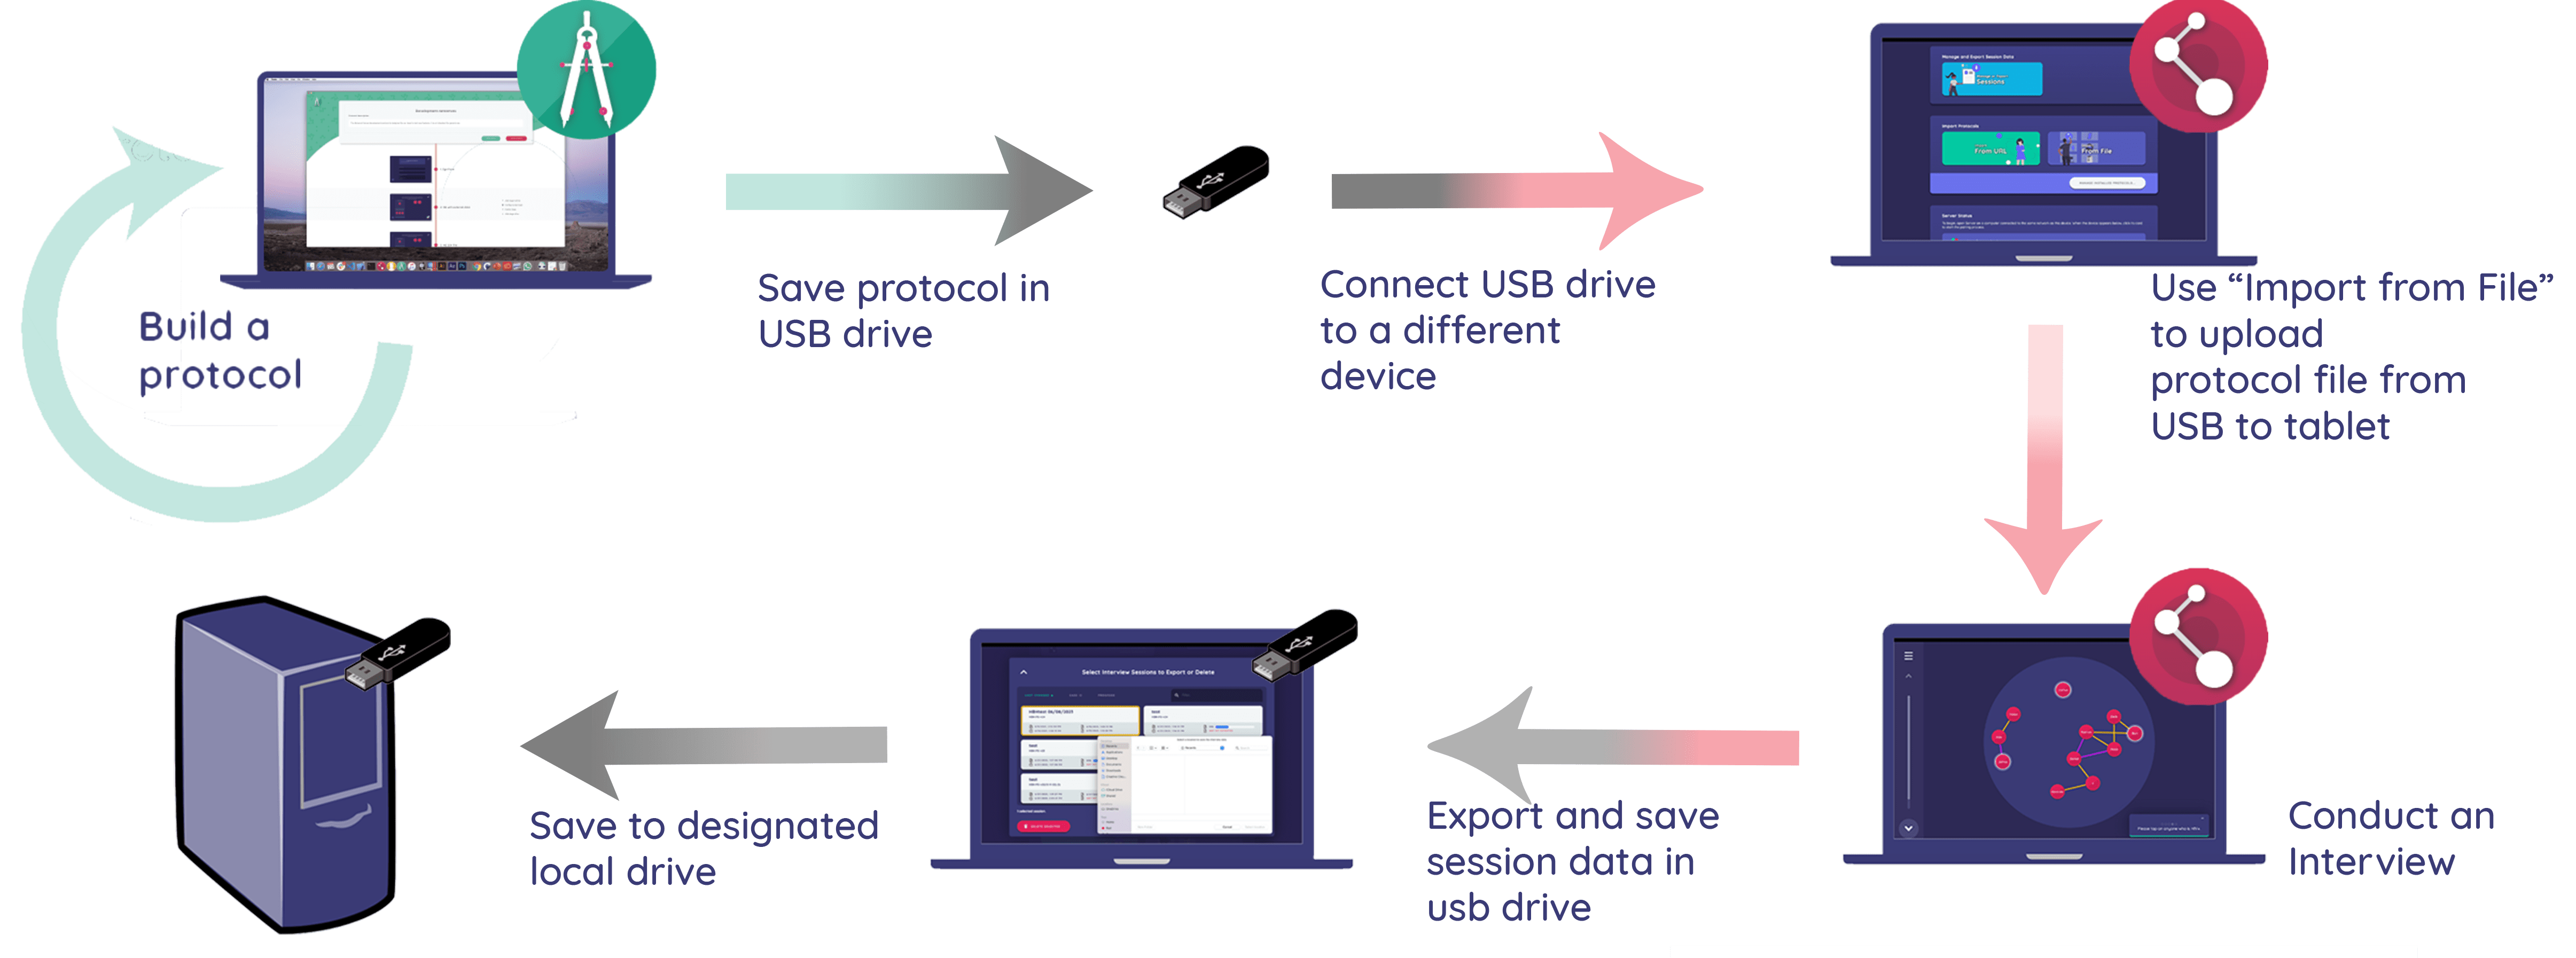
Deploying protocols via USB
In an offline setting, the only option for deploying protocols is to transfer the protocol file physically from your computer to each interview device.
- Determine the path to your protocol file (where it is saved on your computer). It typically follows the format
C:\Folder\Subfolder\file.netcanvasfor Windows or/Users/Username/Folder/Subfolder/file.netcanvasfor Mac. - Open the file browser on your computer and navigate to the location of the protocol file.
- Insert your USB flash drive or other external storage device into your computer.
- Copy the protocol file to the external storage device.
- Eject the external storage device from your computer.
- Insert the external storage device into the interview device.
- Import the protocol from the external storage device.
Open Interviewer and use the Import a protocol card on the start screen, then navigate to the external storage device and select the protocol file. You can also drag the file from the storage device onto the card.
Good to know:
Refer to the documentation from your operating system or device manufacturer (or simply test ahead of time) to ensure that the storage device you are using to transfer the protocol file can be read by the interview device and the computer you used to author the protocol.
Exporting data via USB
As above, the only option for exporting data in an offline setting is to use external storage to carry the data files from the interview device back to a computer.
- Create a dedicated folder on your external storage device to store the interview data. Choose a location that is easily accessible and organized. If you are operating within a large team, consider creating individual folders for each person conducting interviews.
- Once you have conducted your interviews, export the sessions to that folder.
Select the sessions you want in the Interviews area, click Export selected, then click Save export once the archive is ready.
- In a desktop browser, you are usually prompted to choose a location — navigate to the folder you created on the external storage device.
- On a tablet, the system share sheet opens — choose a file manager app, then navigate to the external storage device.
- Otherwise the archive is saved to the browser's downloads folder, and you copy it to the external storage device yourself.
After the transfer
Whichever workflow you use, once your data is off the device:
- Organize and back up your exports. A single copy in one cloud folder — or on one USB drive — is not a backup. See the data organization and backup best practices.
- Export regularly, and clear devices once data is safely stored. Interview data exists only on the device until you export it. See Data Storage and Safety for what can destroy it.
- Rehearse the whole cycle before collecting real data. Piloting Your Study shows how to run a protocol and its export pipeline end to end first.
For a complete description of what the exported files contain and what each export option does, see the Data Export guide.