fresco 🠖 deployment
Deployment Guide
Summary:
This guide will walk you through the process of deploying your instance of Fresco.Prerequisites:
Before you get started, you should:- Read the about Fresco article to understand what Fresco is and how it works.
- Create an account on GitHub if you do not already have one.
- Set aside enough time to complete the deployment process in one sitting.
Duration:
60 minutes
Thank you for taking the time to deploy Fresco! We hope you find it a valuable tool for your research and data collection. This guide will walk you through the process of deploying your instance of Fresco.
Fresco is different from other software that you may have installed previously. It is a web application, meaning that you do not install it on a laptop or desktop. Instead, you "deploy" it to one or more servers (your "infrastructure"), which you can then access from your web browser.
This approach allows researchers to manage their own data and customize the nature of their infrastructure to suit their needs.
This also means that you are responsible for the security and maintenance of your own deployment! The Network Canvas project team by design has no access to your data or infrastructure.
To deploy Fresco, we will use the following services and technologies:
- GitHub: A platform for hosting and sharing code owned and operated by Microsoft. The Fresco code is shared via GitHub, and you will need a GitHub account to deploy it. If you do not have a GitHub account, you can create one for free at github.com.
- PostgreSQL: A powerful, open-source relational database system. Fresco uses PostgreSQL to store data about your study, participants, and responses.
- UploadThing: A cloud-based file storage service that Fresco uses to store protocol assets such as media files.
To make the deployment process as simple as possible, we designed Fresco to be deployed using Netlify, which is a cloud platform that specializes in deploying web applications. It is designed to be easy to use and has a generous free tier that is suitable for most research projects. It is not a requirement to use Netlify to host Fresco, but it is the simplest way to get started and is the method we will be using in this guide.
We previously suggested deploying to Fresco to another cloud platform, Vercel, which offers many of the same features as Netlify. The Vercel deployment guide is still available, should you wish to use it.
How much does deploying Fresco cost?
Deploying Fresco for your study can be achieved entirely for free using the steps detailed in this guide. We built it this way to allow the broadest possible access to the software. The free deployment method does come with some limitations, such as the amount of data you can store and transfer, and the overall performance of the application.
If you are running a large study, require guaranteed levels of performance, or have special requirements imposed by your IRB regarding participant data, you may wish to use a paid plan or a different approach to deployment. Consult the cloud pricing page for more information. Please note that the Network Canvas team does not benefit financially in any way from your choice of cloud provider.
It is also possible to use whatever infrastructure you may have access to in order to deploy Fresco. For information on this, see our advanced deployment guide.
Create a fork of Fresco
Deploying Fresco involves setting up your own unique version of the project, which we refer to as your instance. The first step in creating this instance is to create a copy (or "fork") of the Fresco code on GitHub.
To do this, ensure you have a GitHub account and are signed in, and then:
-
Visit the Fresco repository on GitHub, and click "Fork".
-
Enter a repository name (this will be your Fresco instance name, so you may wish to use your study name or the name of your project), along with a description, and click "Create Fork". Leave the "copy main branch" option selected.
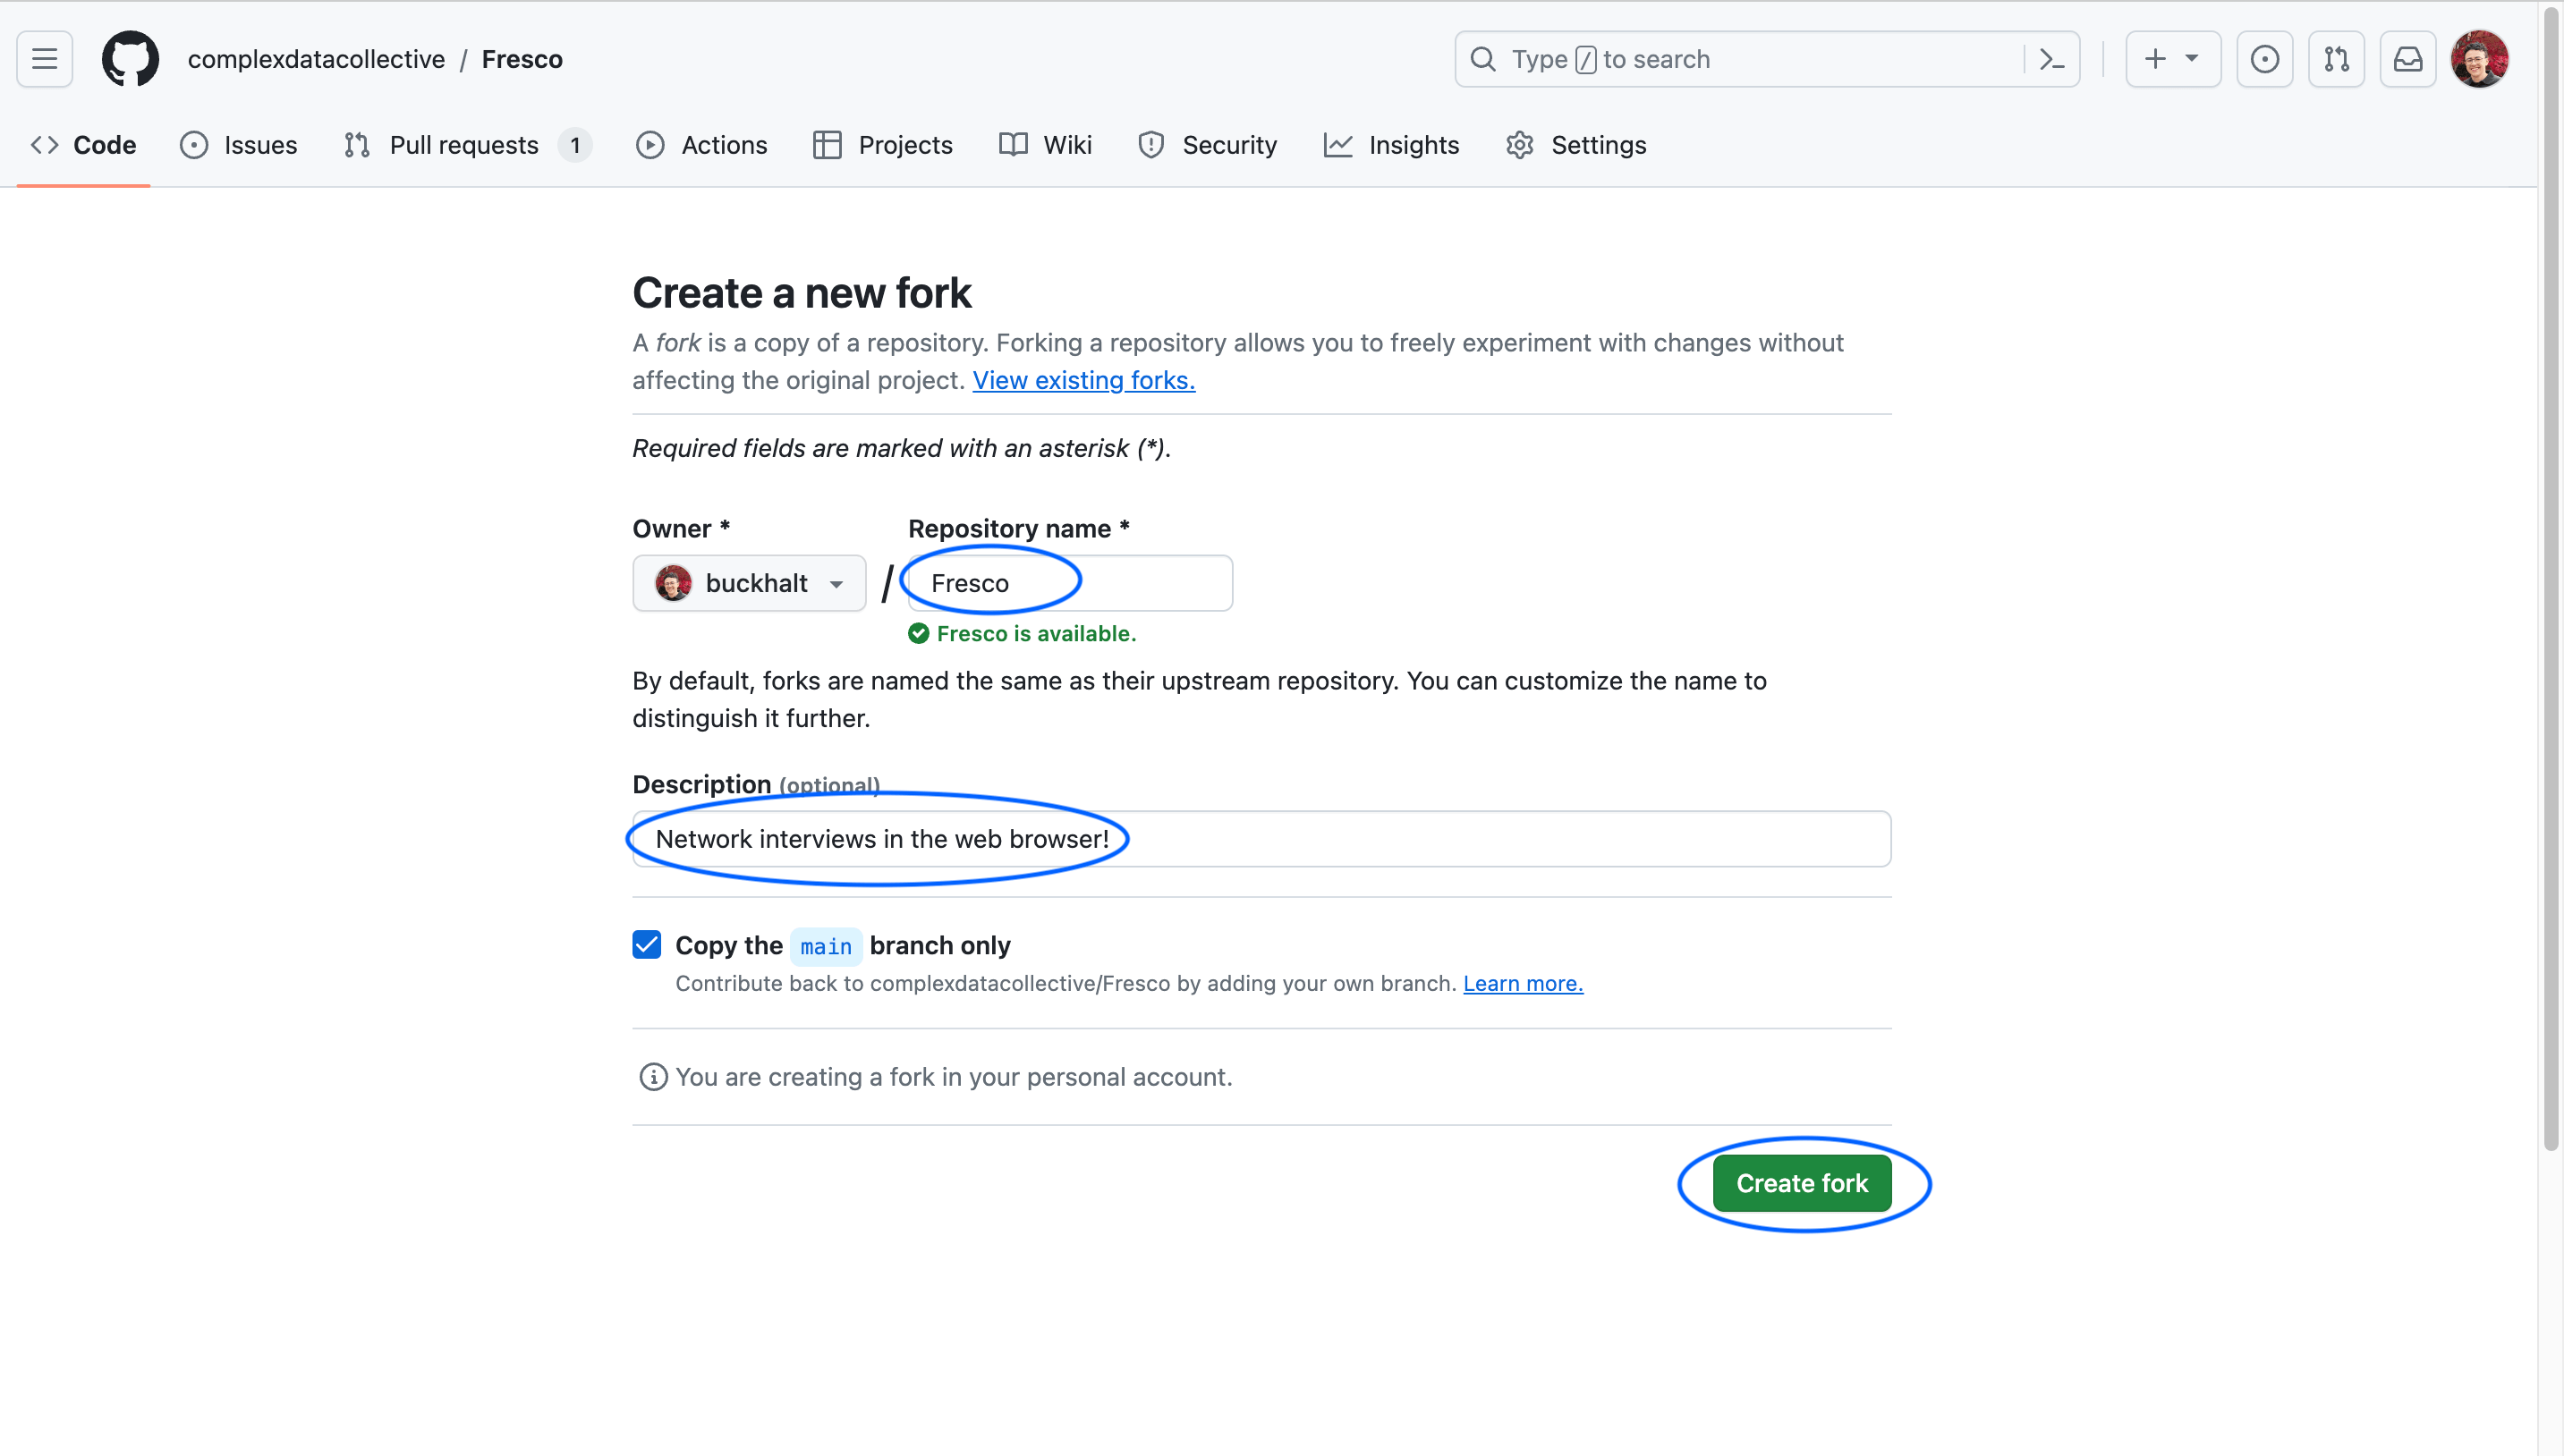
Once you have completed this step, you will be redirected to your forked repository on GitHub. This copy of the Fresco code is now yours to deploy or modify as you wish. ``
Create a database
Fresco uses a PostgreSQL database to store data about your study, participants, and responses. We will next create a new database using the Neon platform.
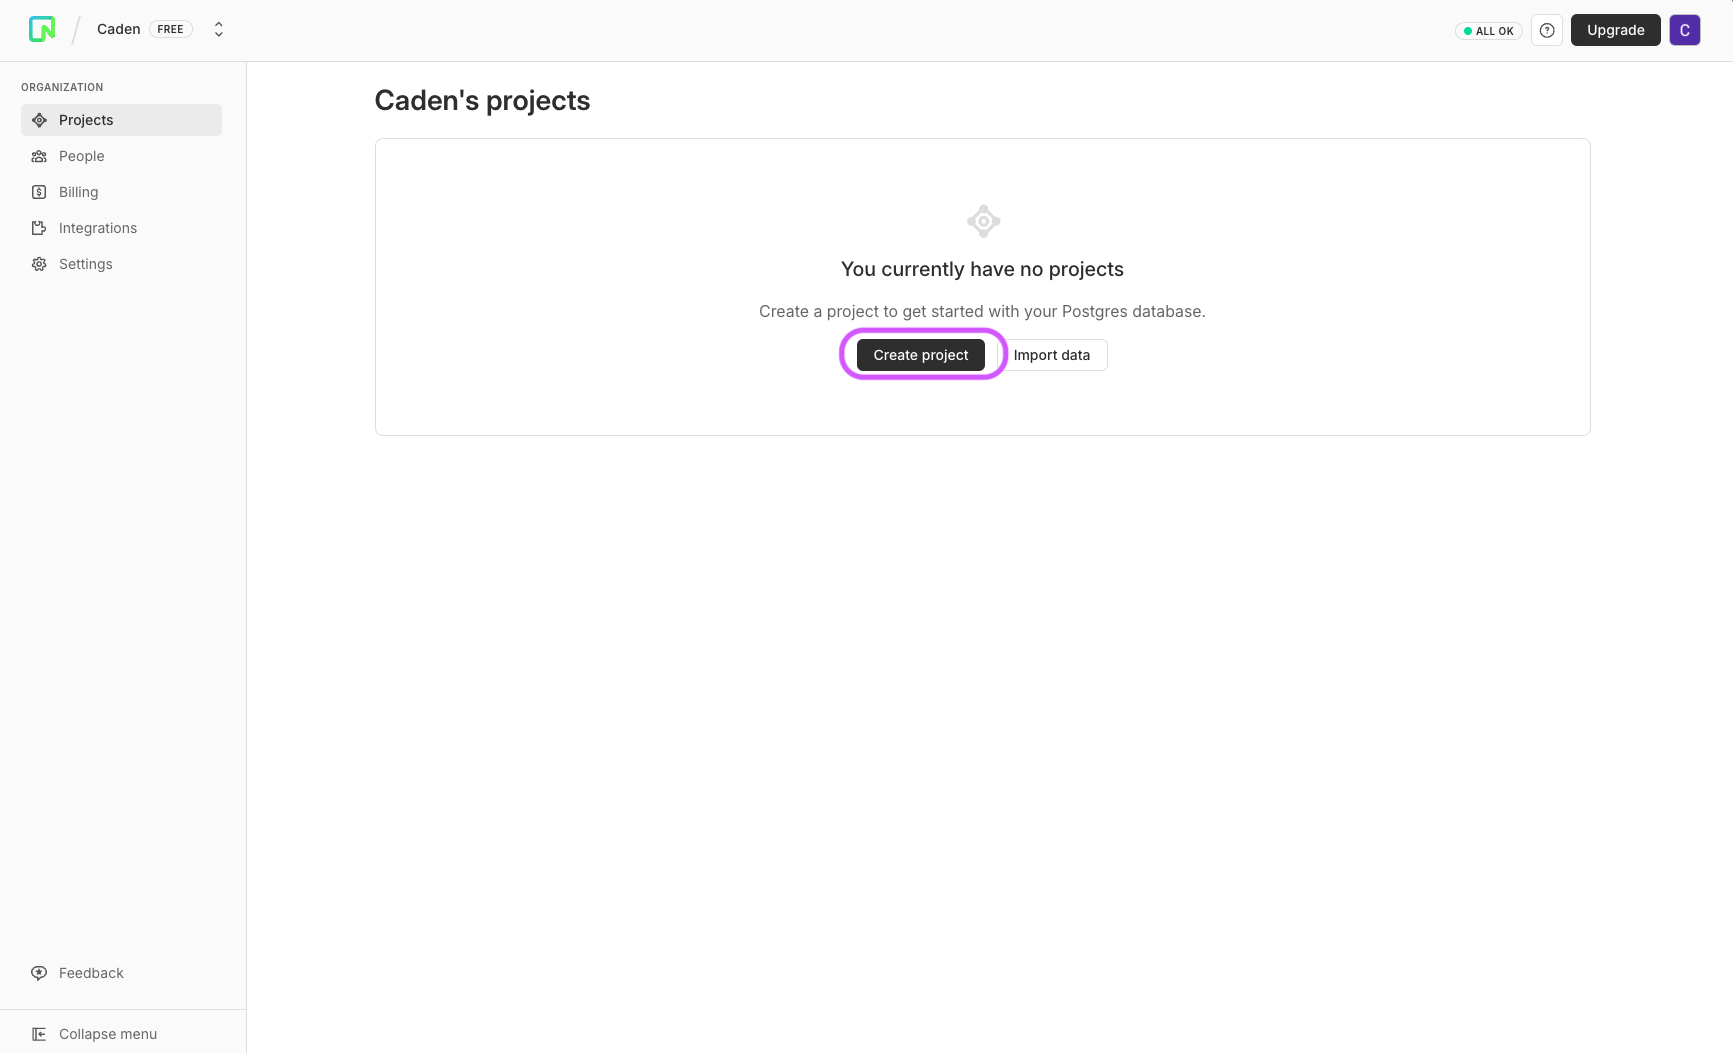
-
Visit the Neon website and click Login. We recommend connecting to Neon with GitHub by clicking the GitHub button. You will be redirected to the Neon dashboard.
-
From your dashboard, select Create Project.
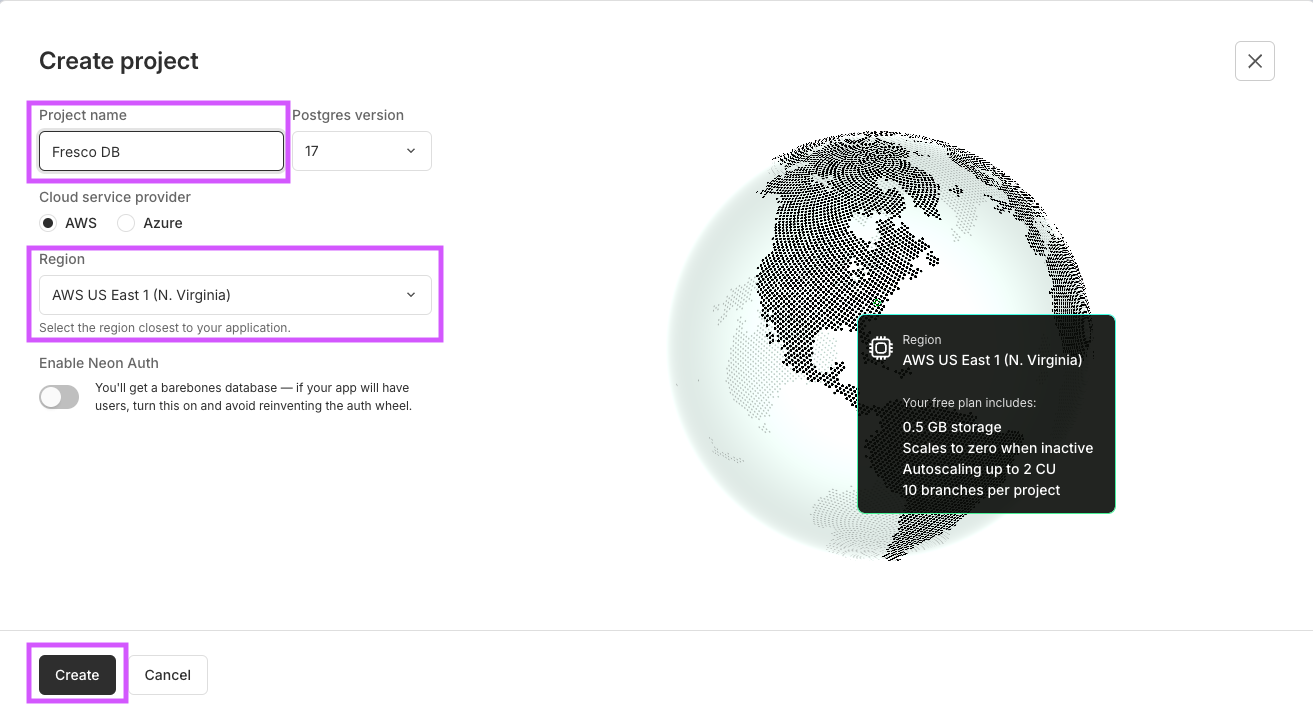
Create a Neon database -
Give your database a name and optionally choose a region from the dropdown. By default, the database will be created on the Free tier. For more information on database tier pricing, consult the cloud pricing page. Then, click Create. Your database will be generated and you will be redirected to the Project dashboard.
-
Under the heading 'Connect to your databse' click Connect.
Click Connect -
Choose Prisma from the dropdown and select the .env tab. You will see environment variables for your database. Click "Copy Snippet" to copy the environment variables to your clipboard.
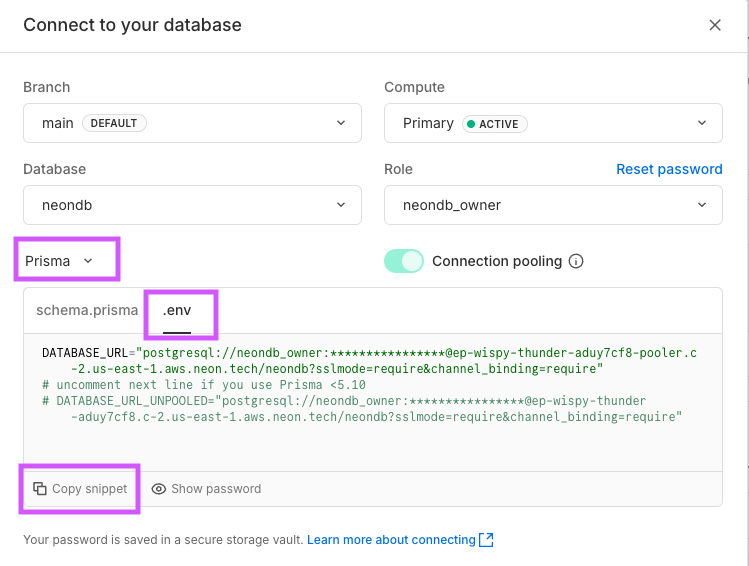
Select Prisma and click the .env tab, and copy the environment variables -
Paste the environment variables into a text file or notes app for safekeeping. You will need these environment variables later in the deployment process.
Create a project on Netlify
Next, we will deploy your fork of the application to the Netlify platform. You can use the Free tier or paid plans (for more information about cloud pricing, read our cloud pricing documentation), but for the purposes of this guide, we will use the free tier.
-
Click here to create a new project on Netlify. Sign in using GitHub, if you are not already signed in.
-
Under the Let's deploy your project with... header, select GitHub.

Import Git Repository -
Authorize GitHub permissions. You will be redirected back to the Netlify project creation dashboard.
-
Find the name of your Fresco instance from the list of your git repositories and click on it.
-
Give your project a name. The project name determines the default URL for your project. If none is provided, a random project name will be generated for you.
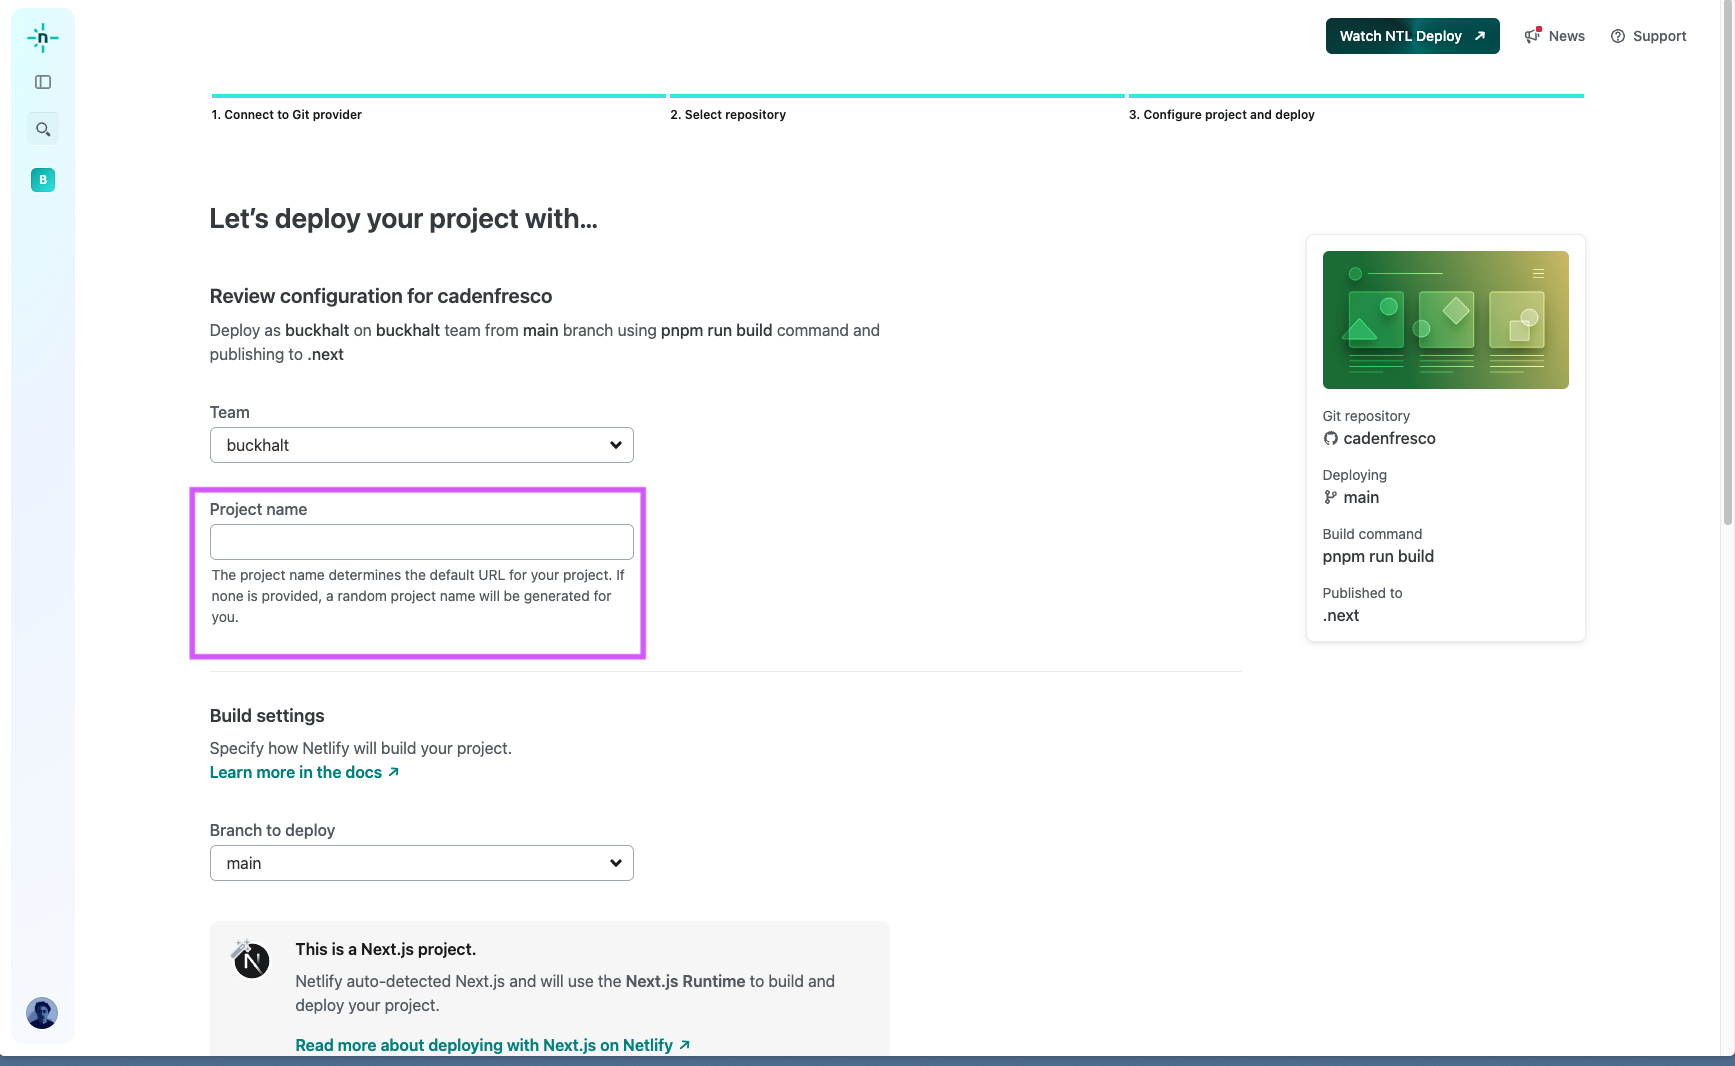
Name your project -
Open the text editor or notes app where you stored your environment variables from the Neon database. Select all of the text, and copy it to your clipboard.
-
Scroll to the bottom of the screen. Click "Add environment variables". Then, click Import from a .env file.
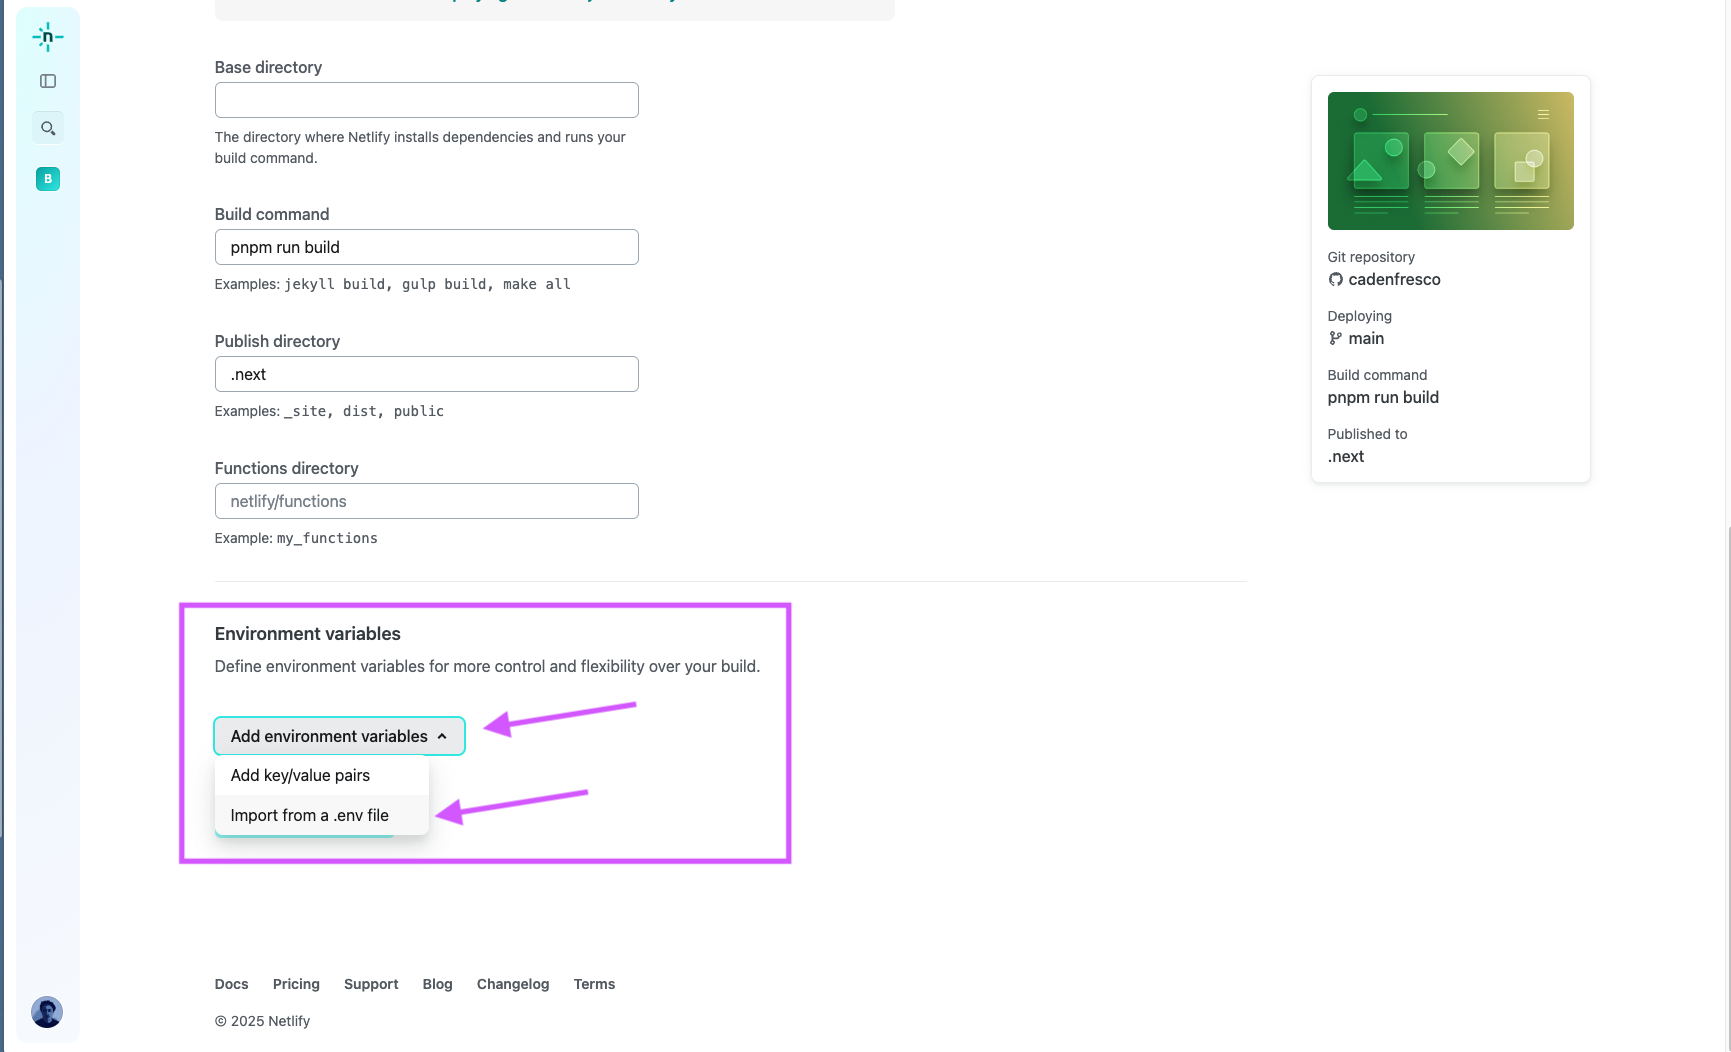
Add environment variables -
Paste your variables into the "Contents of .env file" text box (with the
EXAMPLE_KEY_1=my-secret-value-1placeholder). Your variables will be automatically added. Then, check the box beside Contains secret values.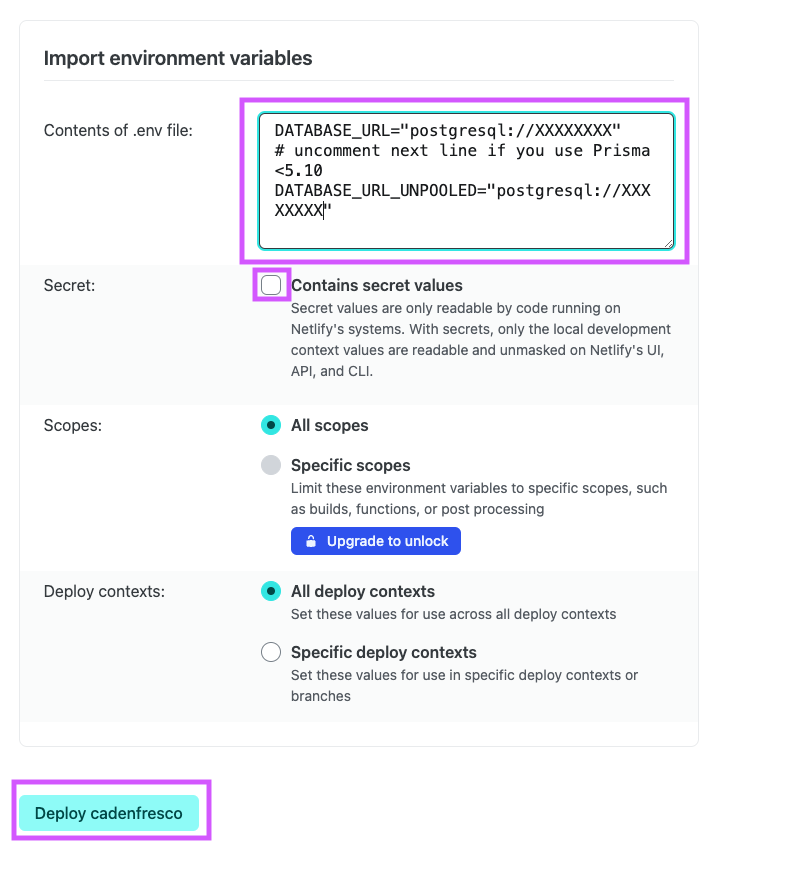
When you paste your variables, they will be added automatically -
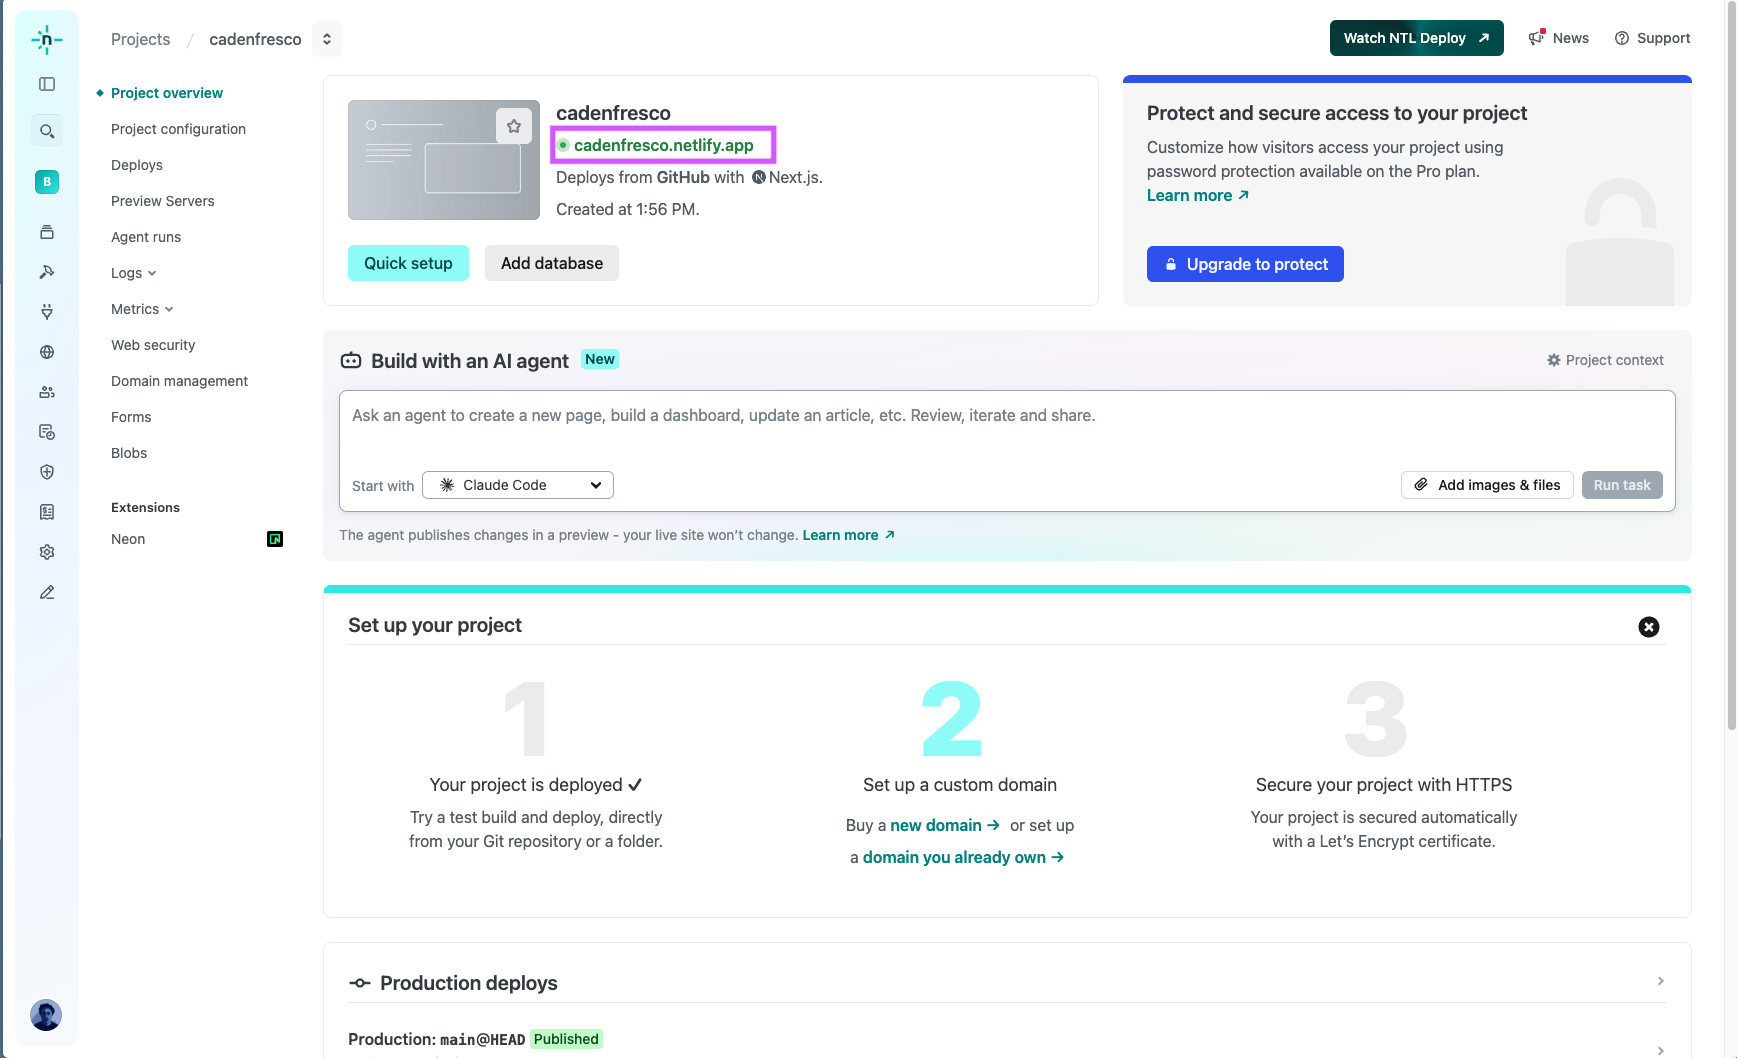
Click the "Deploy" button, and wait for the deployment to finish. Netlify is now building your Fresco instance! This will take 2-5 minutes.
-
Once your app is deployed, click on the deployment URL. It will be listen in green under your project name once it is deployed.
Configuration and setup
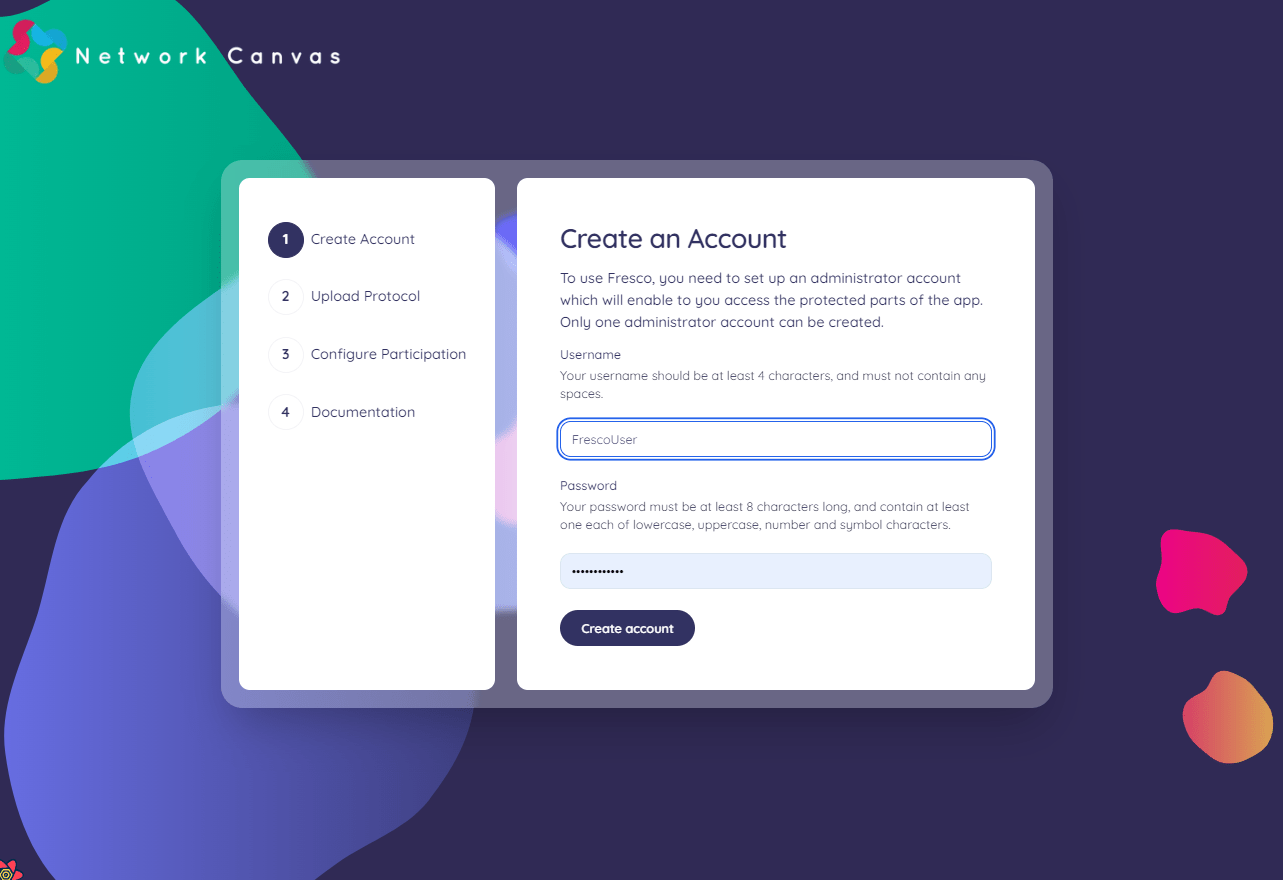
To use Fresco, you need to set up an administrator account which will enable you to access the protected parts of the app for study management. Only one administrator account can be created.
Create a user account
Visit your deployed app and create an account by entering a username and password. Ensure you make the password as strong as possible!
Create a storage bucket using UploadThing
Fresco uses a third-party service called 'UploadThing' to store media files, including protocol assets. In order to use this service, you need to create an account with UploadThing that will allow you to generate an API key that Fresco can use to securely communicate with it.
To create an app on UploadThing:
-
Go to uploadthing.com.
-
Click "Get started".

Select "Get Started" -
Sign in with Github.
-
Authorize UploadThing by clicking "Authorize pingdotgg".
-
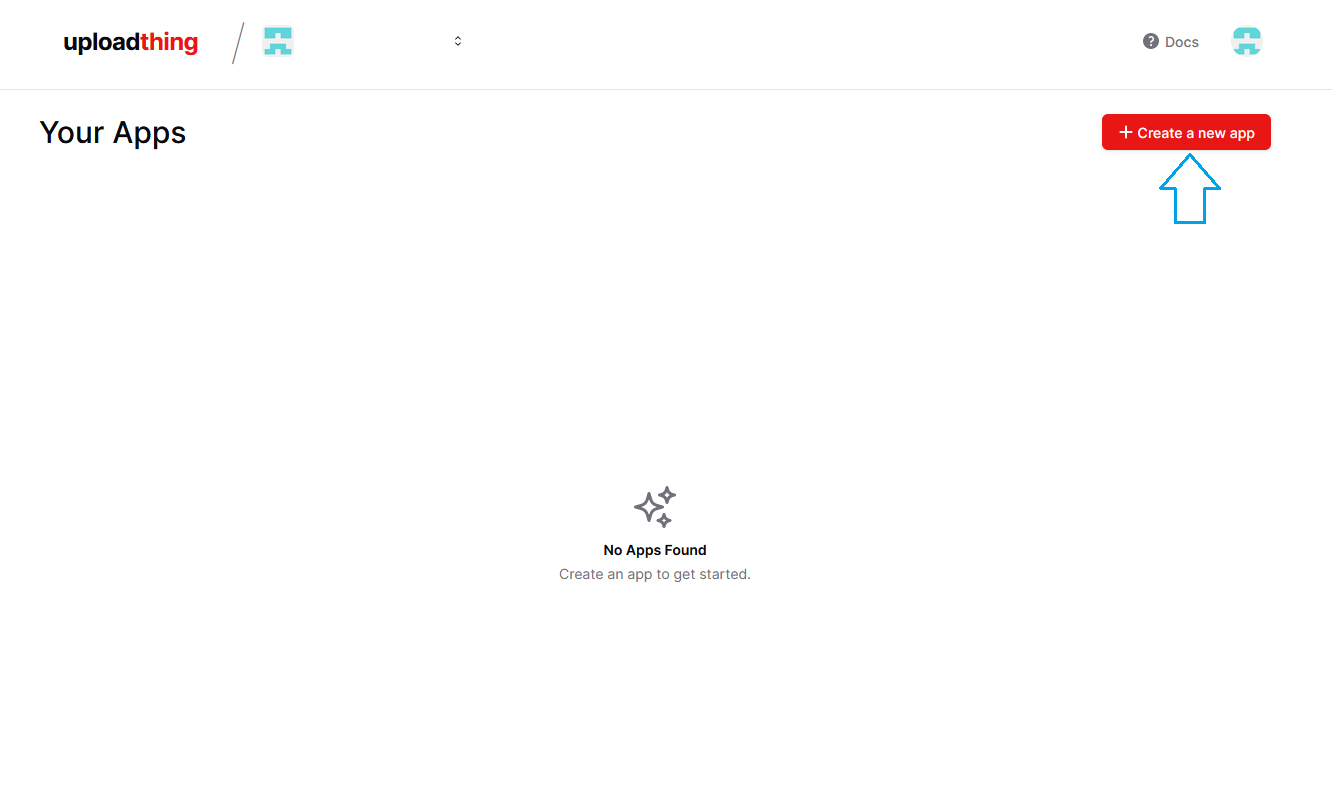
You will be prompted to navigate to your dashboard. From the dashboard Click "Create a new app".
Create a new app -
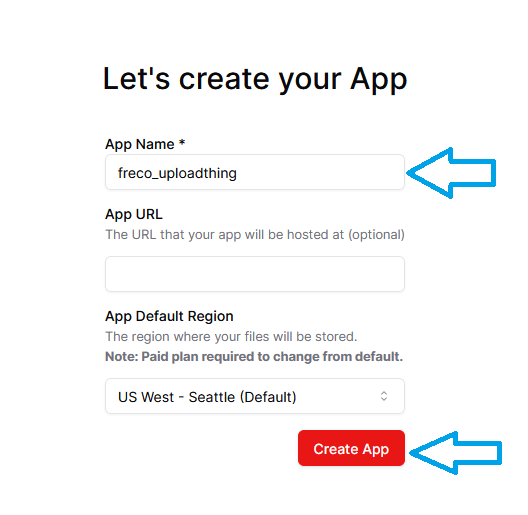
Give your app a name and click "Create App". Do not change the region.
Create app -
From your dashboard, navigate to the "API Keys" section from the sidebar and copy your environment variable using the copy button.
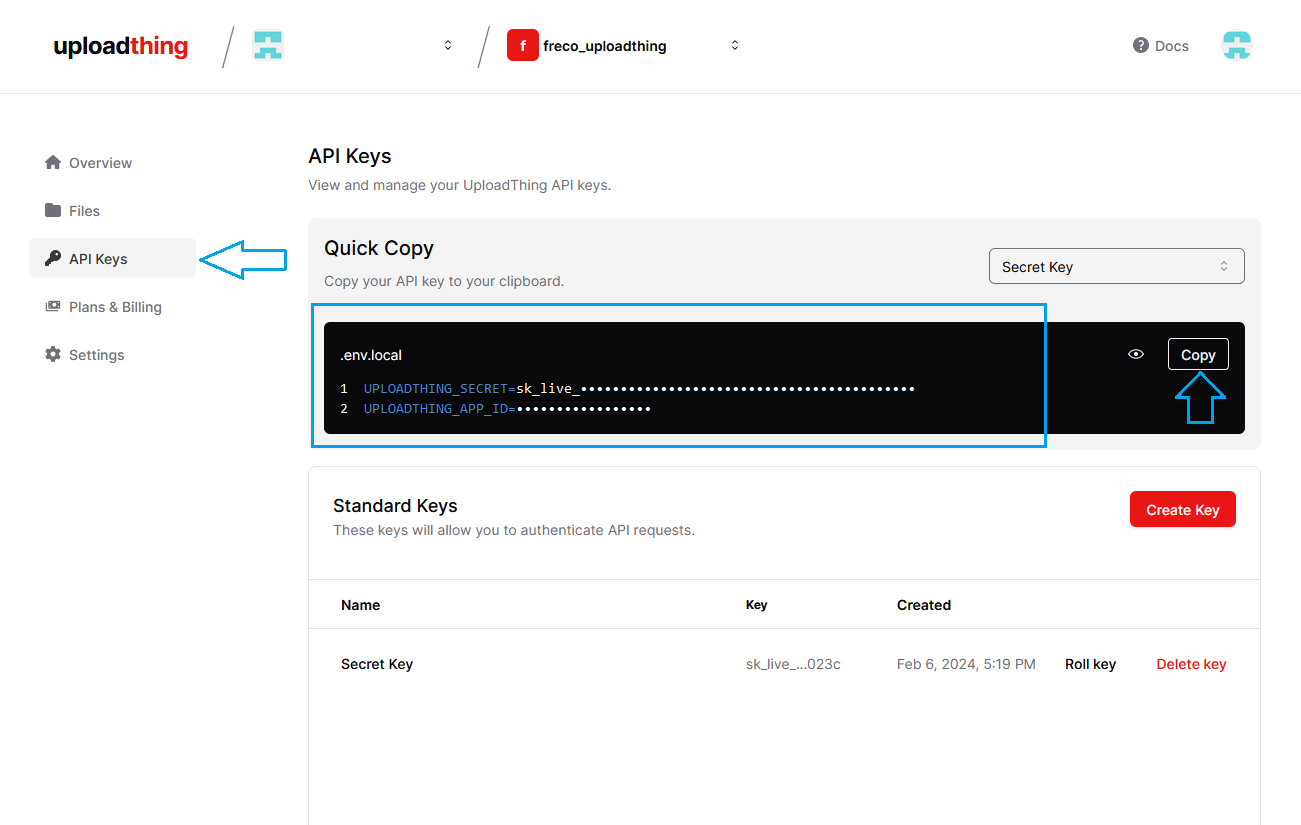
Copy your API keys -
Paste your environment variable into the UPLOADTHING_TOKEN field on the form. It should look something like this:
UPLOADTHING_TOKEN='abCdefGHiJkLmNopQrsTuvWxYz.......'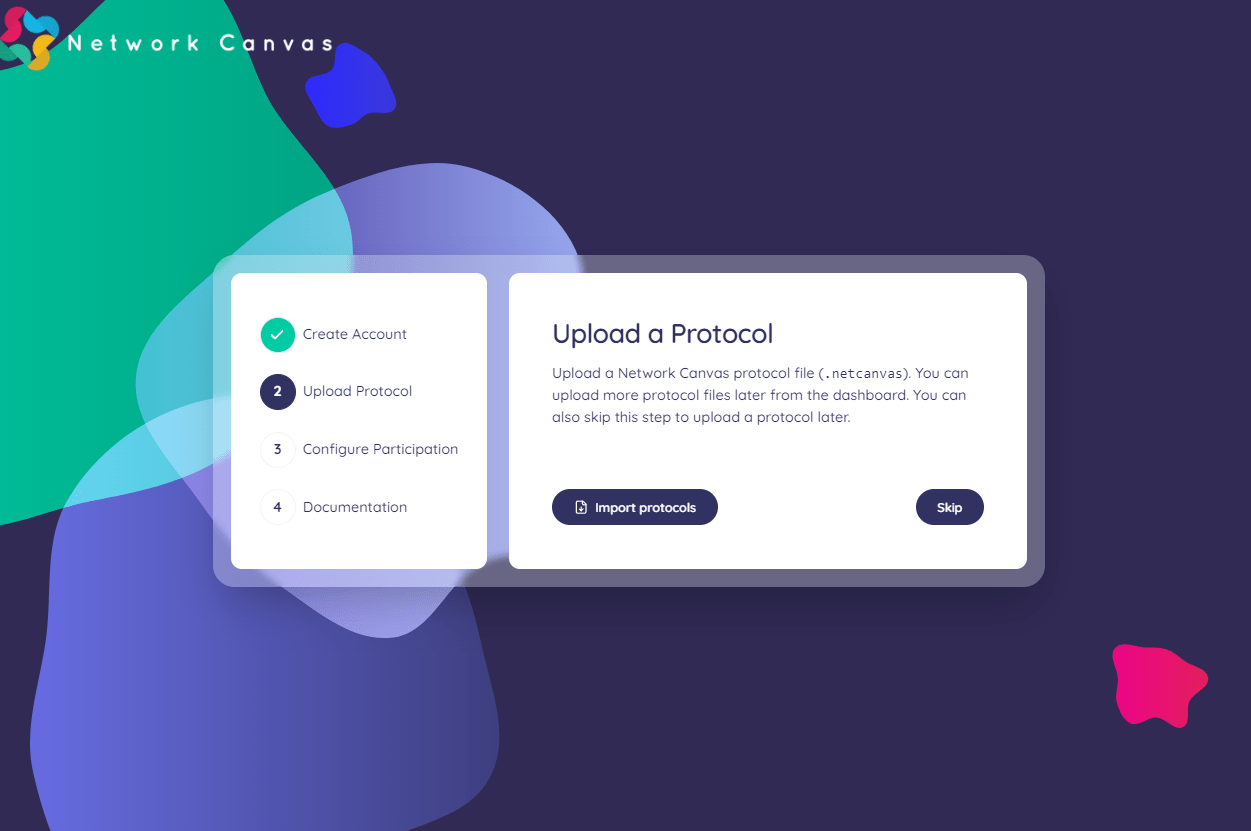
Paste your environment variable into the form
Upload a protocol
You can optionally upload a protocol. Protocols can also be uploaded from the protocols page once the setup steps are completed.

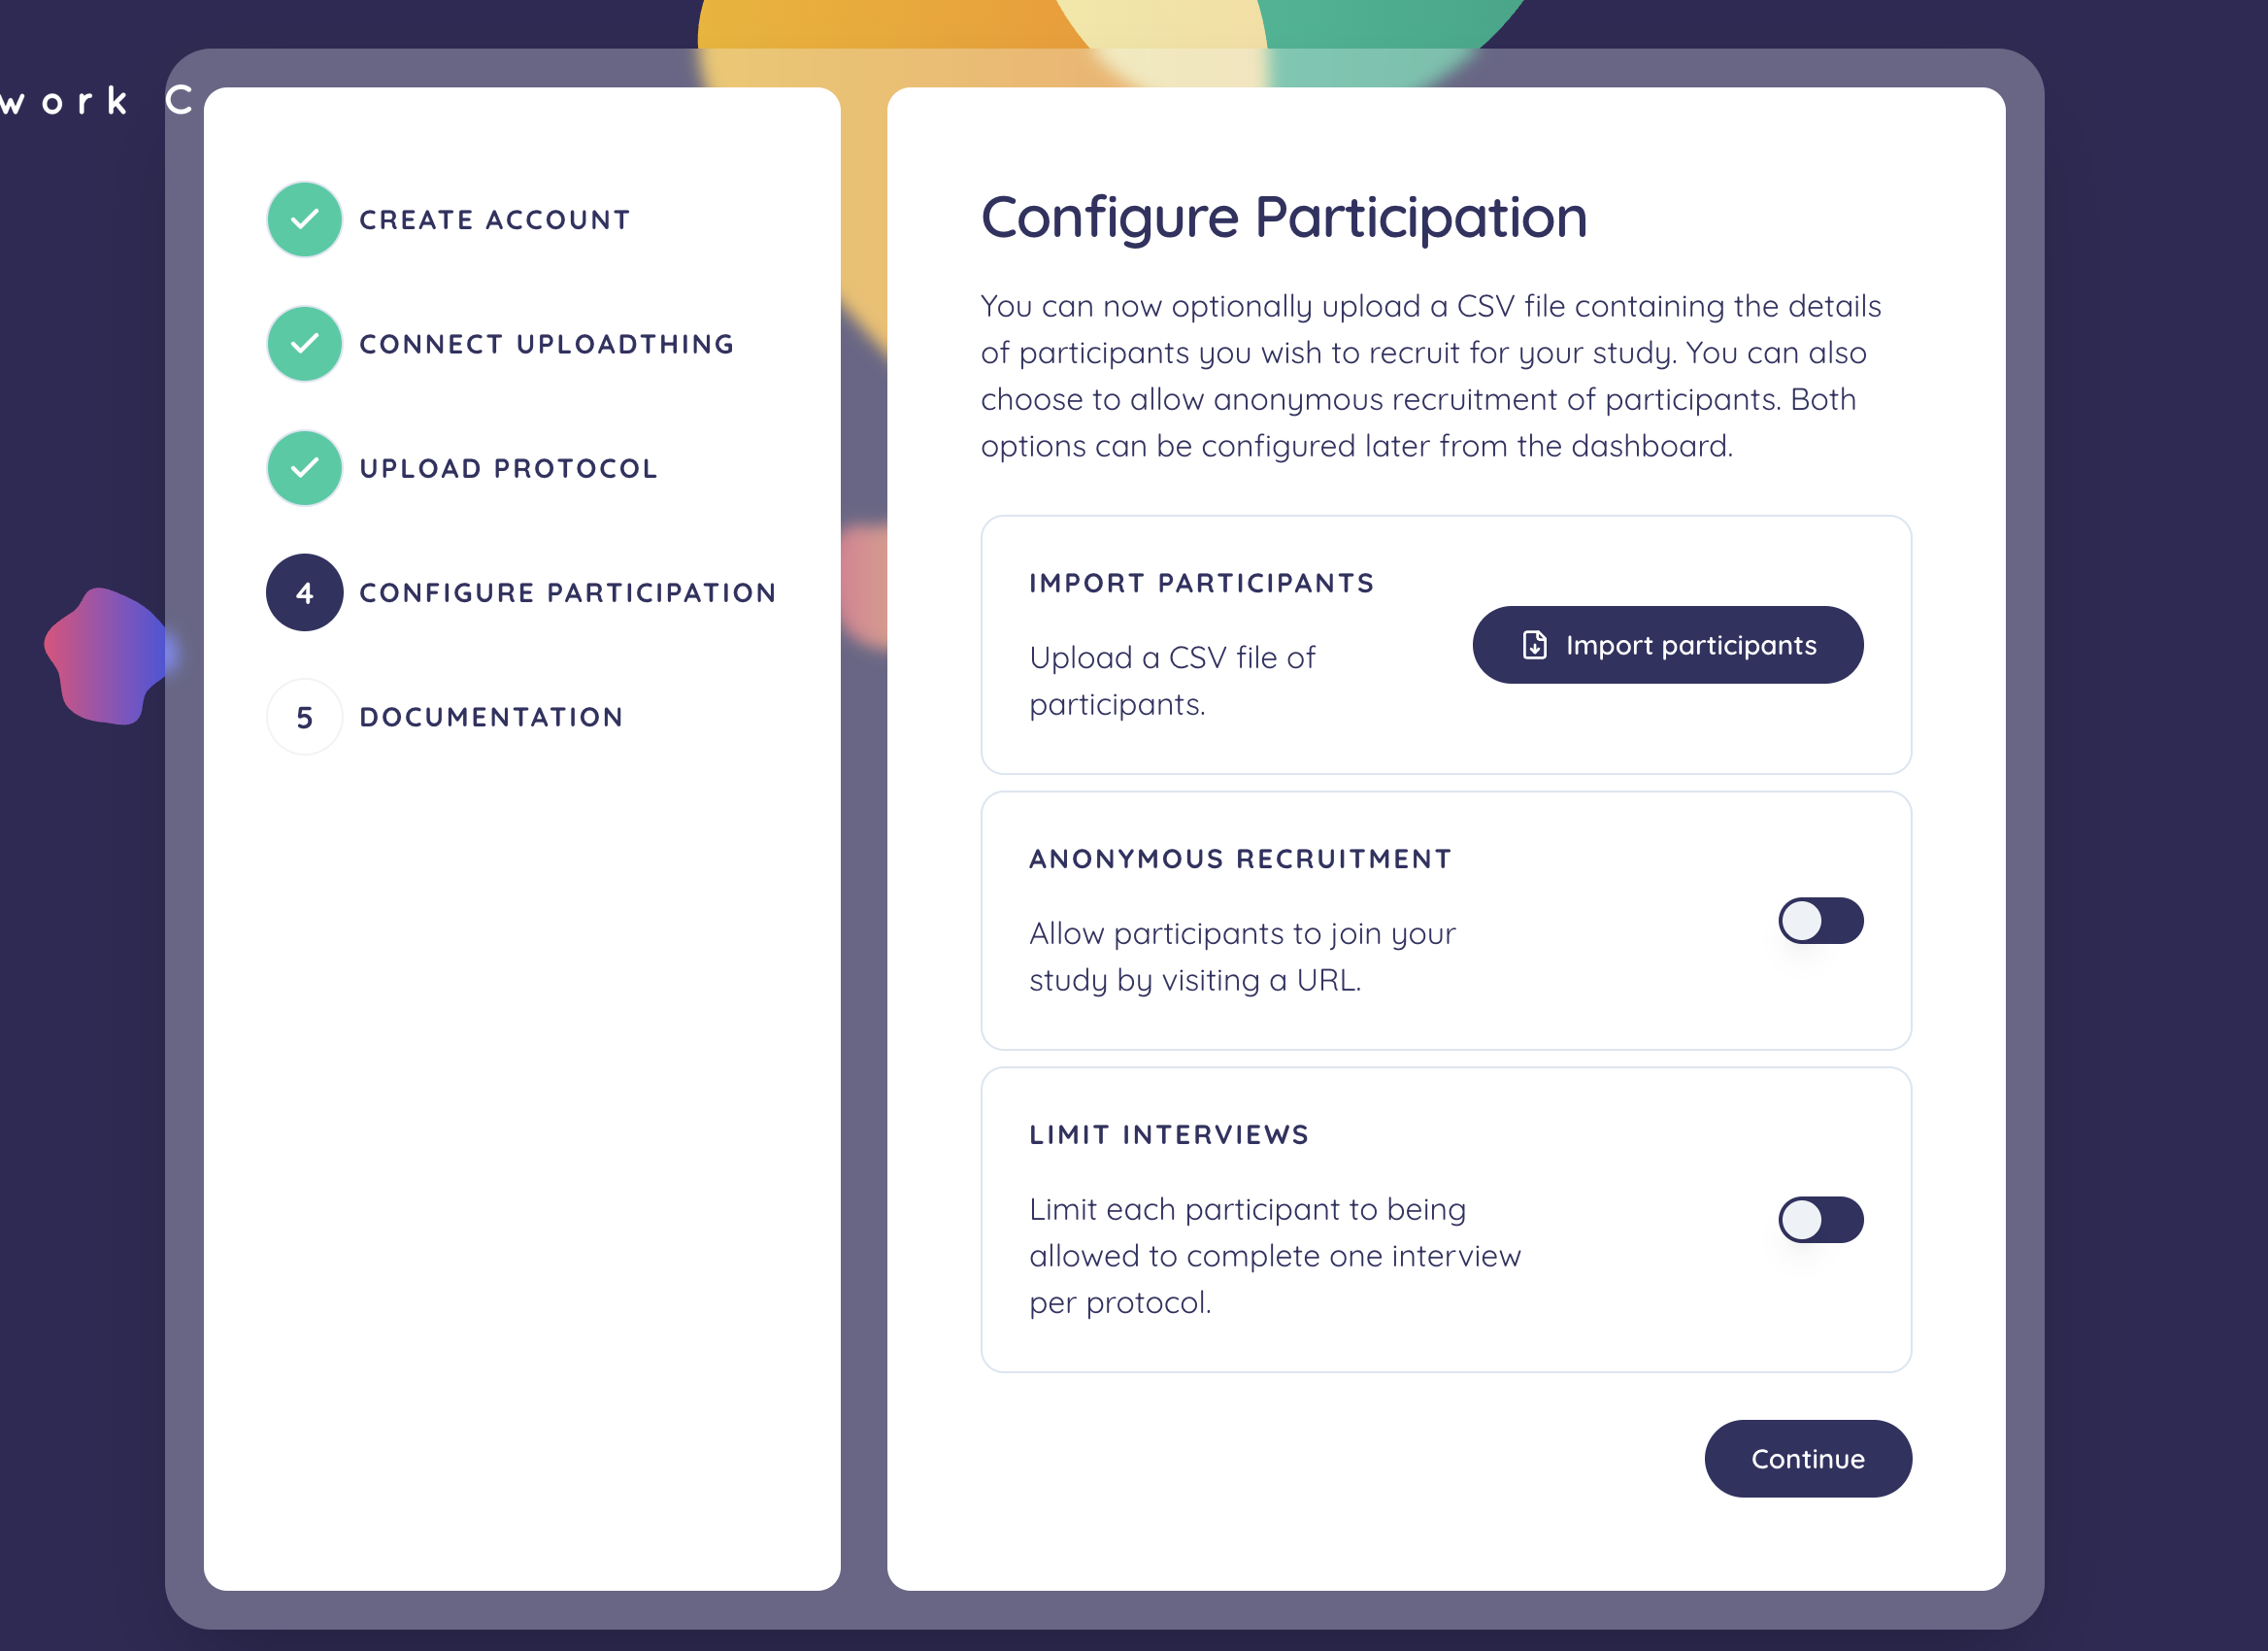
Configure participation
-
Import participants: You can optionally upload a CSV file containing participants you wish to recruit to your study. Participants can also be uploaded from the participants page once the setup steps are completed.
-
Allow anonymous recruitment: You can enable this setting to allow your participants to join your study by visiting a URL. More information about anonymous recruitment can be found in the using Fresco guide.
Visit the dashboard
Click the "Go to the dashboard" button and to begin using Fresco!
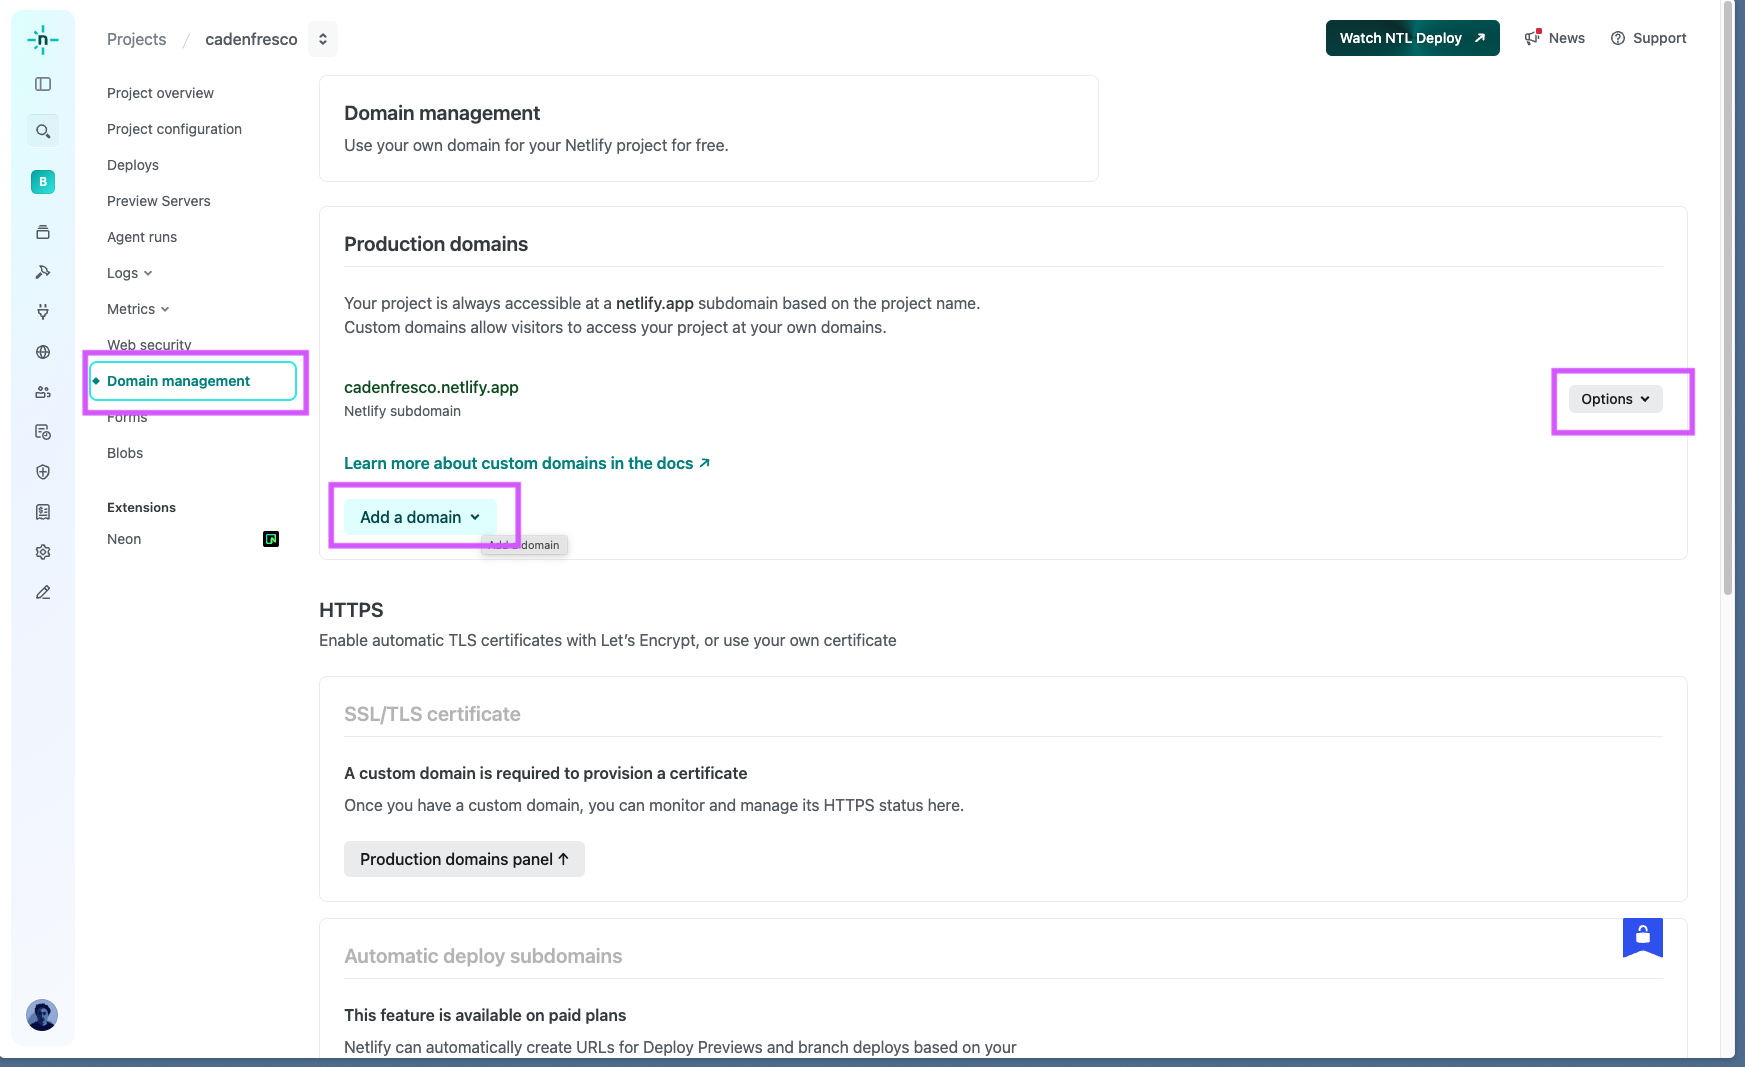
Set up a custom domain (optional)
If you prefer to use a custom domain for your Fresco instance, you can configure this in the Netlify dashboard by following these steps:
-
Navigate to your project dashboard. Click on the Domain Management tab.
-
In the Domains section, you have two options:
- If you have a purchased domain, you can add it here by clicking Add a domain.
- Alternatively, you can modify the default Netlify domain to suit your needs by clicking Options and then Edit project name.
Domain setup options