Collect Datafresco
Using Fresco
This guide will walk you through the basic workflow for using Fresco to conduct your study.
Fresco is designed to be used in conjunction with Architect for designing interview protocols. If you haven't already, you should design your protocol in Architect before proceeding.
Basic workflow
Using Fresco will be familiar to anyone who has used the desktop applications, with the significant advantage that you can now conduct all protocol, participant, and data management through a web-based dashboard.
The basic workflow for using Fresco is as follows:
- Deploy Fresco: Deploy your own instance of Fresco (more on this in the deployment guide).
- Upload protocols: Upload one or more Network Canvas protocols created in Architect to Fresco.
- Add participants: Add participants to your study, either individually or in bulk. Alternatively, use the anonymous recruitment feature to allow participants to self-enroll in the study.
- Conduct interviews: Share either the unique participant URL or the anonymous recruitment URL with participants to allow them to complete the interview on their own device.
- Monitor progress: Monitor the progress of your study using the dashboard.
- Export data: Export data from the interviews page once your data collection is complete.
We will now walk through each of these steps in more detail.
Deployment
Fresco is designed to be deployed on your own server(s) and infrastructure. This ensures you have full control over the data collected in your study and can comply with any relevant data protection regulations or Institutional Review Board (IRB) requirements.
For many researchers, using our basic deployment guide to deploy to the free Netlify plan will be sufficient. However, if you have specific requirements around data security, privacy, or compliance, you may need to deploy Fresco to your own server, or to specialist services.
If you are unable to deploy Fresco yourself, your university may be able to host a compliant version of Fresco for you. Please contact your IT department or research support office for more information, and refer them to our advanced deployment guide for more information on the requirements for hosting Fresco.
Uploading protocols
Once you have deployed Fresco and have access to your dashboard, we can begin by uploading one or more protocols for your study.
Good to know:
If you have not yet designed your protocol in Architect, you should do so before proceeding. You can find a guide to designing a protocol in Architect here.
In Fresco you can upload as many protocols as you would like (within the resource limits of your hosting). This allows you to have multiple protocols for different studies, or to have multiple versions of the same protocol for different groups of participants.
Each individual .netcanvas protocol file may be up to 256 MB in size. This limit is enforced for all storage providers, so it applies regardless of how you have configured Fresco's hosting. If your protocol exceeds this limit, it is usually because of large bundled assets (such as high-resolution images or video); consider compressing or reducing these in Architect before uploading.
However, we recommend not hosting different studies on the same instance of Fresco, as this can lead to confusion and potential data leakage. If you are conducting multiple studies, our suggestion is that you deploy a separate instance of Fresco for each study.
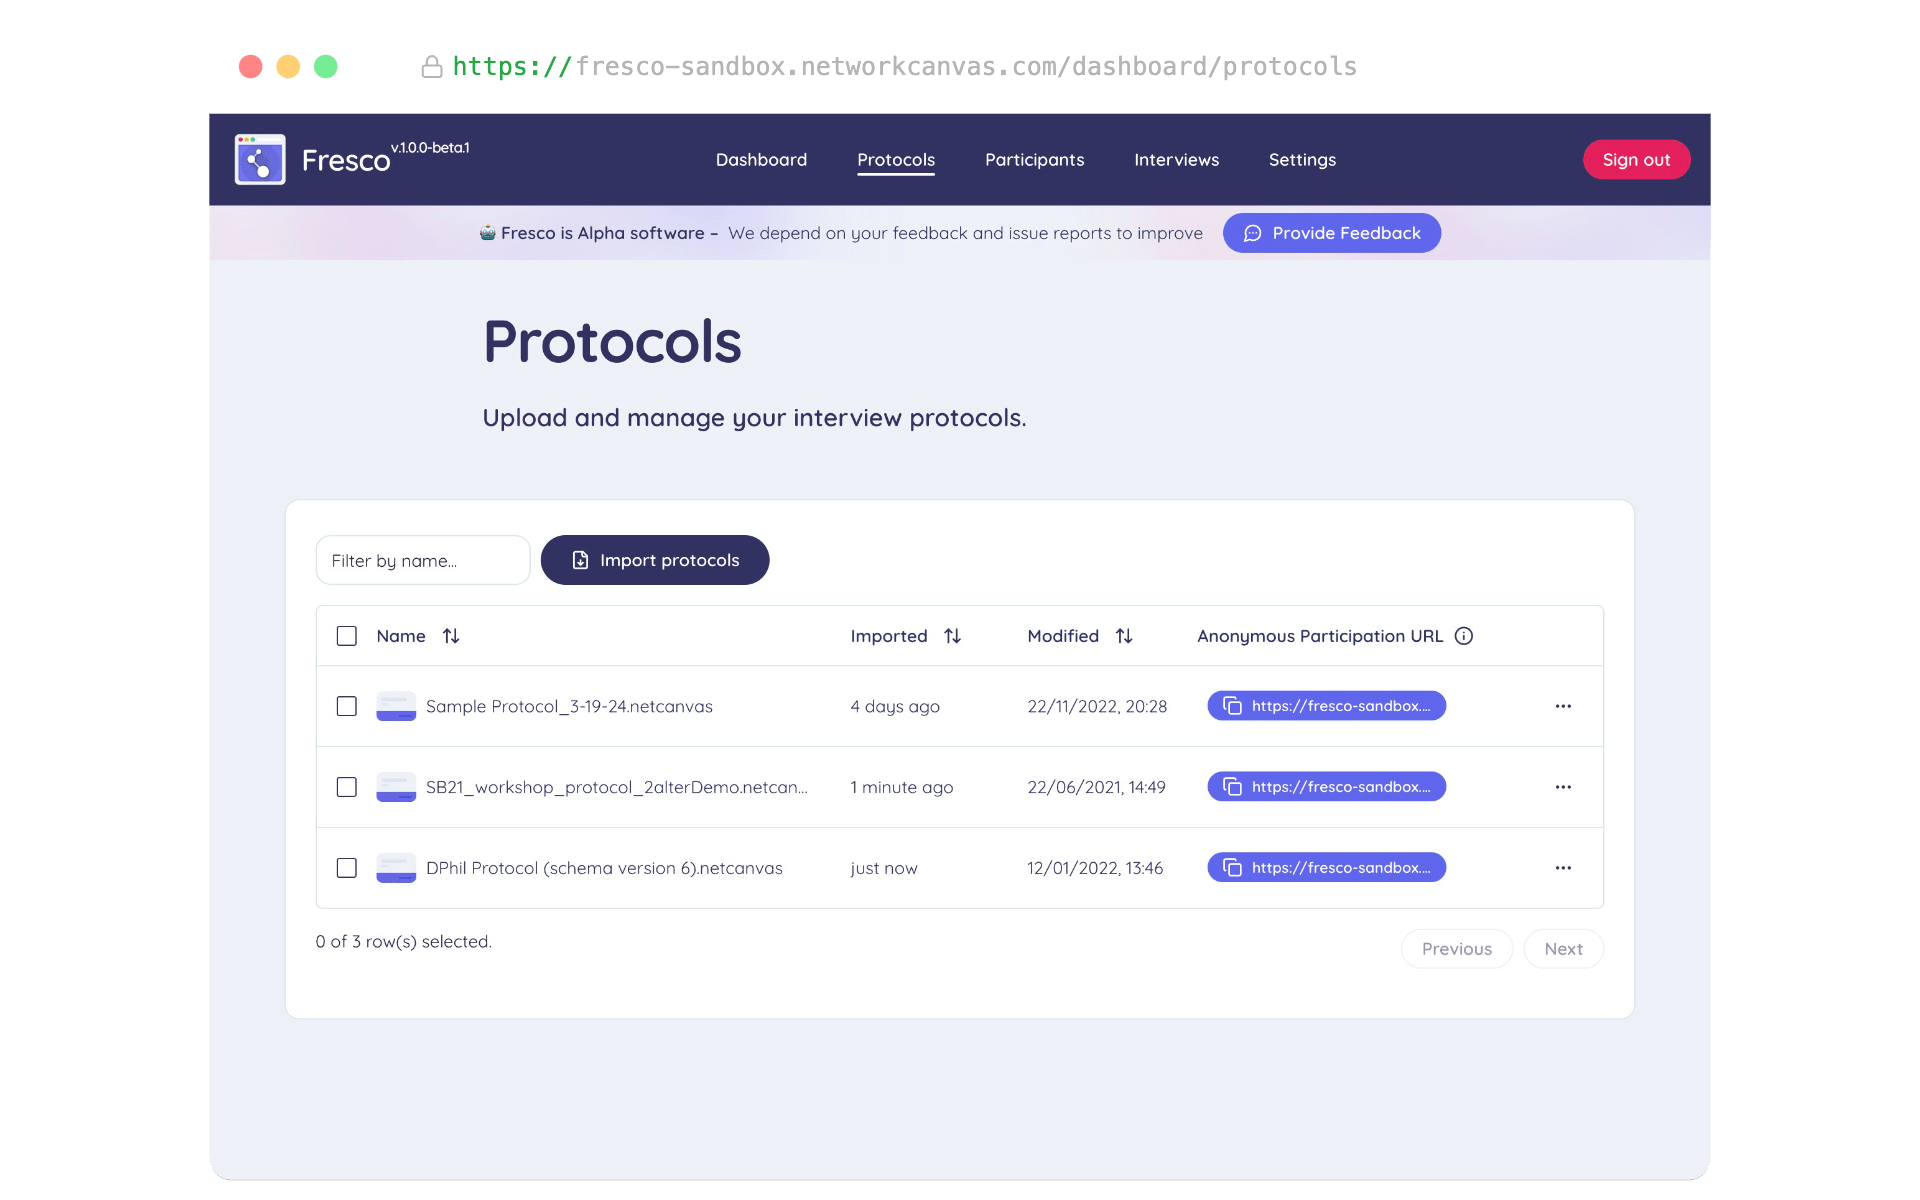
To upload a protocol
- Navigate to the protocols page in the dashboard.
- Click the Upload protocol button.
- Select the
.netcanvasfile that you exported from Architect. - Click Upload.
Fresco will then validate and upload your protocol. If it contains any assets (images, audio, video, or network files), Fresco will upload these to your configured storage provider and link them to your protocol.
Good to know:
Fresco refuses a protocol file that is missing any of its resources, because a resource that never loads would surface to a participant mid-interview. The message names the missing resource as it is named in Architect. A protocol file whose contents are damaged is reported as damaged. To fix a protocol that is missing a resource, open it in Architect, add the missing file again from Resources, and download the protocol again before uploading it. See Resources for how Architect manages resource files.
Once the process is finished, you will see your protocol listed on the protocols page. You can click on the protocol to view its details, and to see the unique URL that you will share with participants to conduct interviews.
Generating synthetic test data
Before recruiting real participants, you may want to populate your study with fake interviews so that you can check that a protocol behaves as expected, preview how responses appear on the interviews page, and test your export workflow end to end. Fresco can generate synthetic interview data for any uploaded protocol from the settings page.
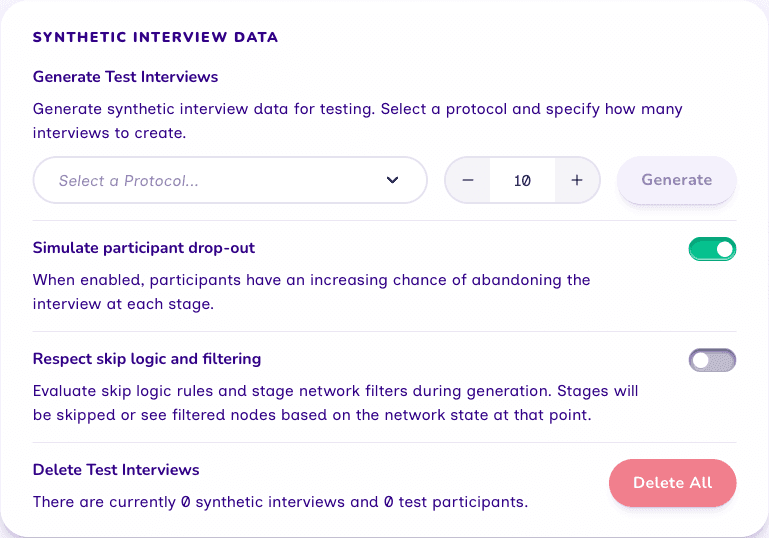
To generate synthetic interviews:
- Navigate to the settings page in the dashboard.
- In the Synthetic Interview Data panel, select a protocol from the dropdown.
- Choose how many interviews to create (between 1 and 1000).
- Optionally configure the generation options described below.
- Click Generate.
You can adjust how the synthetic interviews are generated using two options:
- Simulate participant drop-out: When enabled, generated participants have an increasing chance of abandoning the interview at each stage, producing a realistic mix of complete and incomplete interviews rather than only finished ones.
- Respect skip logic and filtering: When enabled, generation evaluates the skip logic and stage network filters in your protocol. Stages are skipped, or nodes filtered out, based on the network state at that point, so the resulting data reflects the paths real participants would actually take.
All interviews and participants created this way are flagged as synthetic in the database. This flag is what allows Fresco to remove them in bulk without touching your real data. Note that synthetic interviews and participants are not visually badged in the interviews or participants tables, so they appear alongside real data in those lists.
To remove synthetic data, use the Delete All button in the same panel. The panel shows how many synthetic interviews and test participants currently exist, and deletes all of them at once. This only affects data flagged as synthetic; your real interviews and participants are left untouched.
Participants
In order to conduct your study, you will need to decide on a recruitment strategy and to define who is allowed to participate. Fresco supports two approaches:
- Adding known participants, either individually or in bulk.
- Allowing participants to self-enroll anonymously.
These approaches are not mutually exclusive, and can be used in combination. For example, you could have an initial "wave" of known participants which you add to Fresco manually, and then ask those participants to share the anonymous recruitment URL with anyone else they think might be interested in participating.
Which approach you choose will depend on the specifics of your study, and the resources you have available for recruitment.
Regardless of the approach, Fresco defines all participants by their participant identifier and an optional label. For known participants, you can provide the participant identifier (which is useful for linking responses to external data sources), or Fresco can generate one at random. If you enable anonymous recruitment, Fresco assigns participants a random identifier when they begin an interview.
Participant labels are an optional attribute you can use to provide a human-readable label for the participant. This field is not exposed to participants and can store a name or an internal project label for the participant.
Take Care!
Fresco uses participant identifiers to onboard participants. Participant identifiers appear in participant URLs and are visible to participants. For this reason, never use sensitive information or predictable patterns (such as sequential numbers like 001, 002, 003, or easily guessable strings) as identifiers.
Participant identifiers must be unique within the study. If you attempt to add a participant with an identifier that is already in use, you will receive an error message.
Adding participants manually
The simplest method to add one or more "known participants" is manually via the dashboard. This approach is useful when you have a small number of participants.
To add a participant manually:
- Navigate to the participants page in the dashboard.
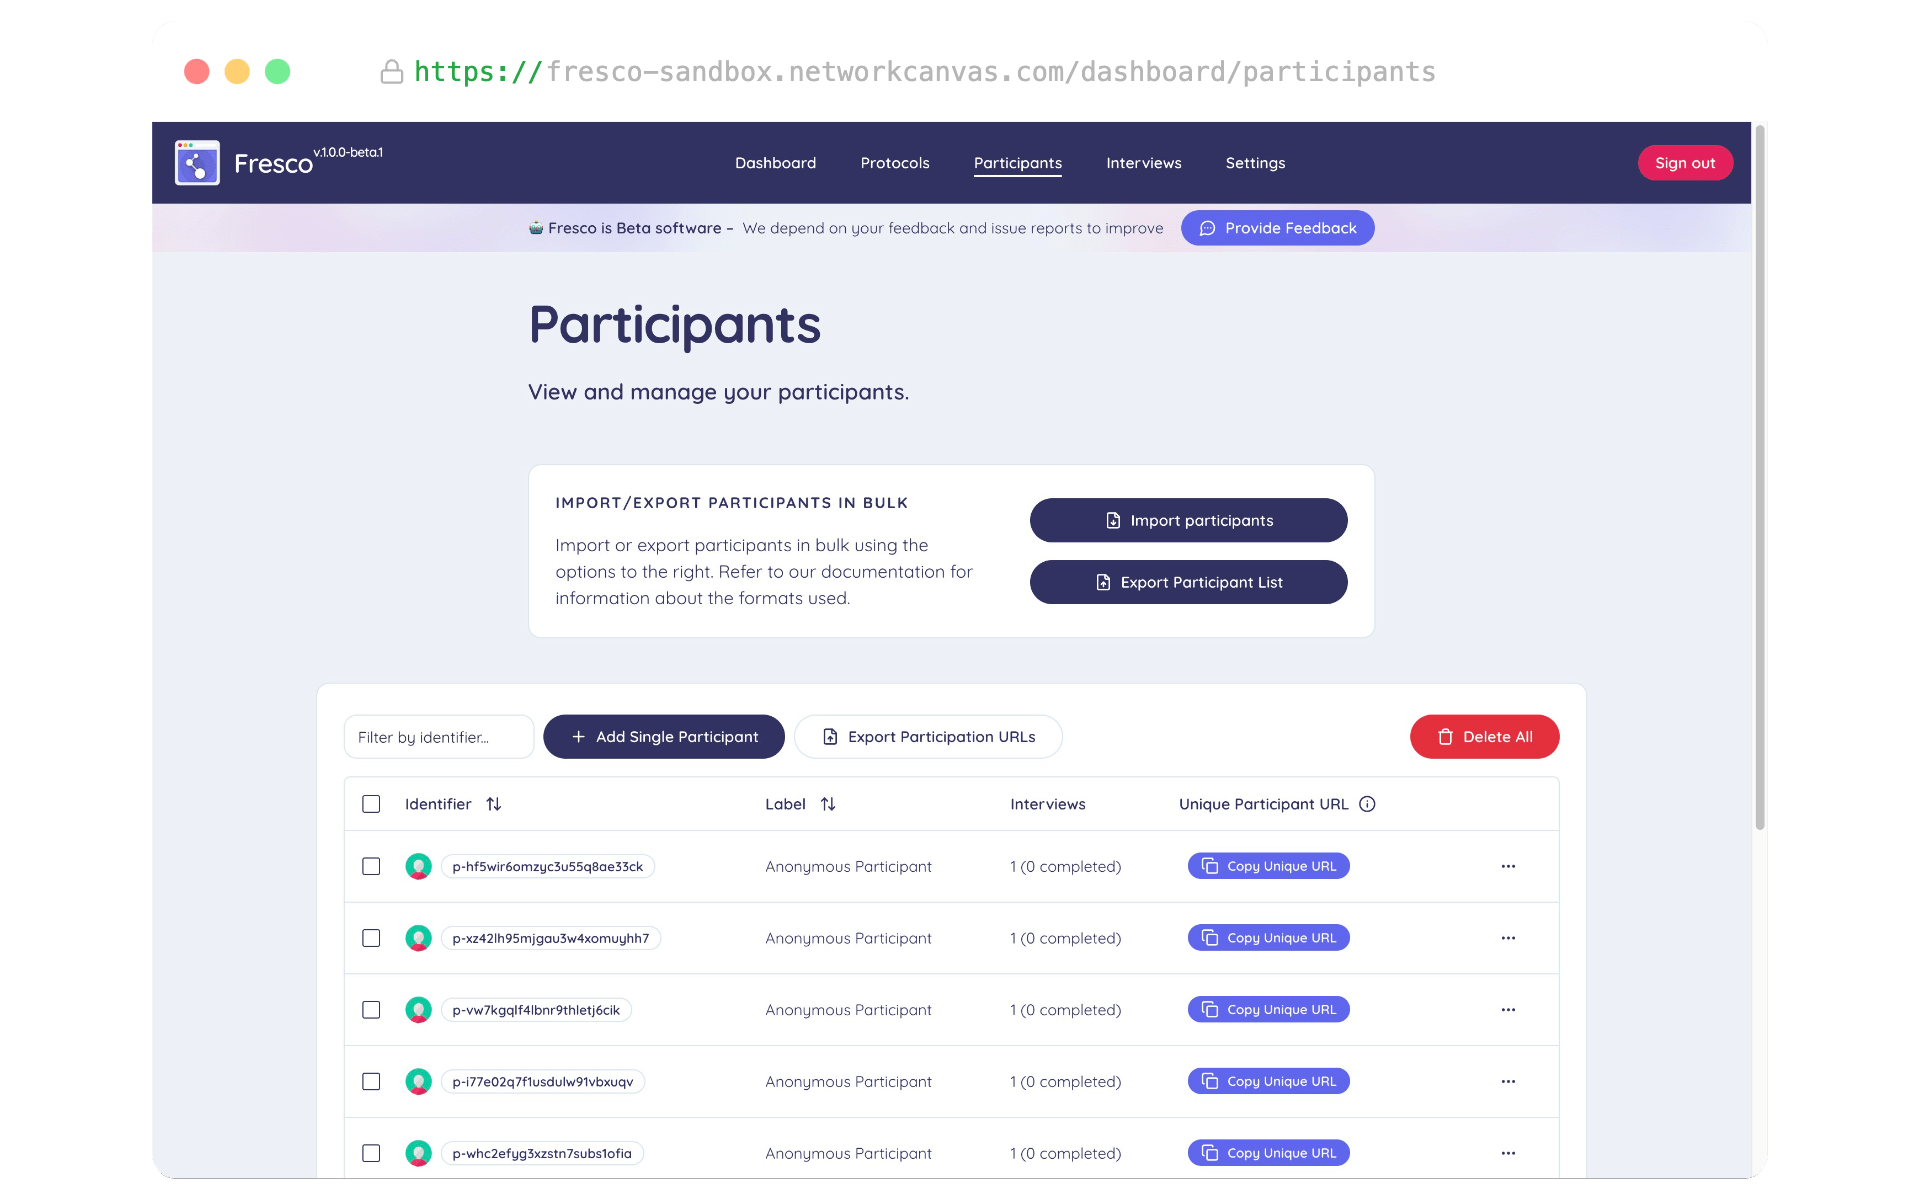
The participants page in the dashboard. - Click the Add Single Participant button.
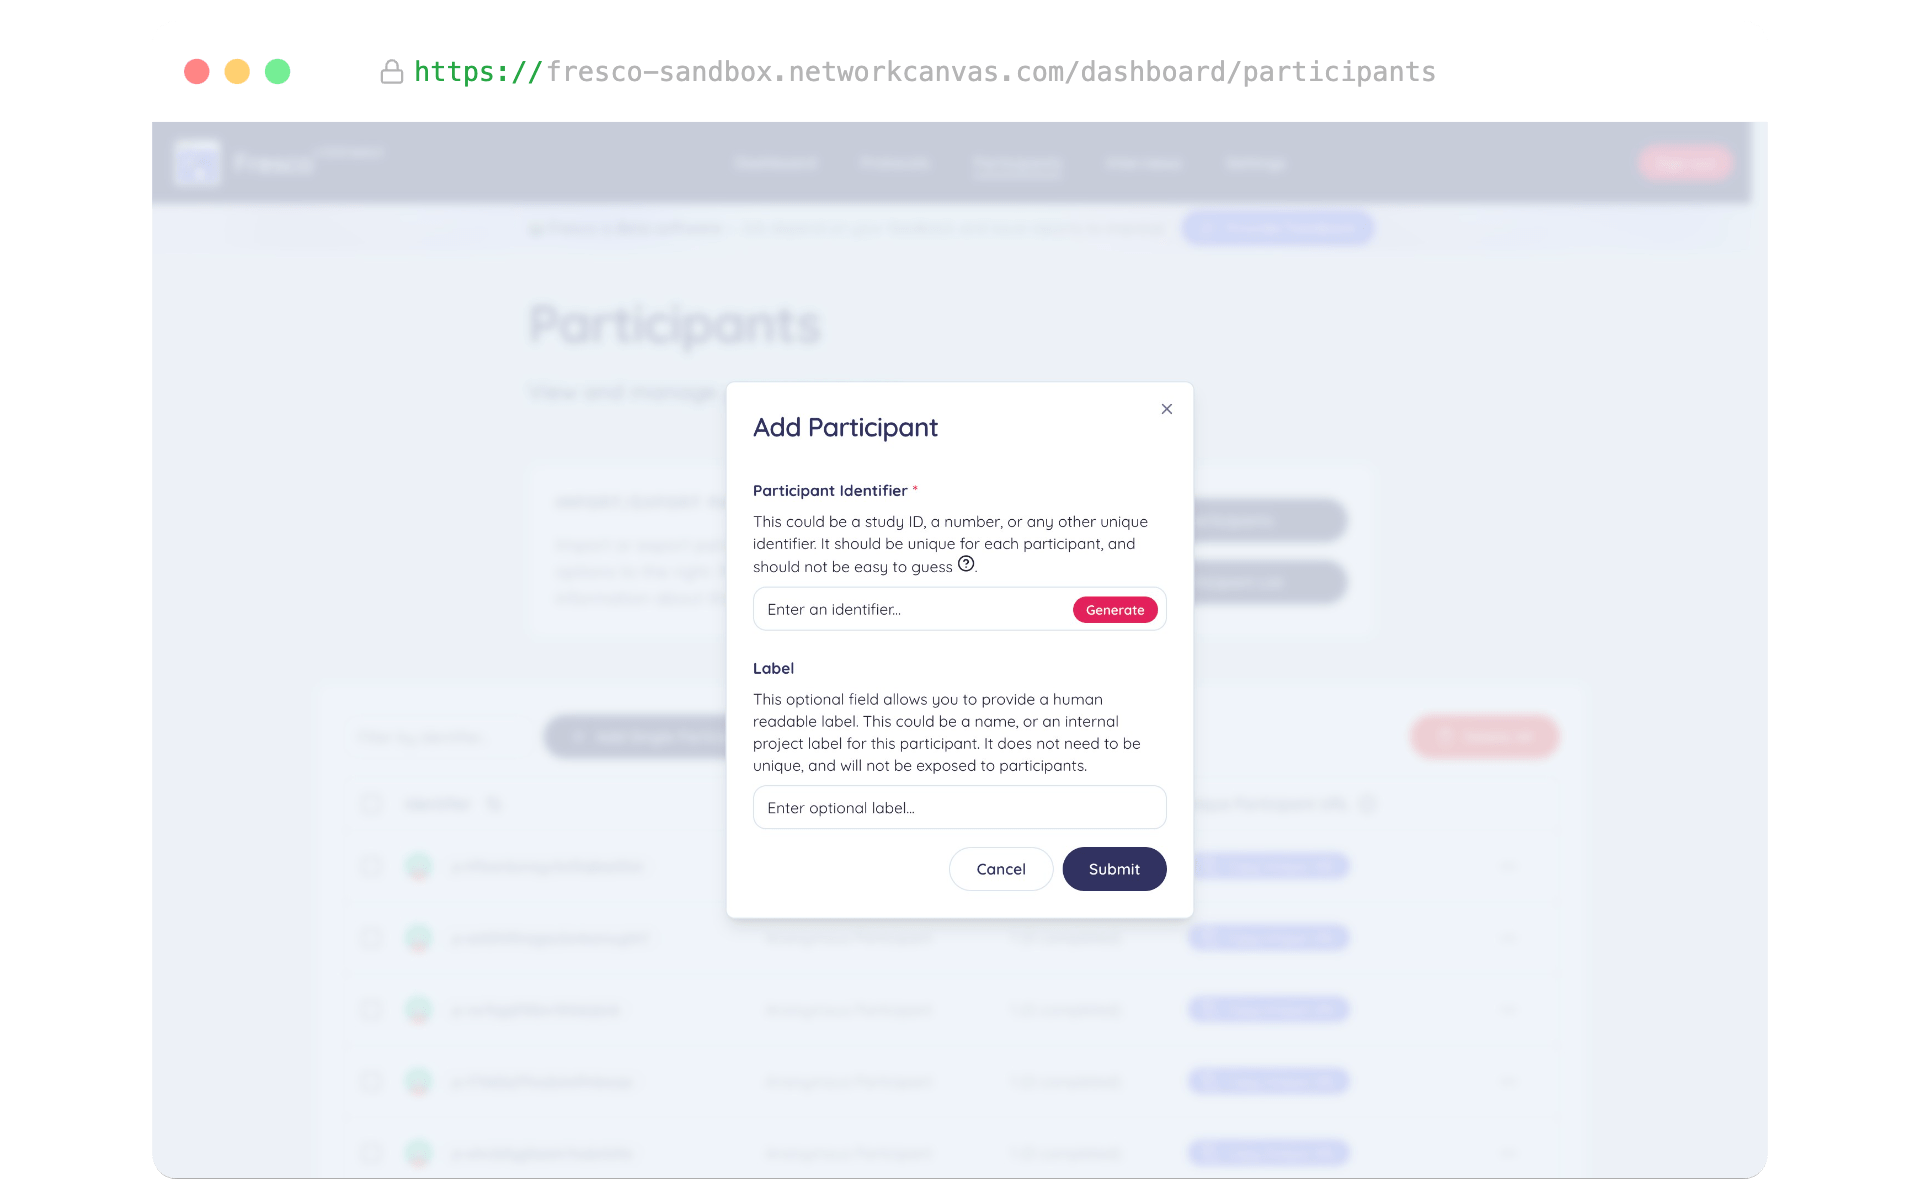
Adding a single participant - Enter a participant identifier, or click the Generate button to have one generated for you at random.
- Optionally, enter a participant label.
- Click Submit.
Your participant will immediately appear in the participants list.
Adding participants in bulk via CSV import
Adding participants in bulk is useful when you have a large number of participants to add to the study. You can do this by uploading a CSV file containing the participant data.
Good to know:
Your CSV file can contain the following columns:
- identifier - this must be a unique string, and should not be easy to guess! It is used to generate the onboarding URL to allow integration with other survey tools.
- label - can be any text or number. Used to provide a human readable label for the participant.
Either an identifier column or a label column must be provided for each participant.
The identifier and label column headers must be lowercase.
You can download a template CSV file to help you format your data correctly from here.
Once you have created your CSV file, you can upload it to Fresco as follows:
- Navigate to the participants page in the dashboard.
- Click the Import participants button.
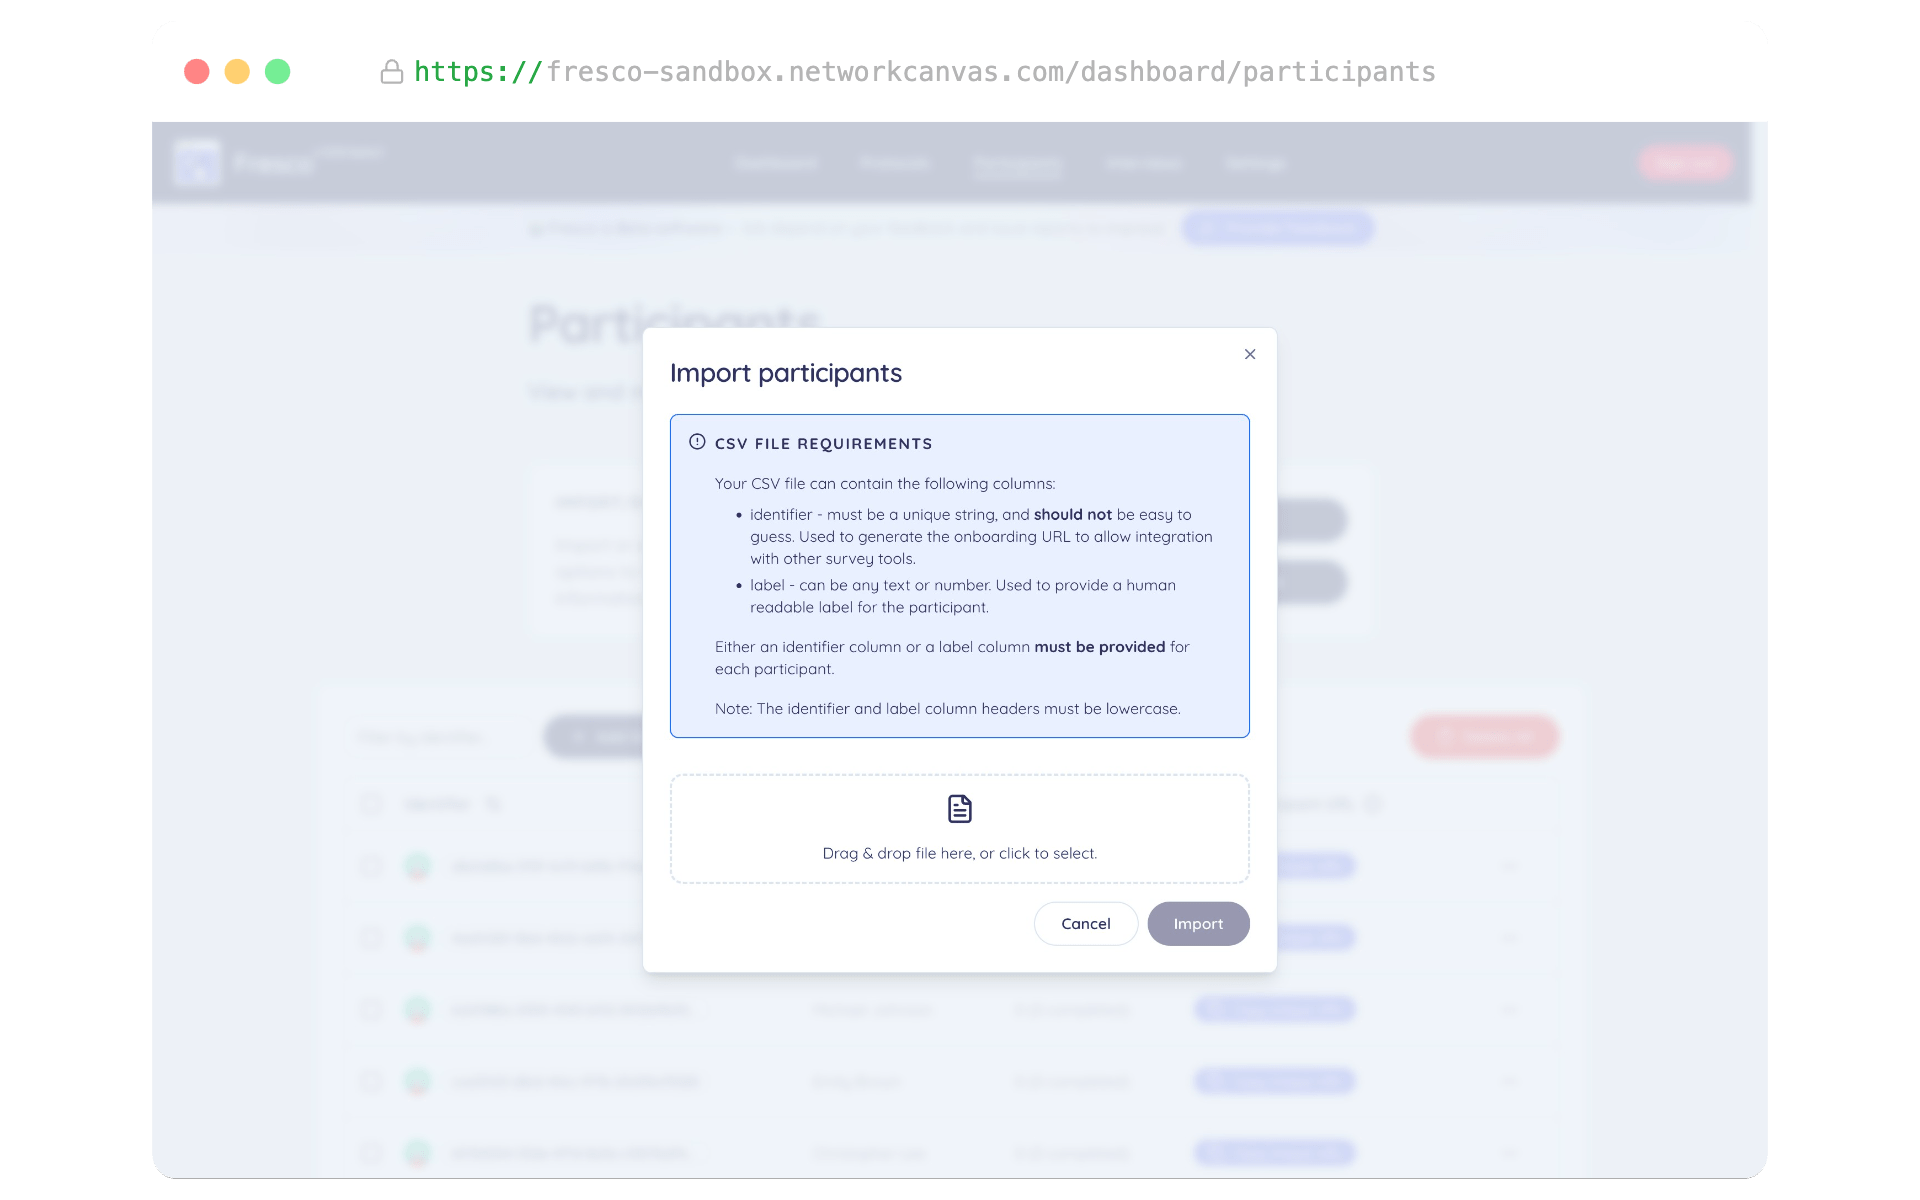
The CSV import dialog - Upload your CSV file.
- Click Submit.
Your participants will immediately appear in the participants list.
Anonymous recruitment
Anonymous recruitment mode allows participants to self-enroll in the study using a unique URL. You can generate this URL for each protocol and share it with participants. When participants visit the URL, Fresco assigns them a random participant identifier and allows them to complete an interview. This method is useful when you do not have a list of known participants or when you want to allow participants to share the study with others.
Enabling anonymous recruitment
- Navigate to the settings page in the dashboard.
- Toggle the Anonymous Recruitment switch.
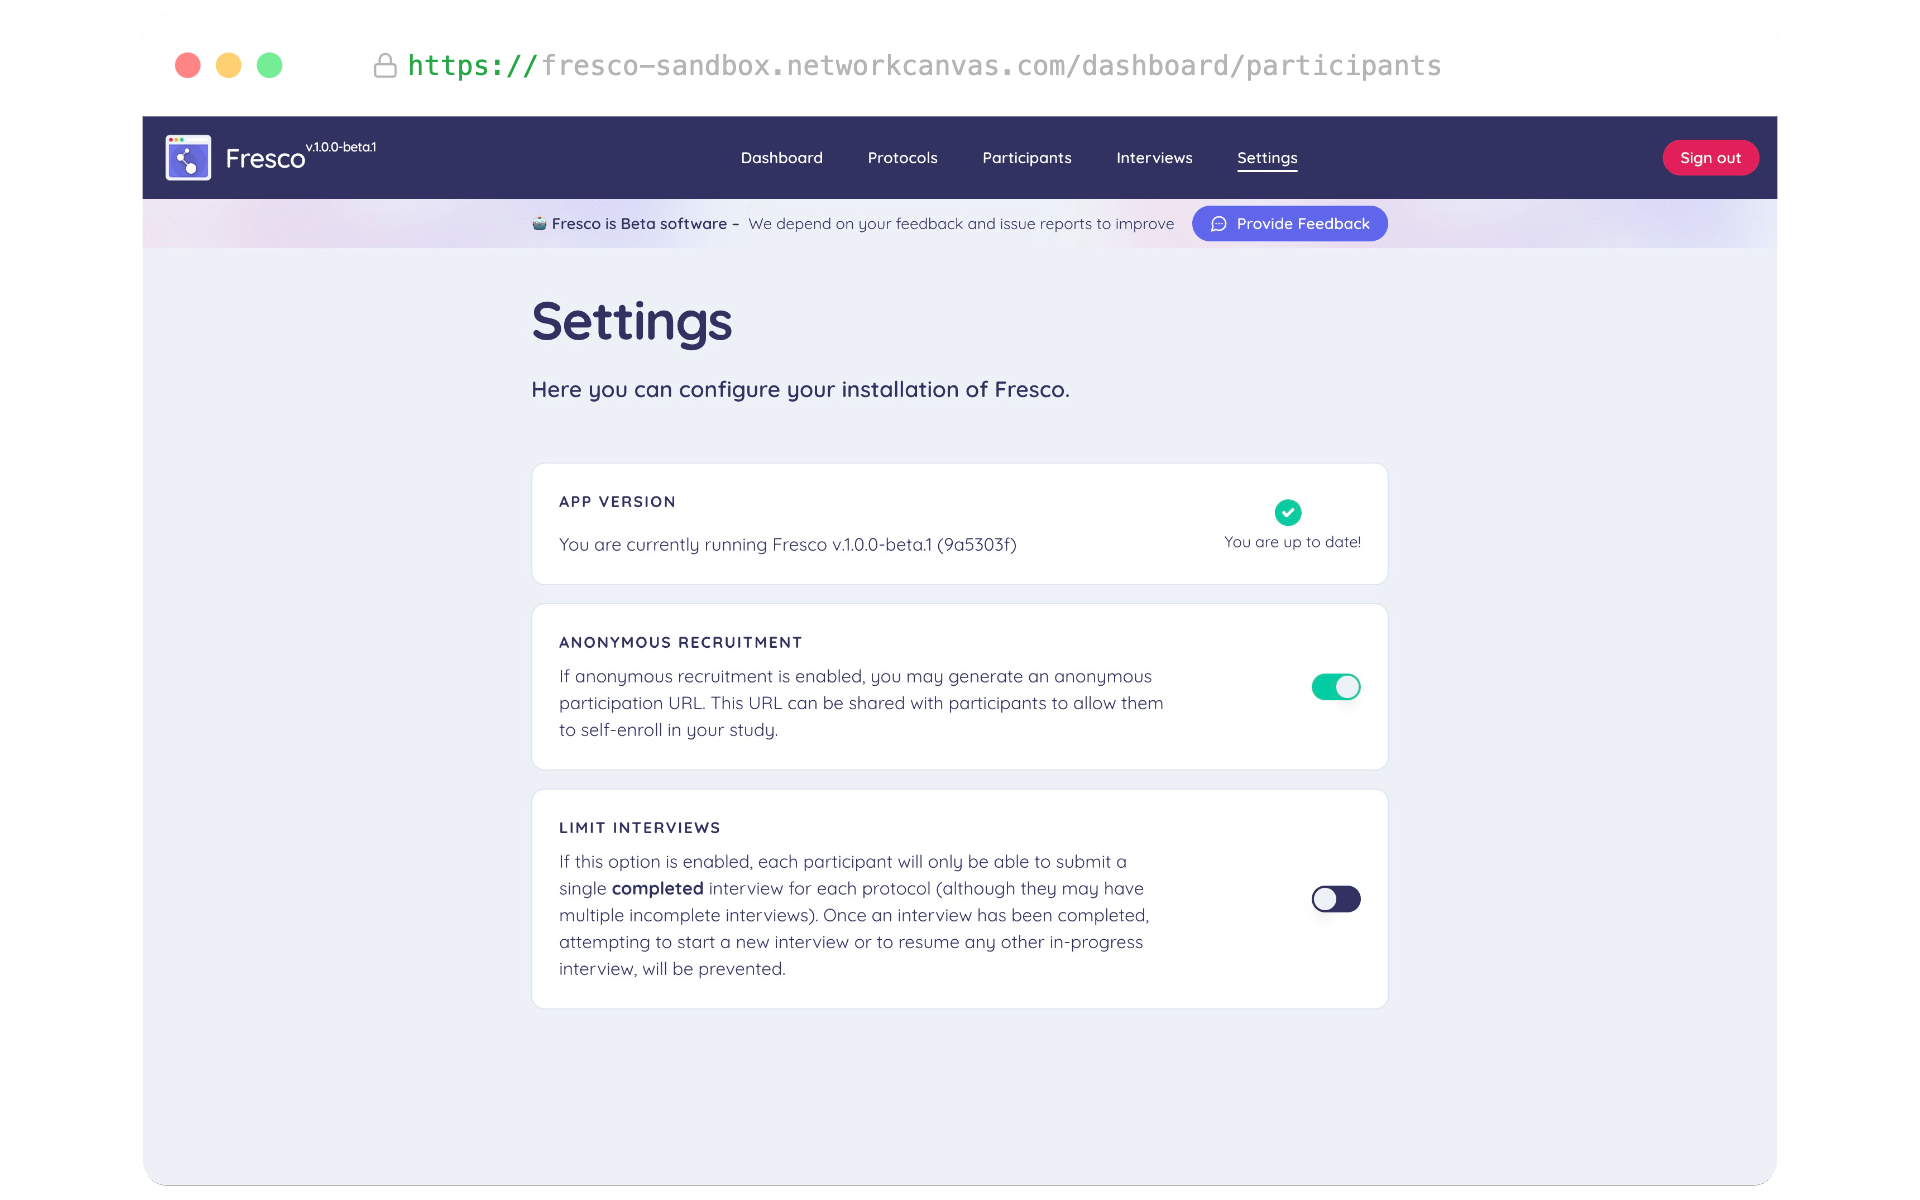
Once enabled, a warning message will be visible on the main dashboard page to remind you that anonymous recruitment is active.
Conducting interviews
Once you have uploaded your protocol and optionally added participants to the study, you can begin conducting interviews.
In Fresco, interviews are conducted by participants on their own devices. Participants can begin an interview by following a URL that you provide them.
Participant URLs
In Fresco, you can share two kinds of URLs with participants: Unique Participant URLs and Anonymous Participant URLs.
-
Unique Participant URLs are unique for each participant and protocol combination (so "James" and "Study A" would have a different URL from "James" and "Study B"). You can share these URLs with participants to allow them to complete an interview. These URLs create a new interview with the specified protocol each time they are visited and redirect the participant into that interview immediately. Fresco links this interview and all response data to their participant identifier.
-
Anonymous Participant URLs are not unique to the participant, but are still linked to the protocol. You can share the same URL with multiple participants to allow them to complete an interview without needing to be added to the study manually. When participants visit the link, Fresco creates an anonymous participant using a randomly generated identifier and starts the interview as normal.
Unique participant URLs
Unique participant URLs are unique URLs you can generate for each participant per protocol and share with the participant to allow them to complete an interview. These URLs take the participant directly to the interview for the specified protocol and link their responses to their participant identifier.
To share unique participant URLs with participants, you can either copy each URL individually or export a CSV file containing all the URLs for a given protocol.
Manually copying a unique participant URL
- Navigate to the participants page in the dashboard.
- Click the Copy Unique URL button for the participant you wish to generate a URL for.
- Select the protocol you wish to conduct the interview for from the dropdown.
- The URL will be copied to your clipboard. You can now share this URL with the participant.
Exporting a CSV of unique participant URLs
- Navigate to the participants page in the dashboard.
- Click the Export Participant URLs button.
- Select the protocol you wish to generate URLs for from the dropdown.
- Optionally, select the participants you wish to generate URLs for. This option defaults to all participants.
- Click the Export Participant URLs button.
The CSV file will contain a row for each participant, with columns for the participant identifier, participant label, and the unique URL for the specified protocol. You can use this file to distribute the URLs to participants via email, SMS, or other methods.
Anonymous participant URLs
If you enable anonymous recruitment, participants can self-enroll in the study using an anonymous participant URL. This URL is not unique to the participant. You can share the same URL with multiple participants to allow them to complete an interview without needing to be added to the study manually.
To generate an anonymous participant URL:
- Navigate to the protocols page in the dashboard.
- Click on the Anonymous Participant URL button for the protocol you wish to recruit participants for.
- The URL will be copied to your clipboard and will be in the following format:
https://yourstudy.com/onboard/{protocolUniqueID}
You can now share this URL with participants to allow them to self-enroll in the study.
Limit interviews
You may want to limit the number of interviews that a participant can complete for a given protocol. For this reason, Fresco includes this as an option you can enable on the settings page.
If you enable this option, each participant will only be able to submit a single completed interview for each protocol (although they may have multiple incomplete interviews). Once a participant has completed an interview, attempting to start a new interview or to resume any other in-progress interview will be prevented. This applies to both unique participant URLs and anonymous participant URLs.
To enable this feature:
- Navigate to the settings page in the dashboard.
- Toggle the Limit Interviews switch to on.
Take Care!
We prioritized privacy and security when designing this feature, meaning that we do not conduct sophisticated tracking of participants. Instead, we use the participant identifier (if available) and a cookie to determine when a participant has submitted an interview.
This means that if you enable anonymous recruitment and a participant clears their cookies, they will be able to submit another interview.
If you require more robust tracking, you should consider using unique participant URLs instead of anonymous participant URLs.
Freeze completed interviews
By default, Fresco freezes completed interviews: once a participant finishes an interview, the submitted data can no longer be altered. If a participant returns to the URL of an interview they have already finished and makes further changes, those changes are silently rejected, protecting your finished data from accidental or intentional changes after submission.
If you would prefer that a re-opened interview keep syncing further changes back to your data, you can turn this setting off.
To disable this feature:
- Navigate to the settings page in the dashboard.
- Toggle the Freeze Completed Interviews switch to off.
Good to know:
This setting is distinct from Limit Interviews. Limiting interviews prevents a participant from starting a new interview once they have completed one, whereas freezing completed interviews prevents changes to an interview they have already finished from being saved. You can enable either, both, or neither depending on the needs of your study.
Disable small screen warning
Network Canvas interviews are designed to be completed on a device with a reasonably large screen, such as a laptop, desktop, or tablet. When a participant opens an interview on a small screen (for example, a mobile phone in portrait orientation), Fresco displays a warning that the screen may be too small for a good interview experience.
If you do not want participants to see this warning, you can disable it.
To disable the warning:
- Navigate to the settings page in the dashboard.
- Toggle the Disable Small Screen Warning switch to on.
Monitoring progress
Once you have sent out URLs to participants and they begin to complete interviews, you can monitor the progress of those interviews using the interviews page in the dashboard and the main dashboard activity feed.
The interviews page provides an overview of all interviews in the study. Each row corresponds to one interview, with columns for the Participant Identifier, Protocol Name, Started date, Updated date, Progress, Network (the number of nodes and edges captured so far), and Export Status. From this page you can also export data from the interviews.
Finding and filtering interviews
For larger studies, the interviews table can be searched, sorted, and filtered so that you can find the interviews you are interested in. Importantly, all of this work happens server-side across the whole dataset, not just the rows currently visible on screen. This means the table count, sorting, and filtering always reflect every matching interview, even when the results span many pages.
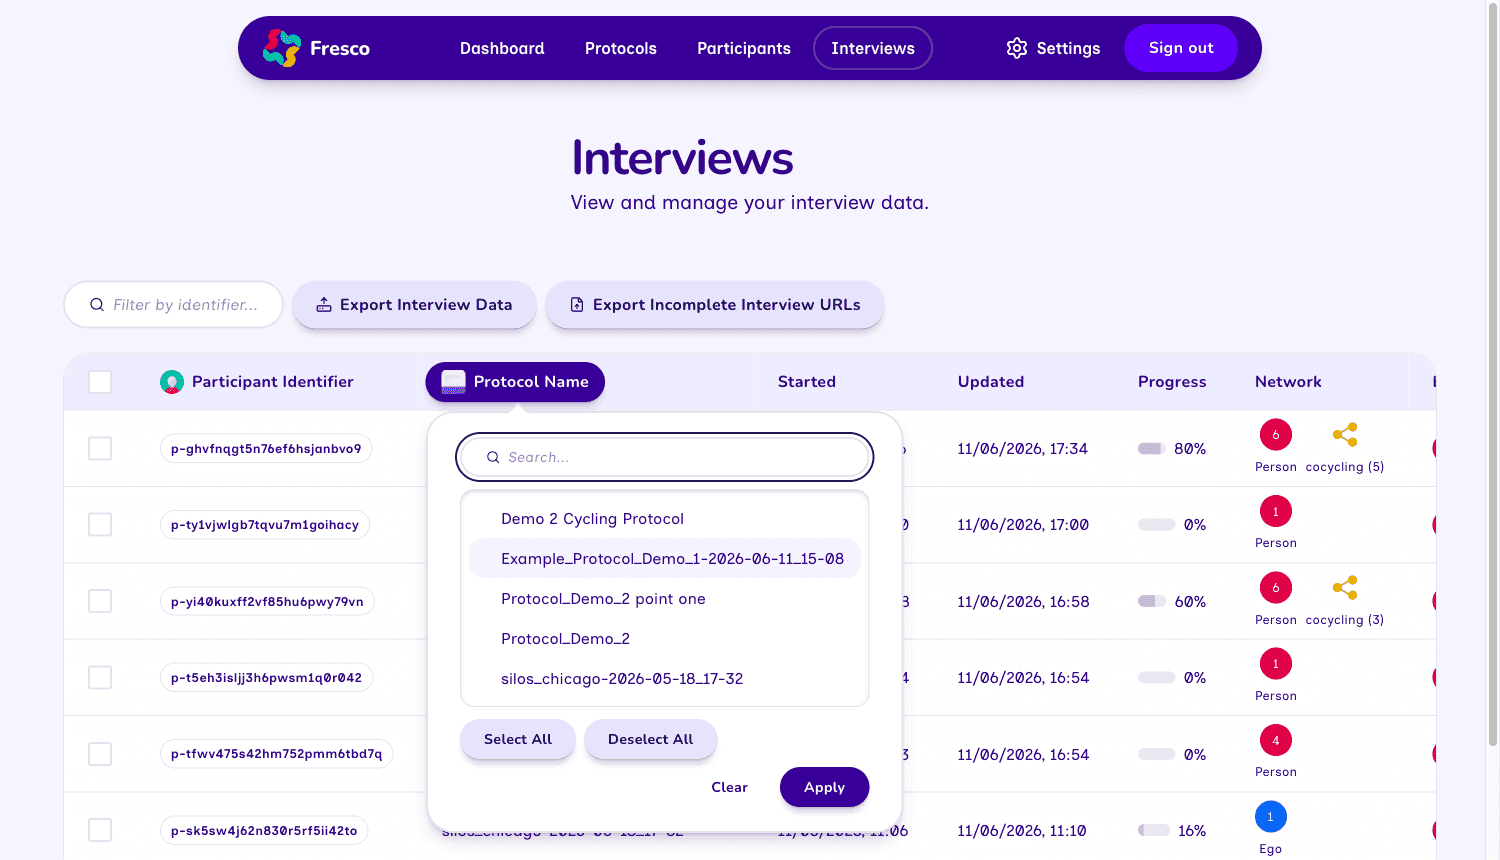
- Search by participant identifier. The Filter by identifier... box at the top of the table performs a case-insensitive substring search against participant identifiers.
- Sort by column. Open the menu in any sortable column header to Sort ascending, Sort descending, or Clear sort.
- Filter by column. Most column headers also offer a Filter option, which opens a popover with an Apply and Clear action. The available filters are:
- Protocol Name — a multi-select list of your uploaded protocols.
- Started and Updated — a date range with quick presets (Today, Last 7 days, Last 30 days, Last 90 days) plus explicit from and to date pickers.
- Progress — a 0–100% range with the presets Not Started, In Progress, and Complete.
- Network — a condition builder. You choose a node or edge type, an operator (is equal to (=), is greater than (>), is less than (<), is at least (≥), or is at most (≤)), and a number. You can stack several conditions, and an interview must satisfy all of them to appear in the results.
- Export Status — Exported or Not Exported.
- Clear all filters. A Clear Filters control resets the search and every active filter at once.
Because filtering and counting run across the entire dataset, the selection and export tools also operate on whatever filters are currently active. When you have a row selected, a Select all N option appears that selects every interview matching the current filters (not just the current page). Likewise, the Export Interview Data options described in Exporting data — export all interviews, all completed interviews, or all unexported interviews — apply to the interviews matching the currently active filters.
The dashboard activity feed
The dashboard activity feed provides an audit trail of activity within Fresco. It is a single table with columns for the Time, Type, and Details of each event, paginated so that you can page back through the history of your study.
Most entries name the researcher who performed the action — for example, User alice installed protocol "X" — with the username embedded in the message text. (Participant-driven events, such as an interview being started or completed, name the participant instead.) The feed is a single, global log shown to every administrator; it is not partitioned per user, so it always shows the activity of everyone who has access to the instance.
The feed covers a broad range of event types — far more than interview progress alone. In addition to installed protocols, added and removed participants, started and completed interviews, and data exports, it records authentication and account activity (such as logins, two-factor changes, passkey registration, API token management, and user-account creation or deletion), changes to settings, and synthetic data generation and deletion.
You can search and filter the feed:
- The Filter by activity details... box searches the details text of each entry.
- The Type filter lets you narrow the feed to one or more event types.
- A Clear Filters control resets the search and type filter.
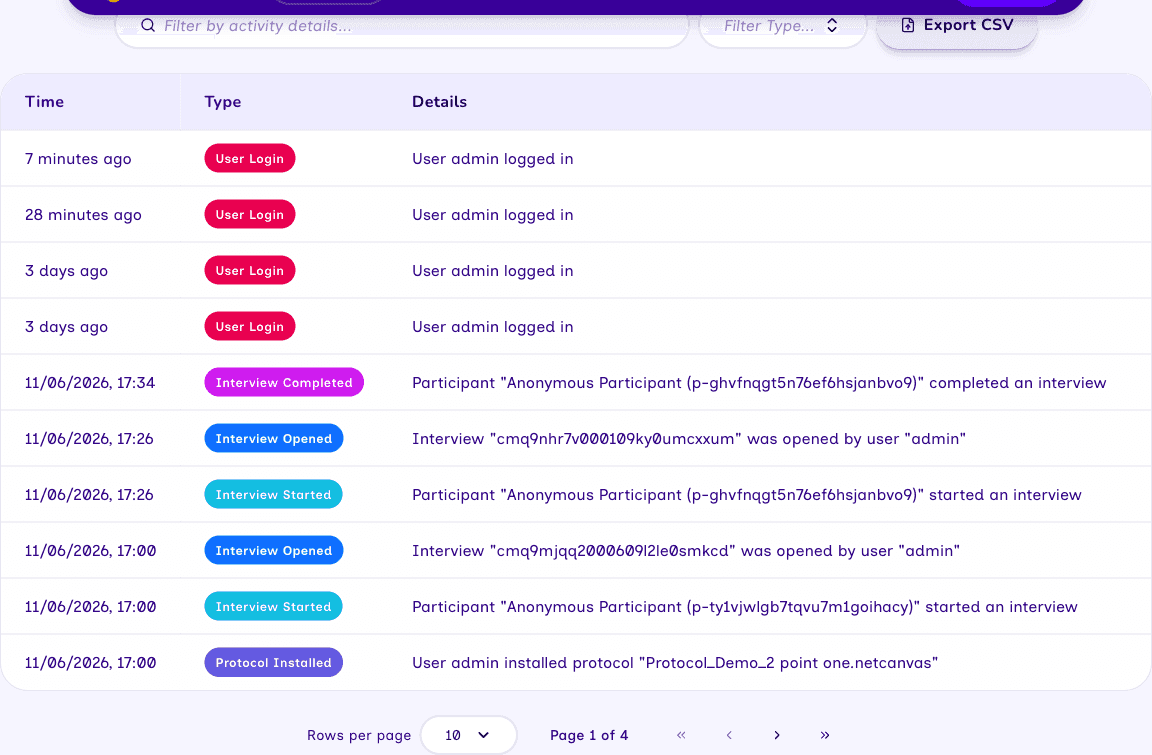
Exporting the activity feed
You can download the complete activity log as a CSV file for your records:
- On the dashboard, locate the activity feed.
- Click the Export CSV button.
- Your browser will download a file named
activity-feed.csv, with columns fortimestamp,type, anddetails.
The export always contains the entire log, regardless of any search or filter currently applied to the on-screen feed.
Generate a CSV of incomplete URLs
You can generate a CSV file of incomplete interview URLs in bulk for multiple participants by protocol. This can be useful for sending reminders to participants who have not yet completed their interview.
- Navigate to the interviews page in the dashboard.
- Click on the Export Incomplete URLs button.
- Select the protocol you wish to generate URLs for from the dropdown.
- Click the Export Incomplete URLs button.
Exporting data
Once participants have completed interviews, you can export the data from the interviews page for analysis in your preferred external software. You can also view the export status of each interview from this page.
To export selected interviews:
- Navigate to the interviews page in the dashboard.
- Select the checkboxes next to the interviews you wish to export.
- Click the Export selected button at the bottom of the table.
- Confirm the file types and export options that you wish to use.
- Click Start export process.
To export all interviews:
- Navigate to the interviews page in the dashboard.
- Click the Export Interview Data button.
- Select Export all interviews from the dropdown.
- Confirm the file types and export options that you wish to use.
- Click Start export process.
To export all unexported interviews:
- Navigate to the interviews page in the dashboard.
- Click the Export Interview Data button.
- Select Export all unexported interviews from the dropdown.
- Confirm the file types and export options that you wish to use.
- Click Start export process.
File types and export options
Before an export begins, Fresco prompts you to choose the file types (CSV, GraphML, or both) and any export options you wish to use. To learn what the exported files contain — the entity files and their columns, the identifiers used to link them, and what each export option does — see the Data Export guide.
If you would rather retrieve interview data automatically than download files from the dashboard by hand, Fresco also provides a read-only Fresco API.
Changing the interface language
Fresco's researcher interface is available in English, English (UK), and Español (Spanish). You can also choose Automatic, which follows the language preferences set in your browser and uses English when none of them is available. Automatic is shown with the language it currently resolves to, for example Automatic (English).
To change the language, click the globe button in the dashboard's top bar and choose a language from the list. On small screens, open the navigation menu and use the language entry there instead. The same globe button appears in the header of the sign-in and setup screens, so you can choose a language before you sign in.
The new language applies immediately. While you are signed in, your choice is saved to your account, so it follows you when you sign in on another device. A language chosen on the sign-in screen is remembered only in that browser: it is not copied to your account when you sign in, and once you are signed in, a language saved to your account takes its place. A language chosen during setup is the exception, because it carries over to the account created by the setup wizard. If Fresco cannot save your choice, the language stays in use for the rest of your visit, and the language list offers to try saving it again.
Changing the interface language translates Fresco's own interface, including messages, dialogs, and validation. It does not translate anything written in your protocol, such as prompts, stage names, and response options, and it does not change collected interview data.
Language in interviews
The built-in interview controls, such as navigation, help, validation messages, and dialogs, are available in the same languages. An interview starts in the interface language Fresco would use in that browser: for a participant on their own device, that is normally the language their browser prefers, matched to one of the available languages, with English as the fallback. If a language has been chosen in Fresco in that browser (for example, on the sign-in screen), or a researcher is signed in to the dashboard in it, that choice is used instead.
Participants can change the language during the interview from the Interface language option in the interview's Settings menu. This choice applies only to that visit to the interview. It does not change any researcher account's language preference, and it does not change protocol text or the answers already given.