desktop 🠖 tutorials
Protocol and Data Workflows
Summary:
This tutorial describes a protocol and data workflow for using Network Canvas tools.
Prerequisites:
To follow along, you should:
- Be familiar with Network Canvas and its data collection process.
- Have access to devices running the Interviewer app.
- Have the ability to install software or configure your devices, or the support of someone who does (e.g., institutional Information Technology (IT) department).
- Create or obtain the protocol file that you want to deploy using Interviewer (see building a protocol).
Duration:
30 minutes
Introduction
This guide will walk you through two possible workflows for conducting research using the Network Canvas tools. These approaches cover both scenarios with and without network connectivity, as well as using tablets or laptop/desktop devices.
Option 1: Online Workflow
If you have access to a network connection with internet access, use the following workflow to deploy protocols and export data.
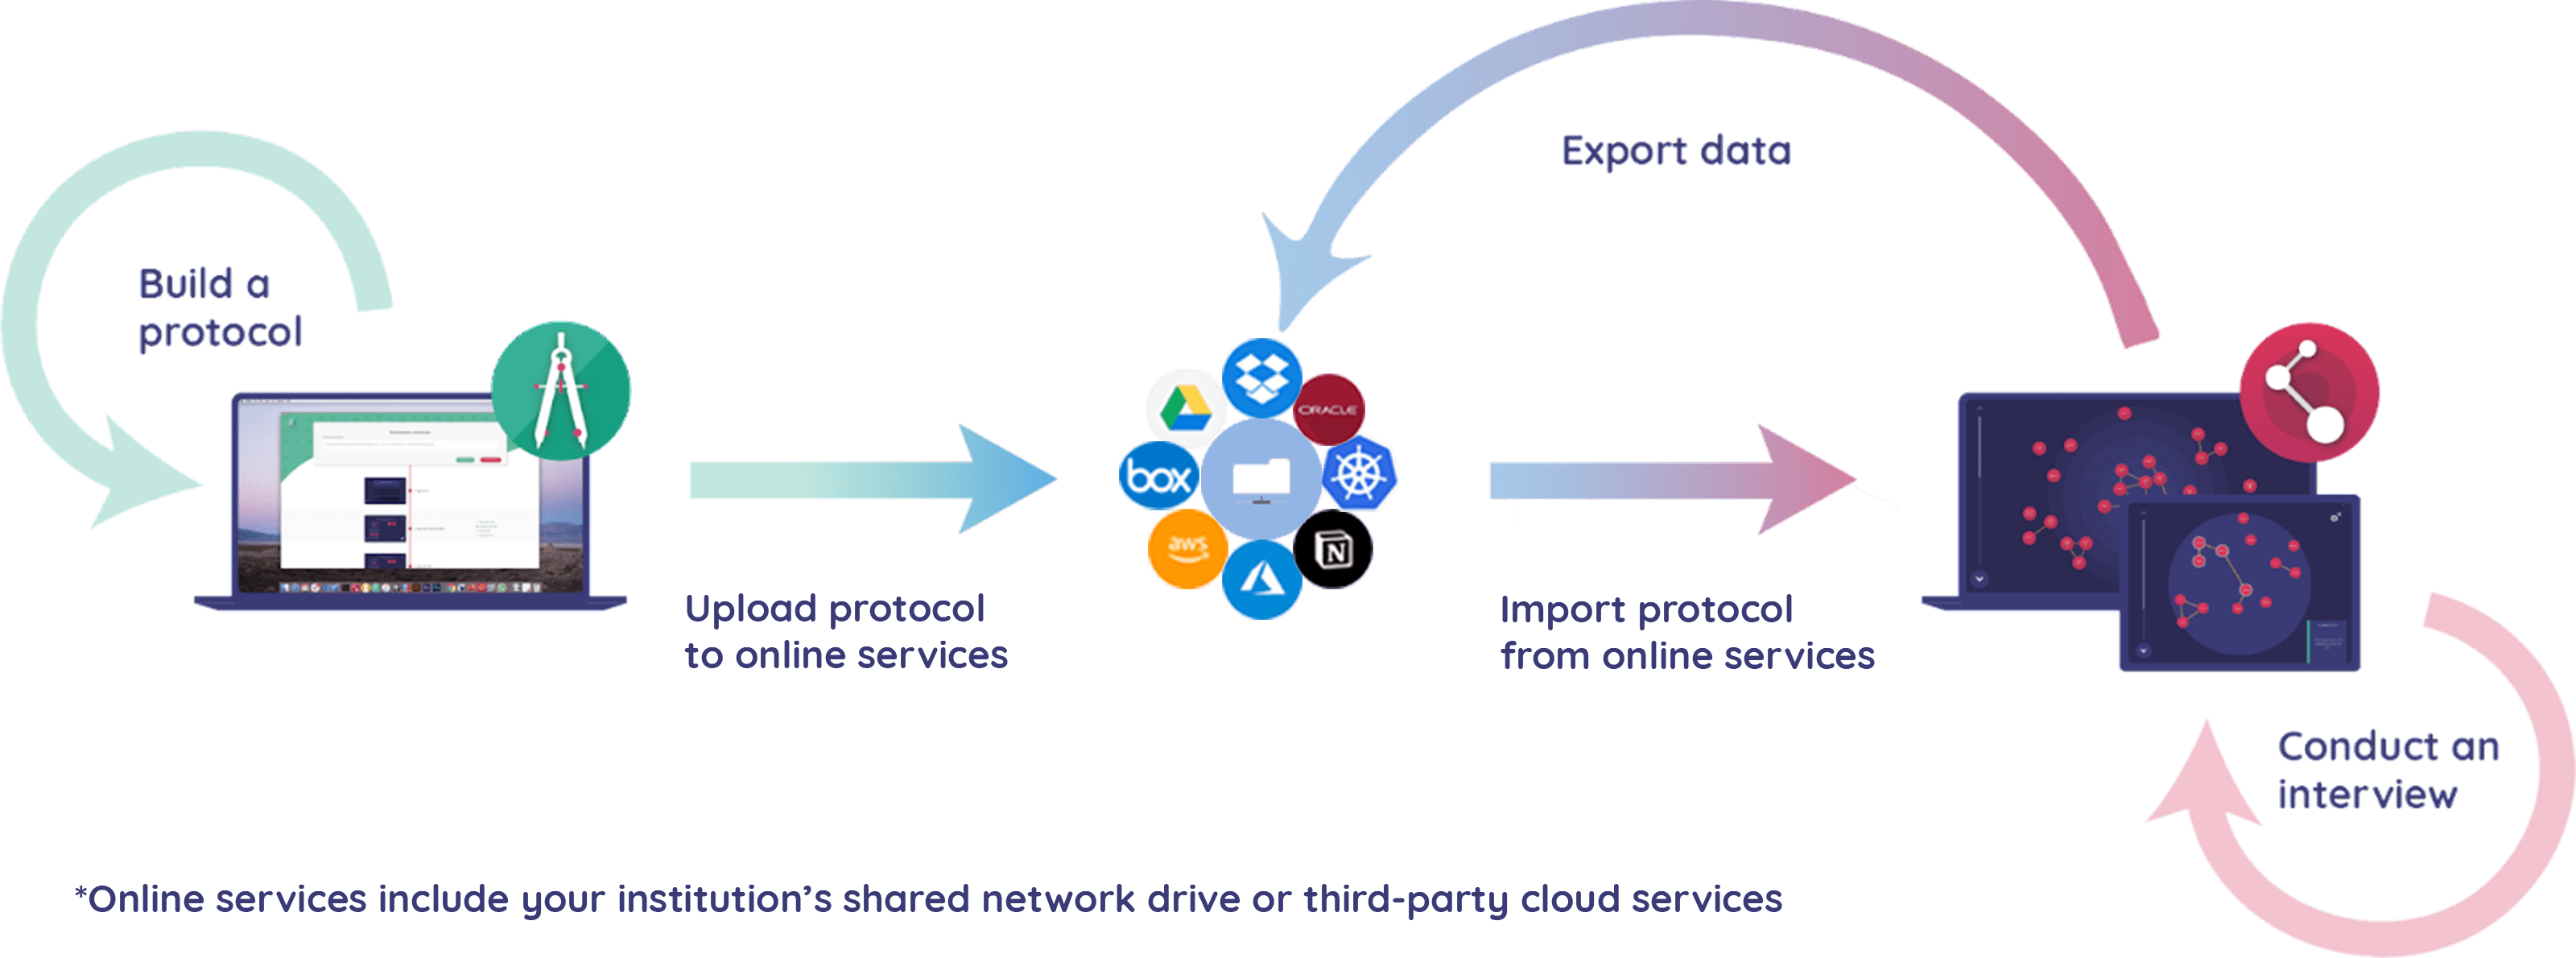
Protocol deployment
The two most convenient ways to deploy protocols are to use a cloud file sharing service or a web hosting service. These options allow you to share your protocol file with others either by providing them with a link to the file or by importing it via the cloud file service's app on your device.
Using a cloud file sharing service to deploy protocols
The preferred method for deploying protocols is to use a cloud file sharing service. This allows you to share the protocol file with others either by providing them with a link to the file or by importing it via the cloud file service's app on your device. It has the significant advantage of providing a single location for the protocol file that can be updated as needed and which can be accessed by multiple people at the same time.
- Place your
.netcanvasfile on a cloud storage service (e.g., Box, DropBox, Google Drive). You can generally accomplish this by dragging and dropping the file into a dedicated folder on the computer you are using to author the protocol. Alternatively, many providers allow you to upload files via a web interface. - (Optionally) Generate a shareable link for the protocol file in the cloud service. The precise mechanism by which this is accomplished varies by provider. You can then use this link to import the protocol file on your devices running Interviewer (see "Utilizing URL import to deploy protocols", below).
- Alternatively, install the cloud service's app on your device and use it to import the
.netcanvasfile into the Interviewer app using the Import from File button on the start screen. Typically, you accomplish this by browsing to a special location in the file browser that corresponds to the cloud storage provider (e.g., "Dropbox" or "Google Drive"). If your provider is not visible in the file browser, try to copy the protocol file to the storage of your device from within the provider's app.
Utilizing URL import to deploy protocols
A second option for protocol import that can work well for cases where the protocol is not likely to change frequently, or where you want to document the setup process in writing, is to use the URL import feature of the Interviewer app. This allows you to import a protocol file directly from a web link (URL).
- Use a web hosting service that provides file hosting capabilities to host the protocol's
.netcanvasfile (e.g., GitHub Pages, SharePoint, and so on). - Once you have a hosting service, upload your
.netcanvasfile. - Once the file is uploaded, determine the URL for accessing the
.netcanvasfile. The URL will typically follow the format:https//<your website>.com/path/to/file.netcanvas. - Ensure that the URL is publicly accessible by opening it in a web browser.
- Once the file is hosted and the URL is accessible, you can share the web link with others. They can then use the link to access and import the protocol file into the Interviewer app using the Import from URL button on the start screen.
Data export
As with the protocol deployment flow described above, we recommend using a cloud file sharing service to export data. This allows you to consolidate interview data by directly uploading your data to your cloud provider.
- Create a dedicated folder on your cloud storage service to store the Interviewer data. Choose a location that is easily accessible and organized. If you are operating within a large team, consider creating individual folders for each person conducting interviews, and consider setting permissions to "write only" (or similar) so that interviewers can only add files to their own folder.
- Install the cloud service's app on your interview device and ensure that you are logged in to the app and have access to the folder you created in step 1.
- Once you have conducted some interviews, navigate to the Manage or Export Sessions card on the start screen and select the files you wish to export. You will be prompted to choose a location to save the export.
- If you are using a tablet device, you will be prompted to choose an app to handle the export. Choose the cloud service's app. The app will then open and you will be prompted to choose a location to save the export.
- If you are using a PC or Mac, you will be prompted to choose a location on the device's filesystem to save the export. Navigate to the cloud service's folder that you created in step 1.
Alternatives
It is possible to transmit the zip files created by Interviewer through many other mechanisms than those described above. However, these are generally not recommended as a primary workflow as they can be more insecure and error-prone than using a cloud file sharing service, and may not be compatible with the Institutional Review Board (IRB) requirements of your research.
However, if you are comfortable with the potential risks, it should be possible to use the same approach as above to "share" your exported data to a number of apps and services, including via email, Slack, SharePoint, and so on.
Option 2: Offline workflow
If you are working in a scenario where you do not have access to an internet connection, you can use the following workflow to deploy protocols and export data.
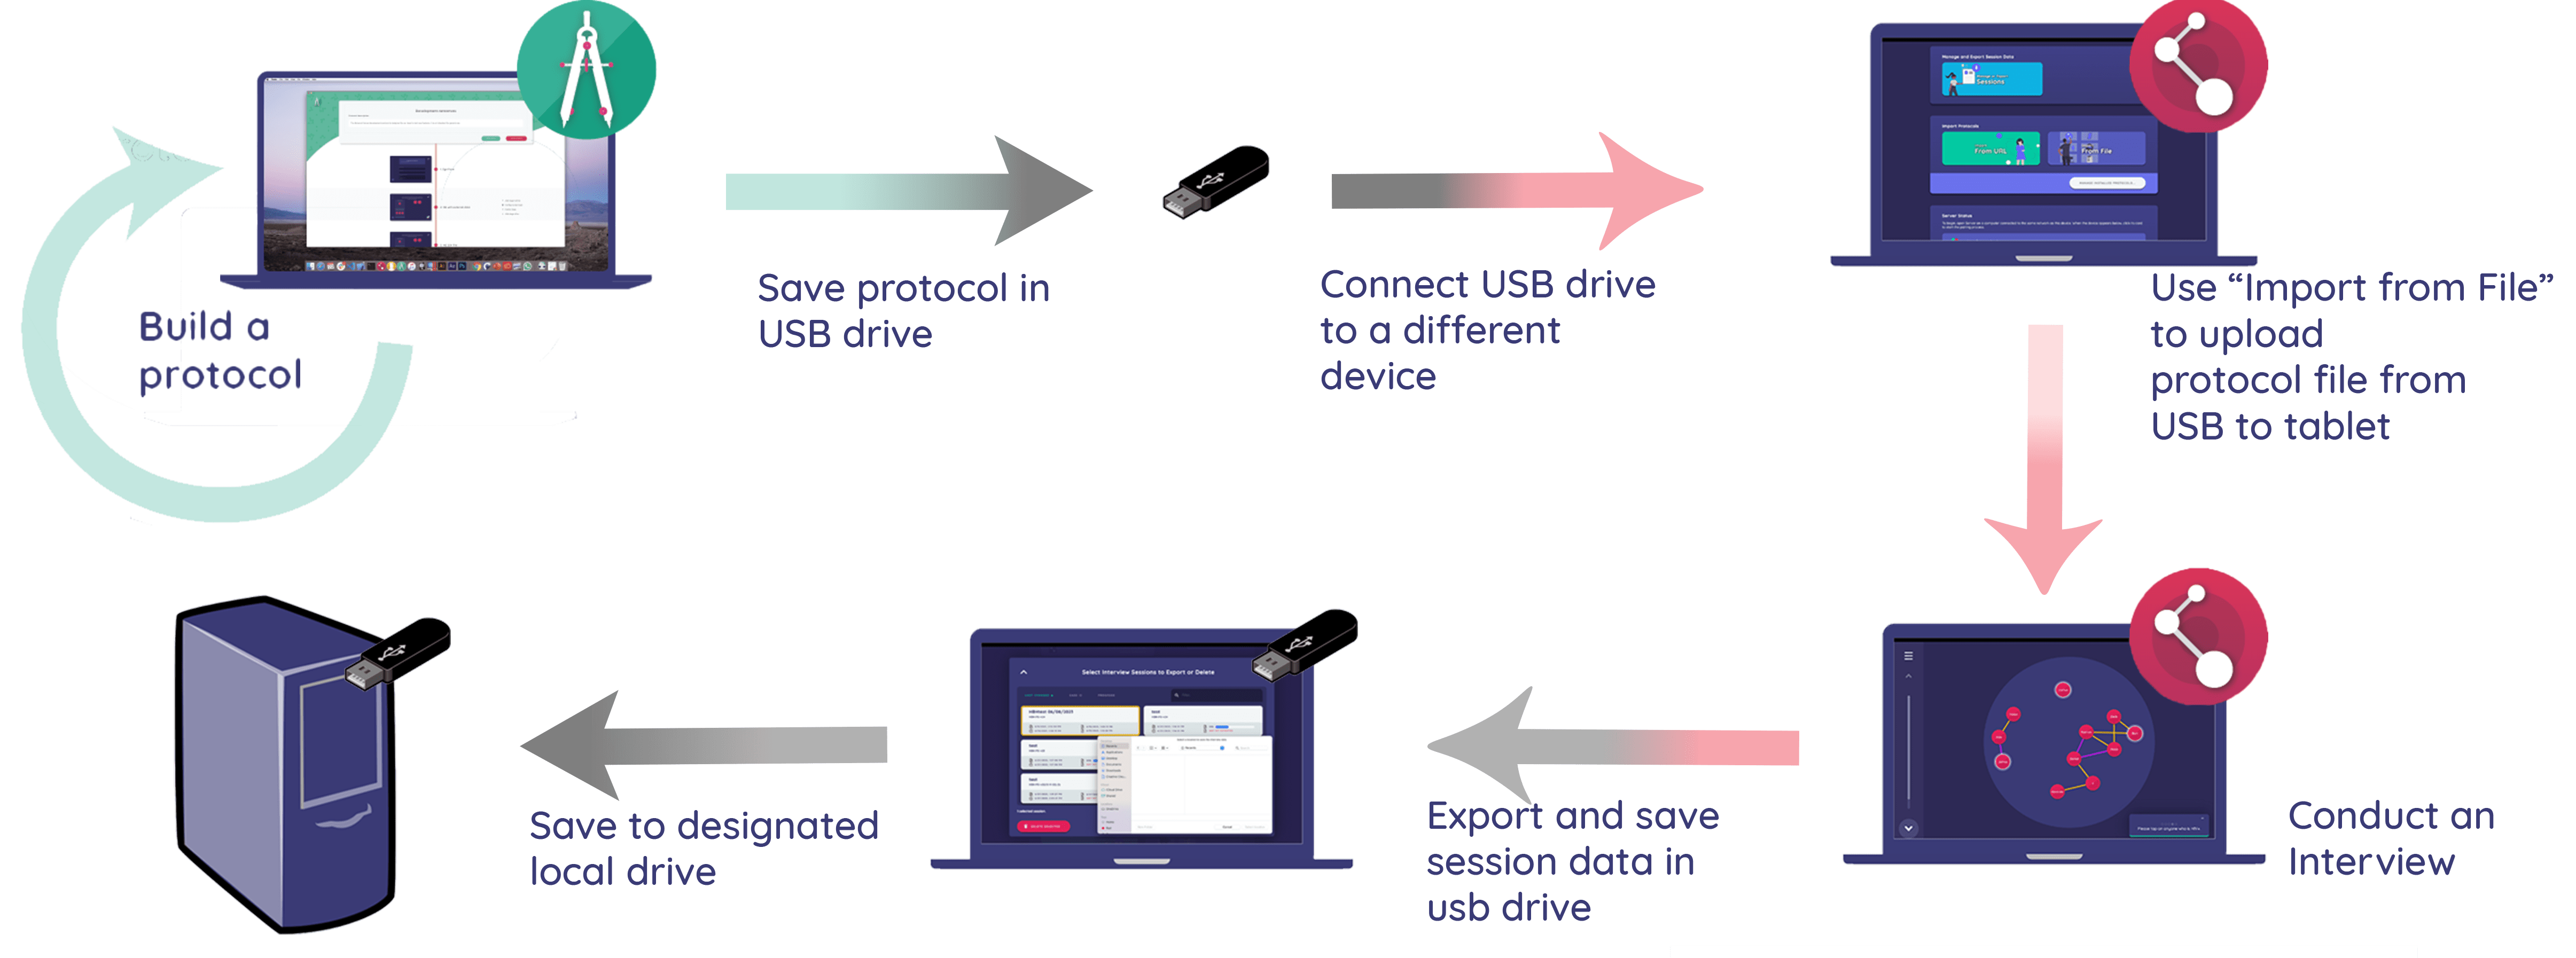
Protocol deployment
In an offline setting, the only option for deploying protocols is to use a USB flash drive or other external storage device to transfer the protocol file physically from your computer to the device running the Interviewer.
- Determine the path to your protocol file (where it is saved on your computer). It typically follows the format:
C:\Folder\Subfolder\file.netcanvasfor Windows or/Users/Username/Folder/Subfolder/file.netcanvasfor Mac. - Open the file browser on your computer and navigate to the location of the protocol file.
- Insert your USB flash drive or other external storage device into your computer.
- Copy the protocol file to the external storage device.
- Eject the external storage device from your computer.
- Insert the external storage device into the device running the Network Canvas Interviewer App.
- Open the Network Canvas Interviewer App and navigate to the 'Import from File' button on the start screen.
- Navigate to the external storage device's folder, and select the protocol file.
Data Export
As above, the only option for exporting data in an offline setting is to use a USB flash drive or other external storage device to transfer the data files from the device running the Network Canvas Interviewer App to a computer.
- Create a dedicated folder on your external storage device to store the Network Canvas Interviewer data. Choose a location that is easily accessible and organized. If you are operating within a large team, consider creating individual folders for each person conducting interviews.
- Once you have conducted your interviews, navigate to the 'Manage or Export Sessions' card on the start screen of Interviewer and select the files you wish to export. You will be prompted to choose a location to save the export.
- If you are using a PC or Mac, you will be prompted to choose a location on the device's filesystem to save the export. Navigate to the external storage device's folder that you created in step 1.
- If you are using a tablet device, you will be prompted to choose an app to handle the export. The export functionality on tablet devices works using the "share" feature built into both Android and iOS. This means that options for saving exported data are determined by which apps you have installed on your device. You therefore need to install a third-party file management app such as "CX File Explorer". Once installed, choose the file manager app from the share menu. The app will then open and you will be prompted to choose a location to save the export. Navigate to the external storage device's folder that you created in step 1.
Data Organization and Backup Best Practices
Regardless of which workflow you choose, it is important to consider how you will organize and back up your data. The following are some best practices to consider:
- Within the local or cloud folder, create subfolders to categorize and organize the Network Canvas Interviewer data based on project, date, or any other relevant criteria.
- Regularly back up the data by copying or syncing the local folder to an external storage device or a different cloud storage service. Putting the data on the cloud provider is not a backup, as it is still only in one location.
- Consider implementing a version control system or maintaining backups at different time intervals to ensure data integrity and minimize the risk of data loss.
- Use the access control features of your cloud storage service to ensure that only authorized individuals have access to the data, and that they only have the level of access required to perform their role.
- Give clear instructions to your interviewers about how and when they should export data. Consider creating a checklist or other documentation to help them remember the steps. This should include information such as how many/which sessions should be exported together, and which export options should be selected. Remember that the result of the export process is a single zip file, so this information will not be visible to you once the export is complete until the data is extracted.
File types
In both workflows, you will be prompted to choose a file type for the export. The two options are:
- CSV. A common format for representing network data. This format is readable as a table (or series of tables) in Excel, LibreOffice, Keynote, and other tabular programs. The CSV version also complies with the
egorpackage standard. Selecting this option will output multiple files, including node and edge lists for each type, and an ego attribute list that also includes session metadata:- Ego attribute list: This file will have one row per ego, with ego-level variables session metadata. The filename will be in the format
caseID_sessionUUID_ego.csv. - Alter attribute list: This file will have one row per alter (i.e. per nominated node). All alters have their own unique ID, as well as an automatically incrementing ID that is only consistent on a per-export basis. The filename will be in the format
caseID_sessionUUID_alterType.csv. - Edge attribute list: This will have one row per relationship, with columns representing edge attributes. Each row will have a key to link to ego (
networkCanvasEgoUUID), as well as source and target columns that reference both the UUID and the automatically incrementing export ID. The filename will be in the formatcaseID_sessionUUID_edgeType.csv.
- Ego attribute list: This file will have one row per ego, with ego-level variables session metadata. The filename will be in the format
- GraphML. An XML based open standard for representing graph data, that is compatible with many social network analysis programs including UCINET, Gephi, NodeXL, Pajek, Visone, and ORA. The filename will be in the format
caseID_sessionUUID.graphml.
Which file type you should choose depends largely on the needs of your analysis tools. We recommend exporting data in both formats, and experimenting with the data you receive to ensure that it needs your needs.
Export Options
You may configure a variety of specialized export options that will impact the data you receive in a variety of ways. These options can be left at their default values unless you know that you need to change them.
Merge sessions by protocol
The option to "Merge Sessions by Protocol" will produce a consolidated file (or files in the case of CSV) that contains all interviews. Although the file(s) will contain all egos, nodes, and edges across all interviews, the ego networks themselves will not be merged in any way.
If this option is left deselected, the export process will produce separate files for each of the interviews completed.
Use screen layout coordinates
Position data from layout variables used on the Sociogram interface in Interviewer is stored on nodes as normalized x/y coordinates, with the origin in the top left of the screen. This allows you to later visualize these layouts on a canvas of arbitrary size, and to compare layouts that were created on screens with different proportions.