desktop 🠖 tutorials
Working with Roster Data
Summary:
This tutorial describes a workflow for using roster data within Network Canvas. It includes basic concepts about file formats as well as some strategies for use of rosters in classrooms, whole network studies, and quasi-longitudinal work.
Prerequisites:
To follow along, you should:
- Be familiar with Network Canvas and its data collection process.
- Have access to a spreadsheet program such as Microsoft Excel or OpenOffice Calc
- Have installed Network Canvas Interviewer and Architect
Duration:
30 minutes
What is a roster?
A roster is a list where each row can potentially become a node in a network. This list might consist of students in a classroom, workers in an office, or people in a team sport. Rosters can also include people mentioned in previous surveys by a specific individual, lists of words related to one's occupation, or any item where it is useful to nominate members of that list in Network Canvas. Commonly, rosters are used in whole network studies since you can merge together all of the ego-alter nominations to create a whole network. Each person in the whole network would make their nominations to others and then the researcher could combine these.
Above we noted rosters for 'people mentioned in a previous survey'. While this is a use for a user-specific roster, this is not yet available in Network Canvas without some workarounds altohugh it is a planned feature for future releases.
Rosters in Network Canvas
In a Network Canvas interviewer session, when a person is nominating nodes we presently have the ability to bring nodes in from a side panel. Typically this side panel would includes 'people already mentioned'. However, we can also bring in nodes from a pre-defined list. Below we discuss:
- how to create this roster list,
- how to add this list to an existing protocol,
- how to display the roster in an interview,
- what might be best practices for smooth workflow using a roster,
- issues with potential name collisions in Interviewer,
- And, finally, a workaround for longitudinal rosters.
A roster in Network Canvas Interviewer exists at the protocol-level. That is, a protocol is used to collect cases, each one representing a participant. Since every case would start an interview session with the same protocol, it will have access to the same roster. The roster is imported into Architect and then is bundled inside of the .netcanvas file that is opened in Interviewer.
How to create a roster
A roster is a list of potential nodes. To avoid confusion, the elements of this list will be called 'items' or roster items because they are not yet nodes in any given interview. This list of items should be prepared outside of Network Canvas in a spreadsheet program and exported as a special kind of file type: csv or comma-separated values.
Below is an example of a table:
| name | var1 | v_2 | v3a |
|---|---|---|---|
| Alice | 30 | True | "Yes it's the case" |
| Barb | 25 | False | "You can include strings!" |
Here is what the table looks like when exported to CSV
name, var1, v_2, v3a
Alice, 30, True, "Yes it's the case"
Barb, 25, False, "You can include strings!"
Considerations for formatting the CSV file
The comma-separated values format is more of a loose set of conventions than a strict standard. This means you could accidentally create a CSV that will not open correctly in Network Canvas. Below are some key considerations for your CSV files:
- The CSV file should have a header row for variable names.
- The first column should have the column header as
name. This is what the participant will see when the roster item becomes a node. - The remaining columns represent additional variables. For example, there could be a column for "club_member", "age", "profile page", etc... These variables can be useful when initially displaying a roster in an interview. They are also 'passed through' so that any data export from Network Canvas that includes these roster items as nodes will also include these columns as variables.
- Since CSVs use commas to separate columns, this means that if you want to have a column with a comma, such as an additional column for city and country (e.g., "Toronto, Canada") then the CSV needs to wrap
Toronto, Canadainside of quotations so that it knows that it is a literal comma and not a column separator. - Fortunately, if you edit a table of data in a spreadsheet program such as Microsoft Office or OpenOffice Calc, when you export that spreadsheet as a CSV it takes care of the issues with quotes and commas for you. We therefore do not recommend creating CSVs in programs like TextEdit or Notepad since they do not manage these small formatting issues.
- Even if the CSV is valid, it might be confusing for Network Canvas if there are certain characters in the column names. These are variable names and so they should follow the conventions of Network Canvas broadly:
- Start variable names with letters.
- Only use simple latin letters (A-Z, a-z) alongside numbers and underscore for variable names. So for example,
género(gender in Spanish) not parse correctly whereasgenerowould. You can use non-latin characters in the rest of the data, so you do not need to reformat the name "Verónica" as long as it is data and not a variable name. - Network Canvas is not always strict about upper case and lower case. You should avoid having two column names with equivalent letters in different cases, such as
Nameandnameas the program may not always detect the difference.
Note: We expect the first column to be the name of the roster item with a column called name. However, these items do not need to be people. Recall that ontological flexibility is one of the design principles of Network Canvas. Thus, you could augment a study with a roster of words representing emotions, concepts, books, places, etc...
Adding the roster to a Network Canvas Interview
Once you are satisfied with your roster, you can add it to a Network Canvas protocol from within Architect. You can add it through the Resource Library, which is available by pressing the button at the top of any protocol you are editing.
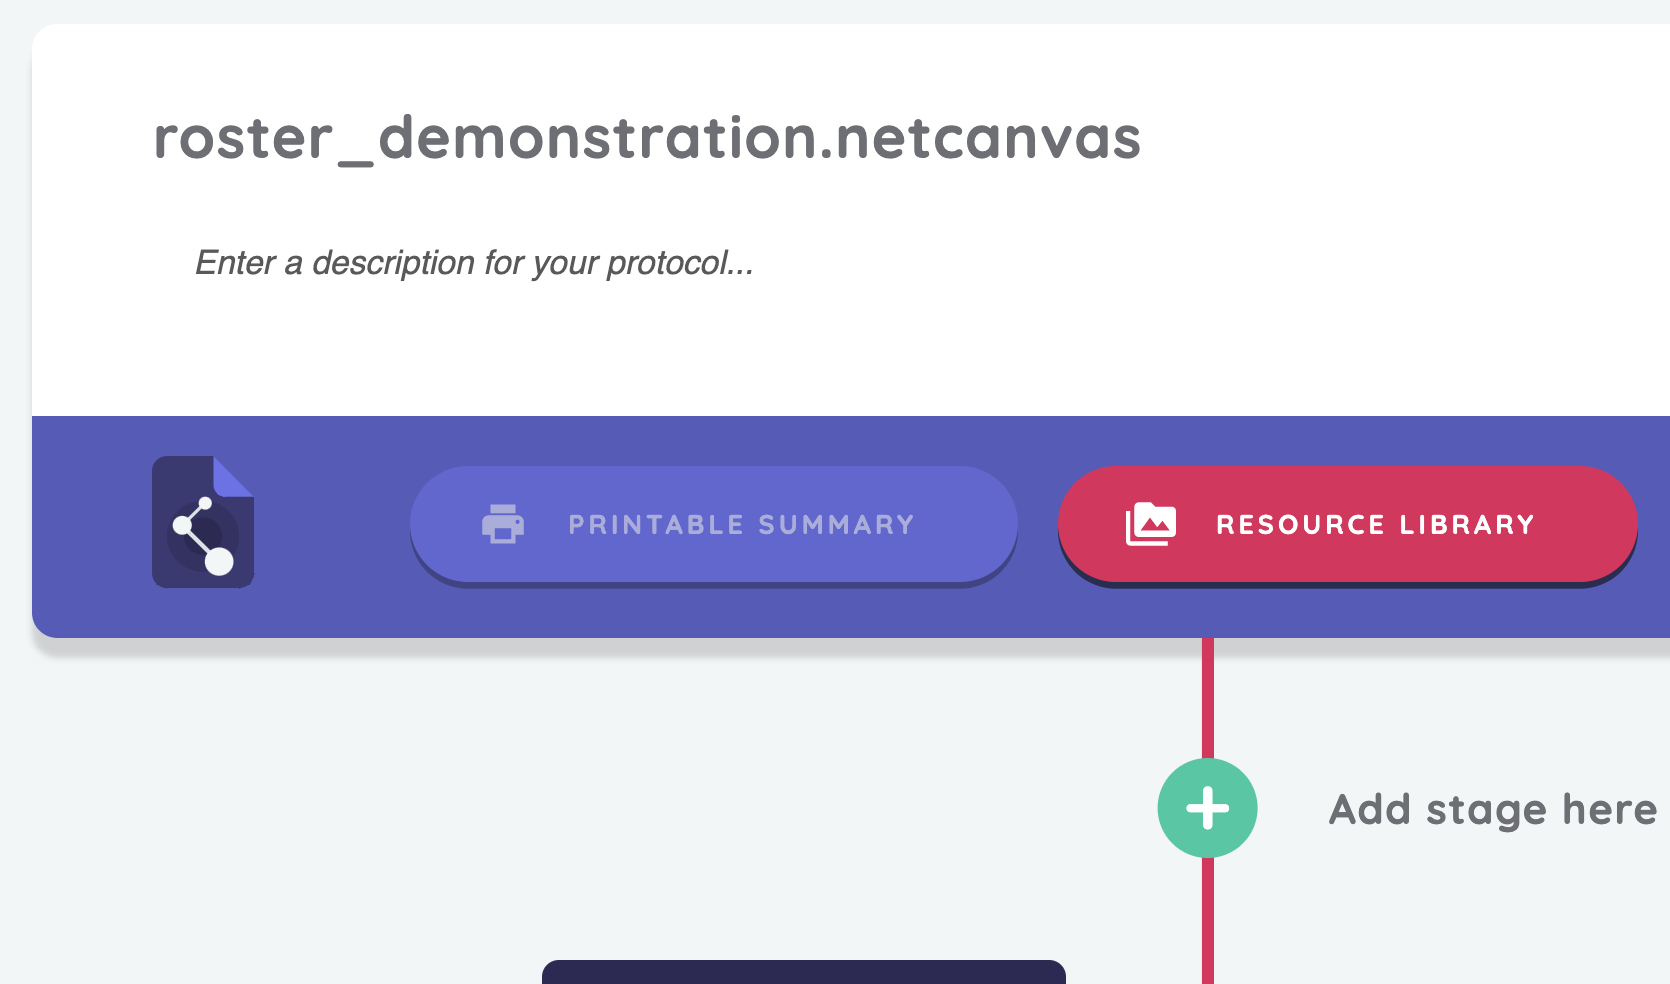
You can also add it when you are creating a roster name generator. Below we walk through the steps of adding it to a name generator and we will add the roster as we go along. We will use a simple roster which includes five members of the cartoon television show, "The Simpsons", but you should be able to follow by analogy for a roster of your own making. The example CSV is available here.
Selecting the Name Generator Interface
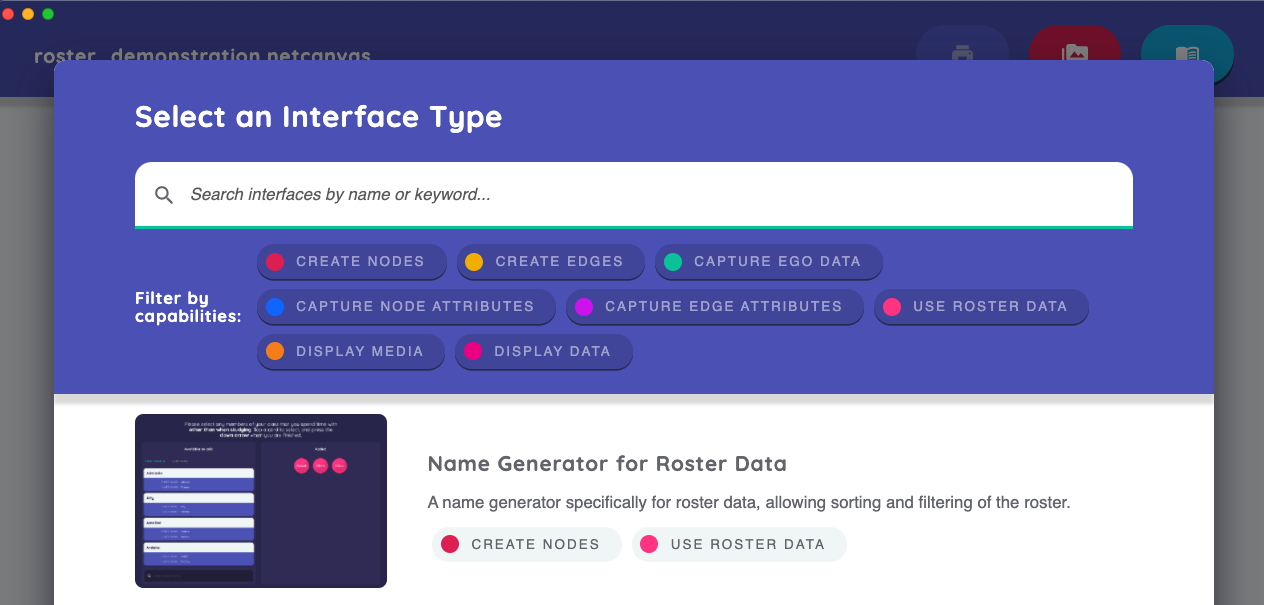
To use a roster, you should select the interface "Name Generator for Roster Data". Give the stage a name (such as roster_01) and then create or select a node type. In the example, we have created a node type called "person" and so we will choose this. Then the program asks for "Data Source for Roster". If you have already uploaded the CSV to the Resource Library it will be available to select. Otherwise, you can upload it now.
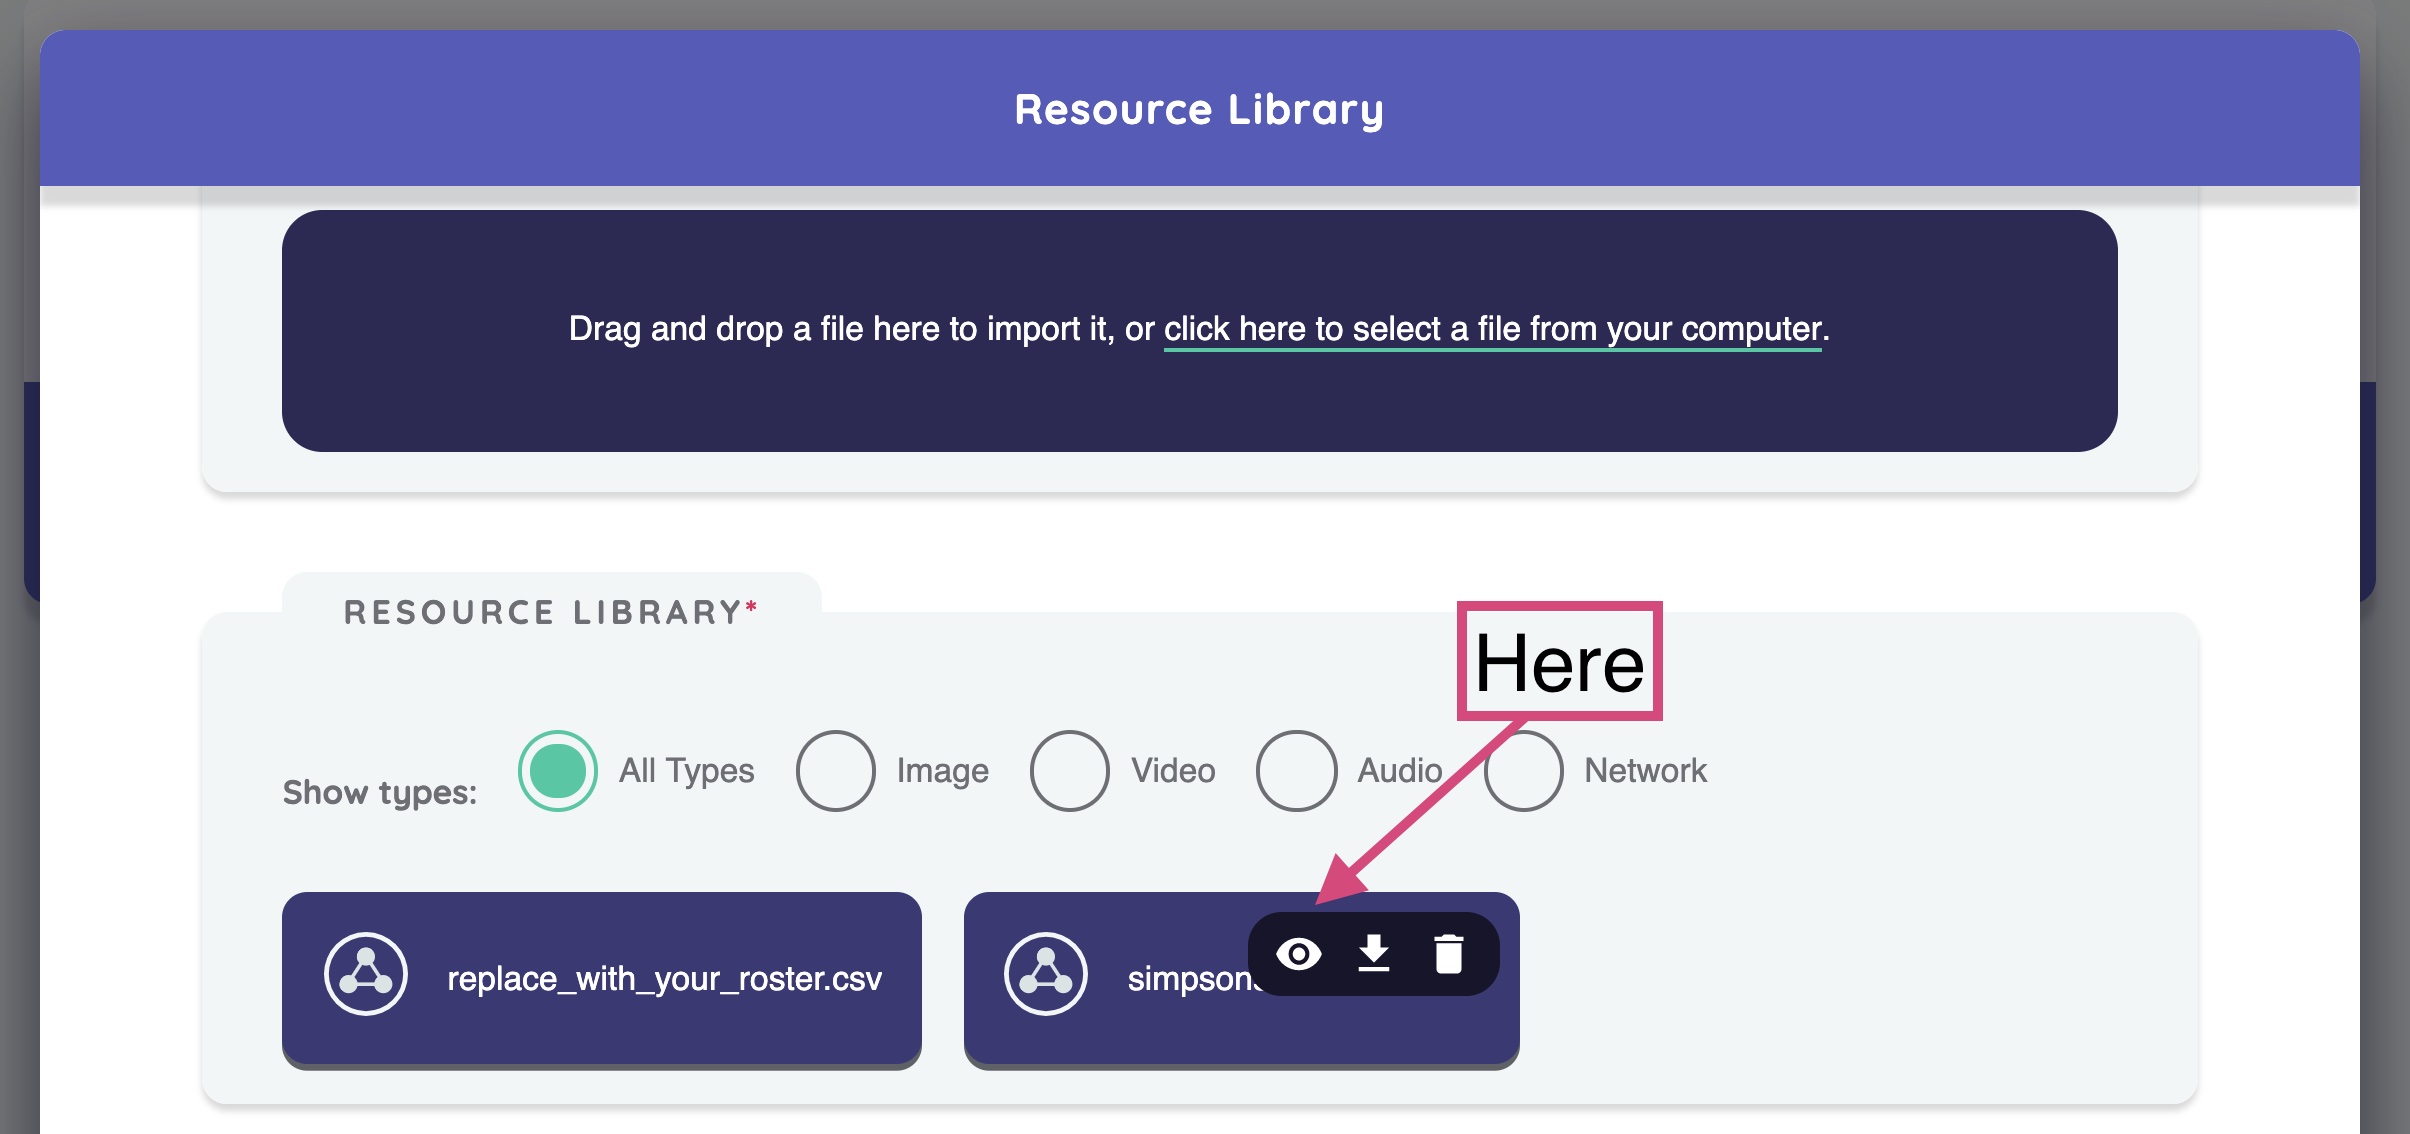
Before you select the roster it is useful to inspect it so see that it has formatted correctly. In the upper right corner of a roster resource is a small eye icon. Clicking on that will show the CSV that has been uploaded.
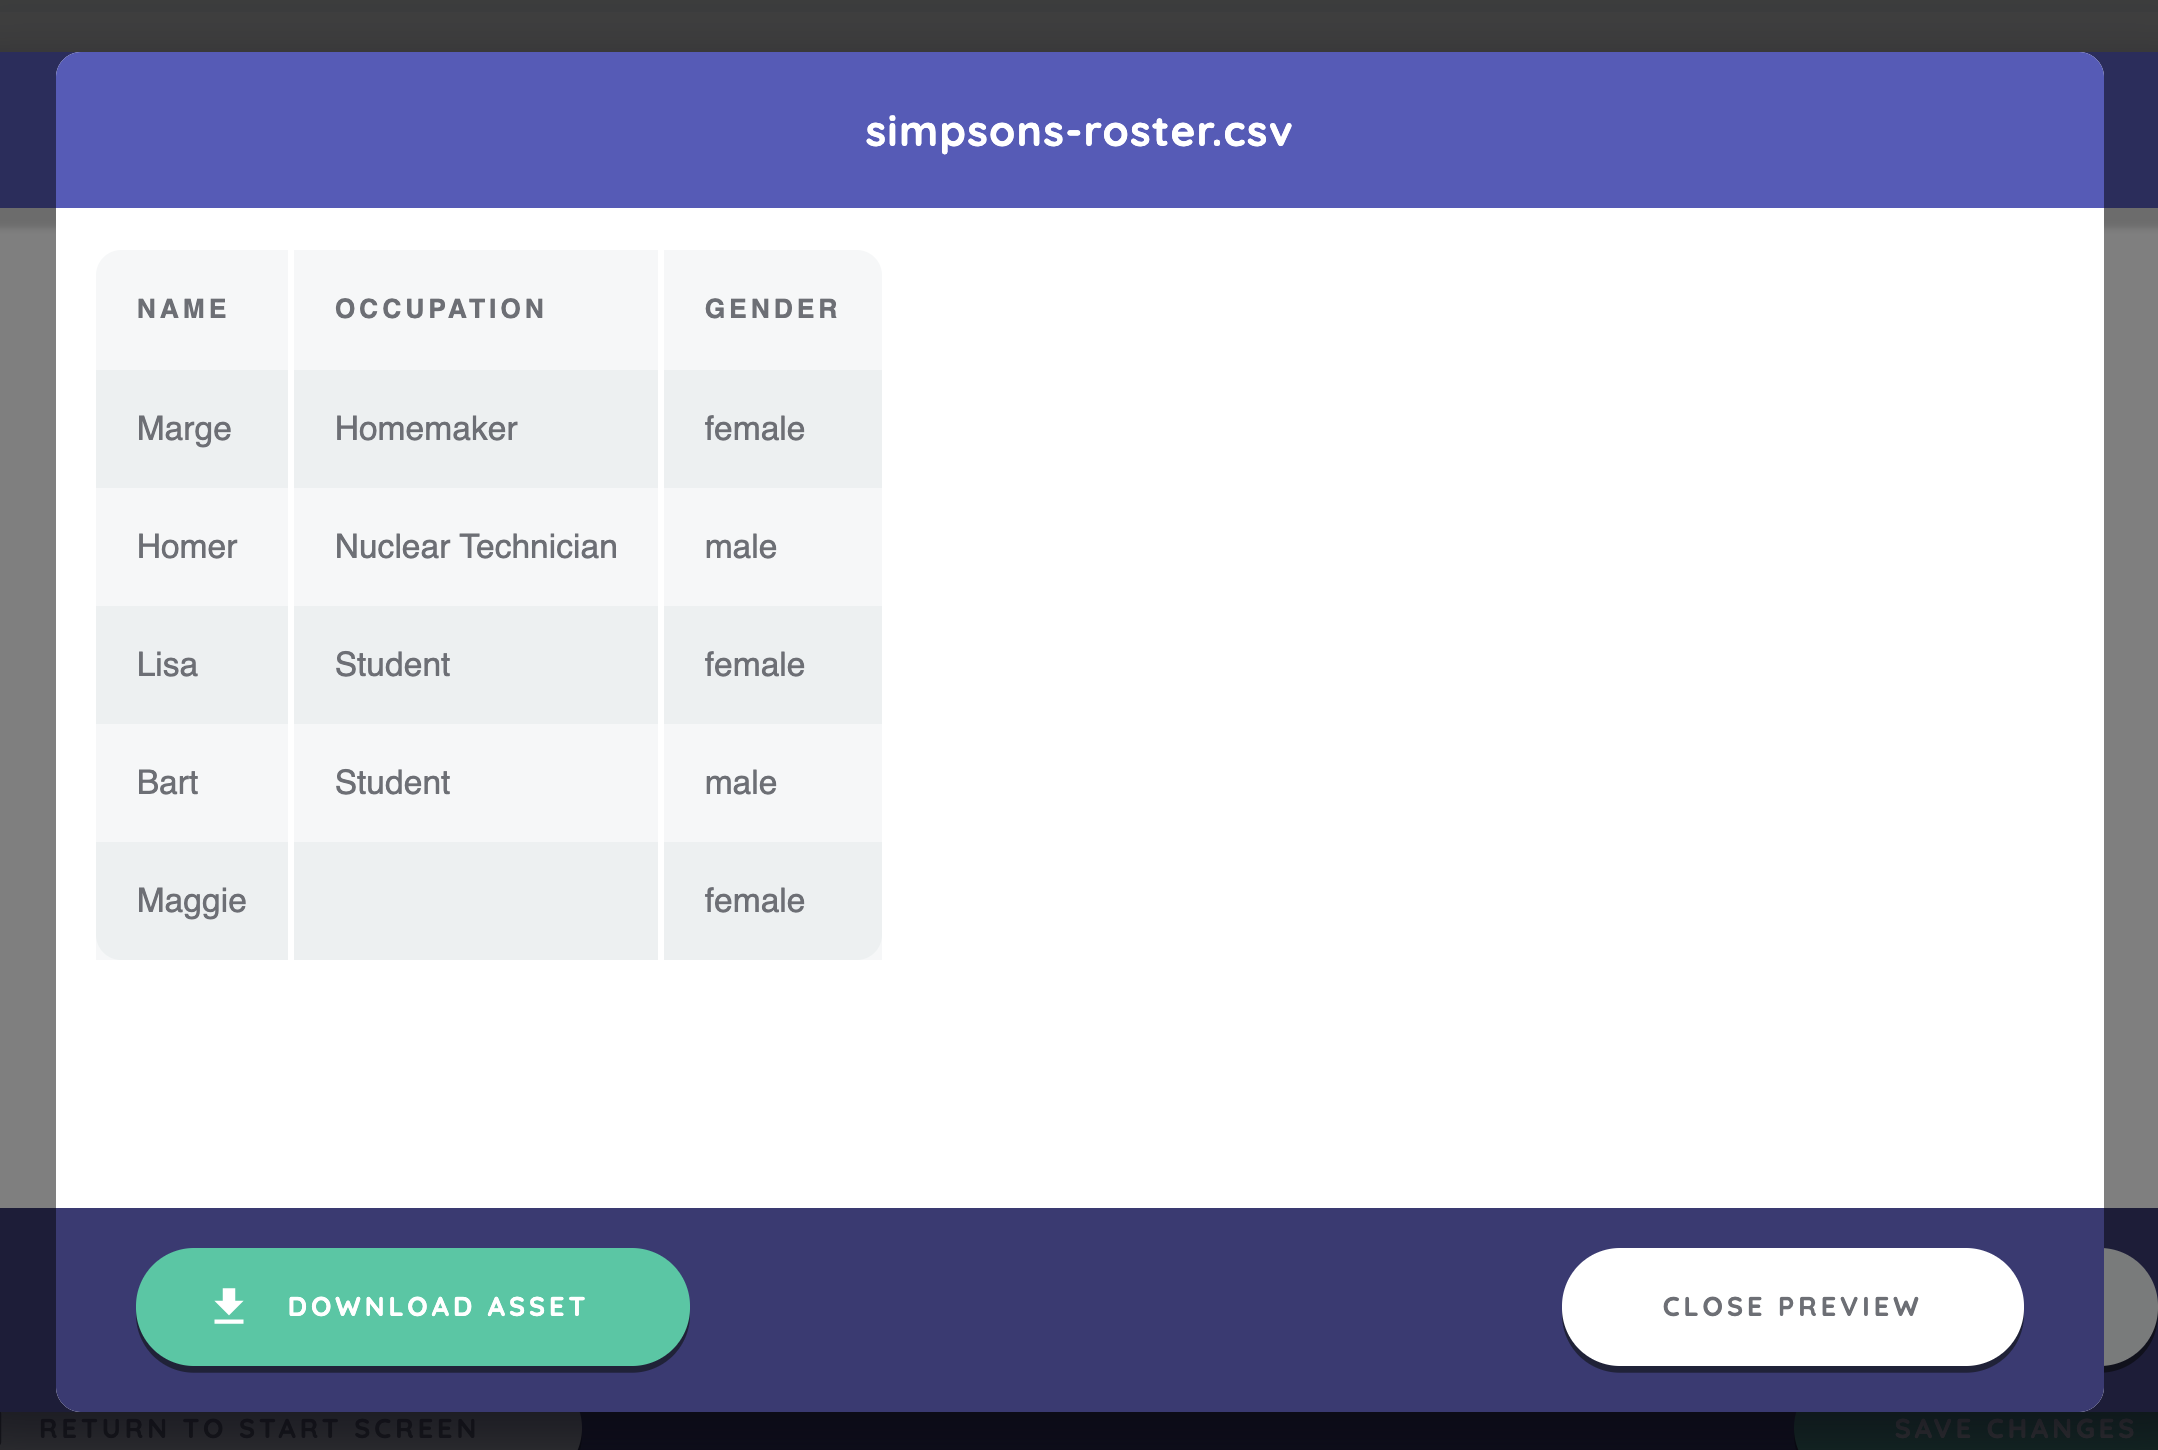
With the simpsons-roster you can observe that there is an empty cell for occupation for Maggie. This shows the data was correctly formatted and the columns are all properly aligned.
Formatting the display of the roster
Once you have selected a roster the next three items allow you to customise the look of the roster item in interviewer. Roster items are displayed as cards rather than nodes. When a participant clicks and drags on the card they can drag it into the drop zone. This is obvious because the background will change color when the card is above it. Dropping the card in the drop zone turns it into a node.
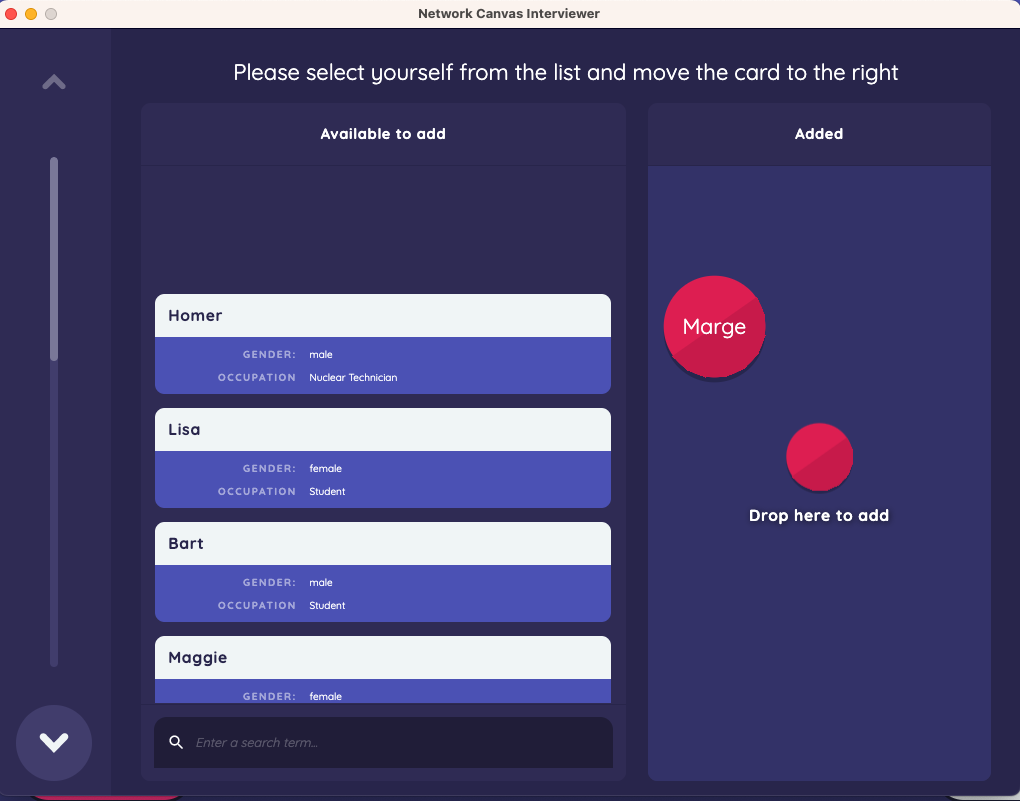
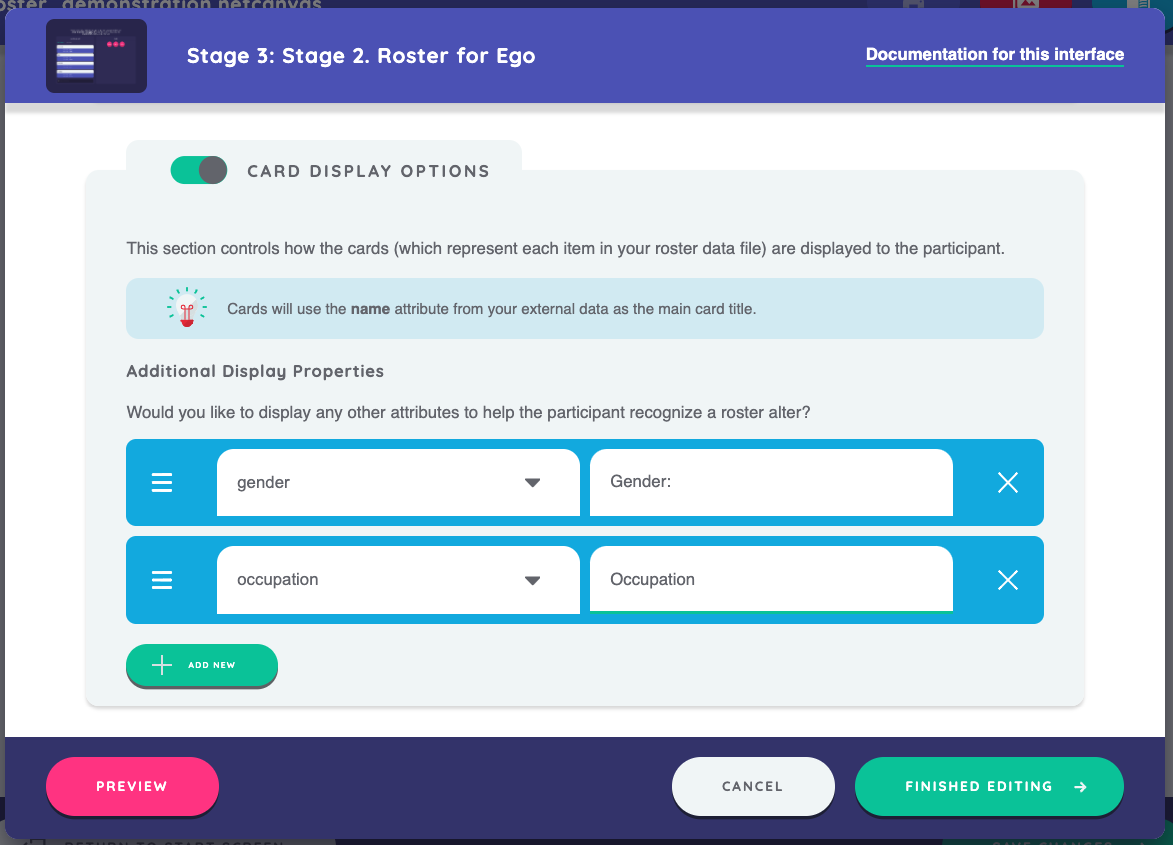
By default, the cards will display the name of the roster item. However, you can add additional details on the card by turning on 'card display options'. This will then allow you to select from the additonal columns of the CSV to be shown below the name. The left hand drop down allows you to choose the column from the CSV and the right hand item allows you to give that variable a different label. So in the simpsons-roster example, while the CSV had a column called gender (in lower case) on the card we will write Gender to be displayed.
Since a roster might have a large number of people to scan, you can also enable the cards to be sorted by some value. So if we add occupation, then in the interview the participant can sort the roster by occupation.
Finally, you can permit participants to search through the roster items using a search box. Selecting name and keeping the accuracy low means that people can find others by typing characters close to the person's name if not exactly.
Prompting for a roster item
Much like in other name generator interfaces, in order to select roster items the interface needs a prompt. This could be as simple as "Please select the people you know" however, we strongly encourage researchers to consider using common prompts or one's that relate carefully to a research question. You can use multiple prompts on the same interface.
Remember that you can use multiple prompts on the same interface but without adding additional variables you will not be able to determine which prompt elicited which node.
Considering additional prompt variables: What is an alter pool?
A roster item can only be added to the interview once (or more strictly, once per node type per interview). This is consequential if you have multiple prompts that are not mutually exclusive. For example, imagine asking people to nominate classmates they study with. Then with a second prompt one might ask about classmates they knew before this current year. What about someone who is both? This is where we can think conceptually of an 'alter pool' and then draw upon this alter pool across prompts.
In order to manage cases where alters could qualify for multiple prompts, it is useful to do two things:
- Use the 'assign additional variables' feature when creating a prompt.
- Use the 'already mentioned' panel in the interview.
When you assign an additional variable with a prompt it means that not only will that prompt create a node, but it will assign some additional data. Usually we use a boolean variable per prompt. So if you have a prompt for classmates who study together then you should also assign an additional variable 'study_together' and set it to True. Then do the same for the prompt about known before this year. When you look at your data later on, you will have two additional columns. The people nominated on the study_together prompt will have True in that column and the people nominated on the known_before prompt will have True in that column.
Since you can only turn a roster item into a node once that means that if people were created in the first, study_together prompt we need an additional way to include them in the known_before prompt. This is why we use a side panel. Side panels are only available in the interfaces "Name Generator (using forms)" and "Name Generator (quick add)" although future versions of Network Canvas will unify these screens.
With a Name Generator (quick add), we can nominate new nodes with the new node button in the lower right. But on the left hand side we can have a side panel. In fact we can have two - one for people already nominated who are now in the alter pool and one for the remaining roster items who have not yet been nominated. Below is an example of such a screen with some of the Simpsons already nominated (in the alter pool) and some still in roster.
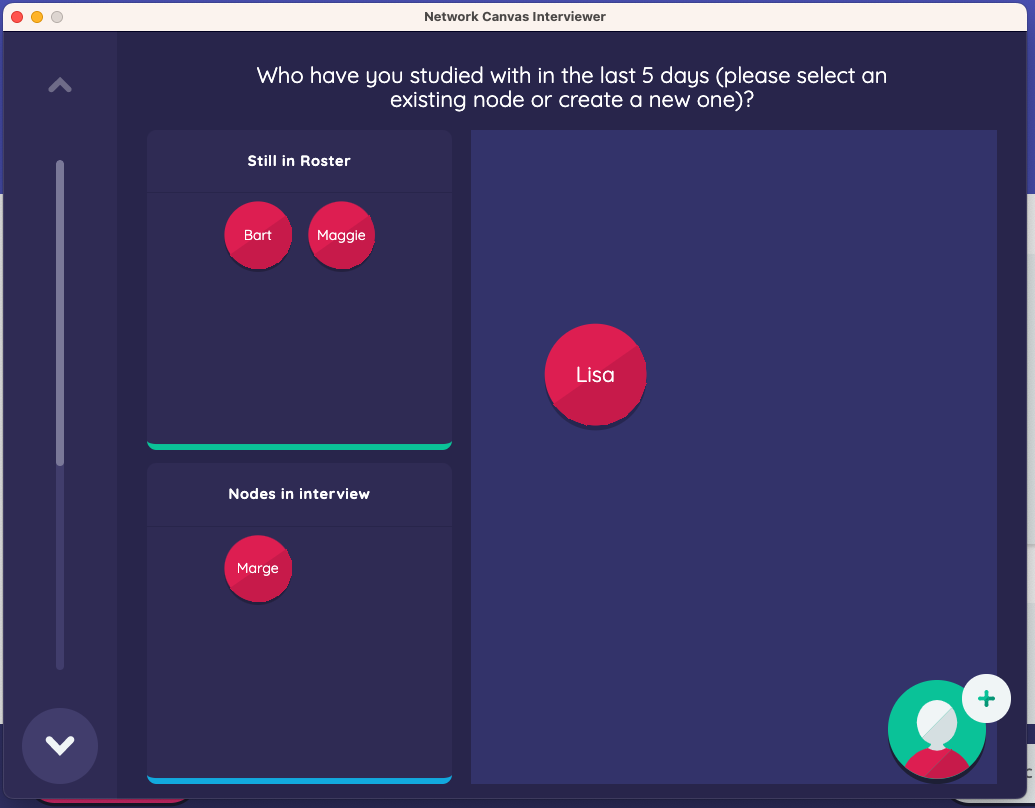
We recommend that you add all the nodes you can to the alter pool before adding additional details so that you can add these details to all the nominated nodes rather than zigzagging through the protocol. This is because all stages draw from the same alter pool if they use that type of node. Imagine the following scenario: the participant adds nodes on stage 3, adds some detail on stage 4 such as how close ego is to alter, and then adds more nodes on stage 5. These newly added nodes will be available if you go back to stage 4. Also note that the roster list does not change once it is in Interviewer. So all the data that you add about a node from a roster will be available when you export your case, but it will not be associated with that roster item in subsequent interview cases.
How large is too large for a roster?
If a roster is too large for Network Canvas to display (based on how it internally calculates memory) you can still use autocomplete to search the roster and possible matches will still show up. This has been tested with rosters with hundreds of thousands of items.
Potential pitfall: Rosters and Name Collisions
Concerning rosters, there are a handful of situations in Network Canvas that can lead to improper data if not considered fully. These issues mainly concern the fact that a node in Network Canvas is only indicated by the name variable. So when the participant is linking nodes or assigning additional data if there are two people with the same value for name it can be difficult to distinguish them. Below are two examples and some proposed workarounds:
Collision type 1. Collisions within the roster list itself.
Imagine you have a roster with two people named Kwame. One is Kwame Kenyatta and the other Kwame Nkrumah. If the participant knows both of these people, then their alter pool will have two Kwames in there and the participant will not be able to distinguish them later on. While the roster card could show their surname, the node icon will just say "Kwame" for both. This is referred to as a name collision.
Internally, the program will have assigned each of these nodes a unique UUID, but the respondent will not be able to determine which is which.
Potential solution: When importing a roster, Network Canvas does not check that the name column contains only unique items. However, you can do this when you are preparing your roster. One way to do this is to highlight the entire column in Excel or Calc and select the menu item (in Excel) "Data" - "Table Tools" - "Remove duplicates". If your list has become shorter you have duplicates you should have removed. One way to manage this is to create a new name variable that is a composite of first and last names. This can be done by hand or by using a formula in Excel.
We do not recommend editing the name in Network Canvas after it has been created both for technical reasons but also because you run the risk of not being able to tell that this is the same Kwame or Kwame_Nk from the roster when comparing across people. Recall that with a roster we typically want to merge data across participants to see who nominates whom.
Collision type 2. Collisions because there is already a node with that name
The second collision type happens when the duplicate name appears because the participant nominates someone outside of the roster with the same name. Imagine that we have one screen with a roster where the person nominates "Kwame" and then nominates a different Kwame using a "name generator (quick add)" or "name generator (using forms)". Network Canvas will not alert you that there is already a node named Kwame in the alter pool. This situation should be managed by a trained interviewer and the participant should be encouraged to use unique names.
Remember, if the participant creates a new node with a duplicate name and they want to delete that node this can be done by dragging on the node and a trash can will appear. Drag the node into the trash can and create a new node with a more unique descriptive name.
Tips for rosters in sociocentric studies
A sociocentric study is one where you are interested in the connections between people within a given network boundary. To start simple, imagine we are only interested in ego-alter ties. That is, we are not focusing on a classmate's impression of whether two other people are friends. We simply want to have people nominate their peers. This can then be converted into a whole network as a matrix using some data wrangling. We do not show such wranlging here, but given past experience we can show some steps to make this process easier.
Recall that an adjacency matrix for a network has rows and columns. The rows represent the participants' data and the columns are the targets (i.e. the people that the participants nominated). Since it is a sociocentric study, the rows and the columns should have the same names. In the following simple table, we see a classroom with four students. 'Alice' nominates 'Bob' and 'Cam' as friends. 'Dot' nominates everyone as a friend, while 'Bob' and 'Cam' only nominate each other. The resulting matrix would look like the following:
| name | Alice | Bob | Cam | Dot |
|---|---|---|---|---|
| Alice | - | 1 | 1 | 0 |
| Bob | 0 | - | 1 | 0 |
| Cam | 0 | 1 | - | 0 |
| Dot | 1 | 1 | 1 | - |
In the case of a roster in Network Canvas, each participant would contribute a row. You will notice that the diagonals have - in them. This is because conceptually we would not think that people can nominate themselves in this sort of work (though that is research-question-specific).
To collect this sort of data in Network Canvas we can use a roster and only collect nominations from the participants. However, we would like to have the participant identify themselves in the roster so that they are not available for subsequent questions. To do this we can use several features of Network Canvas in tandem:
- We can create an 'identify yourself' prompt and set both the minimum and maximum number of alters to 1.
- We can attach an additional variable called
is_egoand set it to True for that one node. - Because roster items become nodes only once, ego will then not be listed on subsequent roster prompts.
- However, ego is still in the alter pool, so any time we want to do something with the alters, such as ask for data on frequency of communication, we need to filter our ego, which we can do with stage level filtering and our
is_egovariable.
You can find a protocol here which has all of these features included. It has the small roster with Alice, Bob, Cam, and Dot but you can replace this with your own roster and modify it for your needs.