desktop 🠖 tutorials
Building a protocol using Architect
Summary:
This tutorial will guide you through the process of creating a Network Canvas protocol using Architect. We will be rebuilding the sample protocol that is available to install within Interviewer, which was discussed extensively in the tutorial on using Interviewer. If you would like to download and open the finished protocol, you can do so from here.
Prerequisites:
This tutorial assumes you are familiar with the general concepts of the Network Canvas software, have read the project overview, and have read the tutorial on using Interviewer.
We recommend following along using your own computer, so you should also download and install Architect
Duration:
2 hours
What is Architect?
Architect is a desktop application which runs on Windows, macOS, and Linux operating systems. The purpose of Architect is to provide a simple means for researchers to build Network Canvas interview protocols, without needing extensive technical knowledge. It aims to provide a visual and intuitive user interface, so that you can focus on the content of your interviews. You don't need to run Architect on the computer that you use to run Interviewer or Fresco, but you can if you wish.
Opening Architect
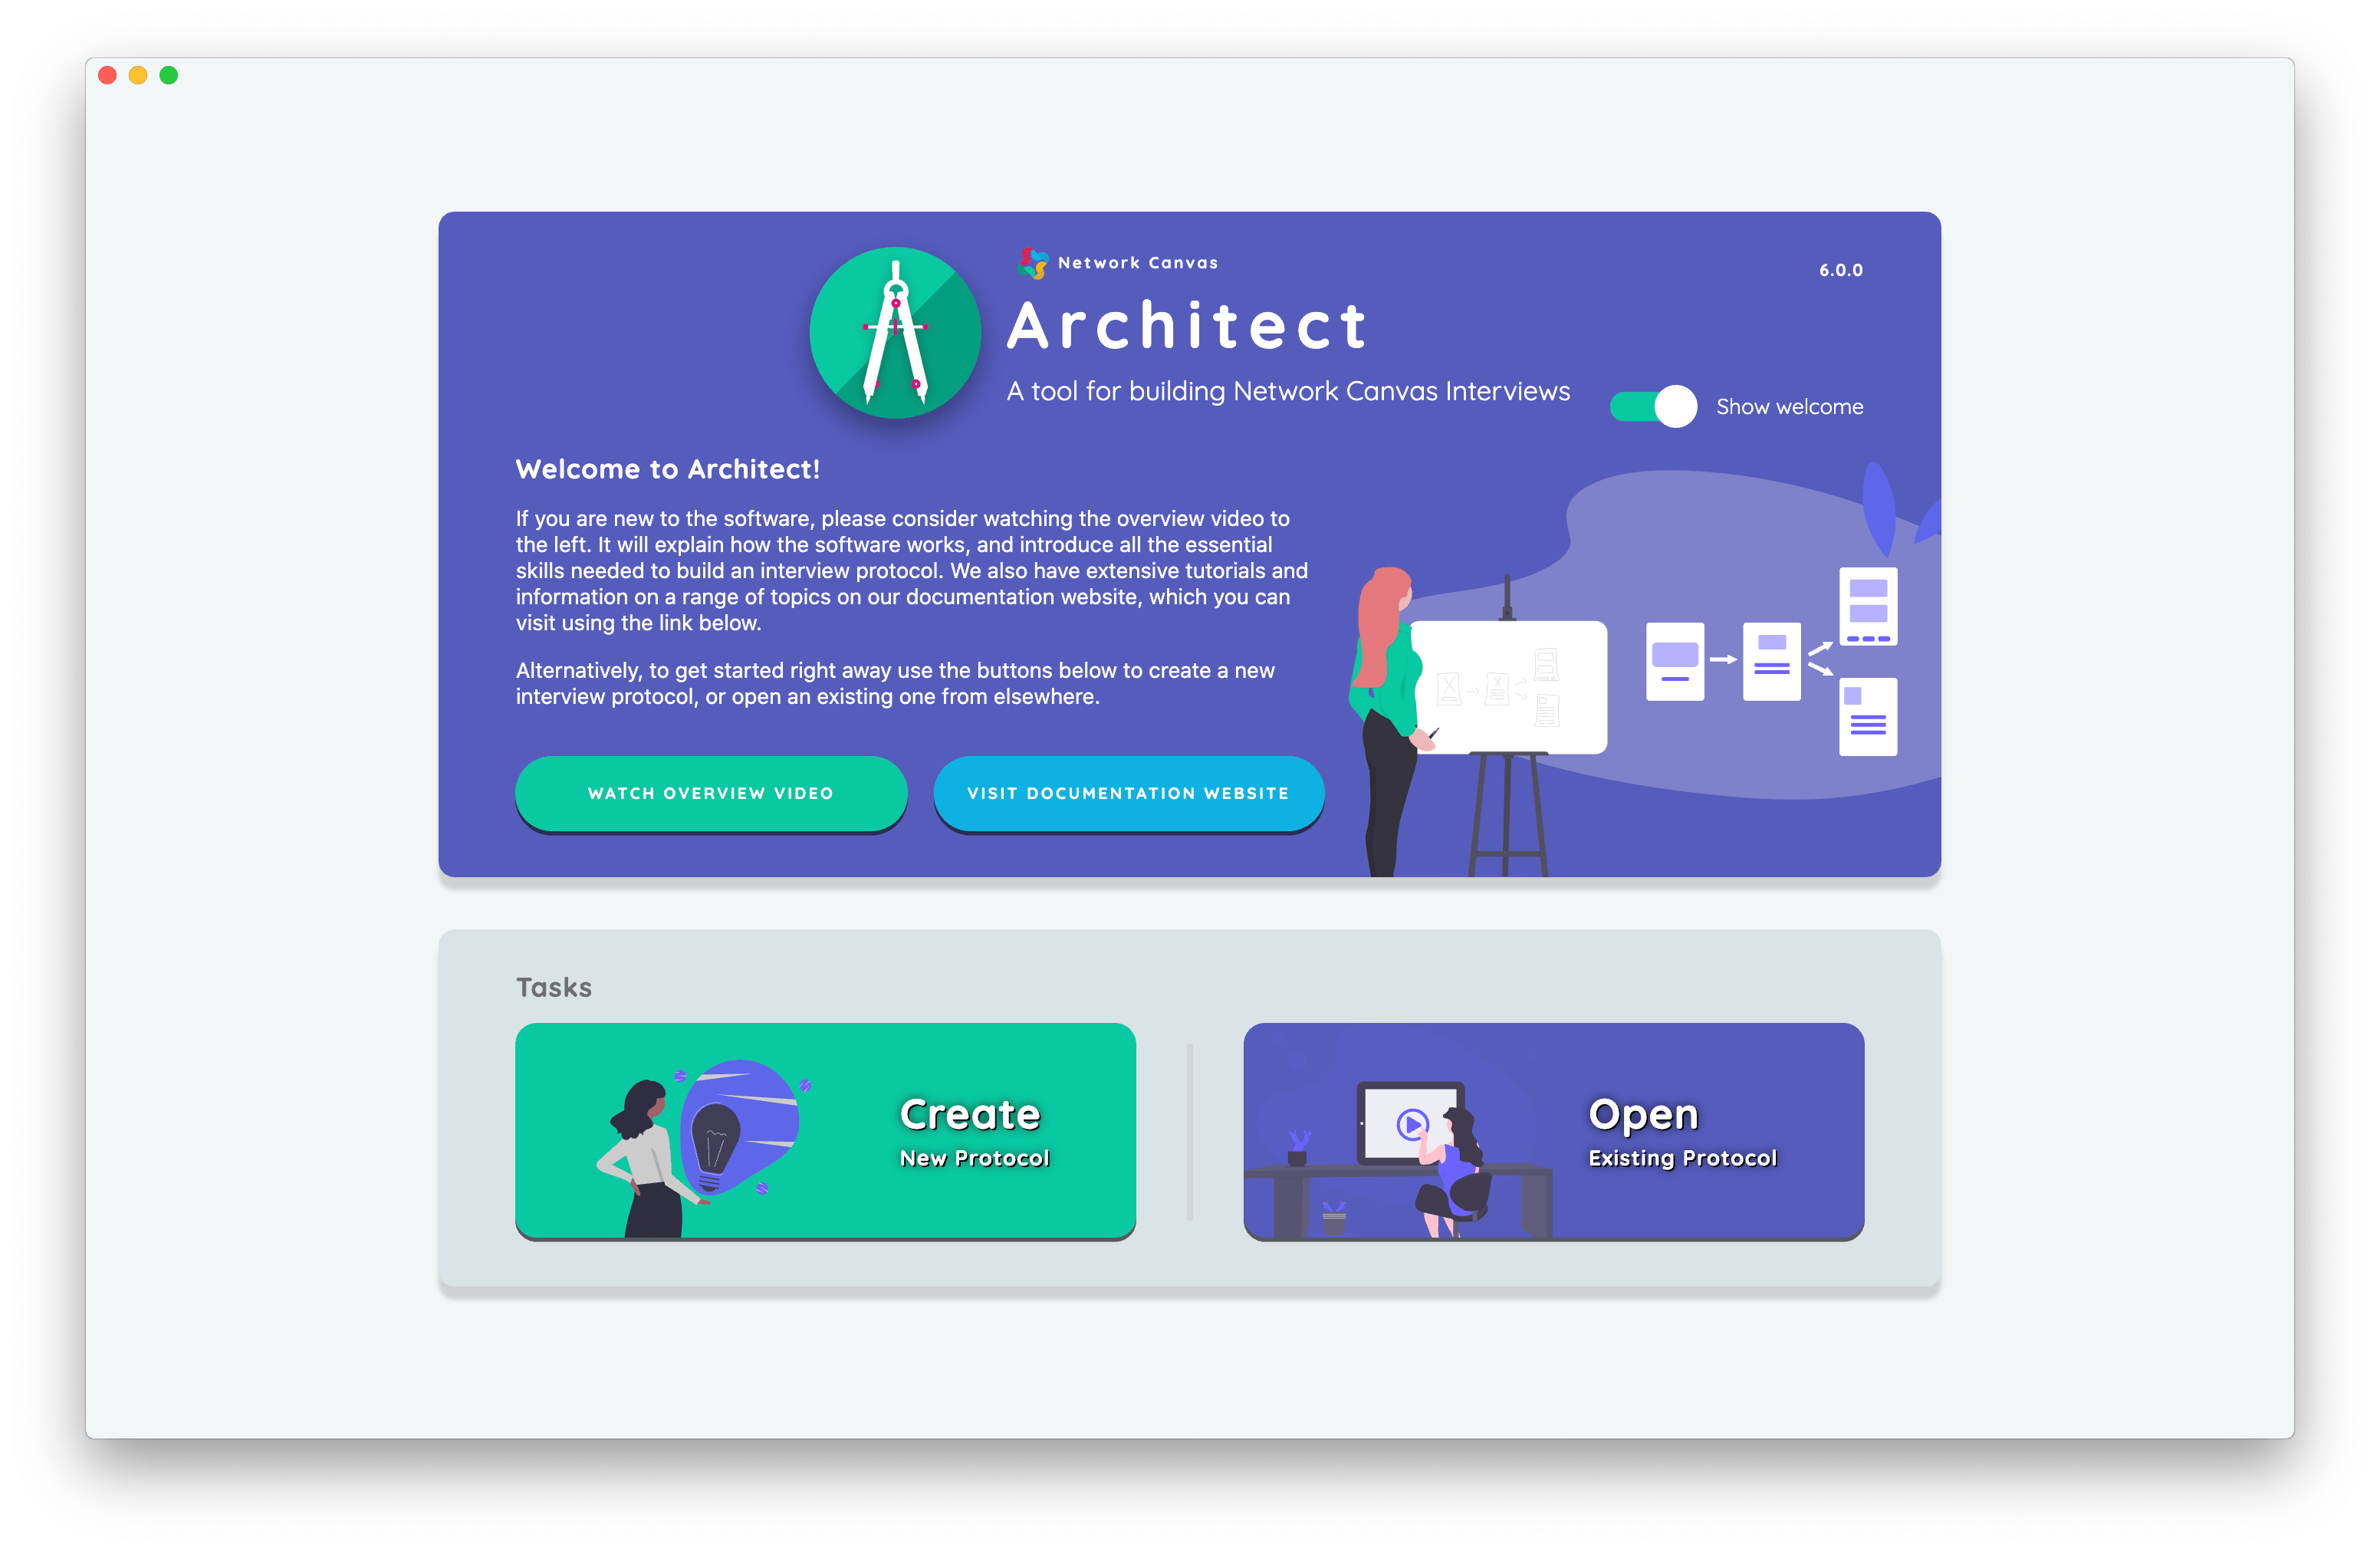
Upon opening Architect, you are greeted by the start screen. Like the start screen in Interviewer, you will see a welcome panel that contains links to the project overview video and the documentation website, with other sections becoming available as needed. When opened for the first time, the Architect start screen presents two task options: (1) create a blank new protocol, or (2) open an existing protocol from your computer.
In this tutorial we will be building a protocol from scratch, so we are going to start by creating a blank protocol. Click the "Create New Protocol" button within the tasks panel. Save the file with a name and location that you will be able to find later.
The protocol overview screen
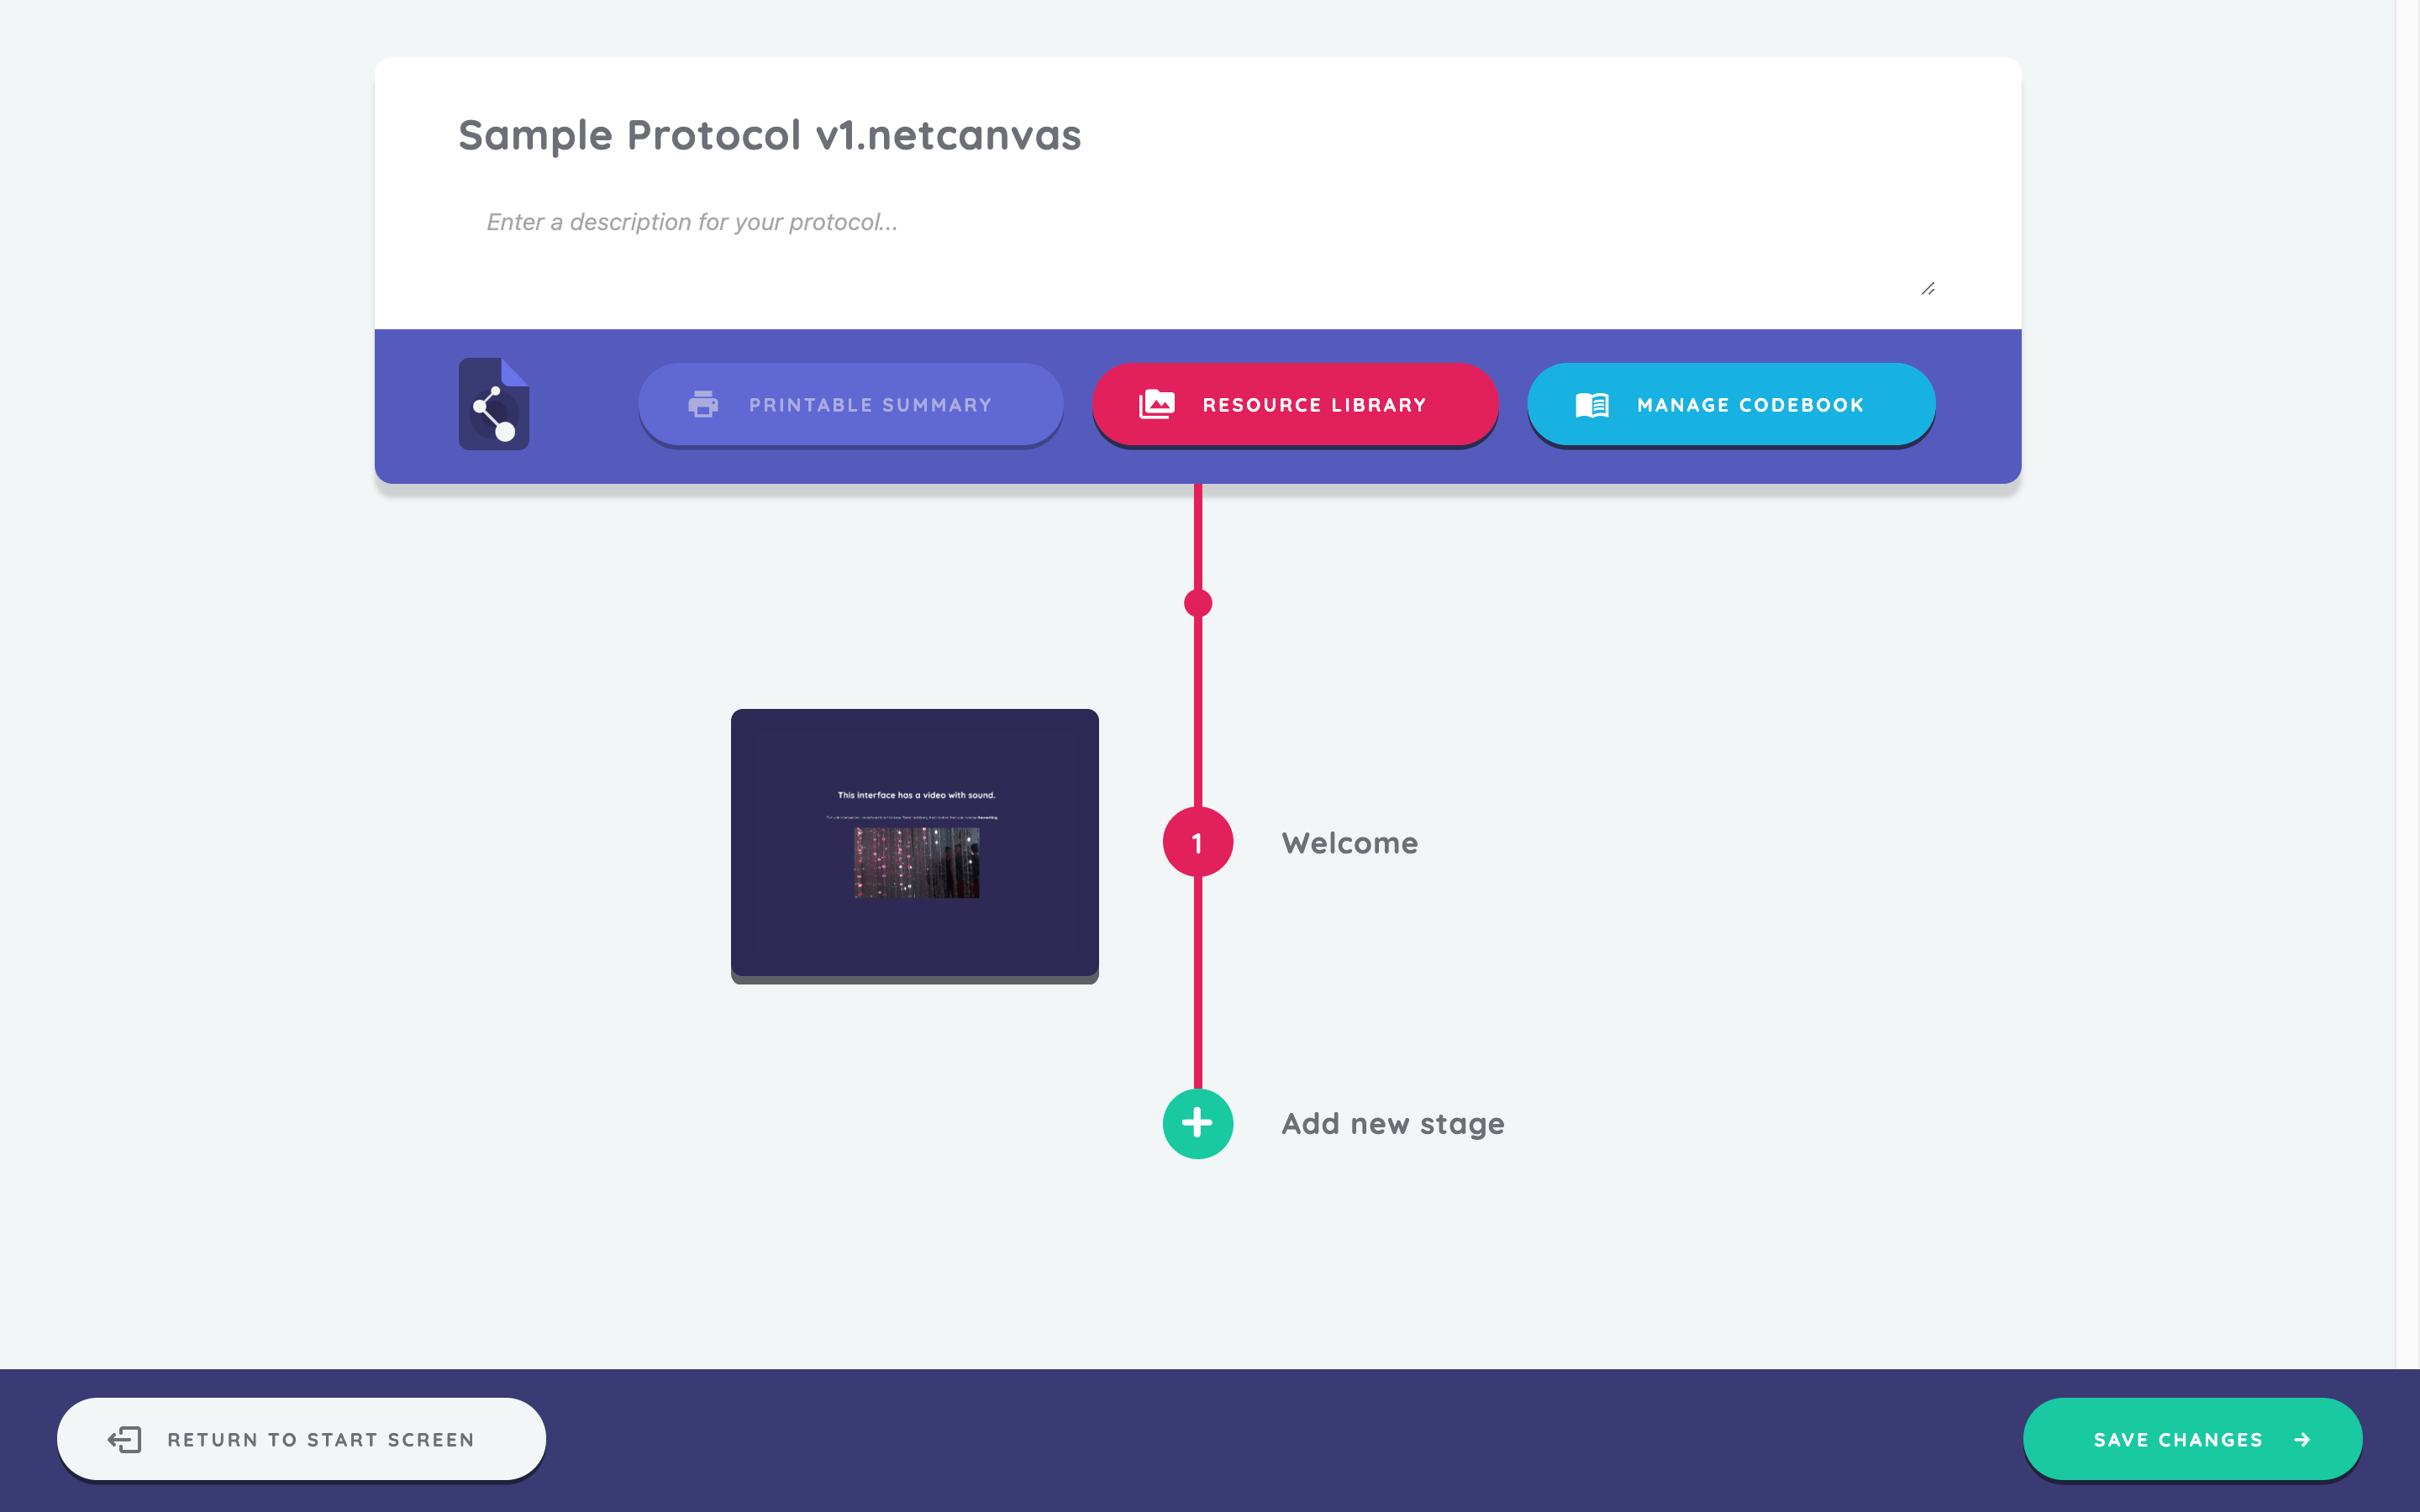
Once you have created or opened a protocol, you will be taken to the protocol overview screen. This screen is designed around the vertical "timeline" metaphor also used by Interviewer. It visually represents the stages of your interview in the sequence that your participants will see them.
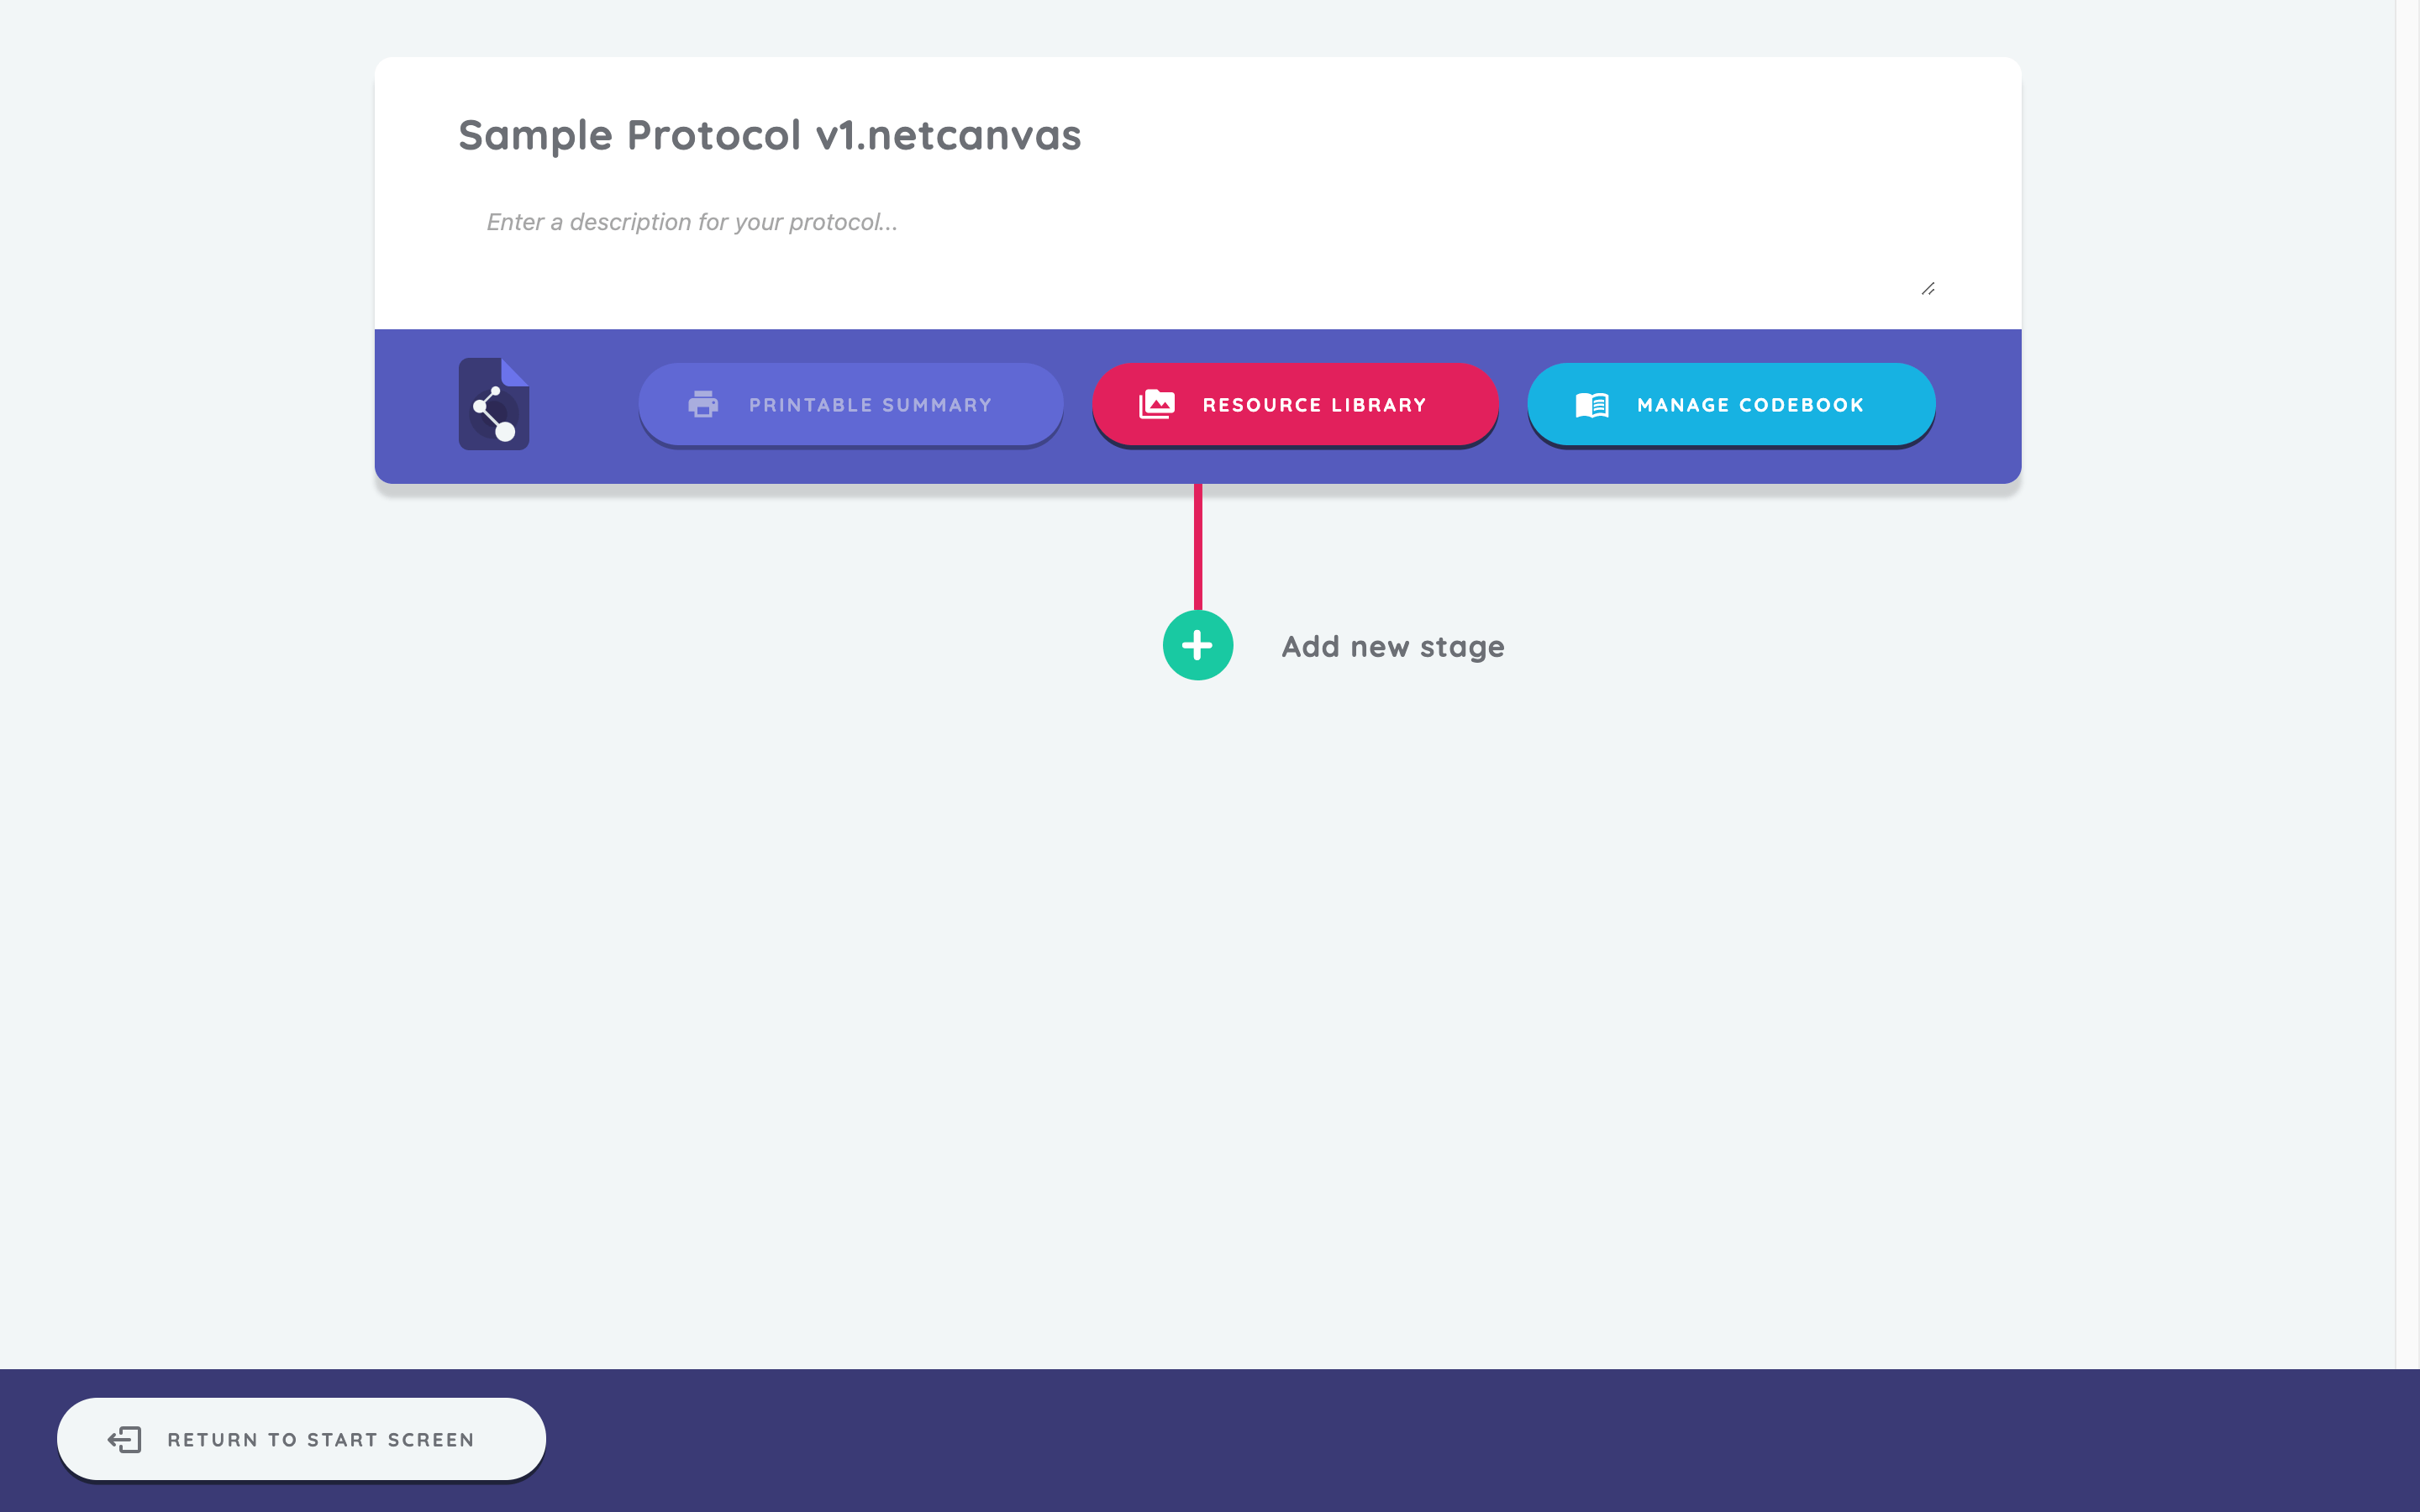
The protocol card at the top displays the protocol name and description, and provides three buttons: download printable codebook, access resource library, and manage codebook. This card appears when you import the protocol into Interviewer. The protocol description is optional and will appear in the Interviewer app on the start screen.
In Fresco, the protocol name will be displayed on the protocols page. For more information about protocol management in Fresco, see the using Fresco tutorial.
In the bottom left, you can see the "Return to Start Screen" button. Clicking this button will take you out of the current protocol, and back to the start screen.
Since we have just created a new protocol, we have a single button at the bottom of the screen, which enables us to add our first stage.
Adding a stage
You will begin by configuring an Information interface.
Click the add new stage button. A screen appears showing a menu of all available Interfaces within the app. Interfaces are grouped together by type, with the example below showing all available name generators.
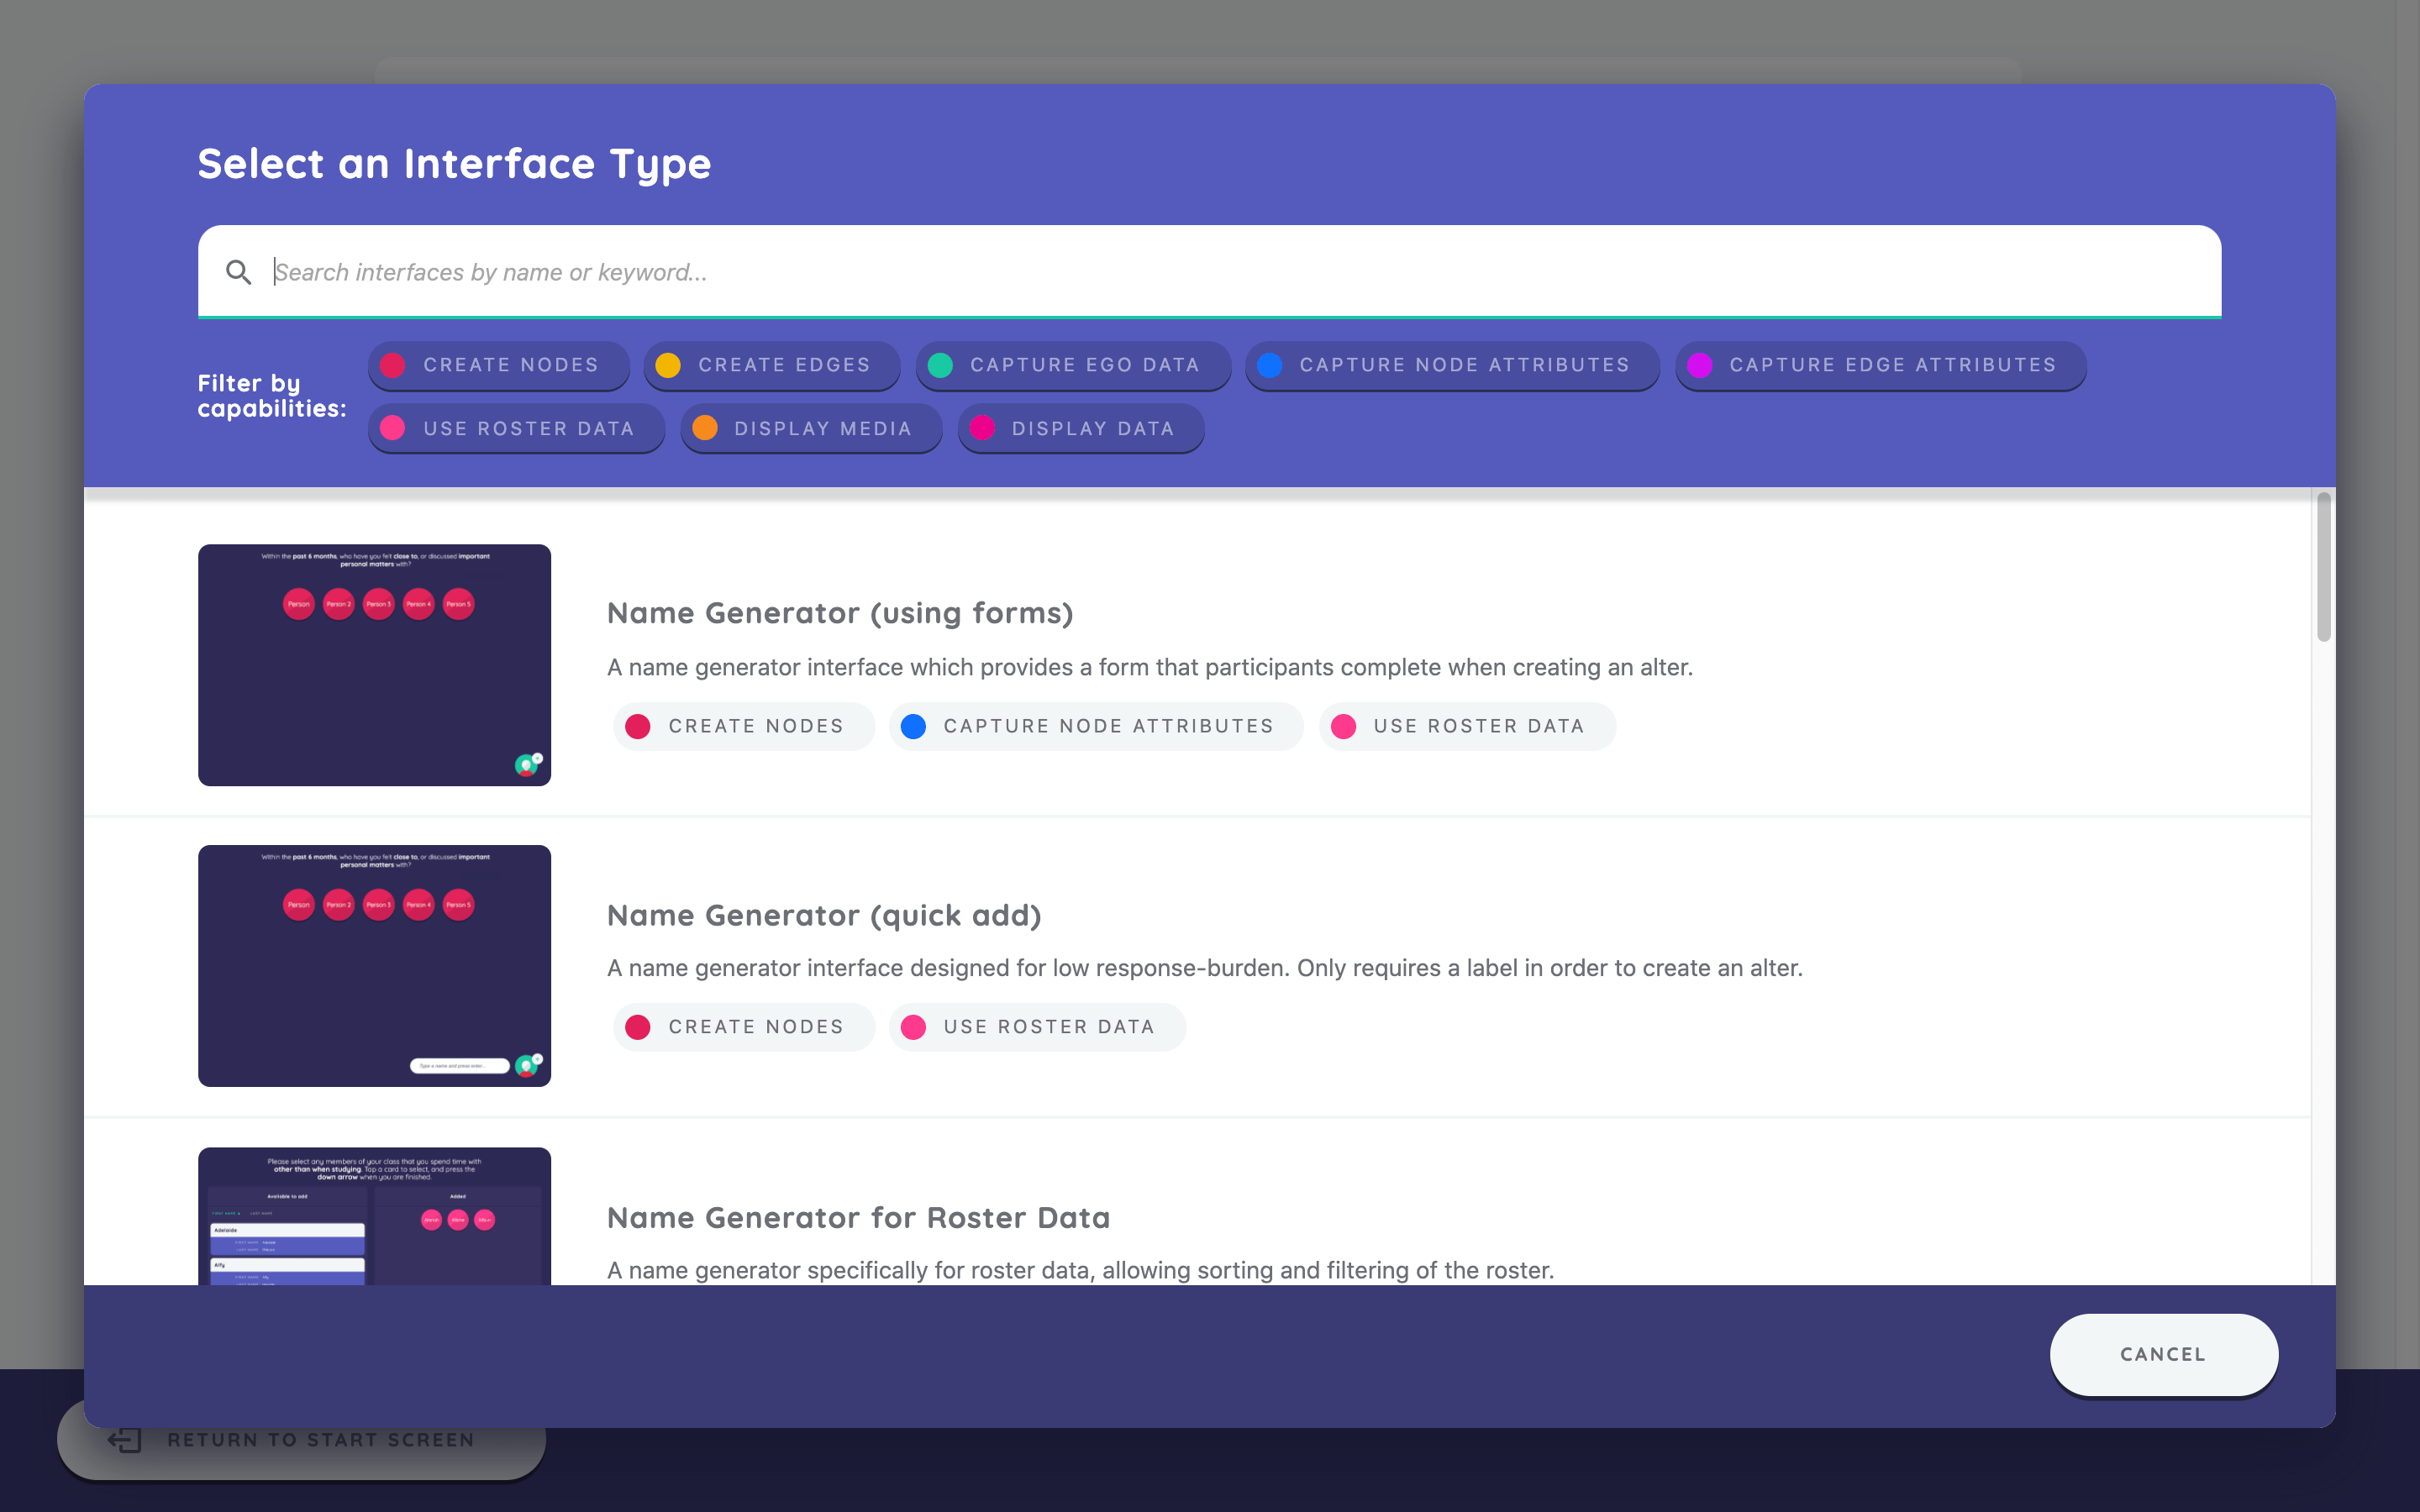
Each Interface is designed for a specific task within a network interview. For now, scroll down and select the Information interface from the Utilities section. You can also find the Information interface by searching for it or selecting the Display Data filter.
Selecting an Interface will open the stage editor, which is where the configuration of the Interface takes place.
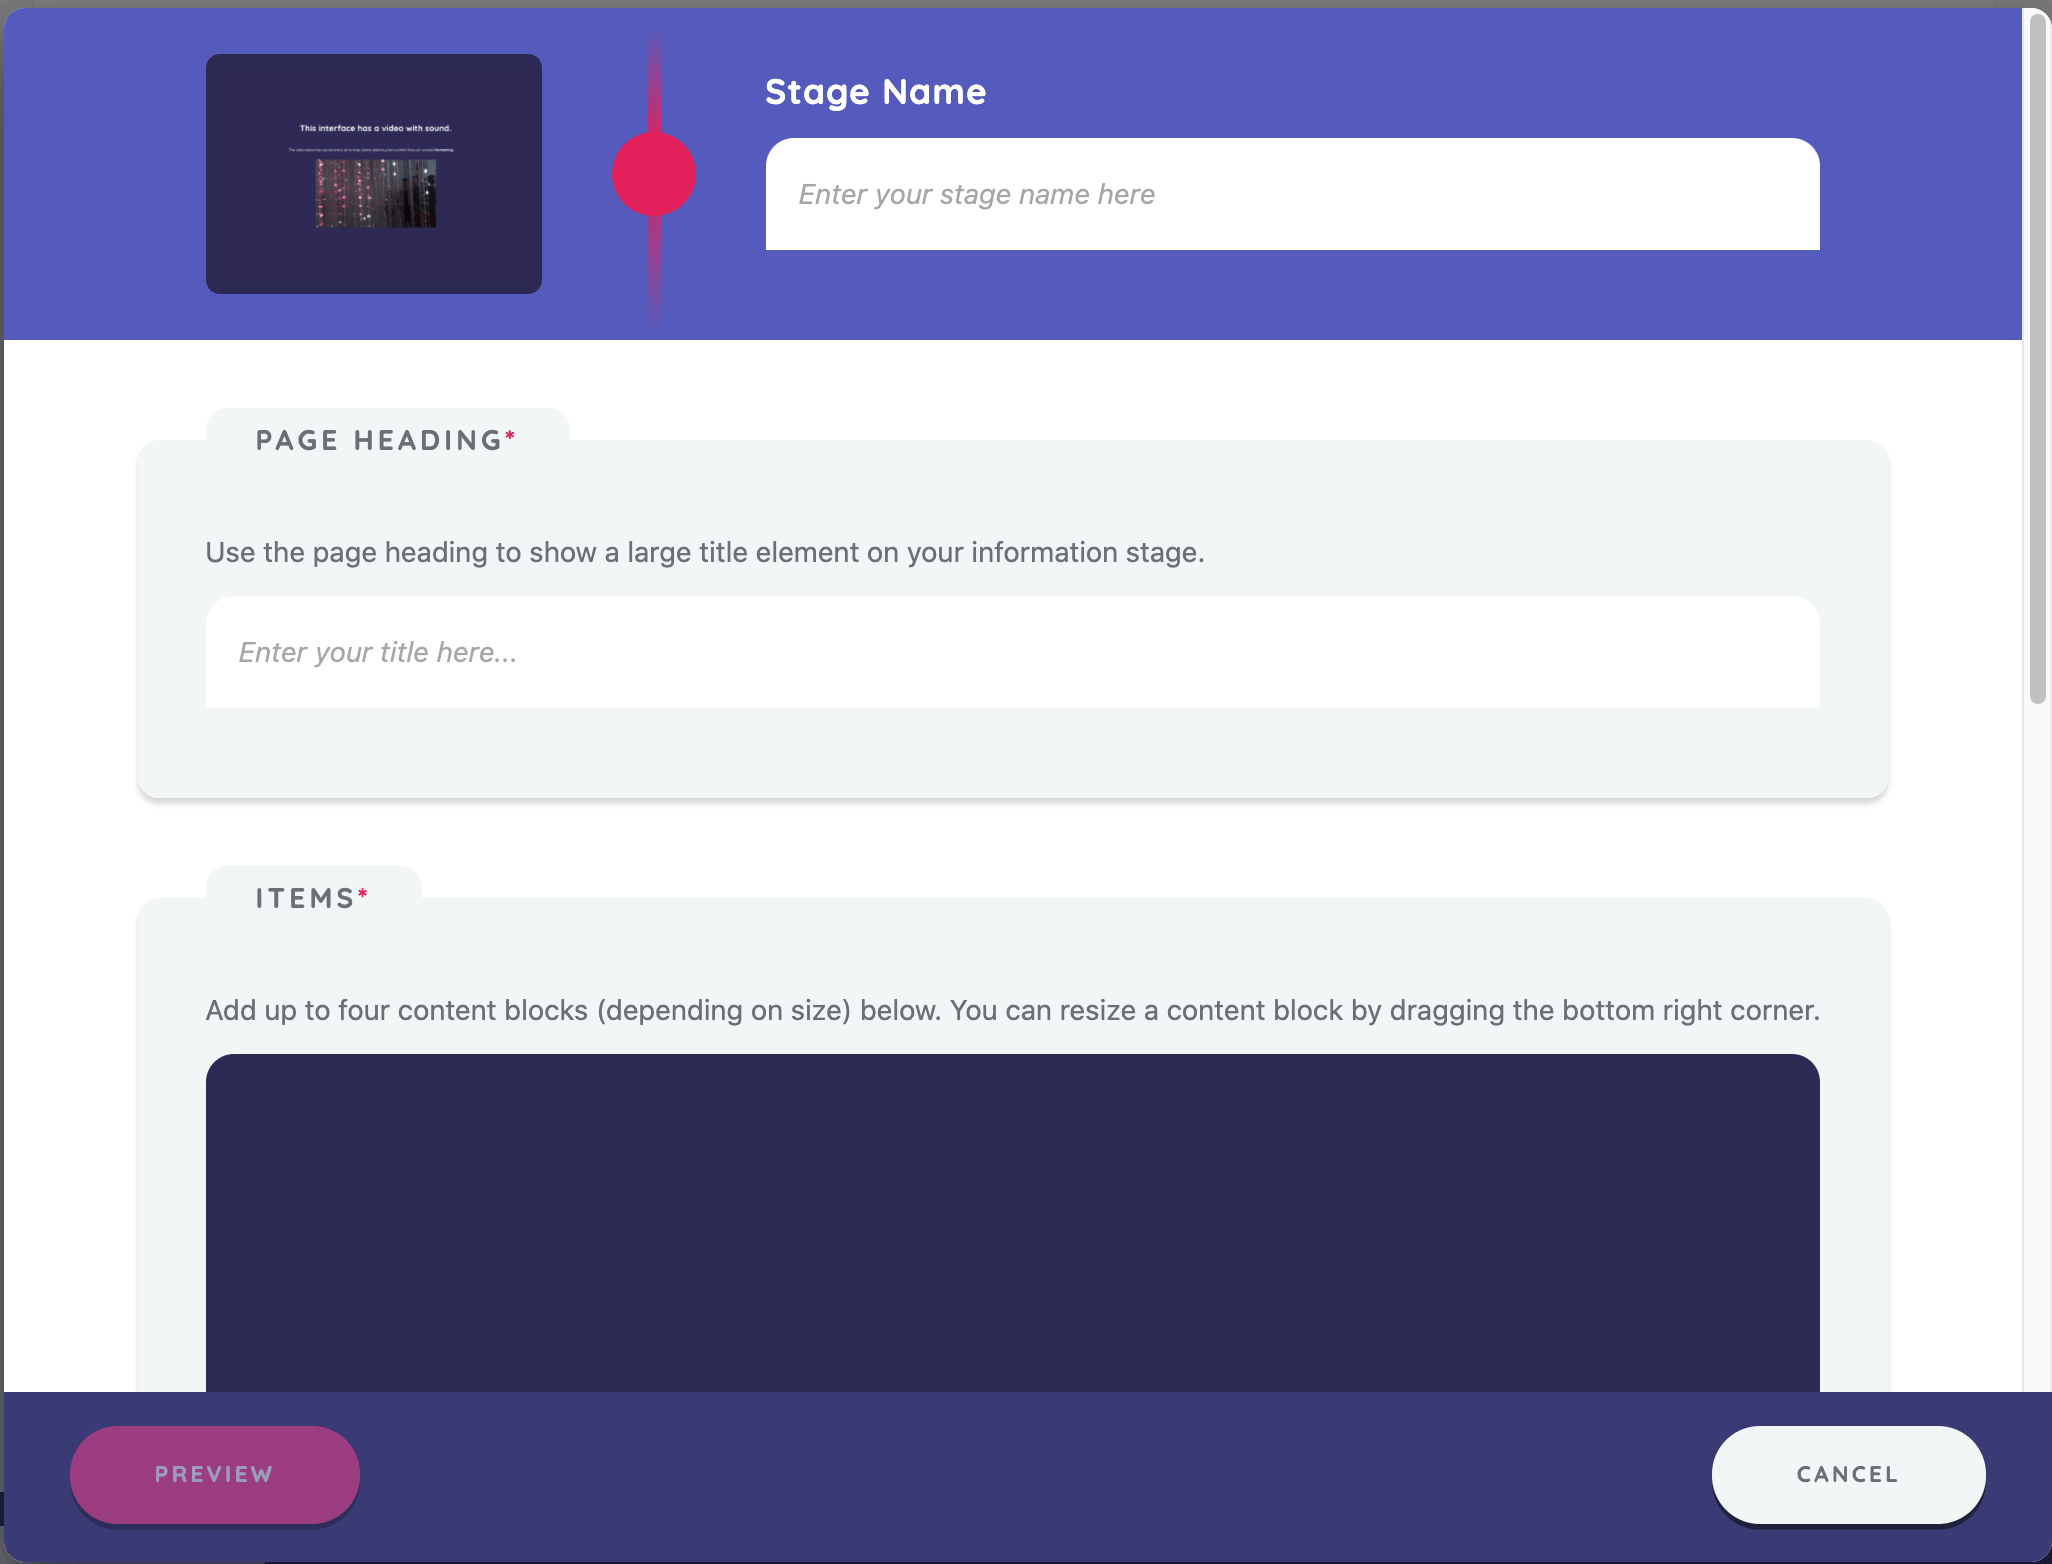
Setting the stage name
All stages have a name, which appears next to the stage icon in the timeline and helps you quickly differentiate between stages of the same type. Enter "Welcome" under Stage Name. When creating your own protocols, use a consistent system for naming your stages.
Page heading
The page heading allows you to customize a large title element that appears at the top of your Information interface. Enter "Welcome to the Sample Protocol" as the heading. Next, add the information you want displayed on the screen.
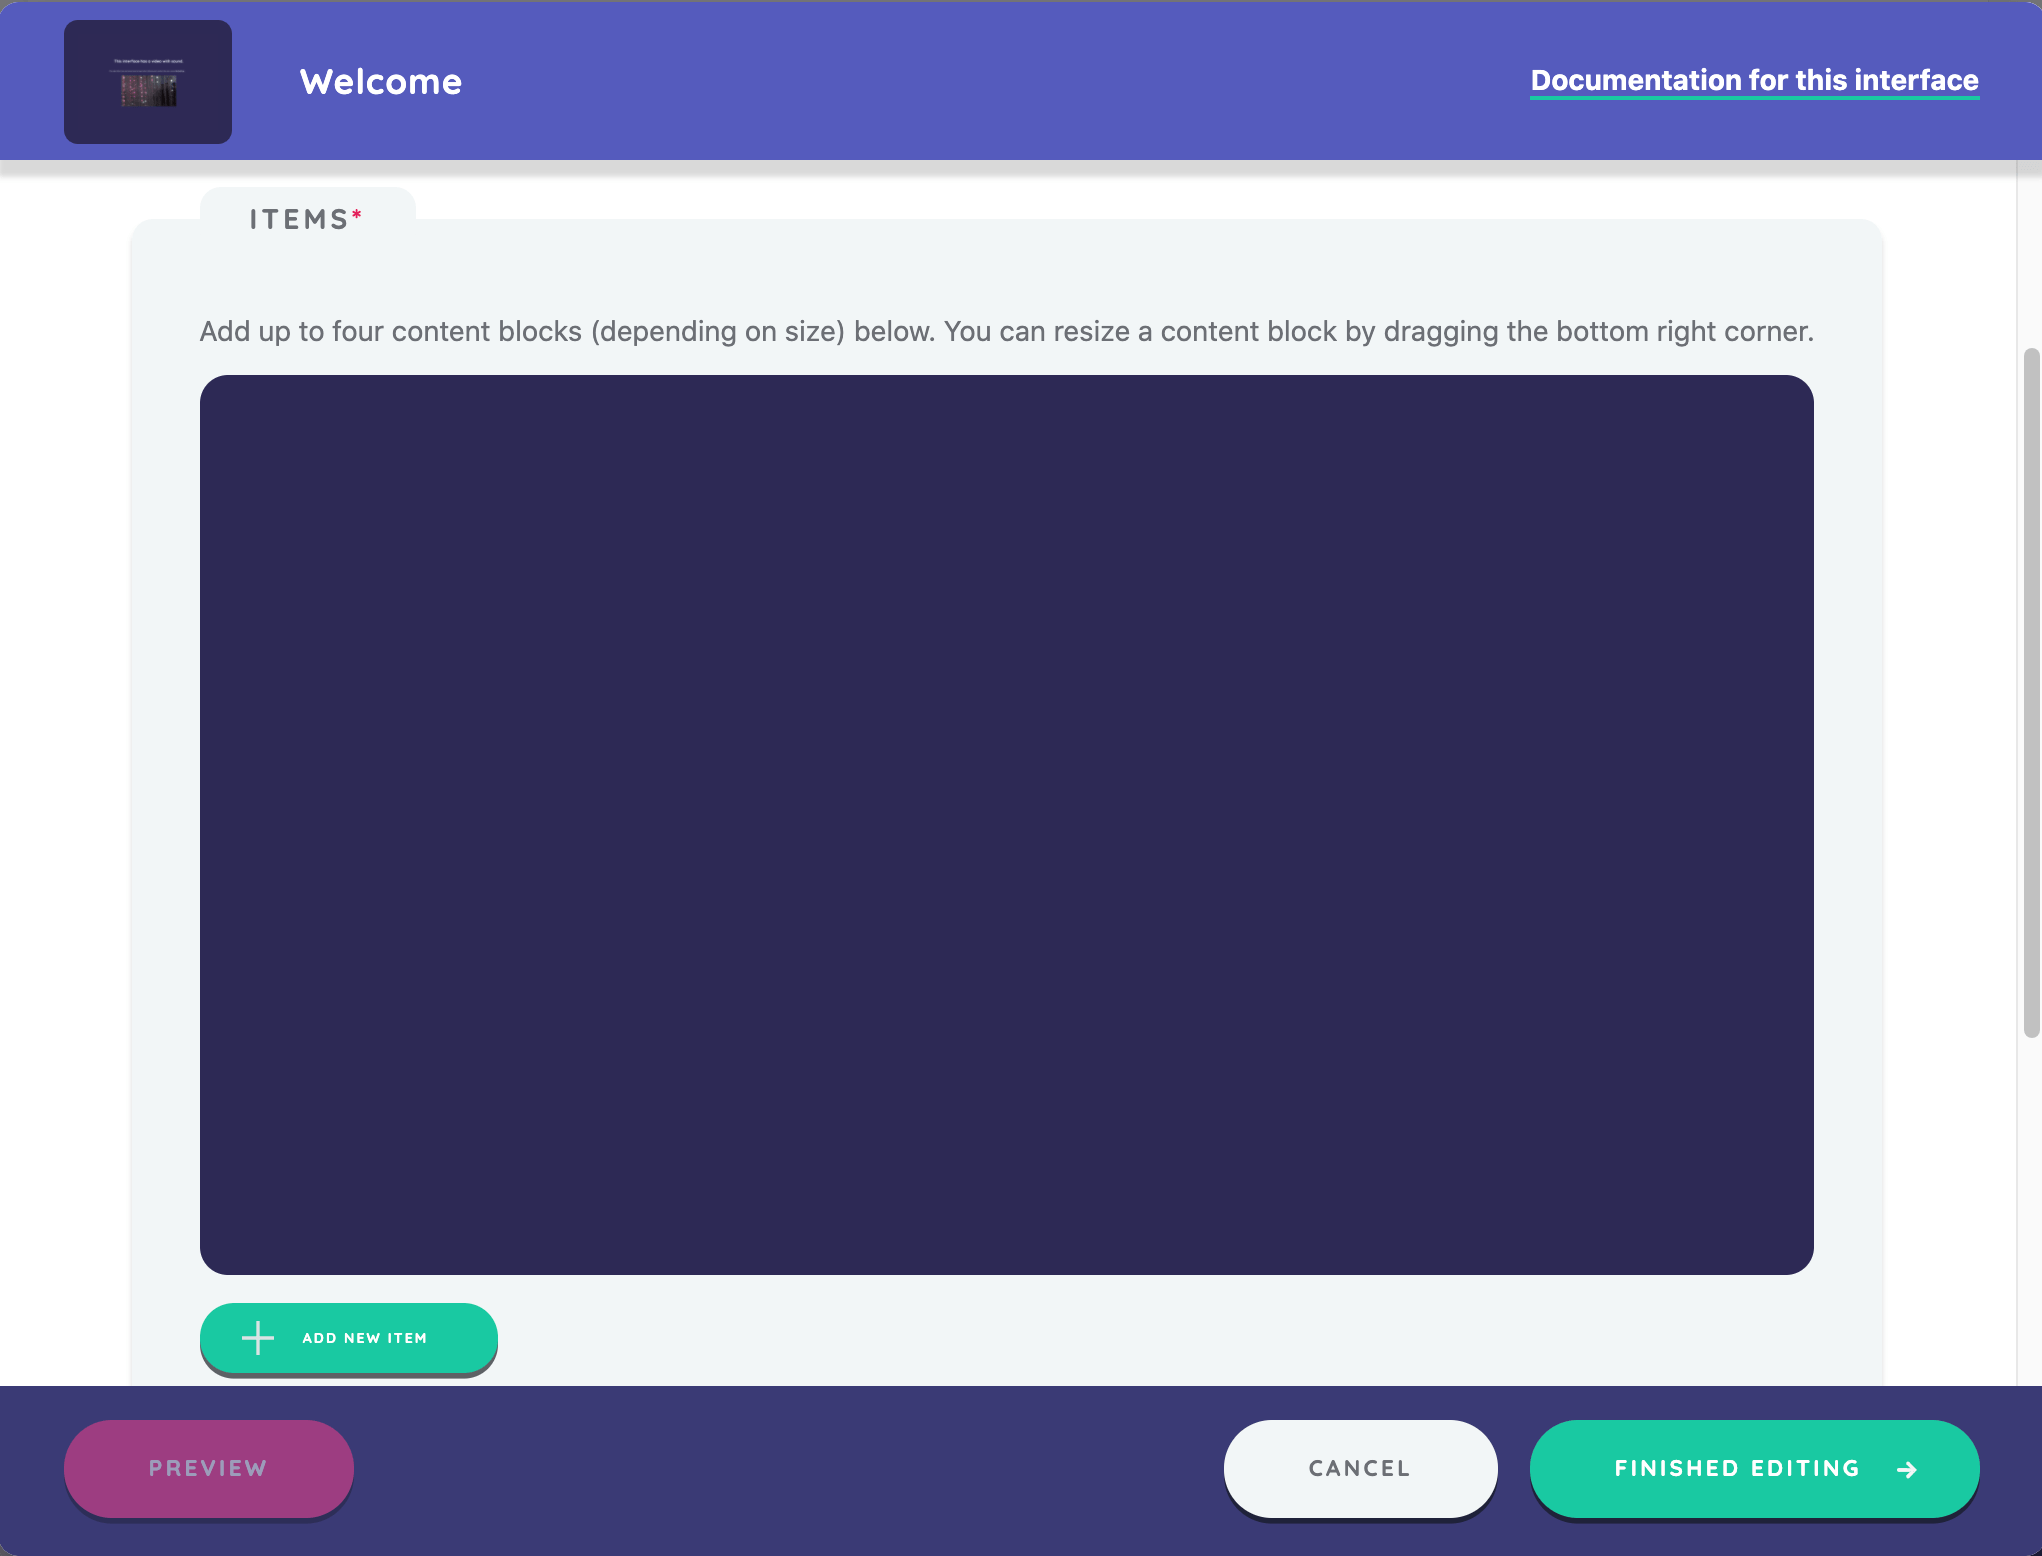
Items
The items panel allows you to add various types of media to the screen. You can add image, video, audio, or text content. Each resource appears in vertical blocks according to the order you add them. You can also reorder content blocks by dragging.
To add a resource to this screen, click the add new item button at the bottom of the panel. A new screen opens where you can choose between the available media types. You can add text content directly in markdown. Add image, audio, and video files by selecting the type and browsing for the file, either from a location on your device or from the resource library.
This tutorial will not cover the configuration of each Information interface included in the sample protocol. You can use Information interfaces as frequently as needed throughout your protocol to describe an upcoming task, orient a participant to a series of prompts, or present participants with a resource to consider.
Once you have added all resources for this stage, click the Save and Return button in the bottom right. This saves your stage and returns you to the timeline view where your newly configured stage is now visible.
Creating name generators
You will now create three separate name generator stages, which appear as stages 4, 6, and 8 in the sample protocol. The first one uses a Quick Add Name Generator, followed by one that utilizes a side panel, and finally a name generator that uses forms.
Name Generator using Quick Add
First, within the timeline view, click the add a stage button. From the interface menu, select the Name Generator (using Quick Add) interface. When the new stage opens, define a stage name as you did for the previous stage.
Creating a new node type
Before you can continue, you must tell Architect which type of node this interface will create. Since this is your first name generator, you have no node types defined yet. Click the Create New Node Type button to begin the process of creating one.
Your name generator will ask about people, so name the node type "Person". You can select a color to differentiate this node type from others, though in this case leave the default coral color selected.
Finally, select the person icon to use for this node type. This icon appears in Interviewer wherever the participant has the opportunity to create a new node of this type.
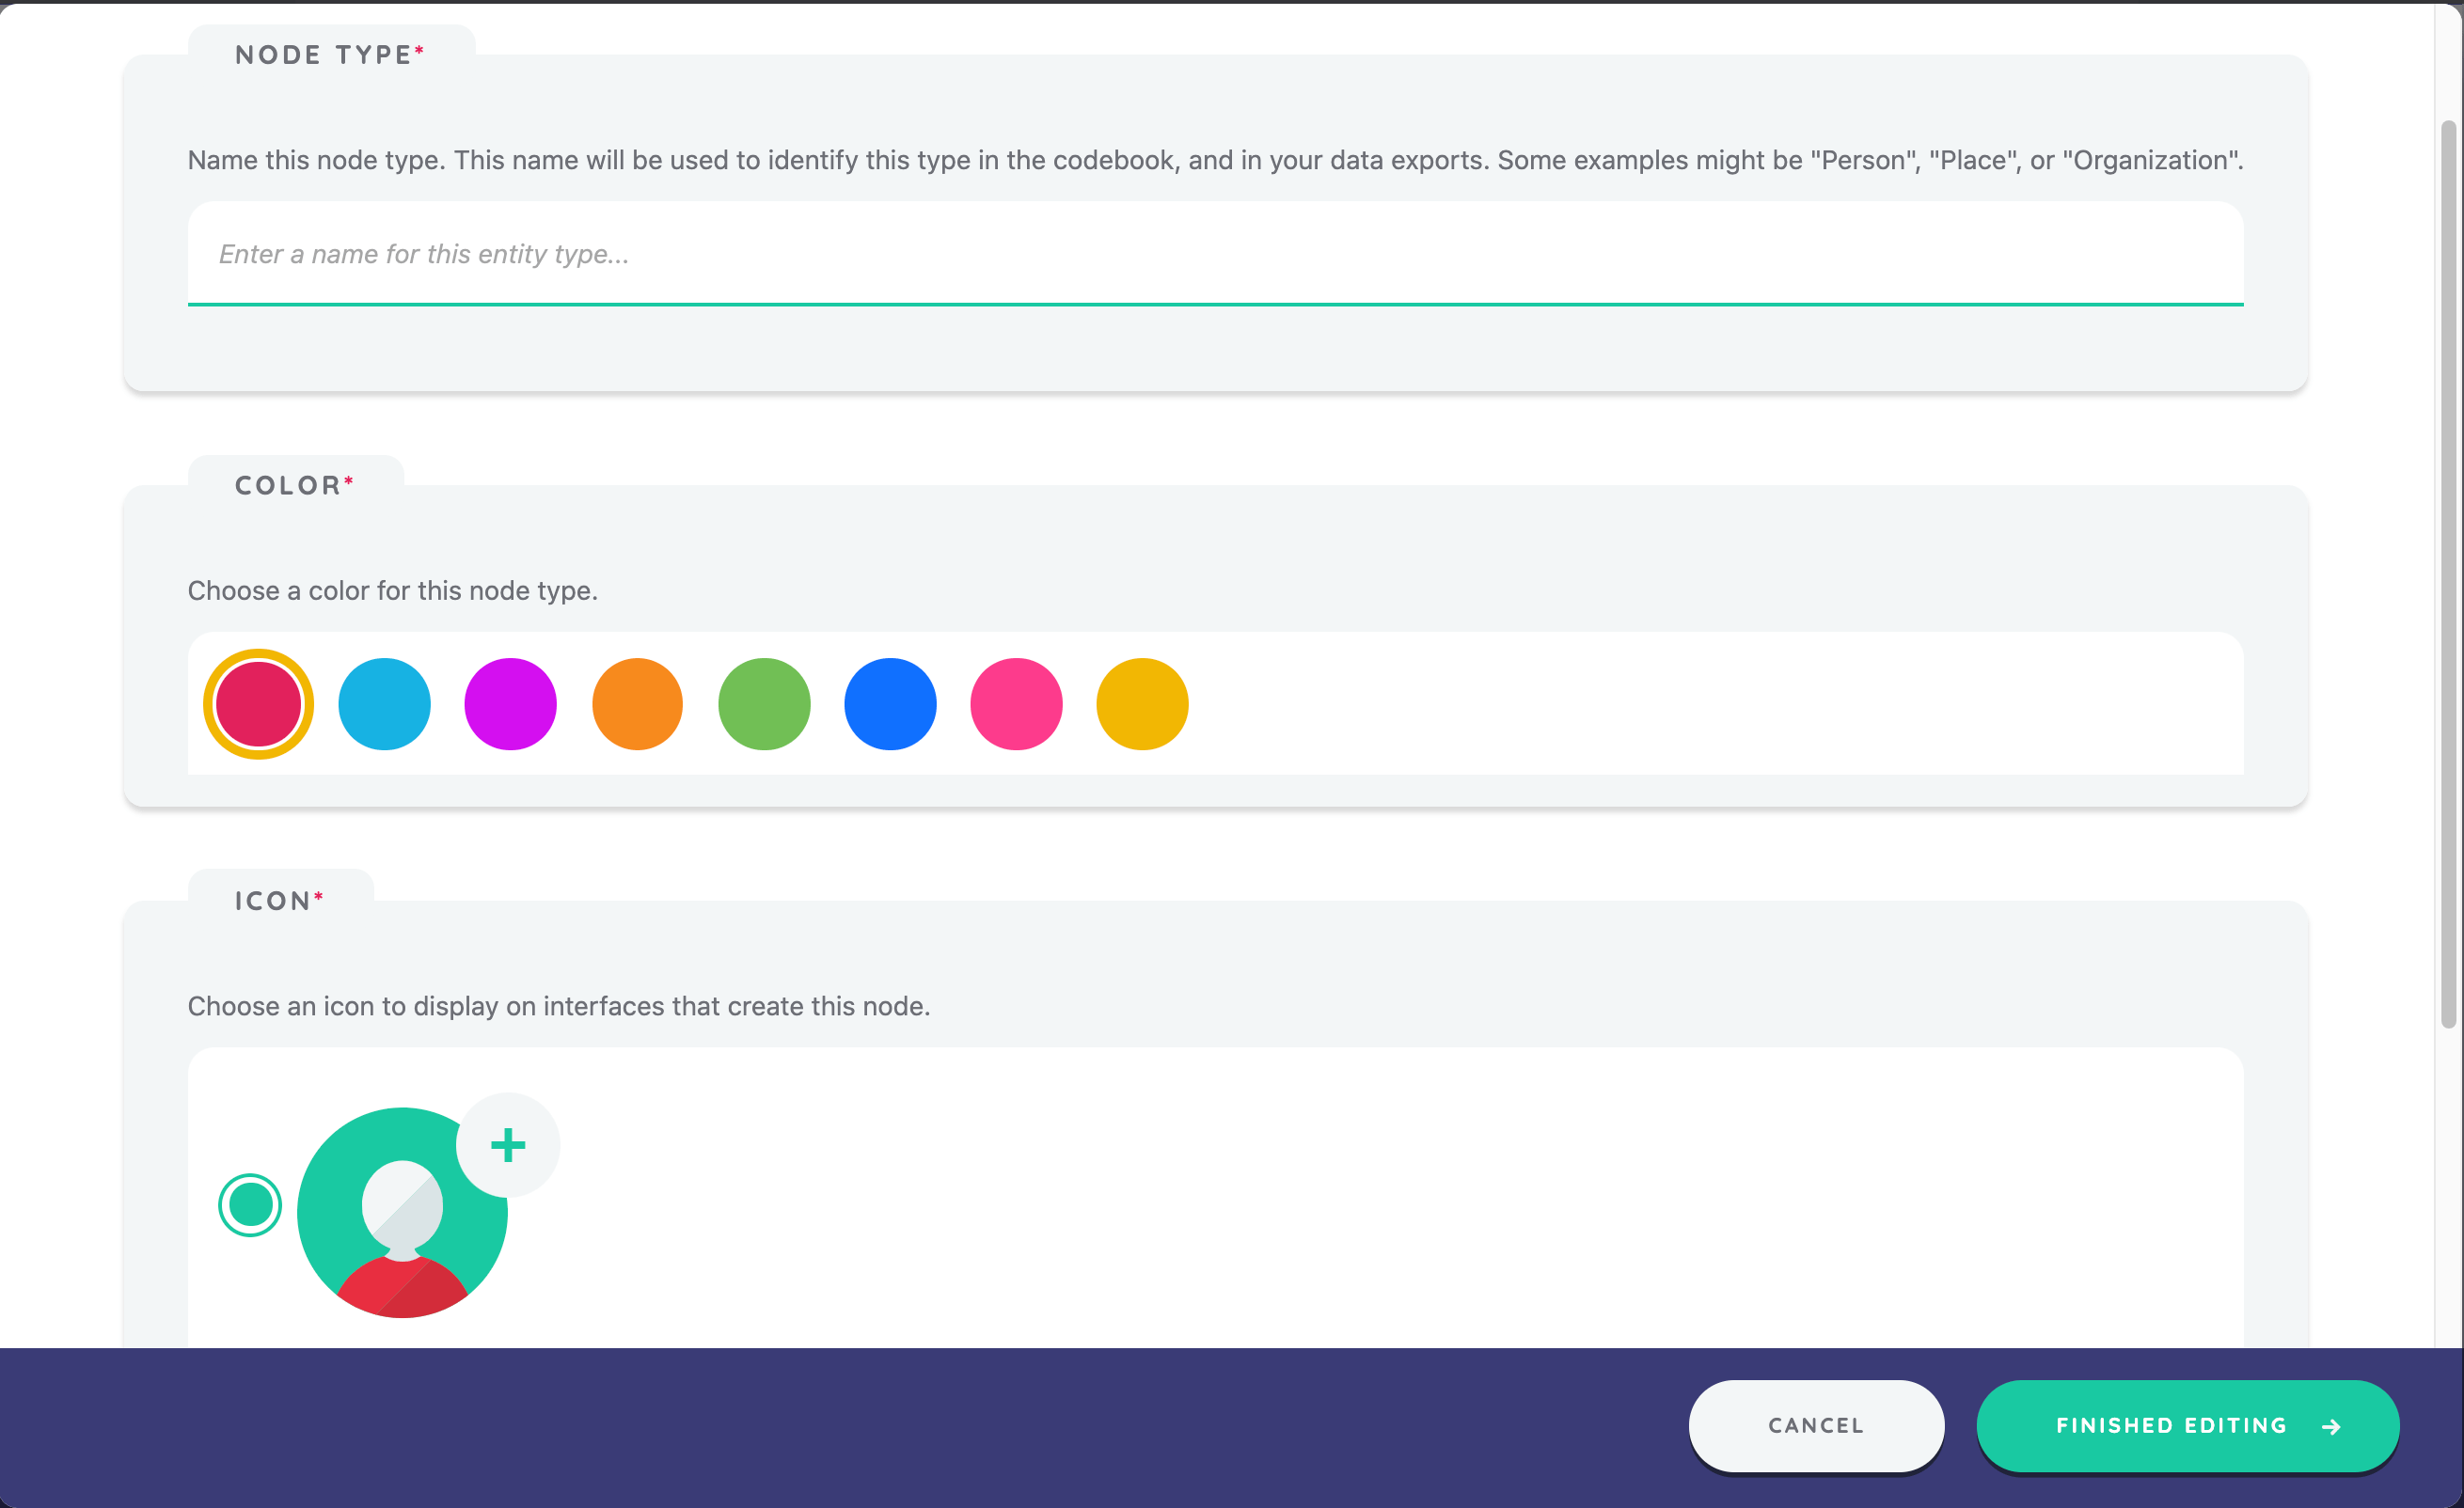
Click Save and Return to create the node type and return to the name generator edit screen.
Creating a Quick Add variable
Next, create a Quick Add variable that will store data entered for each alter nominated by the participant. Unless you have a good reason not to, this variable should be called "name". Interviewer will use this variable as the label for every node created on this stage. To create a new variable, select the dropdown menu and click create new, then type the name of your variable (e.g., "name"). Click the Create button and you will see the new variable name selected as the Quick Add variable.
Creating prompts
Next, provide some questions to prompt the participant to add alters within the interview.
Most stages use the concept of "prompts" to allow you to define questions for the participant during the interview. You can explain the task to the participant in ways that are meaningful to your study.
You can have multiple prompts on a single stage or a single prompt per stage. Consider grouping prompts by theme and creating one stage for each theme. For example, a "Name Generator (family)" stage could contain prompts about family alters, and a "Name Generator (colleagues)" stage could contain prompts about professional alters.
Click the Create New button in the prompt section to open the new prompt edit form.
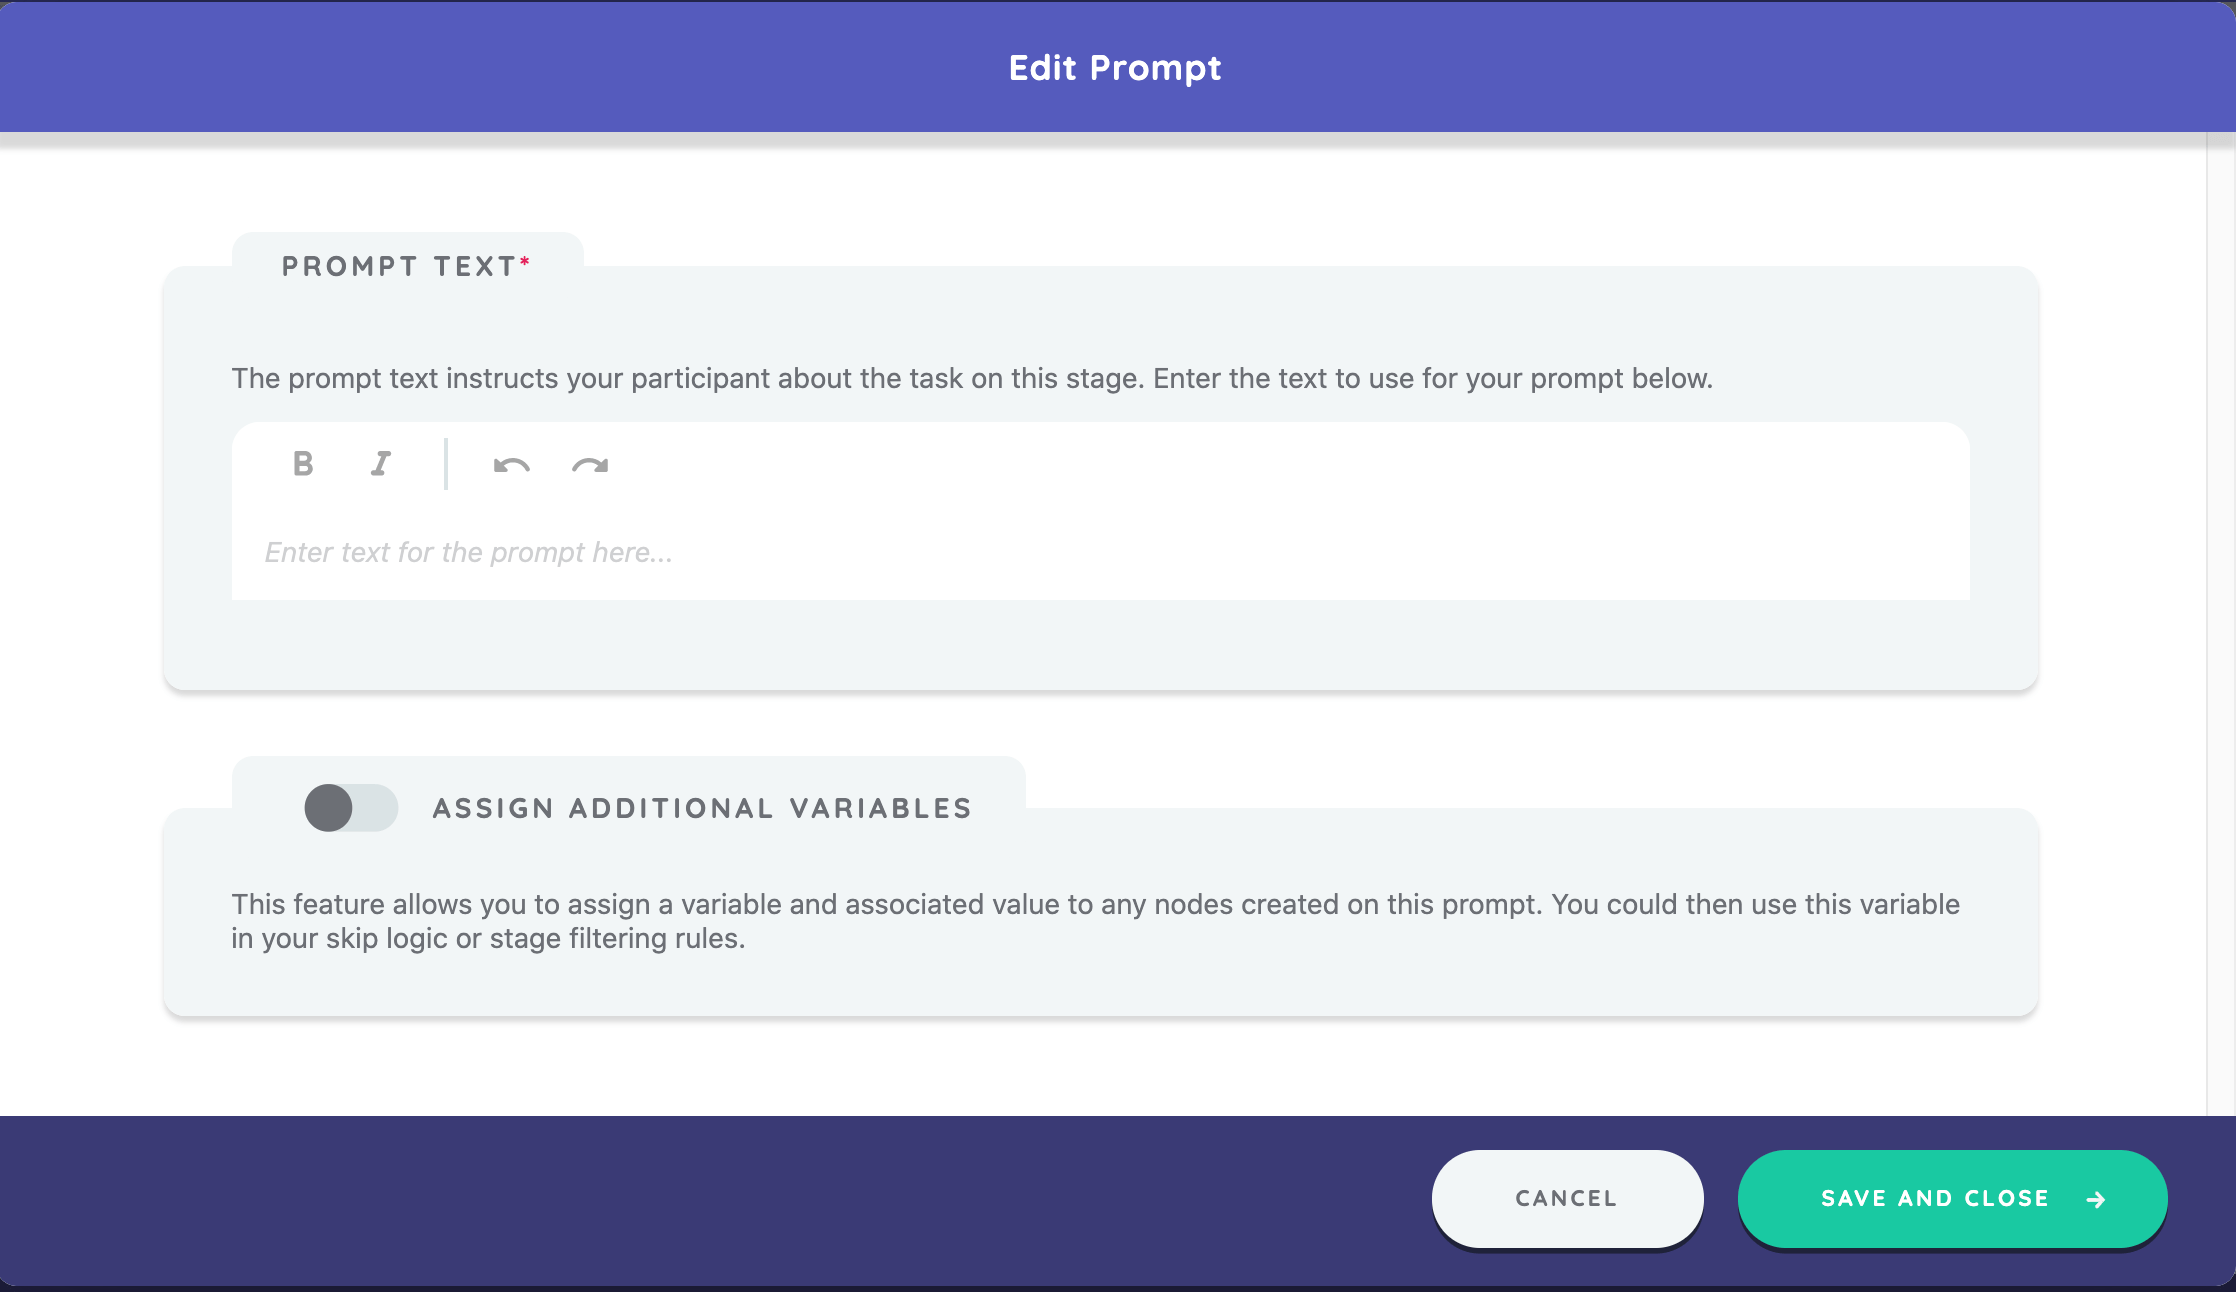
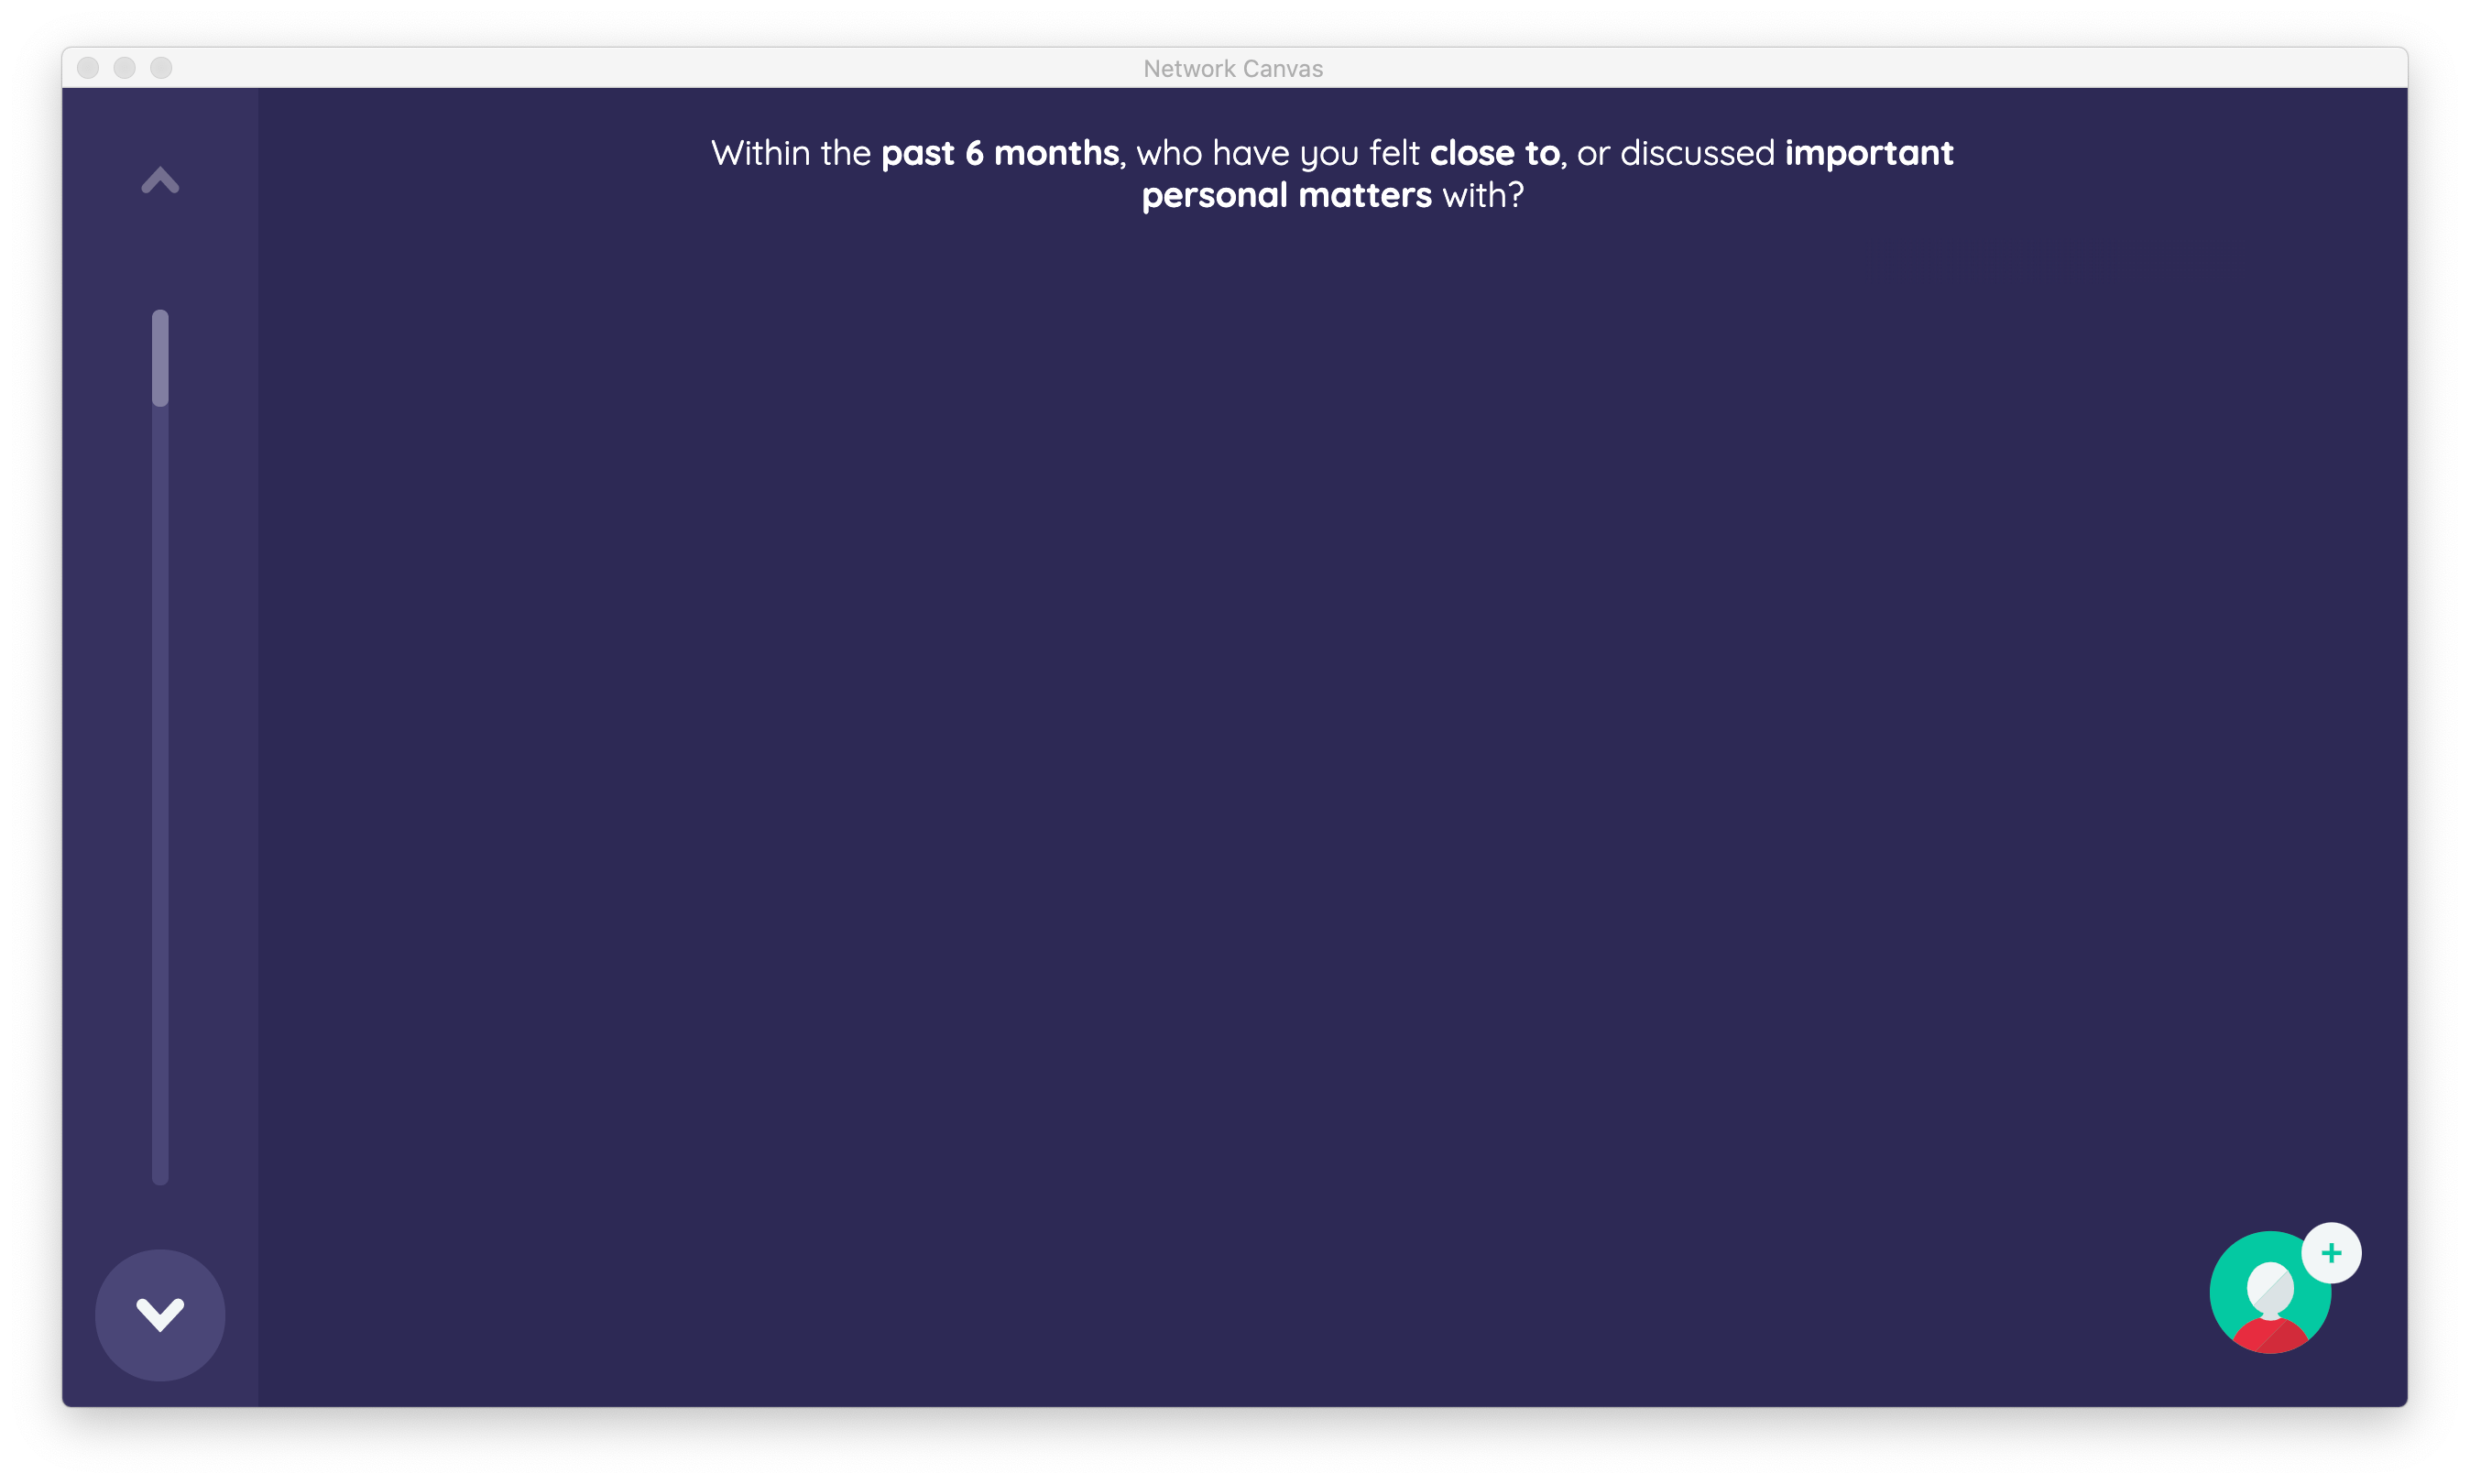
Your first prompt will ask the participant to name the people with whom they have felt close to or discussed important matters. Enter the text "Within the past 6 months, who have you felt close to, or discussed important personal matters with?" and click Save and Close.
Preview mode
You can now see what your stage will look like in the finished interview by using the preview feature.
Click the Preview button to open a window with the current stage loaded, showing the interface functioning as it will in Interviewer on a study device.
Click the pink Preview button in the bottom left corner of the stage editor to open the preview window.
Click Save and Return on the stage editor to return to the timeline view with your new stage visible.
Quick Add with a side panel
Next, configure another Name Generator (using Quick Add) interface, but this time include a side panel.
First, create a stage name, select the person node type (which you previously created), assign the Quick Add variable of "name", and create a new prompt. The prompt for this stage will be "Within the past 6 months, who have you discussed social networks research with?"
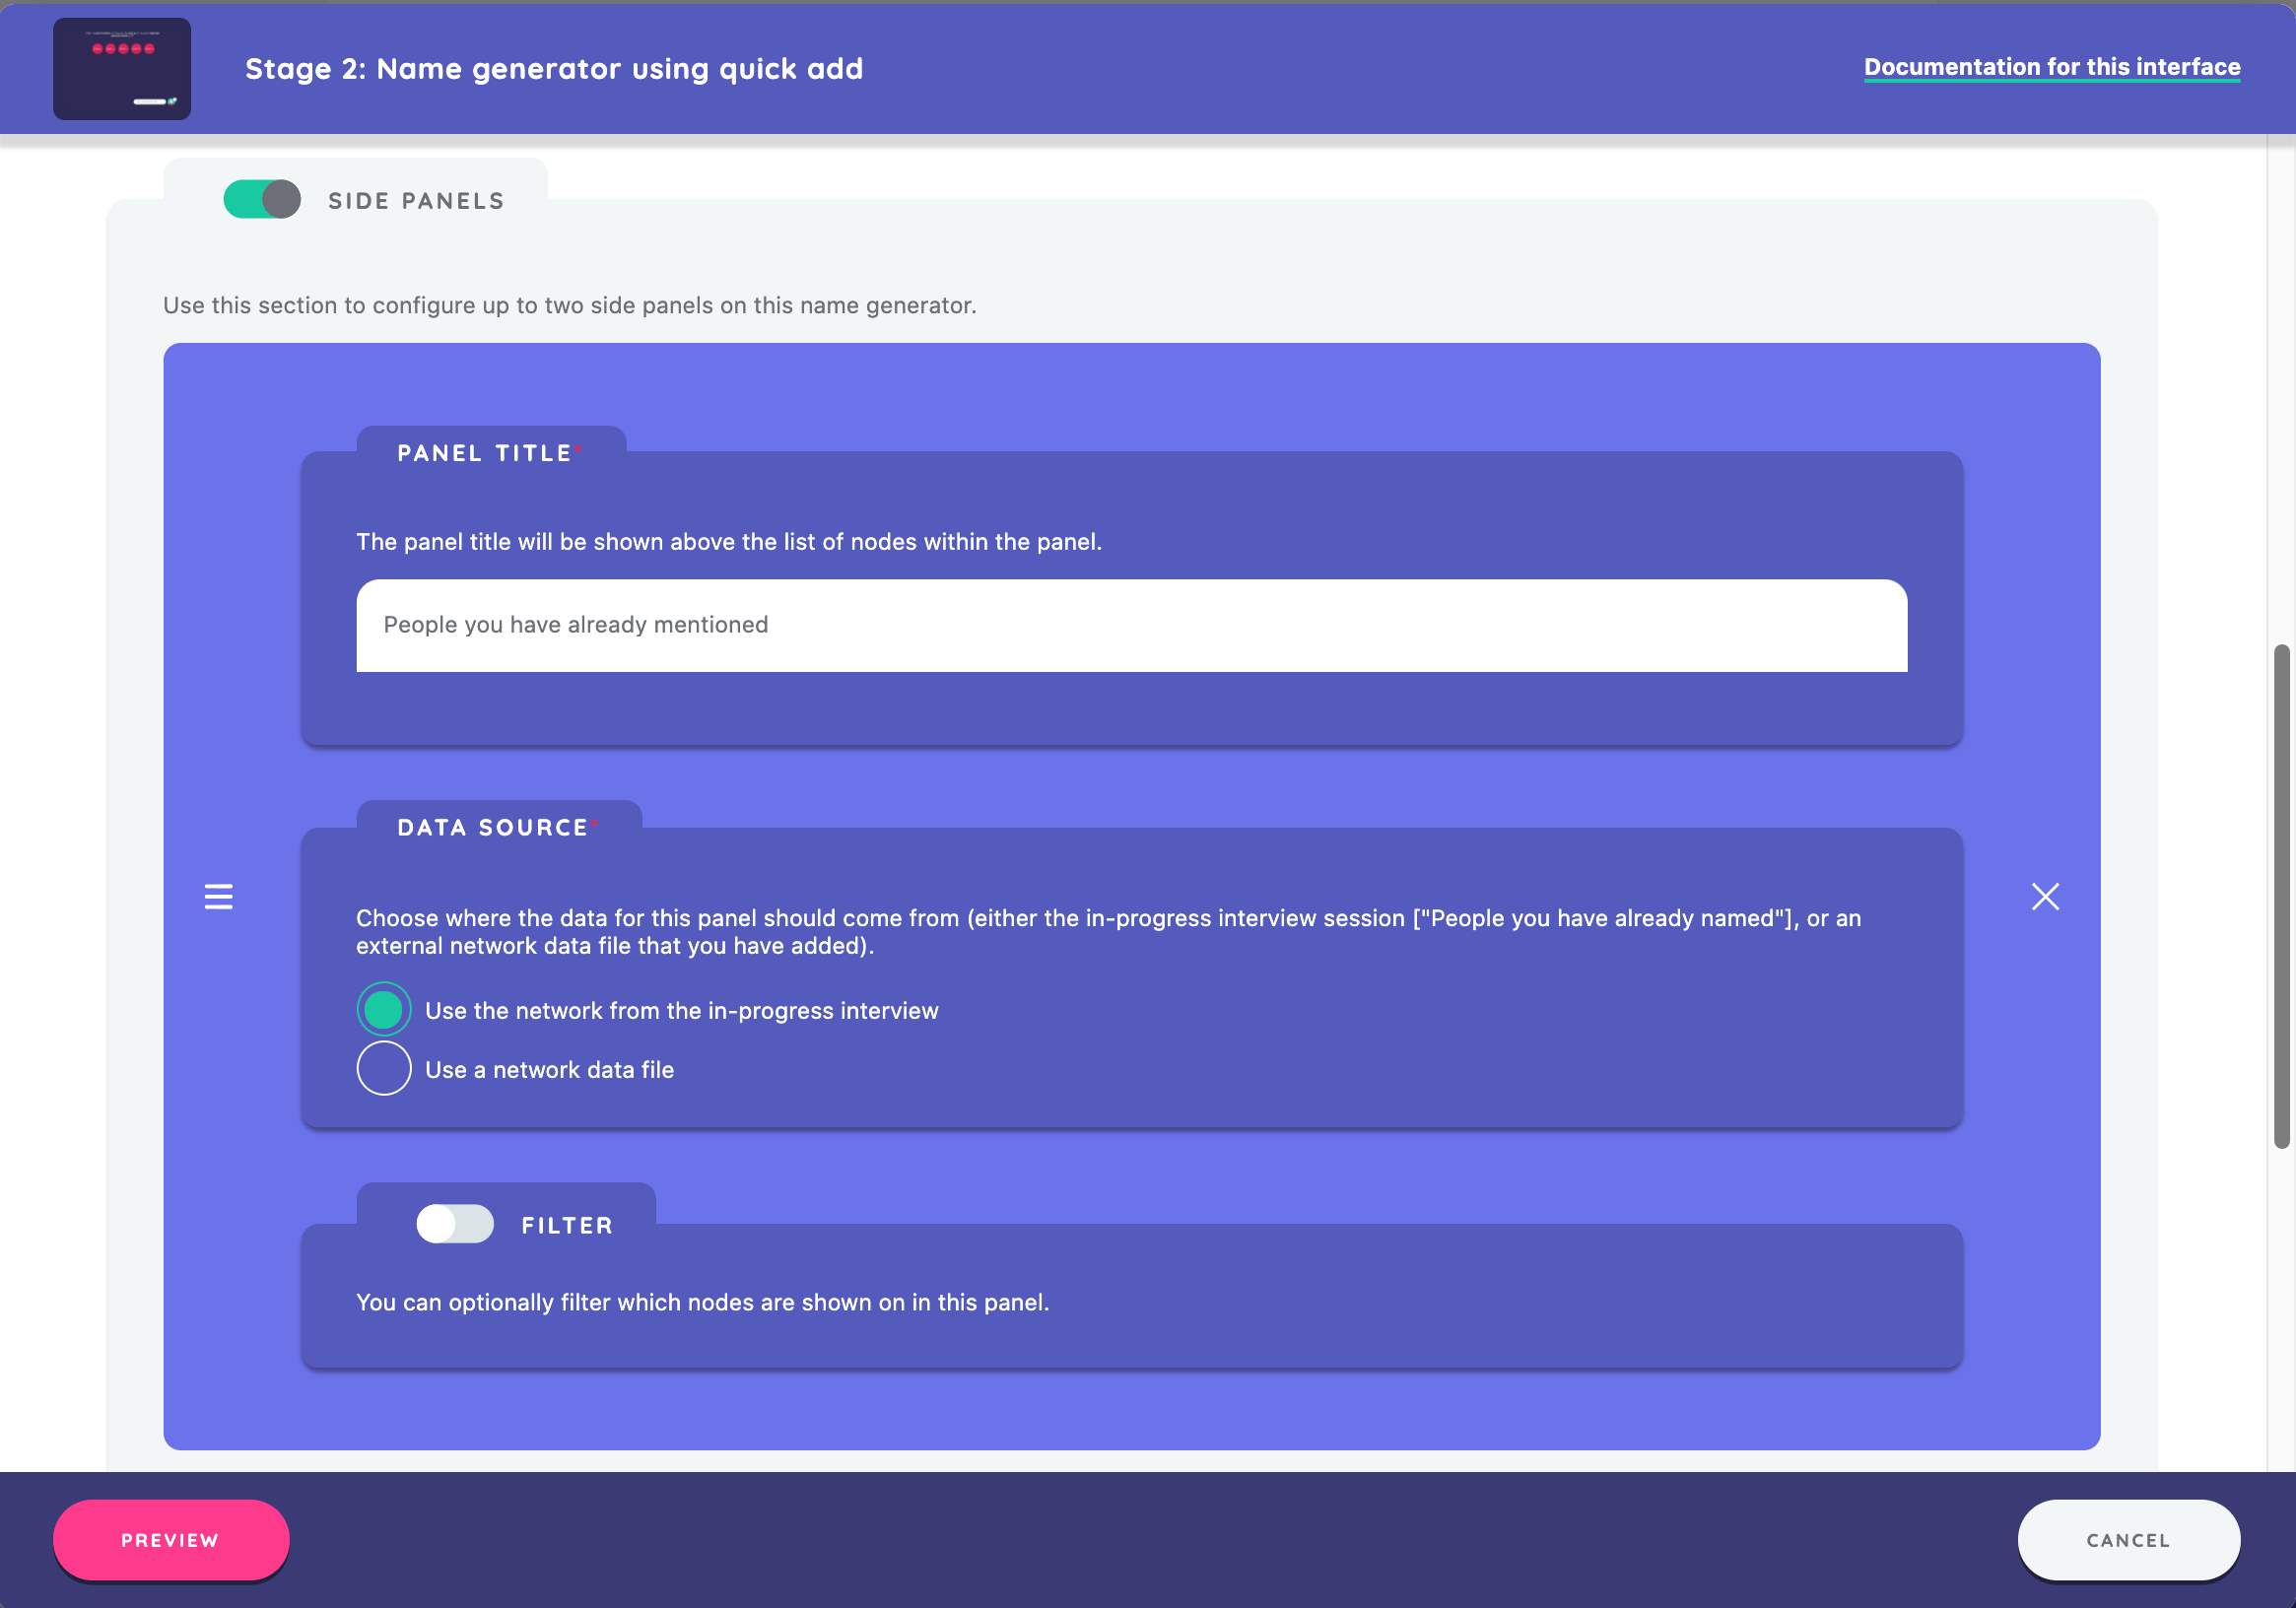
Now, add the side panel. Click Add New Panel and give the panel the title "People you have previously mentioned." This title will appear across the top of the side panel and will contextualize the nodes that appear to the participant.
Next, choose a data source for this side panel. You have two options: either use the network constructed during the interview or bring in an external data file (e.g., a roster) that will populate within the side panel. In this example, choose to use the network from the in-progress interview.
You can optionally preview the interface at this point, checking that the prompts and the form look and function as you expected. When you are satisfied, click continue to add your stage.
Name Generator using forms
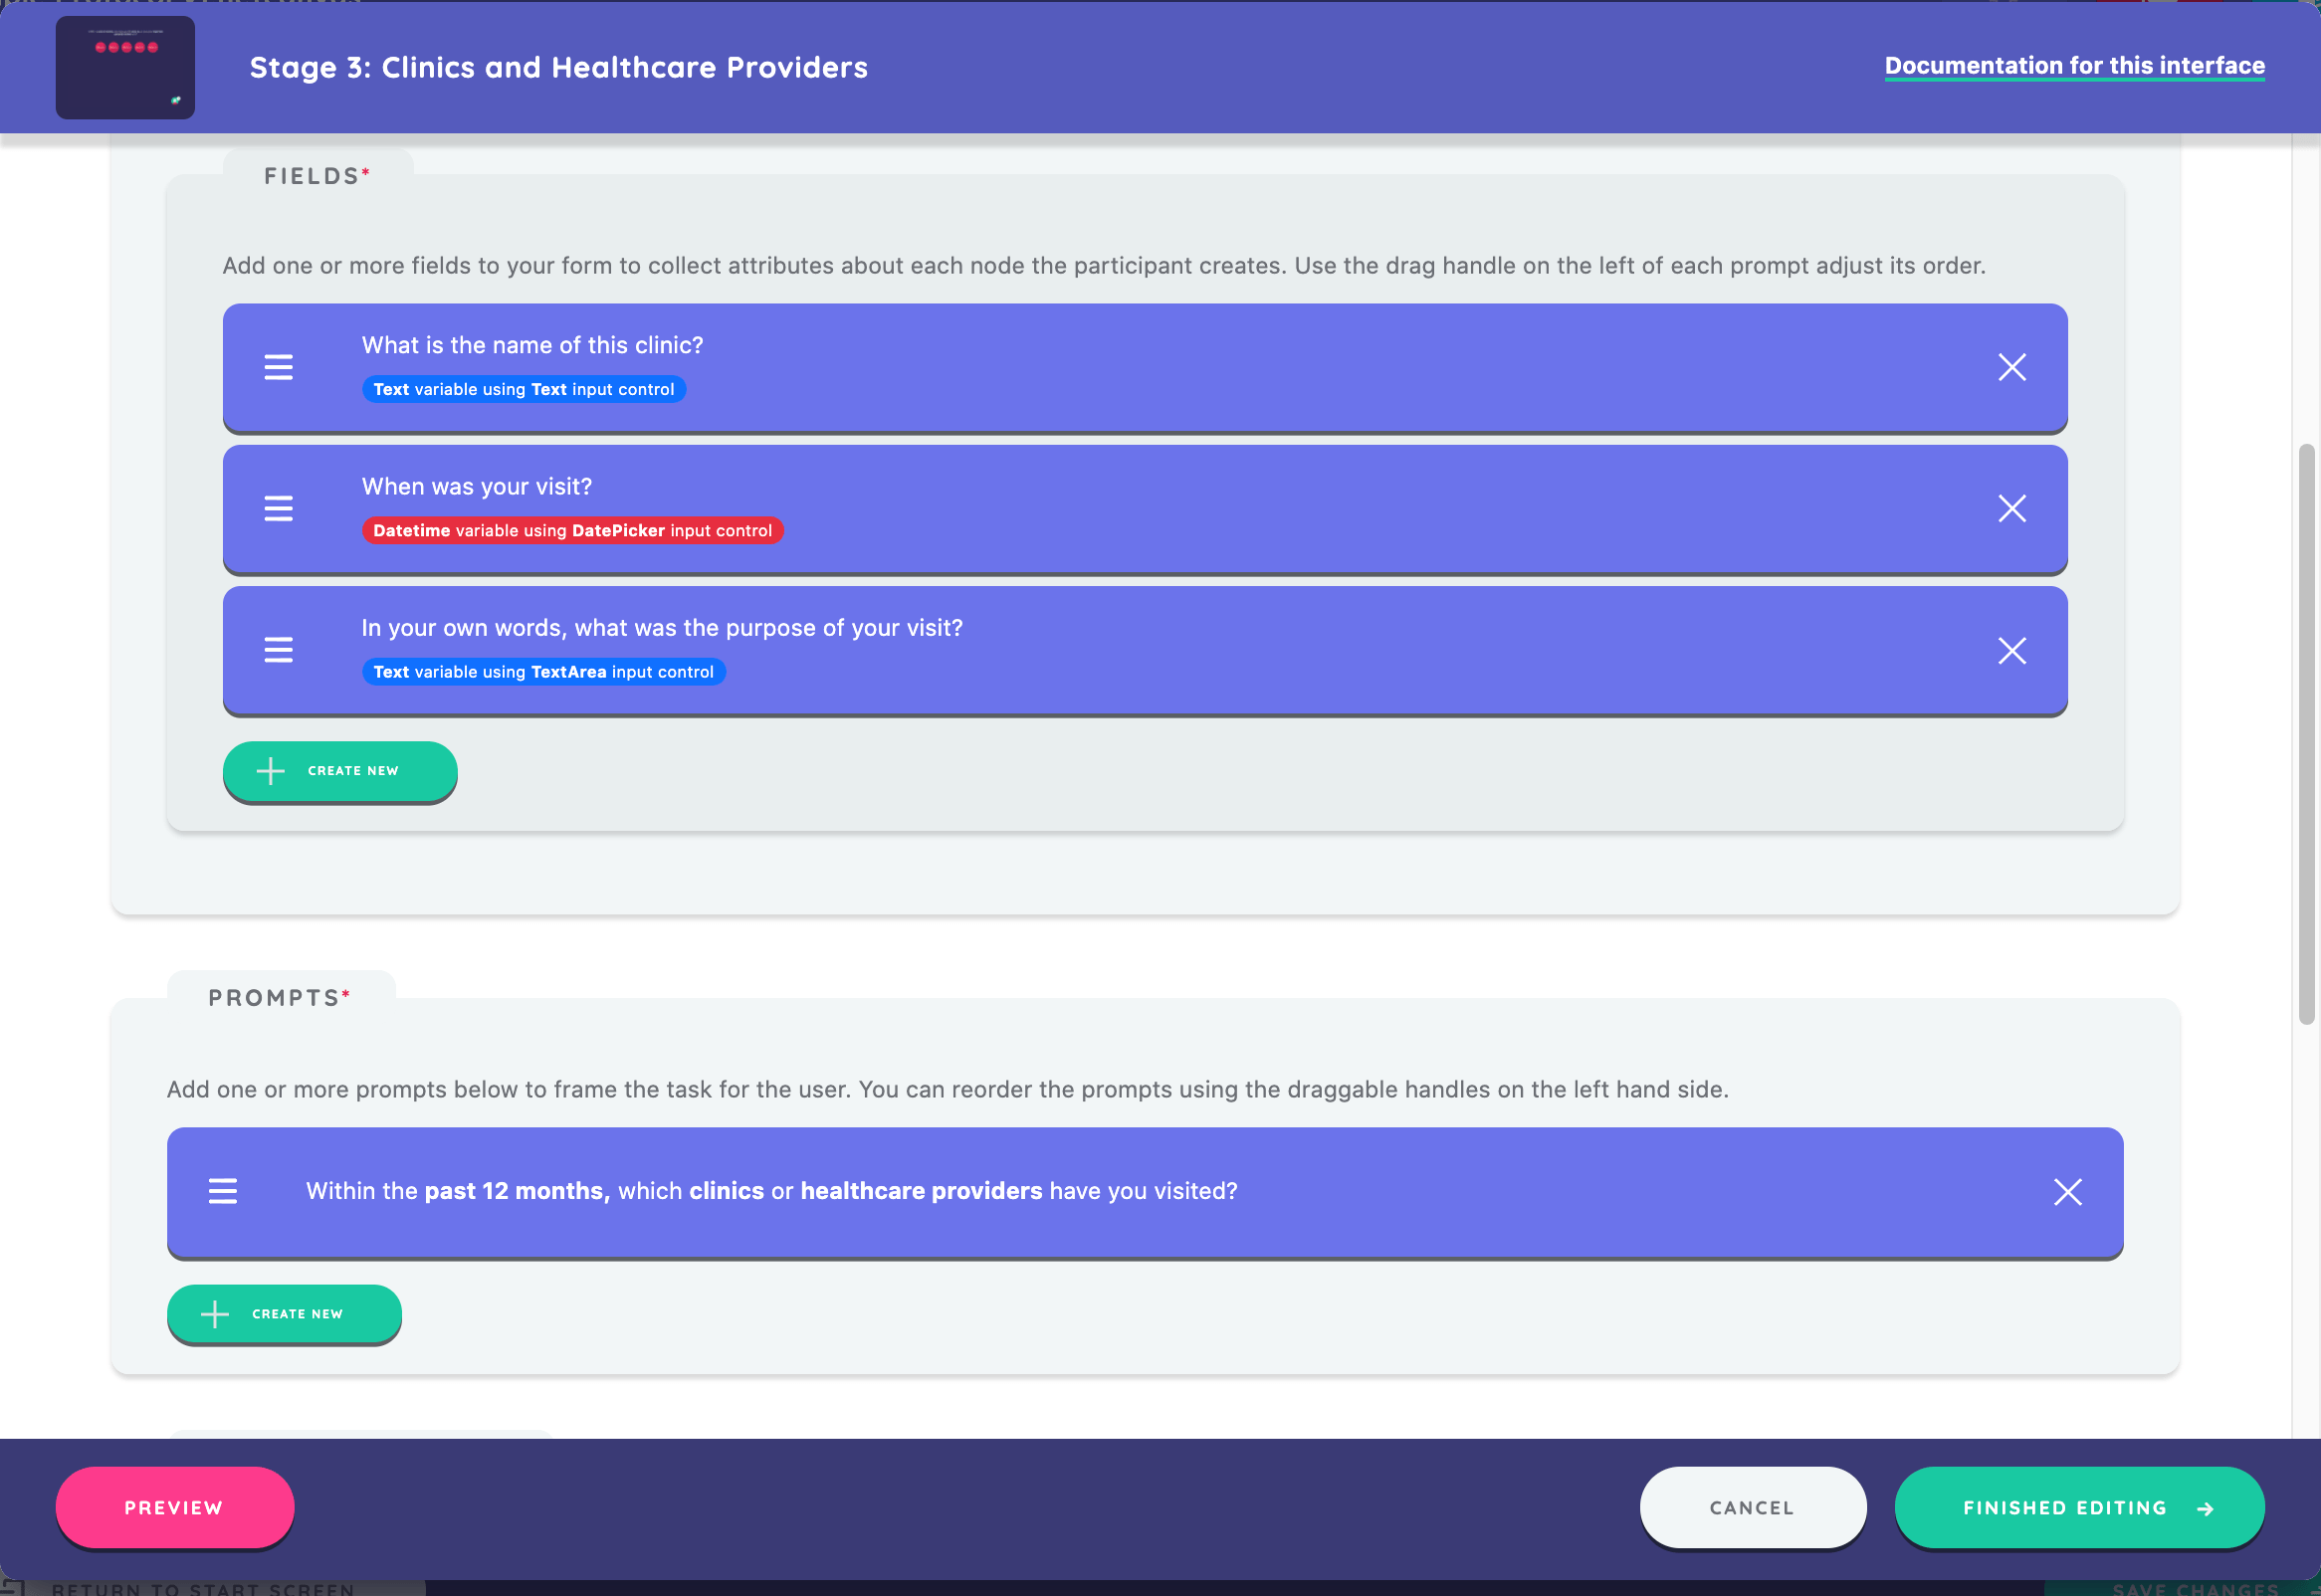
You will now create a new name generator stage that uses a form to capture data on alters named. As before, add a new stage (selecting the Name Generator (using forms) from the interface menu) and add a stage name. Next, create a new node type for "Clinic" on this stage as you will be asking a prompt about clinics rather than people. Once you create the node type for Clinic, move on to edit the form.
Form
This section is where you will define the fields that will be shown on the form when the participant creates a node on this name generator.
Fields capture data about alters or ego, and are where specific variables are defined.
First, create a title for the form to orient the participant to the information you want to collect. Enter the title "Add a Clinic or Health Care Provider."
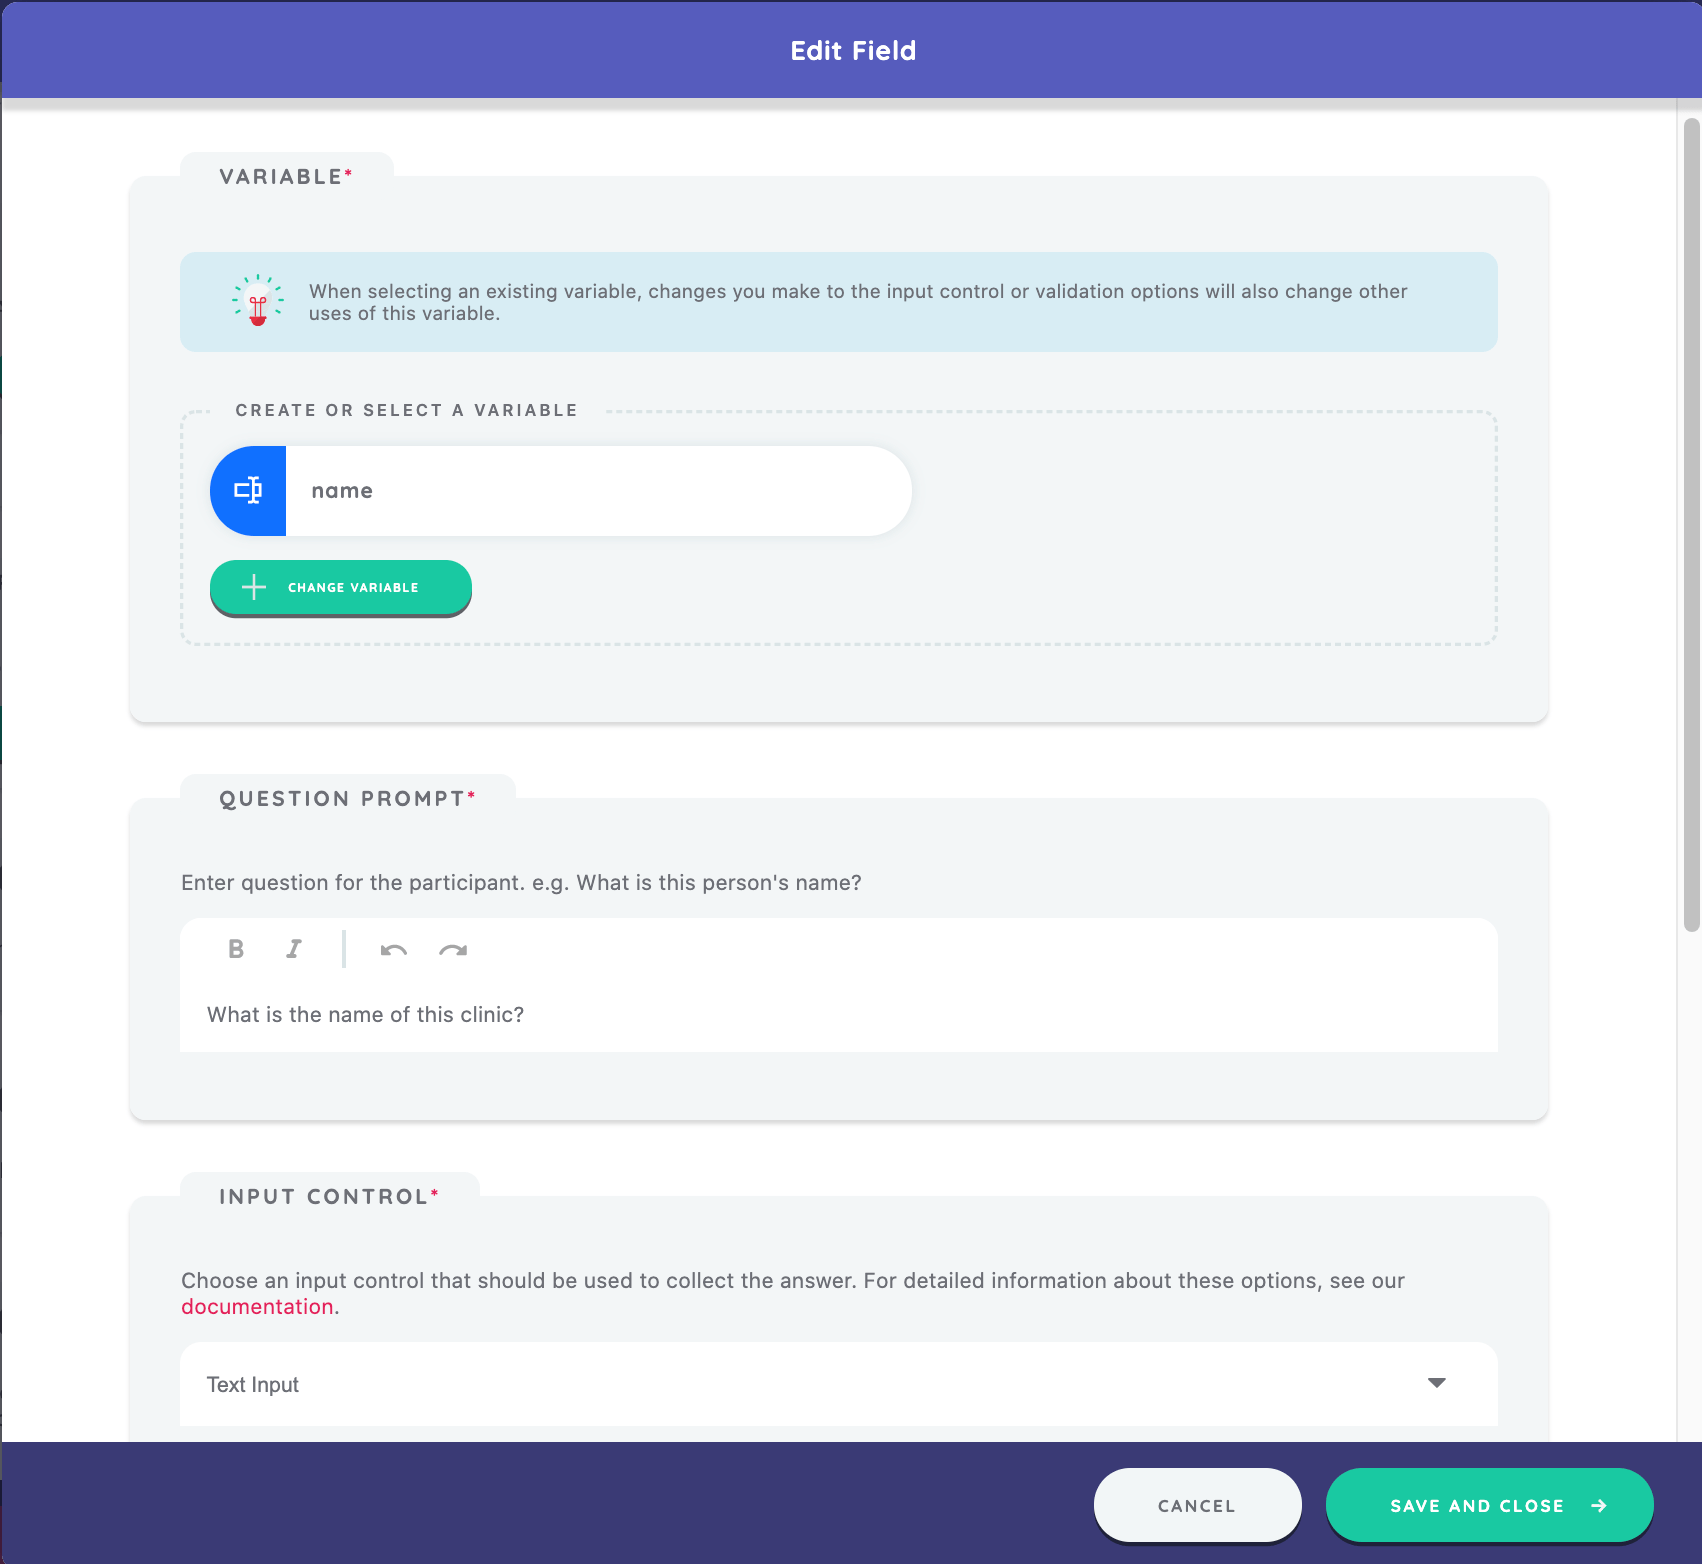
Next, define the fields of the form. By clicking Create New in the fields panel, a new screen opens which asks you to define a variable for the field, the question prompt, an input control, and to select any validation you may want to include.
For the first field, you want to know the name of the clinic the participant is nominating so use the variable "name" that you previously created by clicking Select Variable and selecting it from the list. Next, enter the text for this field label. In this example, use the question prompt "What is the name of this clinic?"
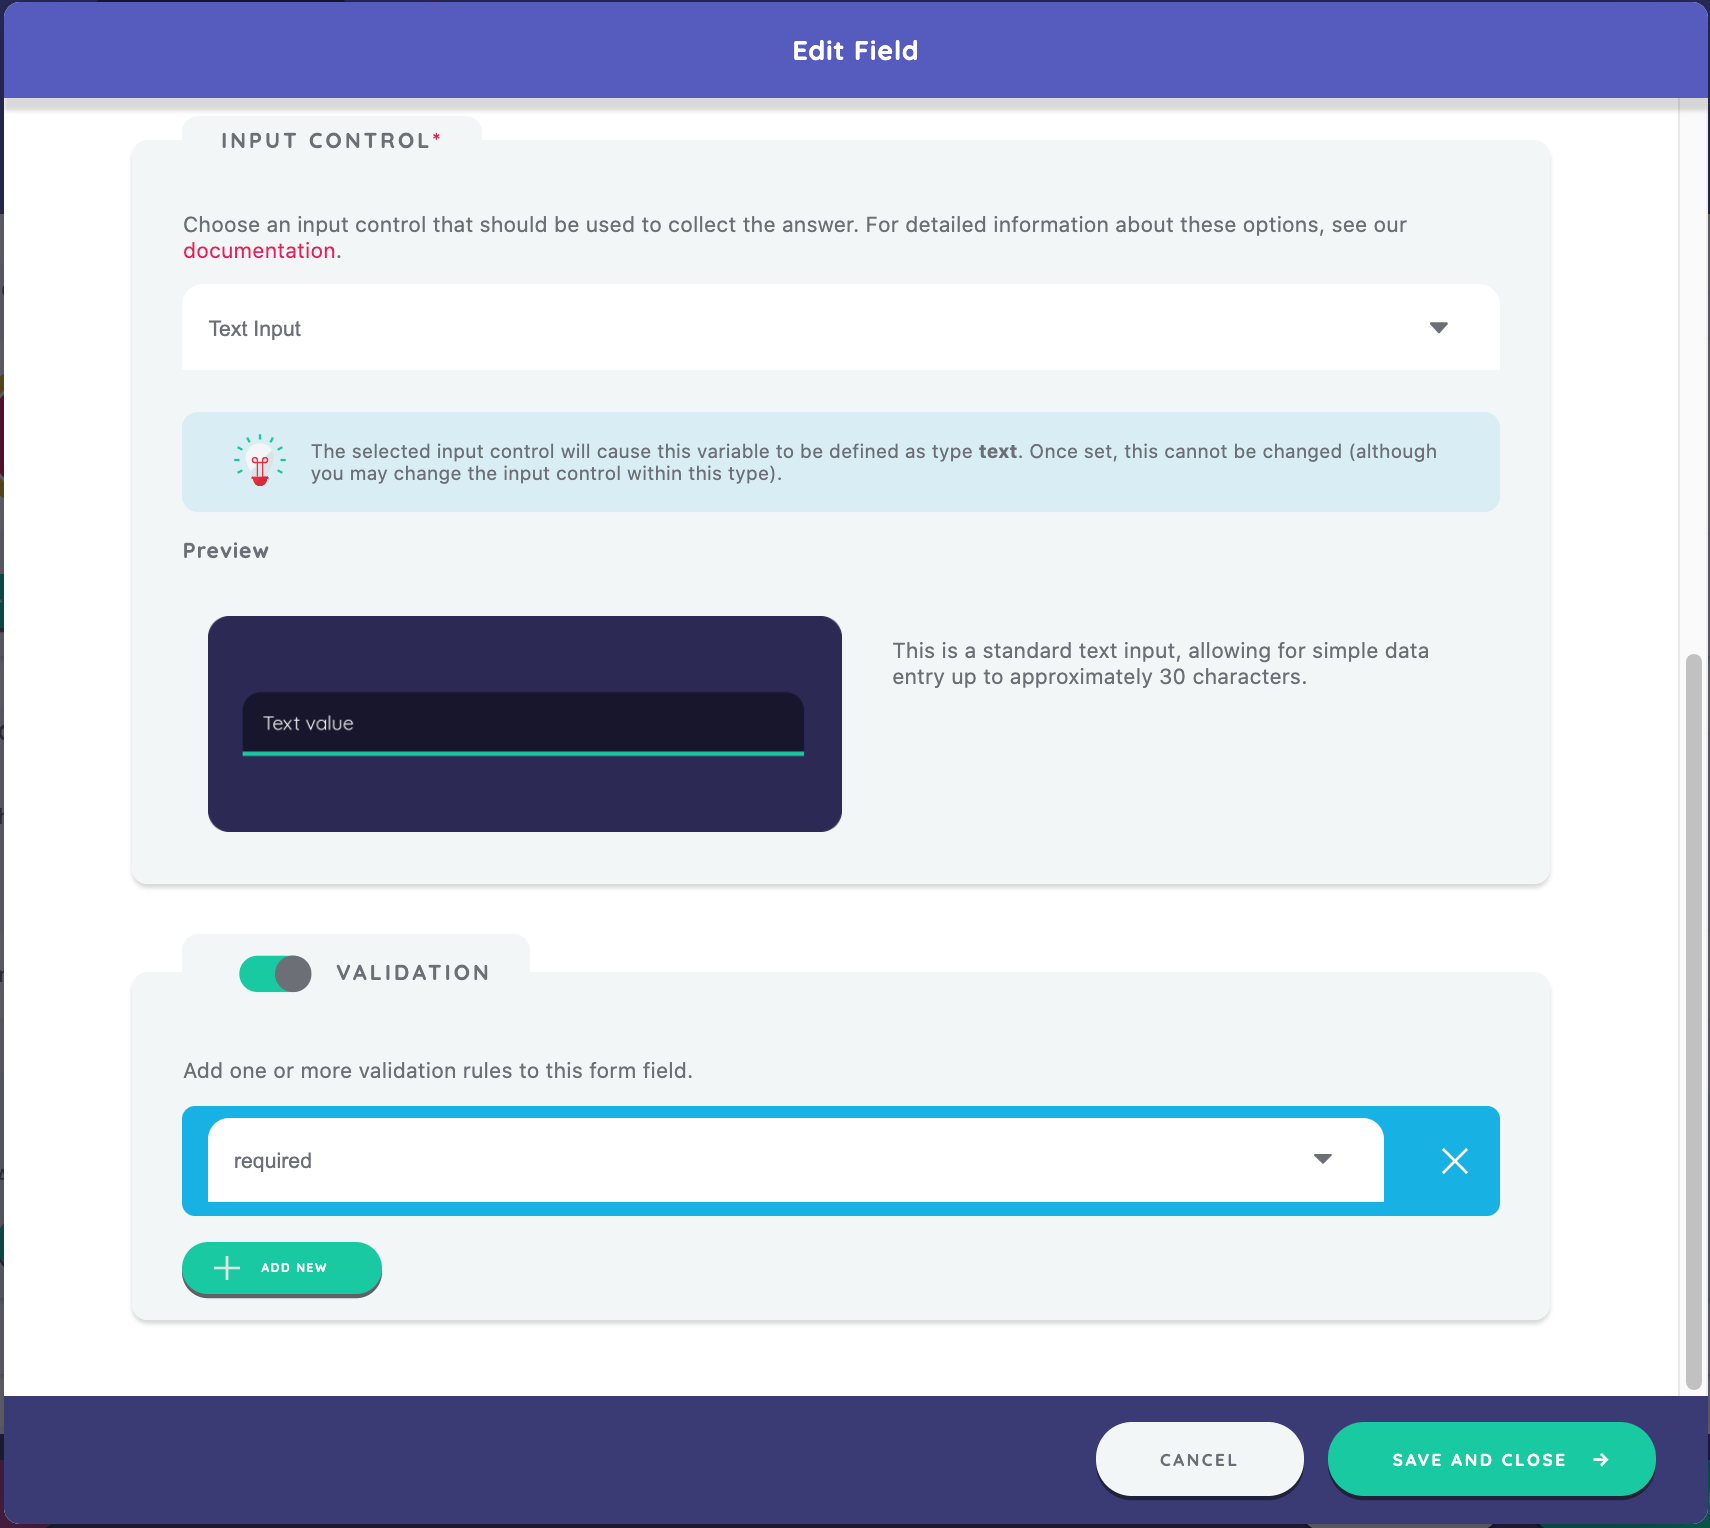
Finally, choose the input control that will be shown to collect this variable.
Because you are asking for the name of the clinic (a simple text variable), a Text Input is the most appropriate option.
Finally, define validation requirements for this field. Indicate that this text field is required. The validation options available vary depending on the type of variable. By adding a required validation, the participant must include information in this field before they can proceed. For more information, see the field validation guide.
Click Save and Close to create your first form field.
Now, using the process you learned above, create the two additional fields for this form.
Create the following fields with appropriate input controls, question prompts, and options:
- A
last_visitvariable, using the Date Picker input control, prompt of "When was your visit?", and an appropriate start range - A
visit_purposevariable, using the Text Area input control, and a prompt of "In your own words, what was the purpose of your visit?"
After completing the form, configure the prompt for the stage. Click Create New in the prompts section and enter the text "Within the past 12 months, which clinics or healthcare providers have you visited?"
Name Generator for Roster Data
Next we will develop a name generator that uses a roster brought in as an external data file.
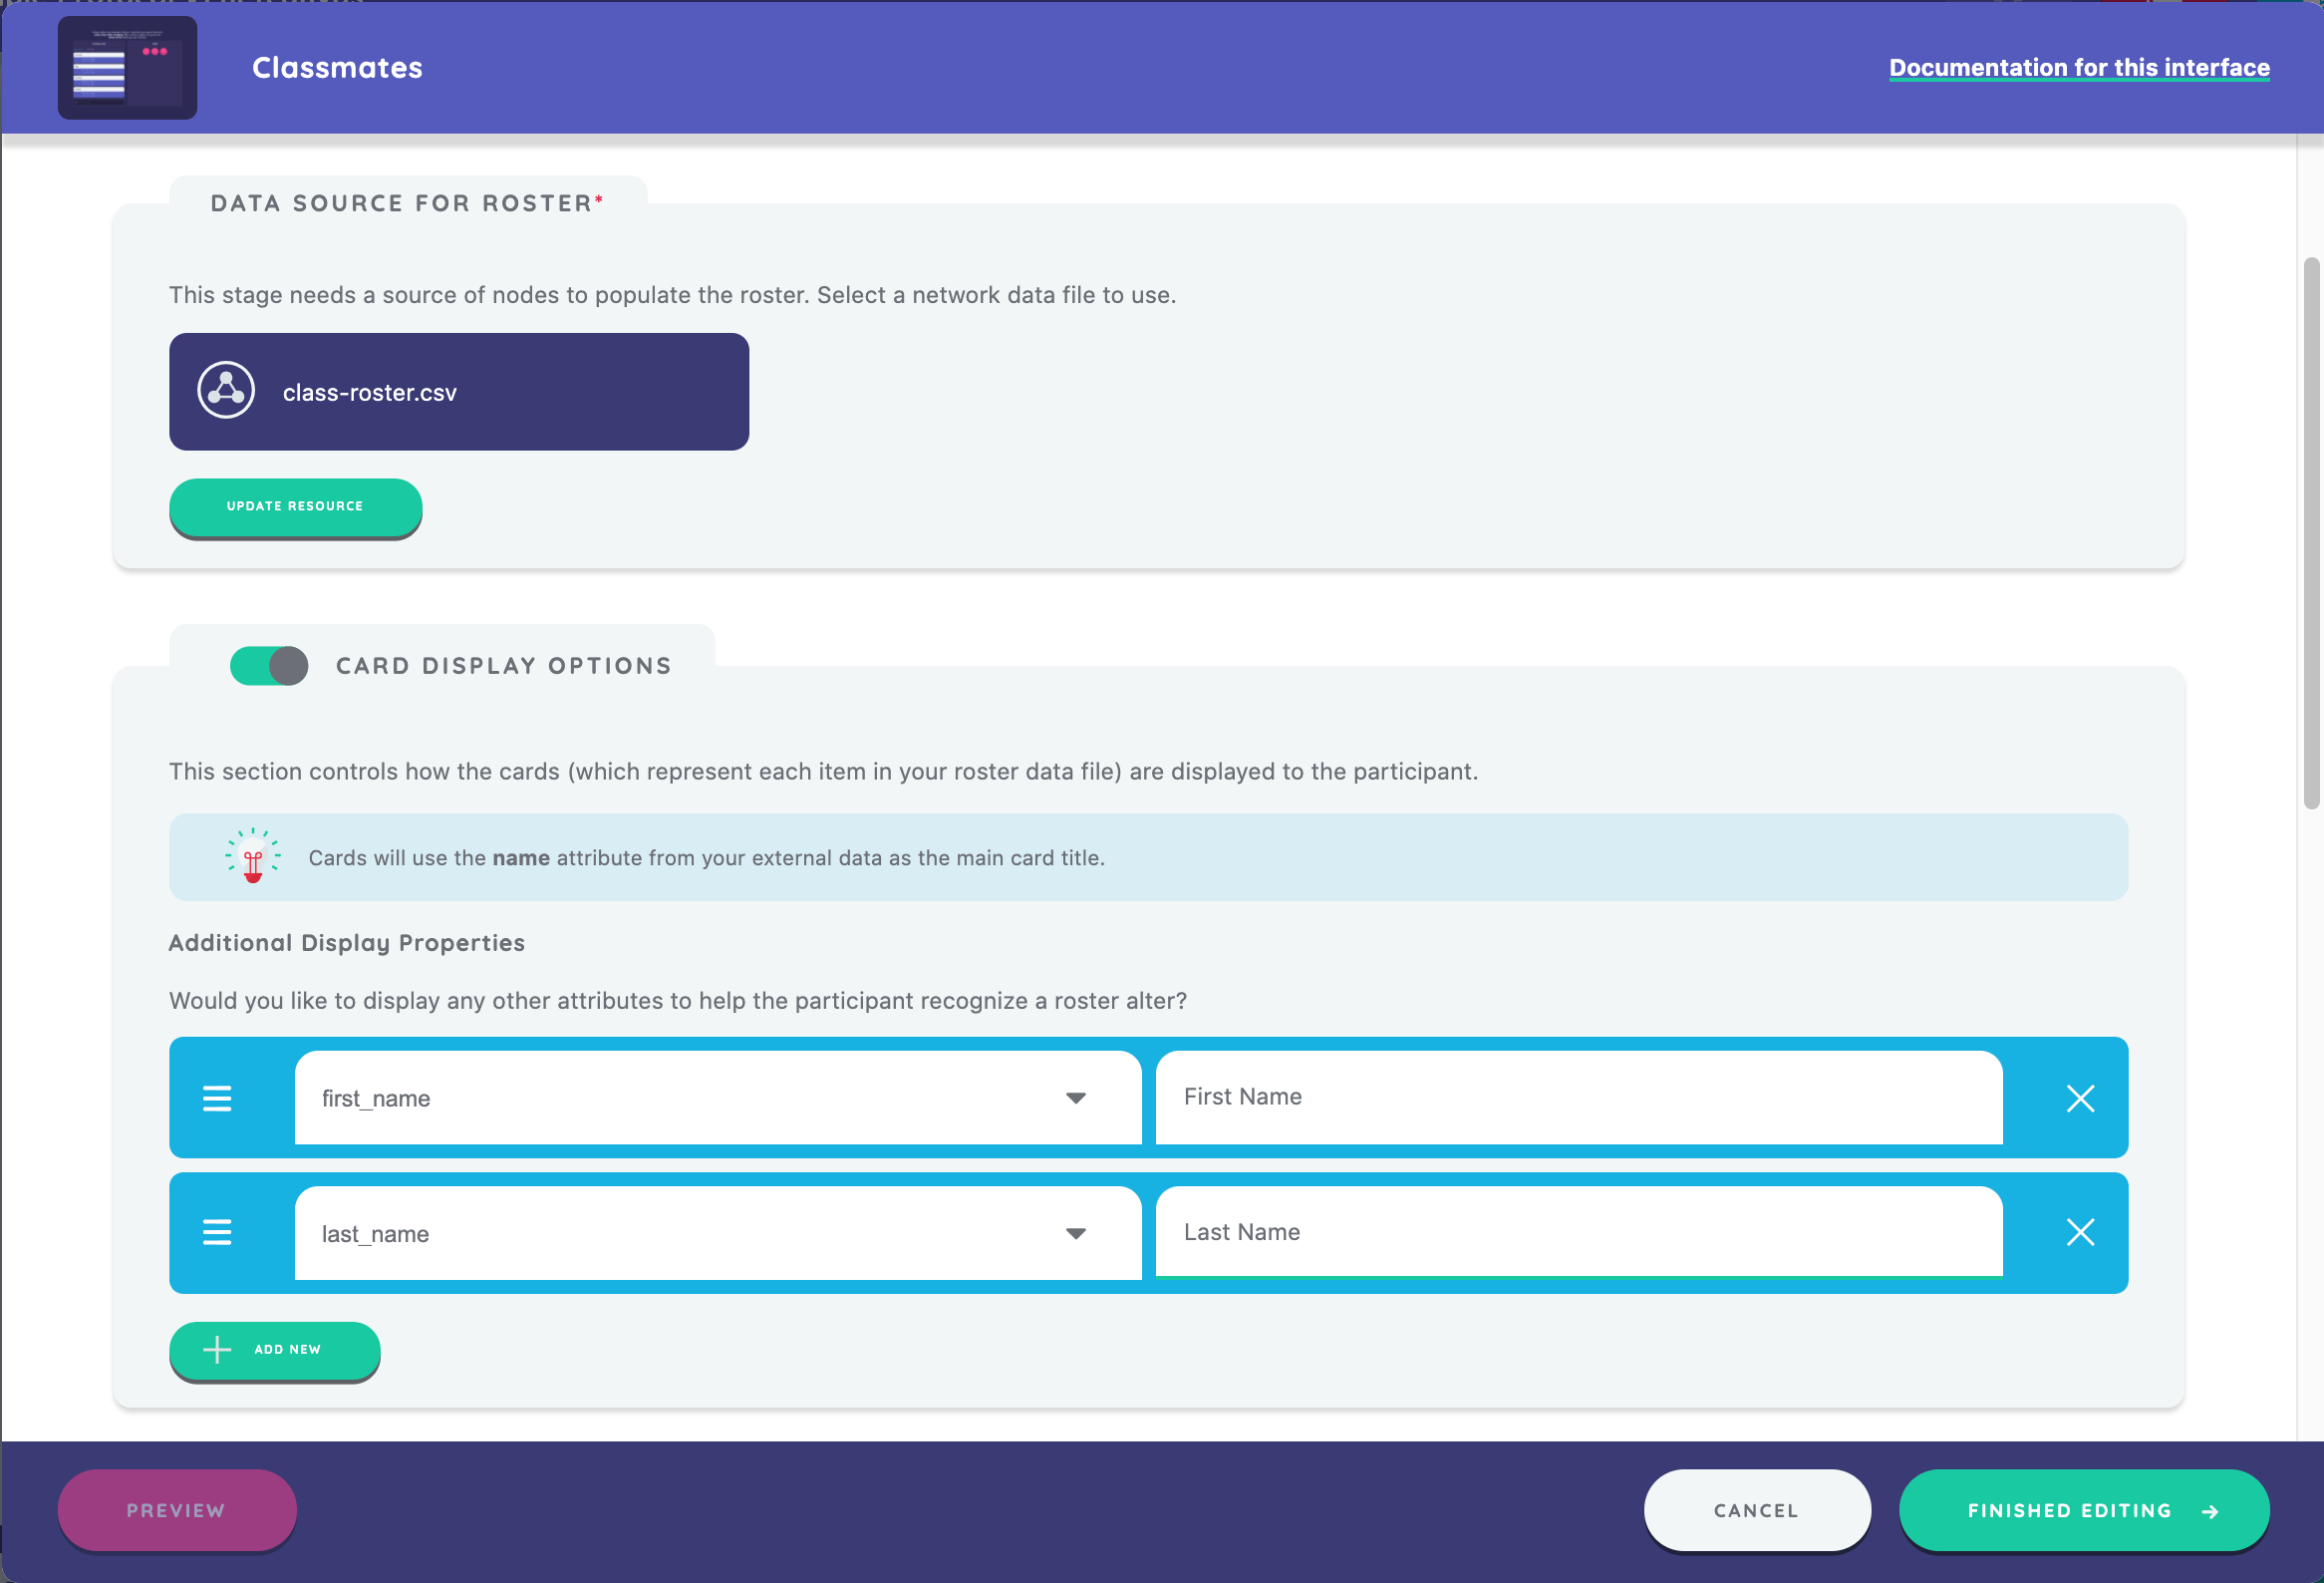
As we did in prior name generators above, we will first select the interface we want to configure (Name Generator for Roster Data), add a stage name, and create a new node type for "Classmate".
Next we will select the external data source to bring into the protocol that will populate the nodes on the roster. For this example, we have used a fictitious classroom roster. To use the same roster as the sample protocol, please click here to download our CSV file. Alternatively, use any other roster you have on hand.
Just as you added resources to the Information Interface above, you will also browse for your external data source from the protocol resource library if you saved it there or else from another location on your device.
We will then define what display properties are used to identify the nodes in the roster as they appear to the participant. First we select the variable that is defined in the external data file - in this case "first_name." Next, we define how we want that variable to appear to the participant on the roster - in this example we enter "First Name." We repeat the same process for the last_name variable.
We can optionally choose to include sorting controls. Sorting controls are especially useful when a roster is large enough to make discoverability difficult at first glance. In this example, we choose to implement an initial sort order that uses the "first_name" variable to order the roster cards in an ascending order.
By default, the roster cards will use the "name" attribute from your external data file as the main card title.
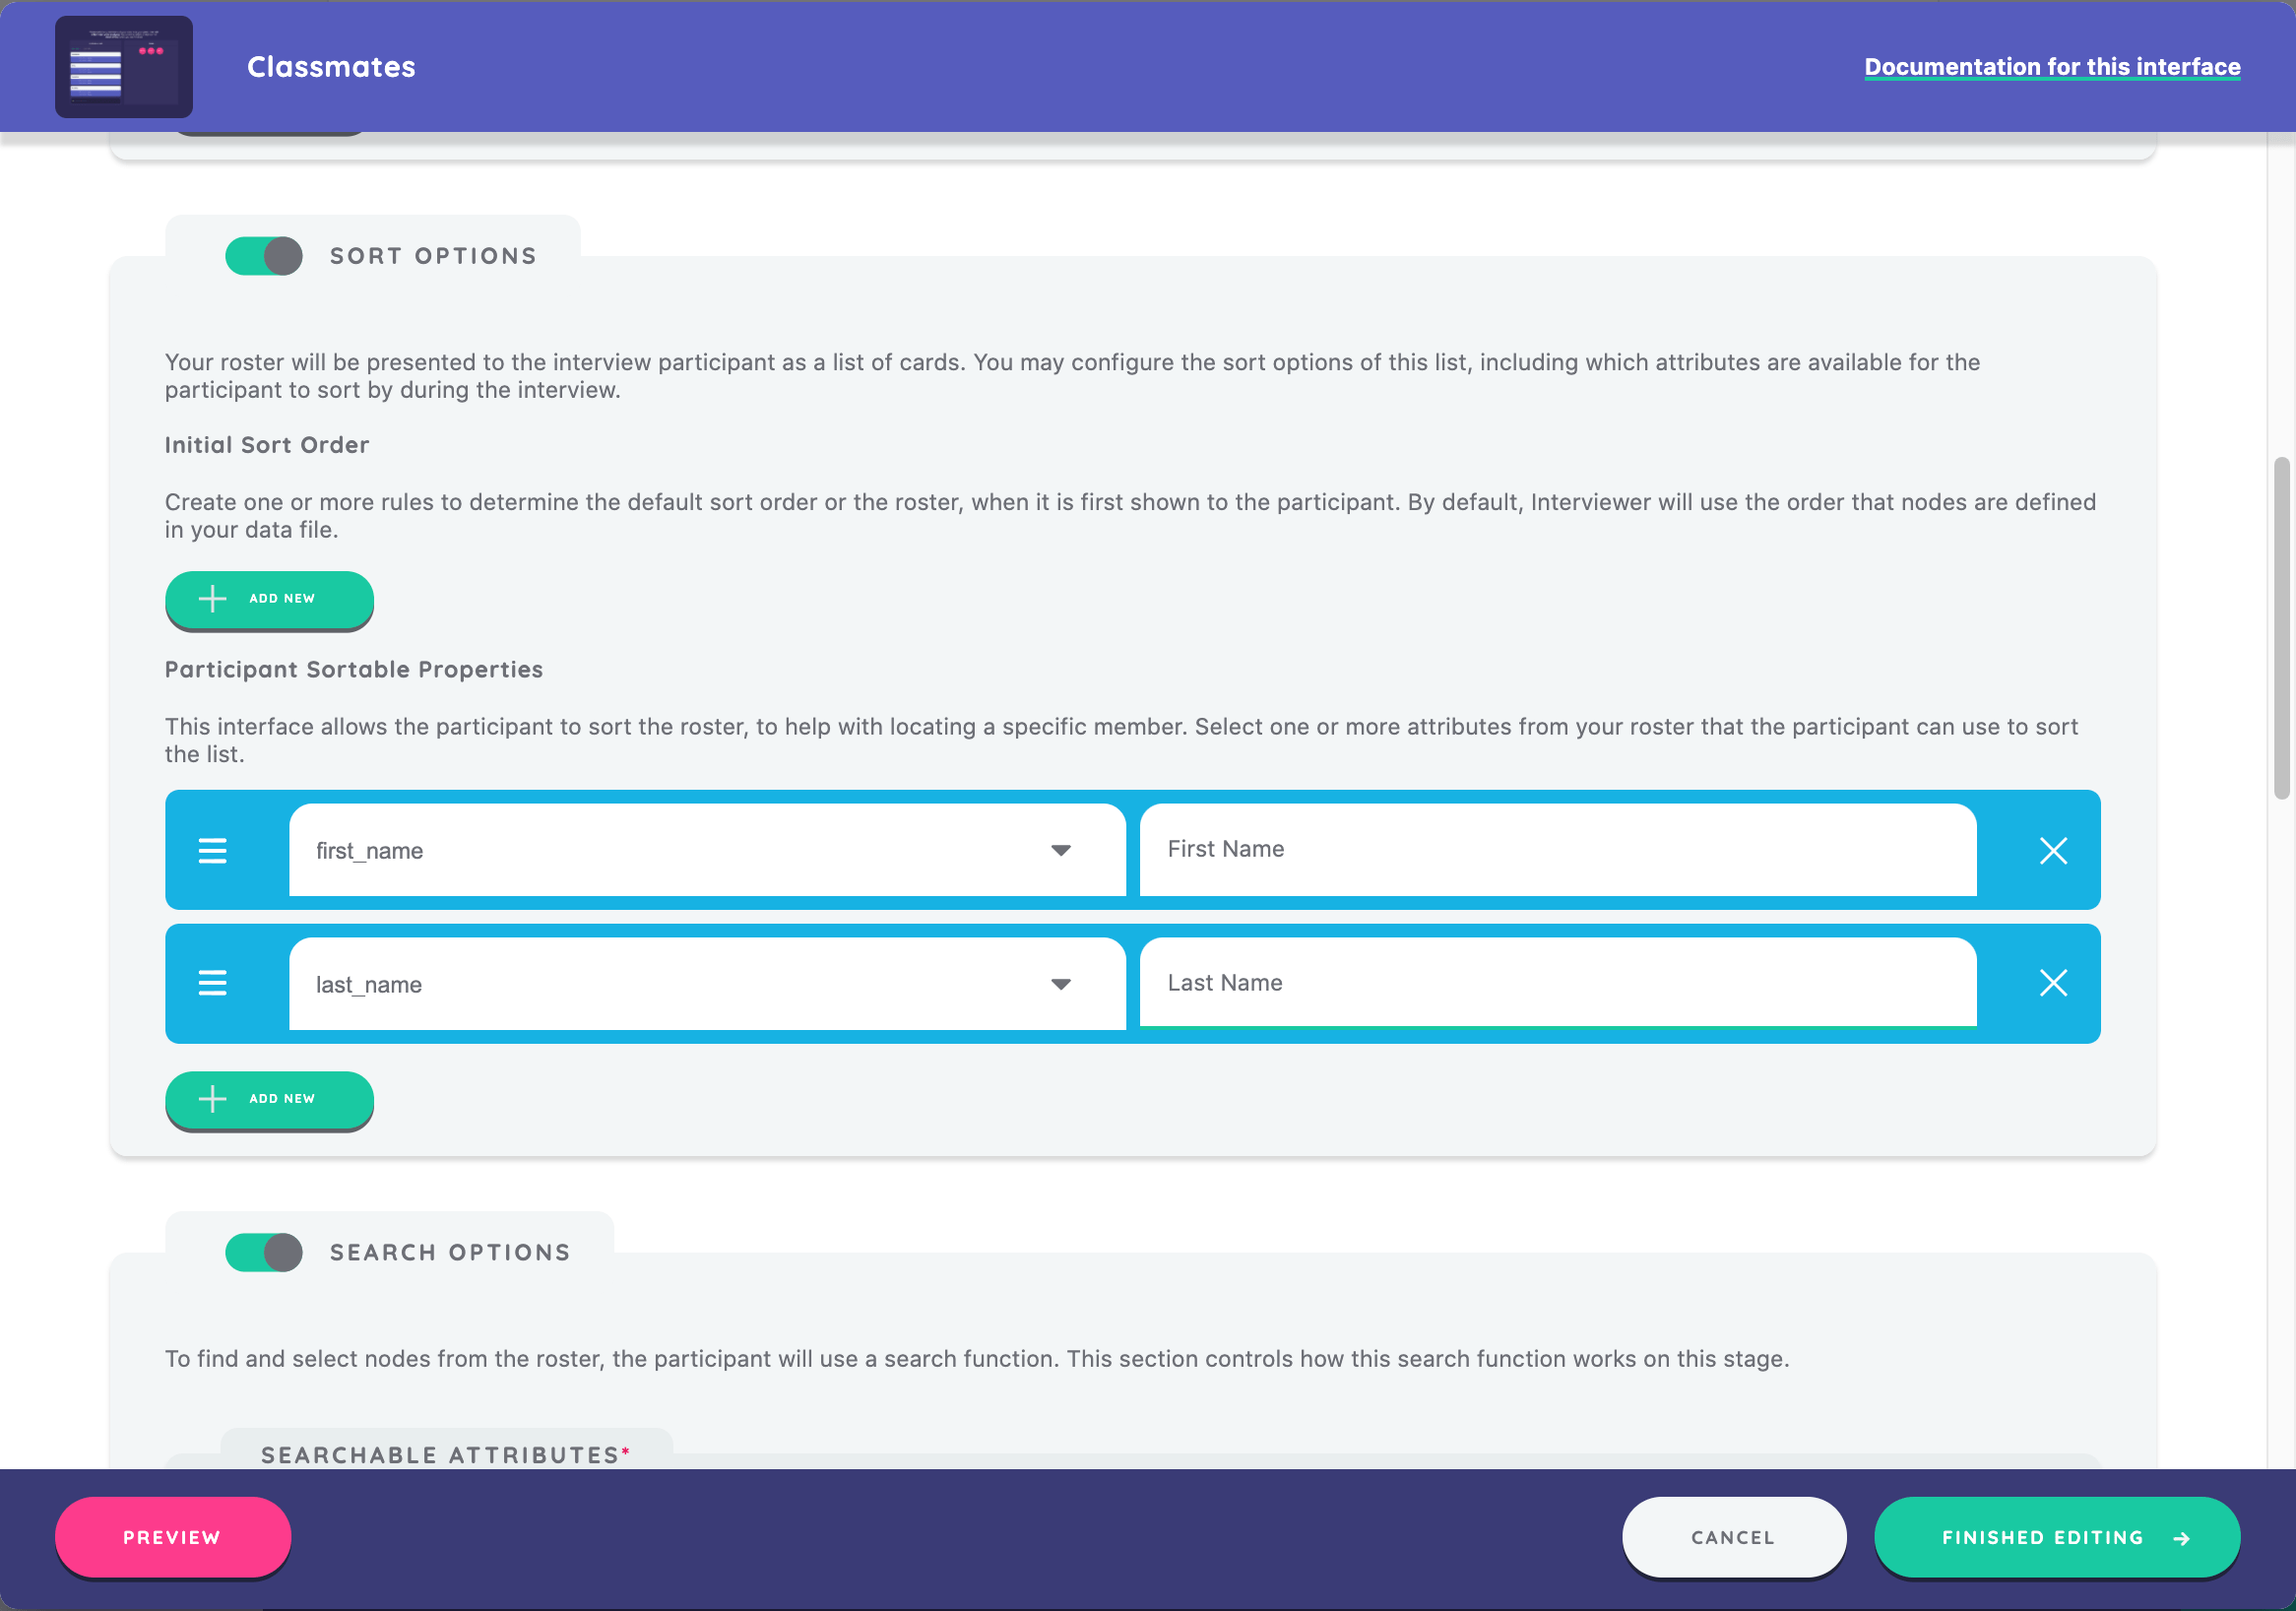
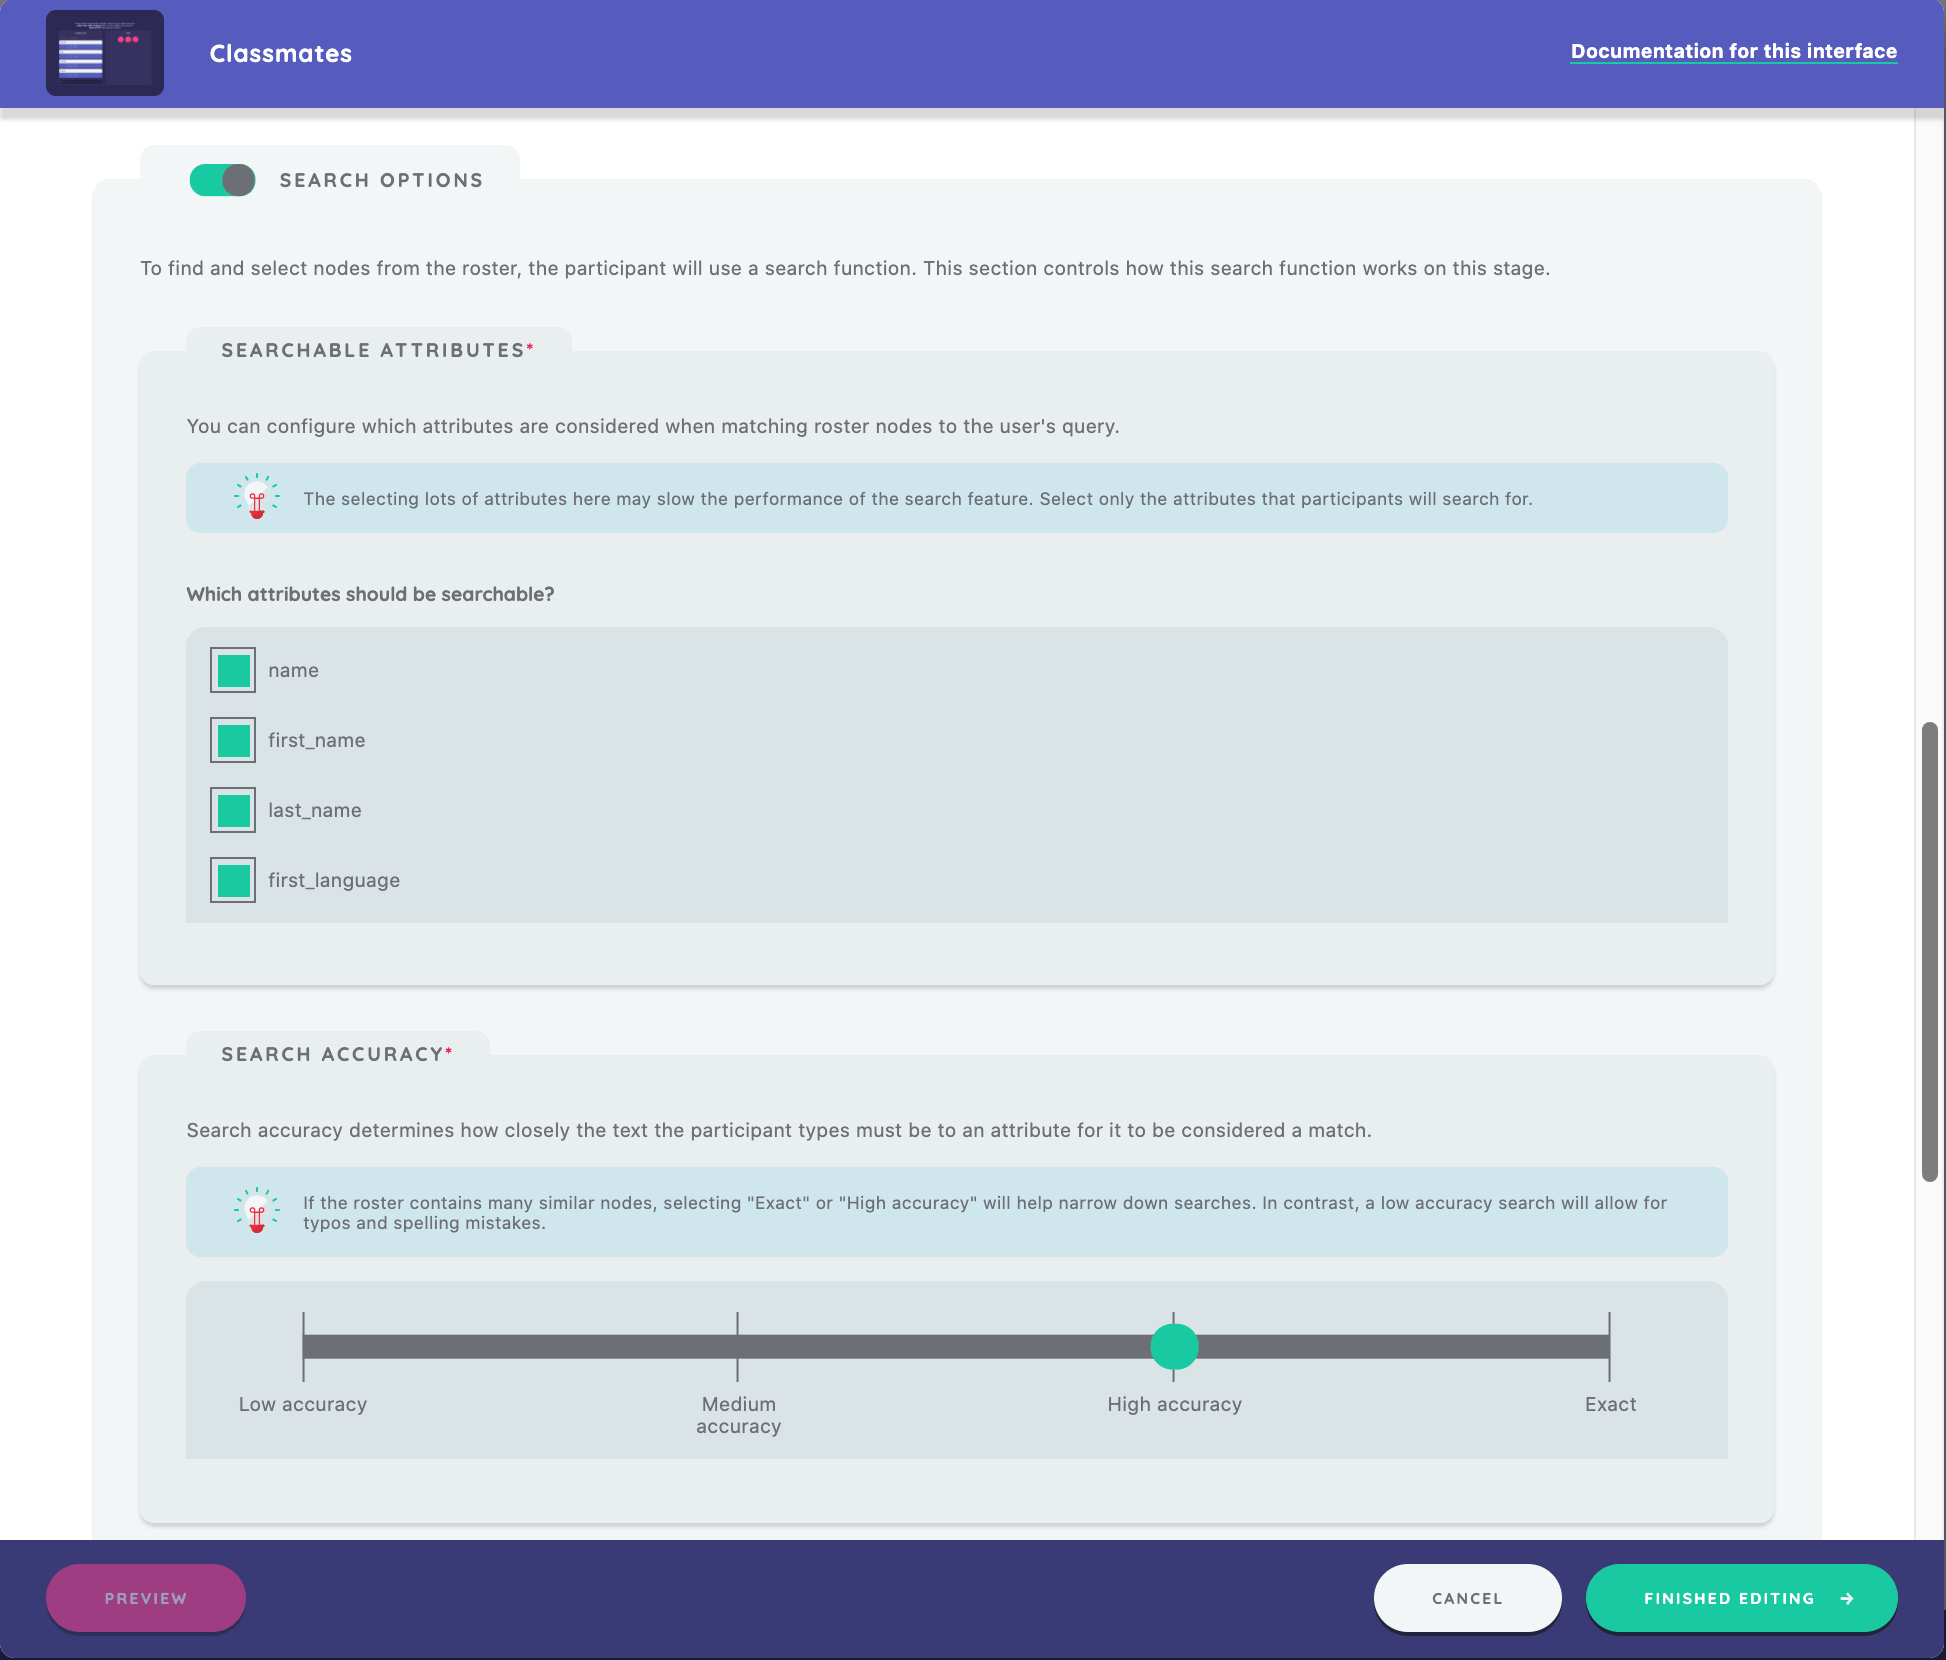
Next, we will configure how the roster file is searchable to the participant. The functionality available for this interface includes the ability for participants to search the database for specific attributes in order to locate the alters they want to select.
The search options listed will depend on the variables outlined in your datafile. Here, we have the option to select "name, "first_name", "last_name", and "first_language", and we choose to include all four.
We can also narrow down the options that appear to a participant when they search on the stage by selecting "Exact" or "High Accuracy." In this case, we select "High Accuracy."
Last, we implement a prompt for the stage, following the same process we did in the previous stages. We enter the prompt that includes instructions for how to nominate a node from the roster, "Please select any members of your degree class that you spend time with other than when studying. Tap a card to select, and press the down arrow when you are finished."
Creating an Ego Form
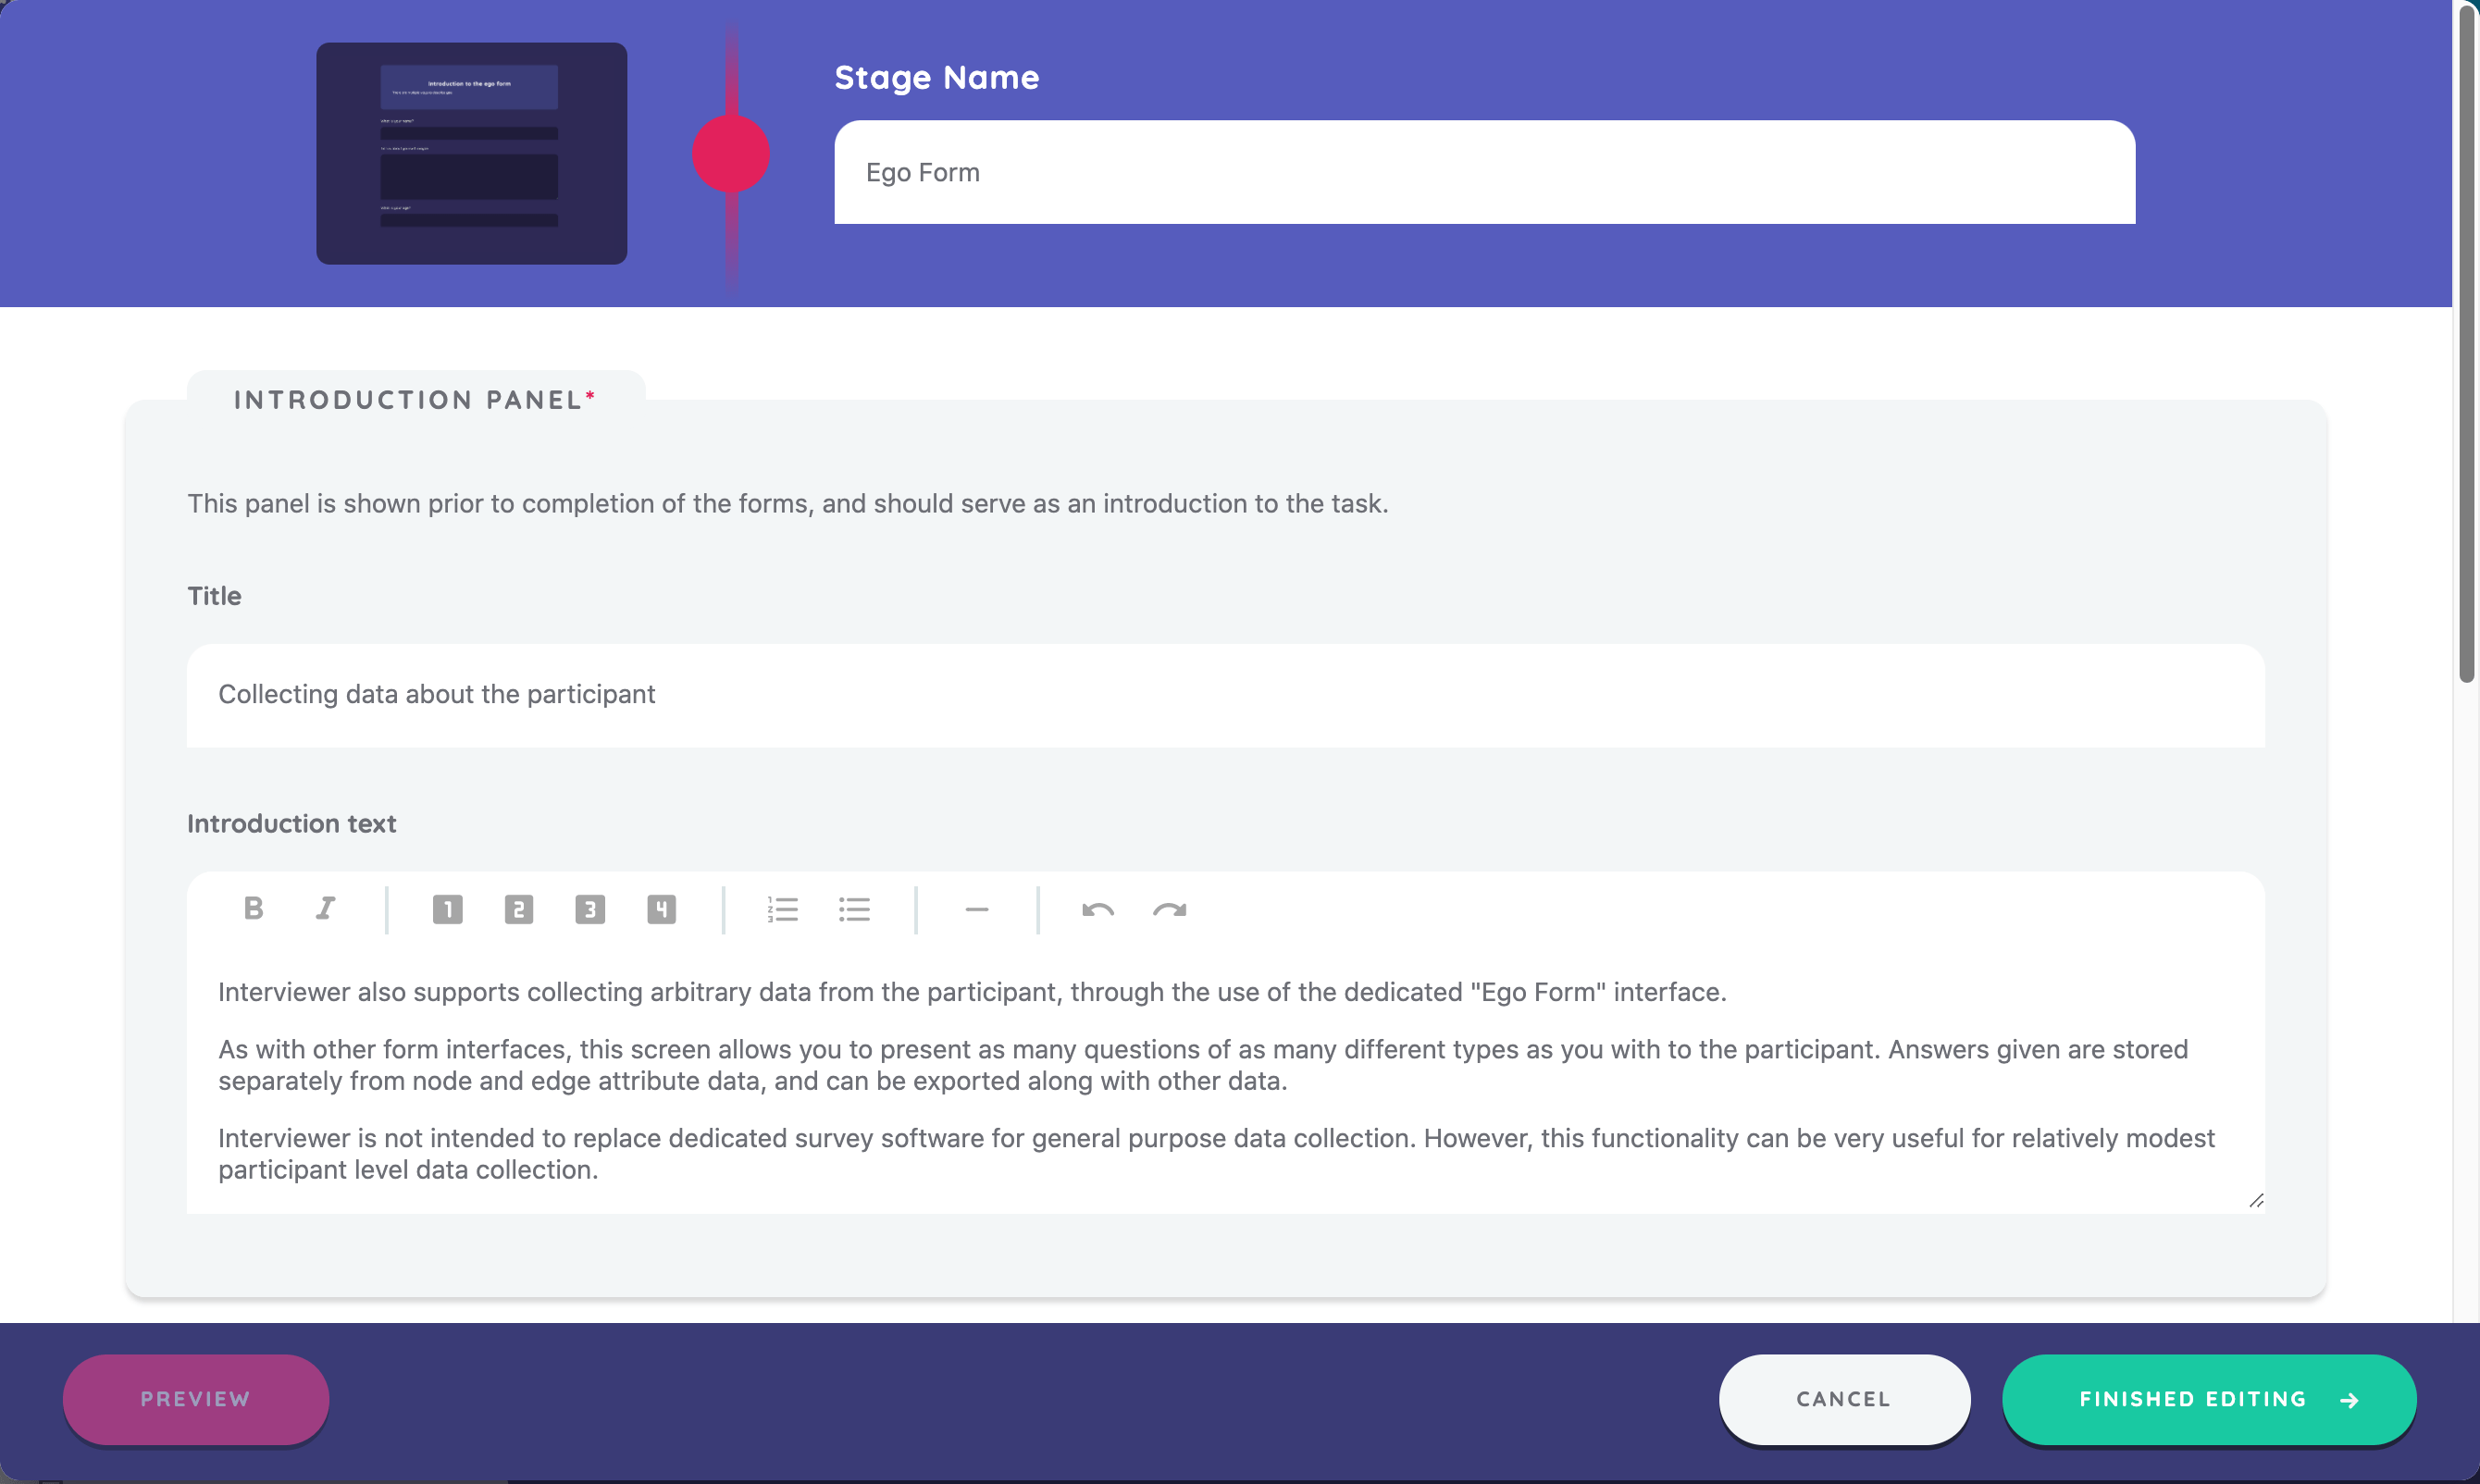
The next stage in this sample protocol uses the Ego Form Interface. We create the Ego Form and set a stage name as we have previous interfaces.
Introduction Panel
The introduction panel is a feature of the Ego Form Interface that lets you introduce the form to the participant. You might use it to explain which data you are asking for, and why. In our case, we explain the intended use of the Ego Form Interface.
Now, let's create a series of fields for our ego form just as we did while configuring the Name Generator using forms. If you don't remember how we did this, please review above.
Next, we will create the following fields with associated variables, question prompts, input controls, validations (if used):
- first_name, "What is your first name?", Text Area, Required validation
- last_name, "What is your last name?", Text Area, Required validation
- dob, "What is your date of birth?", DatePicker with end range 2002/January/1
- languages_spoken, "Which of the following languages do you speak fluently?", Toggle Button Group with options English, Mandarin Chinese, Hindi, Spanish, French, Arabic, Bengali, and Russian
- existing_software, "Overall, how satisfied are you with existing social network analysis software?", Radio Group with options Very Satisfied, Somewhat Satisfied, Neither Satisfied nor Dissatisfied, Somewhat Dissatisfied, and Very Dissatisfied
- research_support, "How satisfied are you with the level of support you receive?", Likert Scale with Very Satisfied, Somewhat Satisfied, Neither Satisfied nor Dissatisfied, Somewhat Dissatisfied, and Very Dissatisfied
- operation_pain, "Thinking back to your last medical procedure, how much pain do you feel you experienced?", Visual Analog Scale with min and max labels as No Pain and Unbearable Pain
- prefered_contact_method, "How would you prefer to be contacted about your next interview?", Checkbox Group with options Email, Post, SMS, and Phone Call
- other_info, "Is there any other information you would like to provide at this time?", Text Area
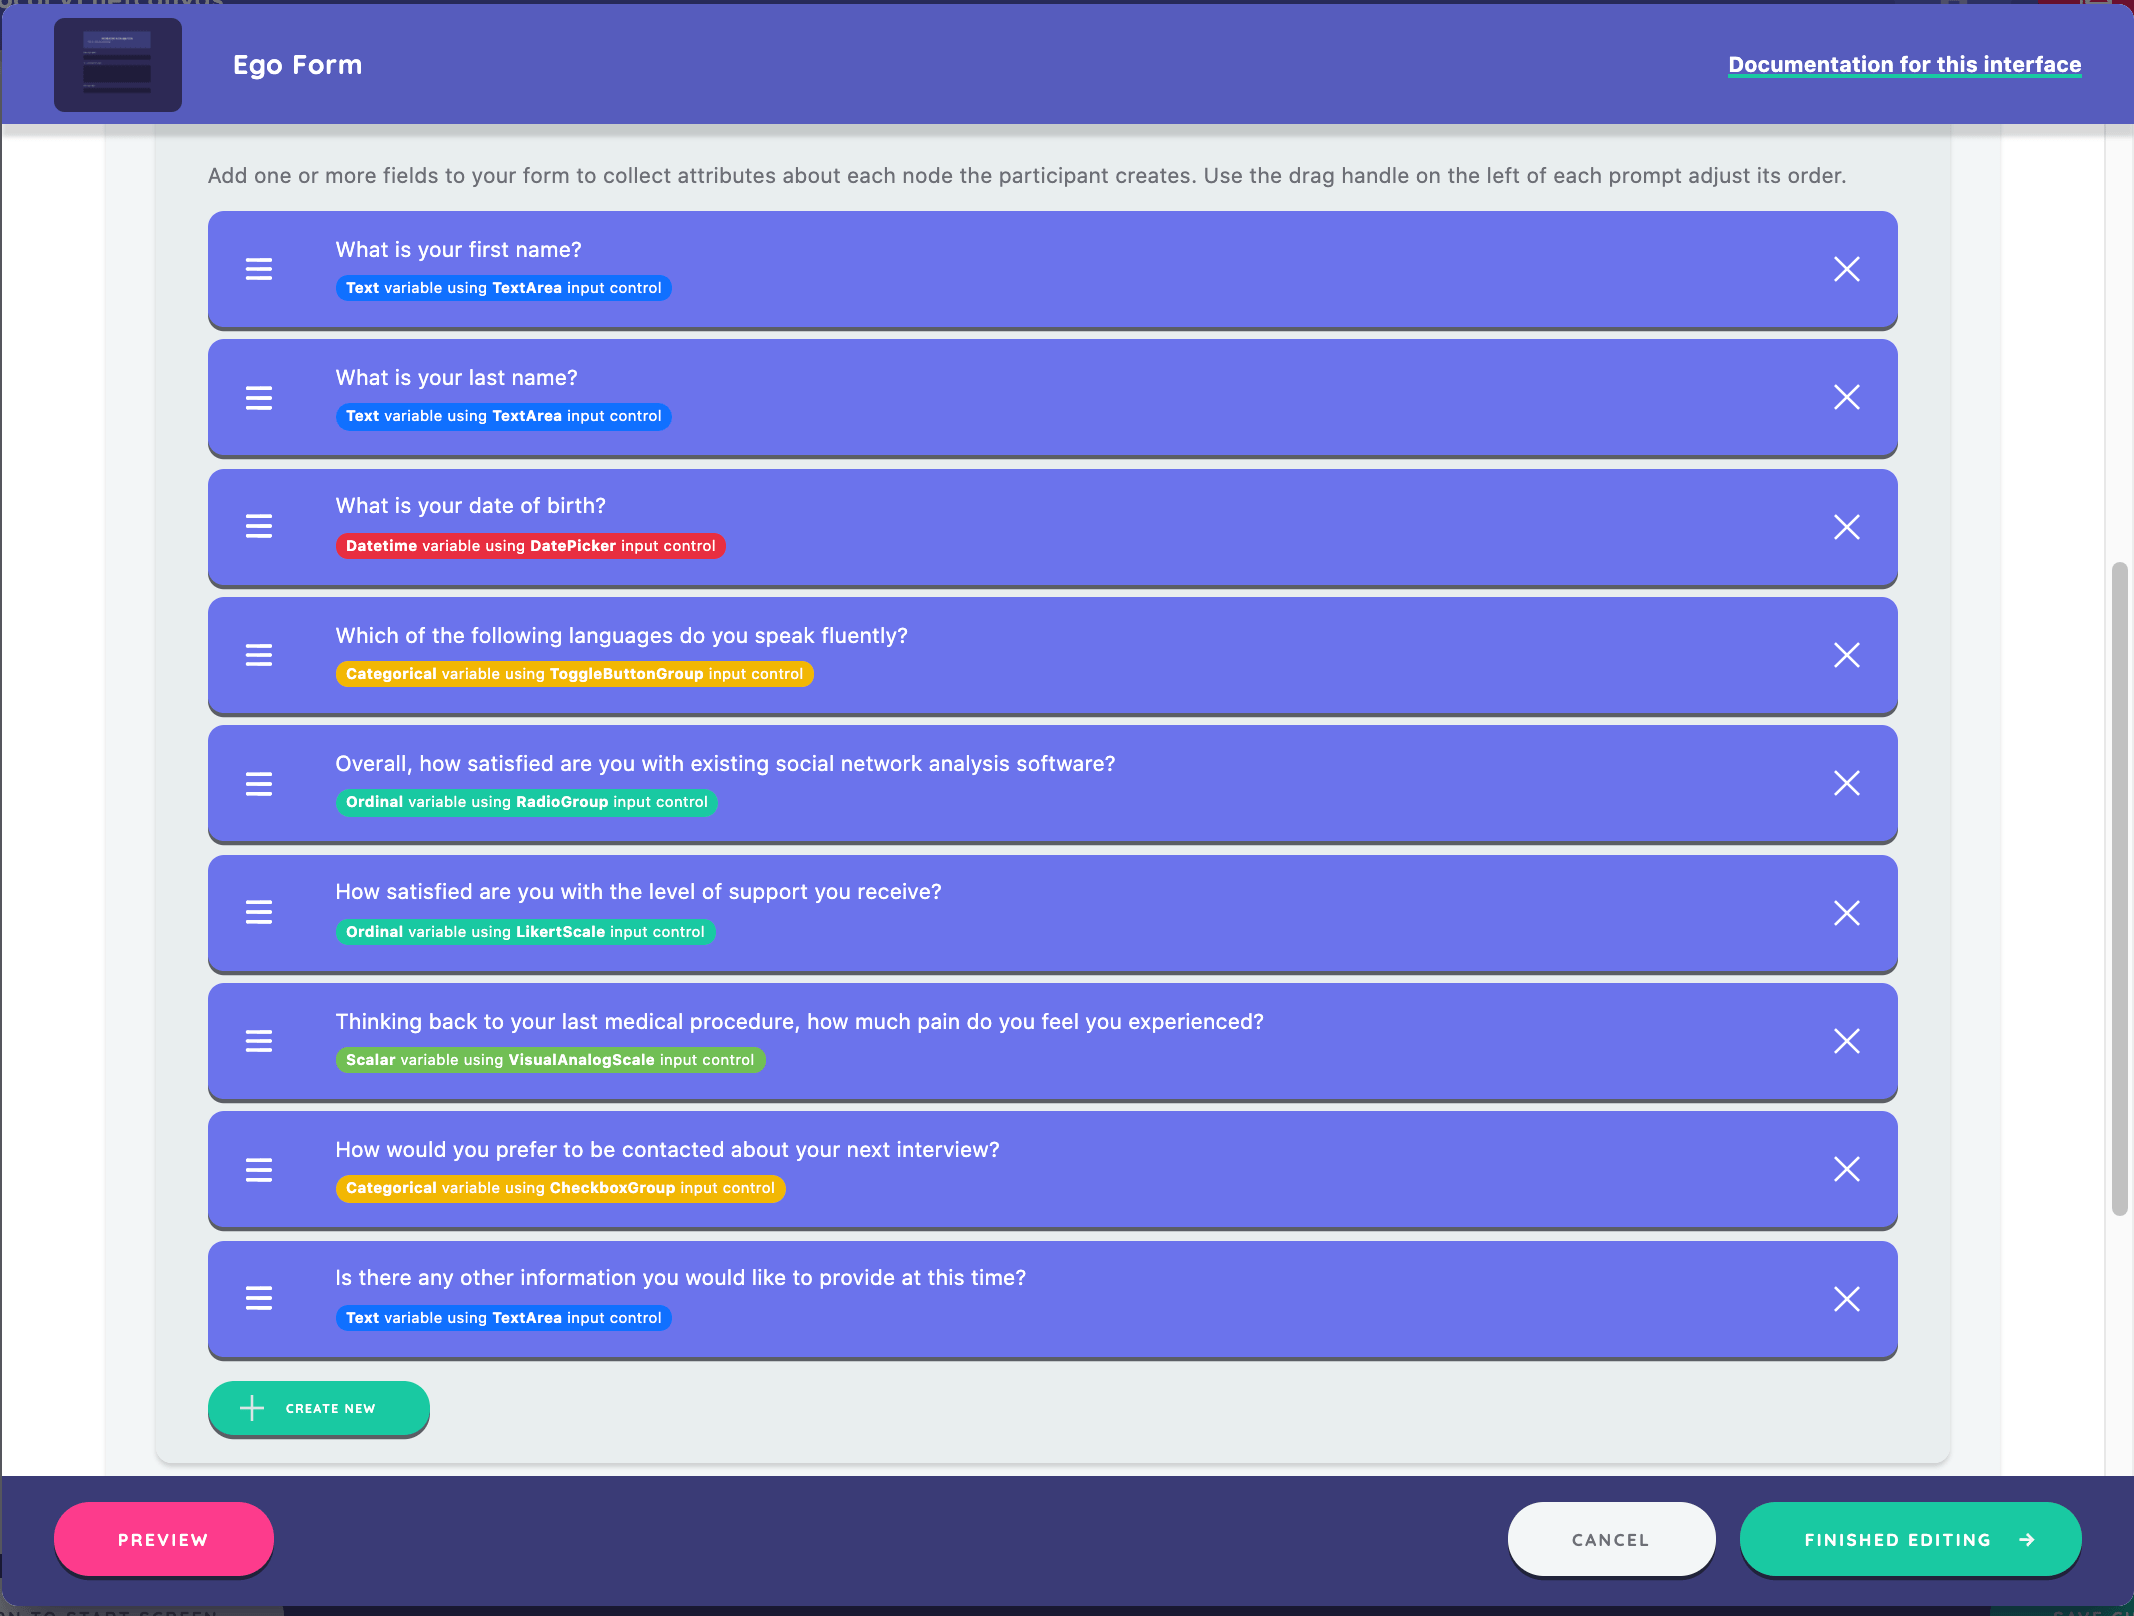
To demonstrate the range of input control options, this example implements far more fields than would typically be best practice for a form within an interview. For more information, see the input controls guide.
Click Save and Return to go back to the timeline view and implement the next stage.
Creating a Per-Alter Form
Next, repeat that process, but this time create a form that will capture data from alters on the Per-Alter Form interface. Create a new stage using the Per-Alter Form interface and set the stage name. Next, select the node type "University" and scroll down to configure the information panel.

Add just two fields to this form. Here are the details you need, following the same process as above:
- Variable called
visit_or_study, prompt of "Did you visit this university, or study there?", input control of Radio Button Group with options "Visited" and "Studied", Required validation - Variable called
overall_review, prompt of "Overall, how would you describe your experience at this university?", input control of Likert Scale with options "Excellent", "Above Average", "Average", "Below Average", "Poor"
When finished, save and return to the overview screen of your protocol.
Creating sociograms
For the next stage, use the Sociogram interface. The Sociogram is an interface designed to allow participants to interact with the alters produced within Name Generator stages in three principal ways:
- Layout, where the participant spatially arranges the nodes
- Edge creation, where the participant can create alter-alter ties
- Variable toggling, where the participant can nominate alters as having a given boolean attribute
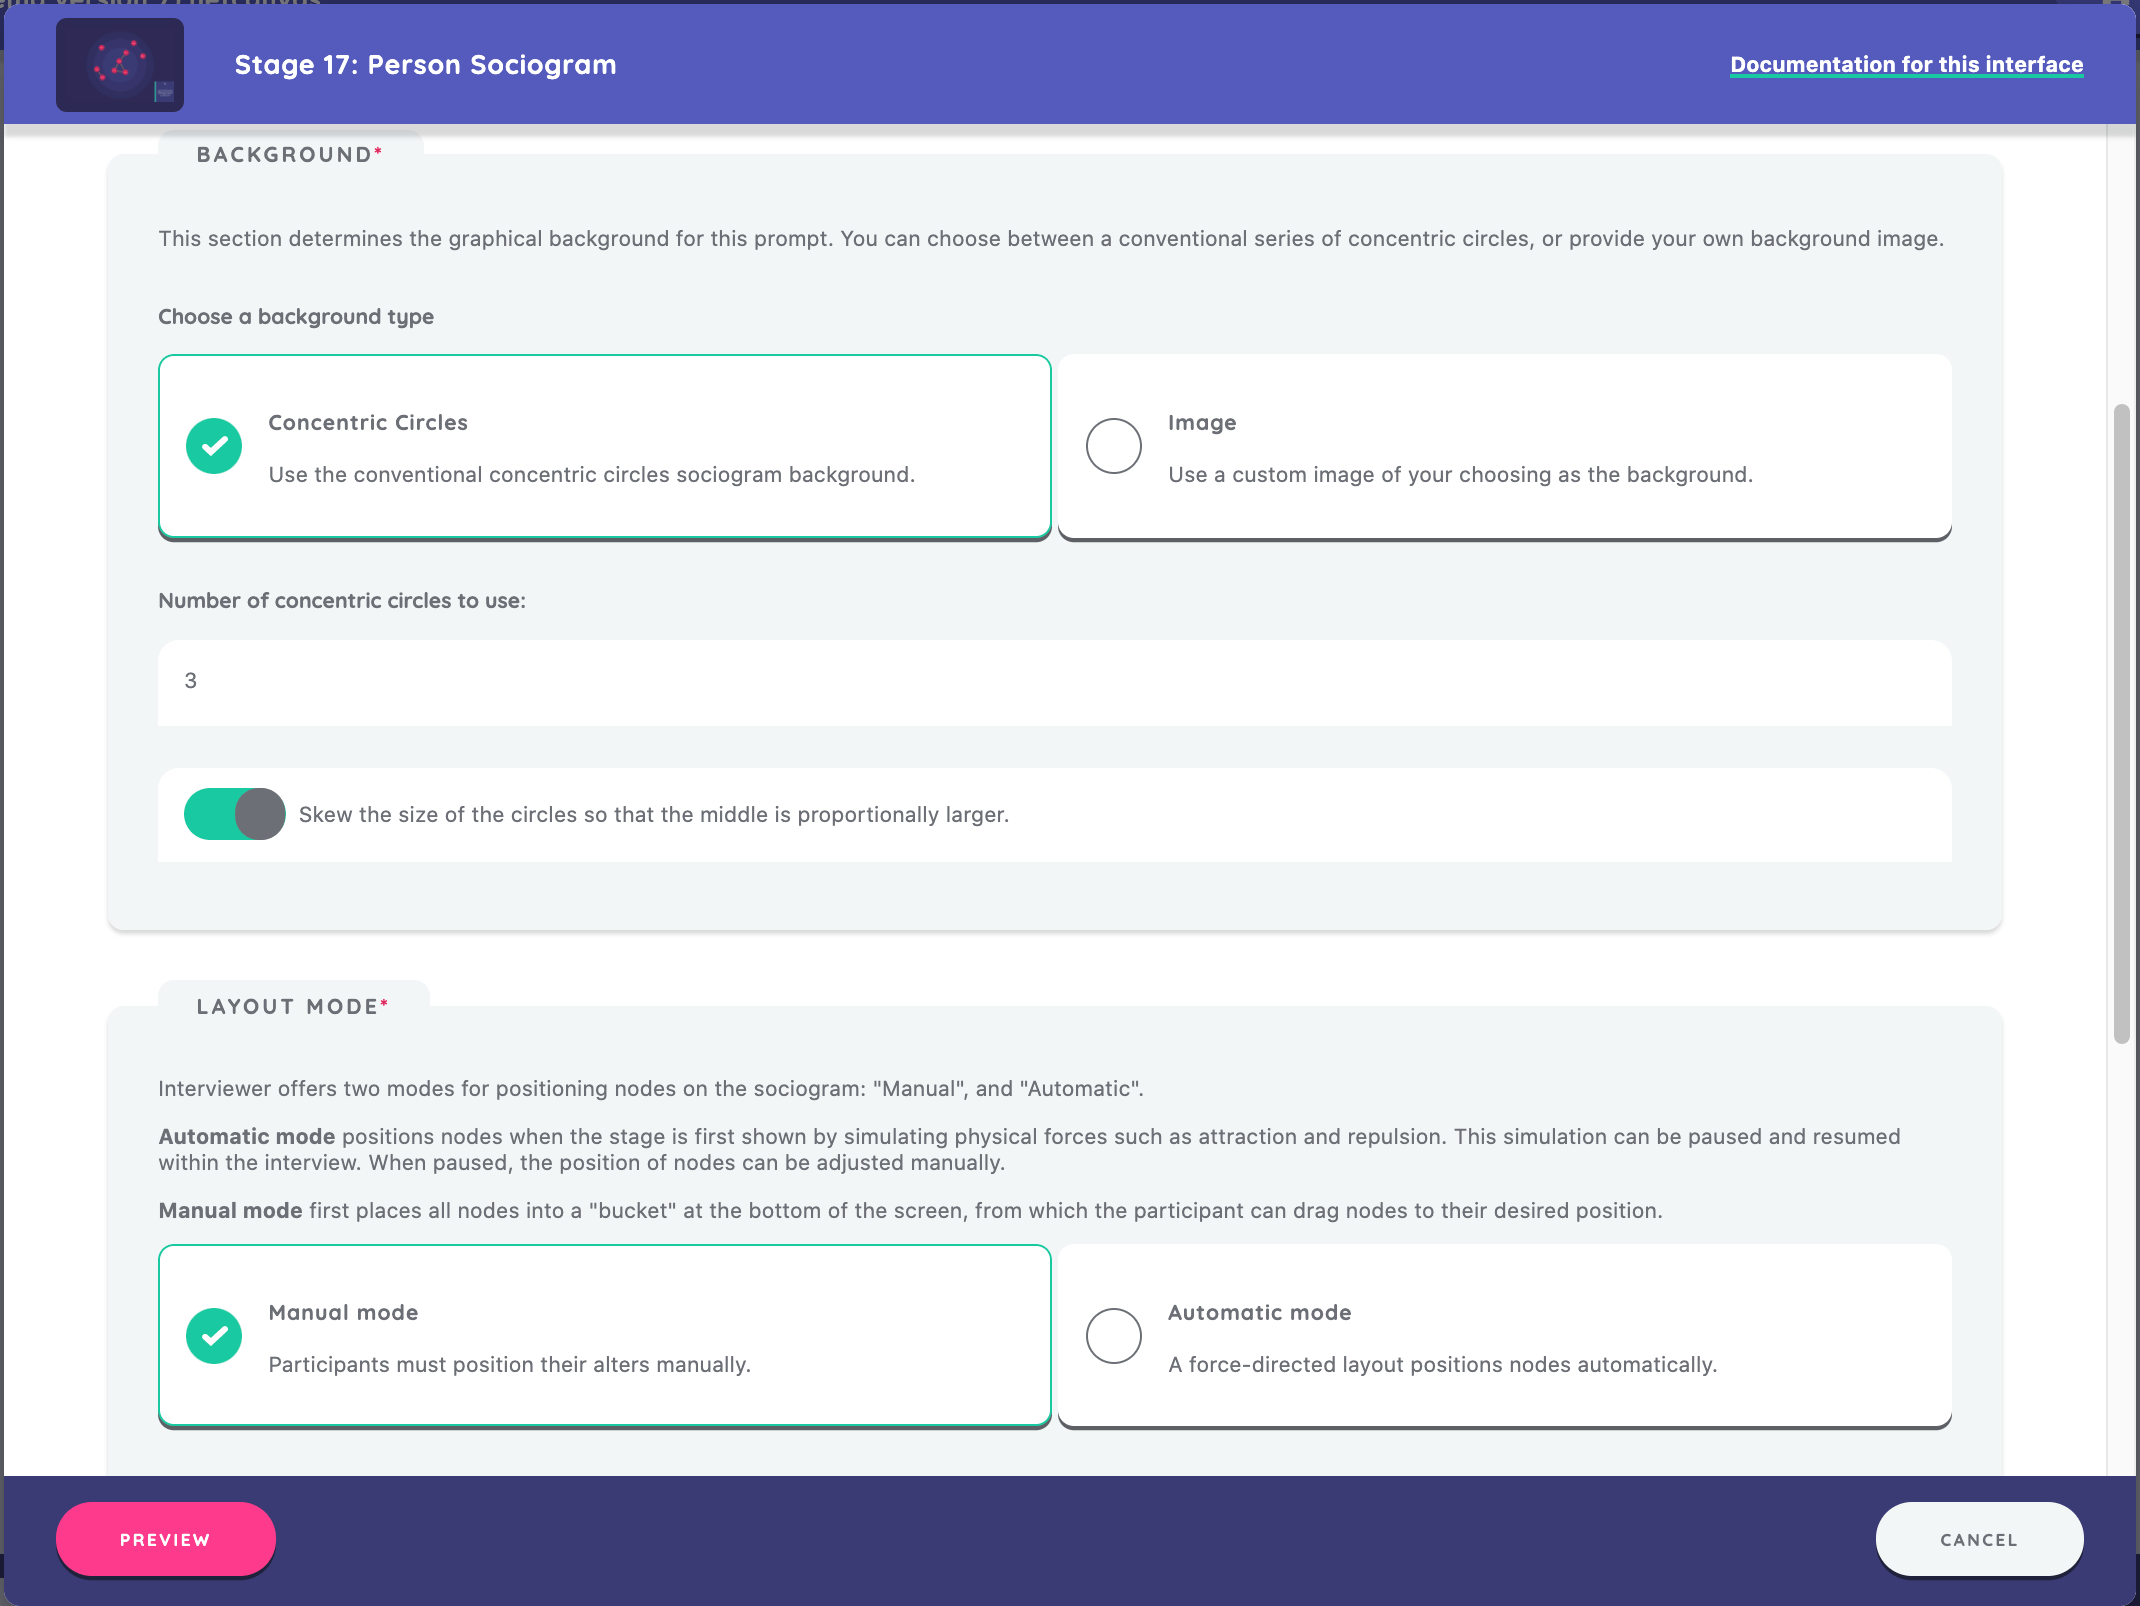
Create the stage, set a stage name, and select the "Person" node type.
Node Positioning
Next we need to choose a background image for the Sociogram. We can decide between using a default concentric circles background or adding our own image file from the resource library or from another location on our device. For this first example, we will choose the default option and specify that we want 3 circles skewed so that the middle is proportionally larger.
Interviewer offers two modes for positioning nodes on the sociogram: "Manual", and "Automatic".
- Automatic mode positions nodes when the stage is first shown by simulating physical forces such as attraction and repulsion. This simulation can be paused and resumed within the interview. When paused, the position of nodes can be adjusted manually.
- Manual mode first places all nodes into a "bucket" at the bottom of the screen, from which the participant can drag nodes to their desired position.
For this example, we will choose manual mode.
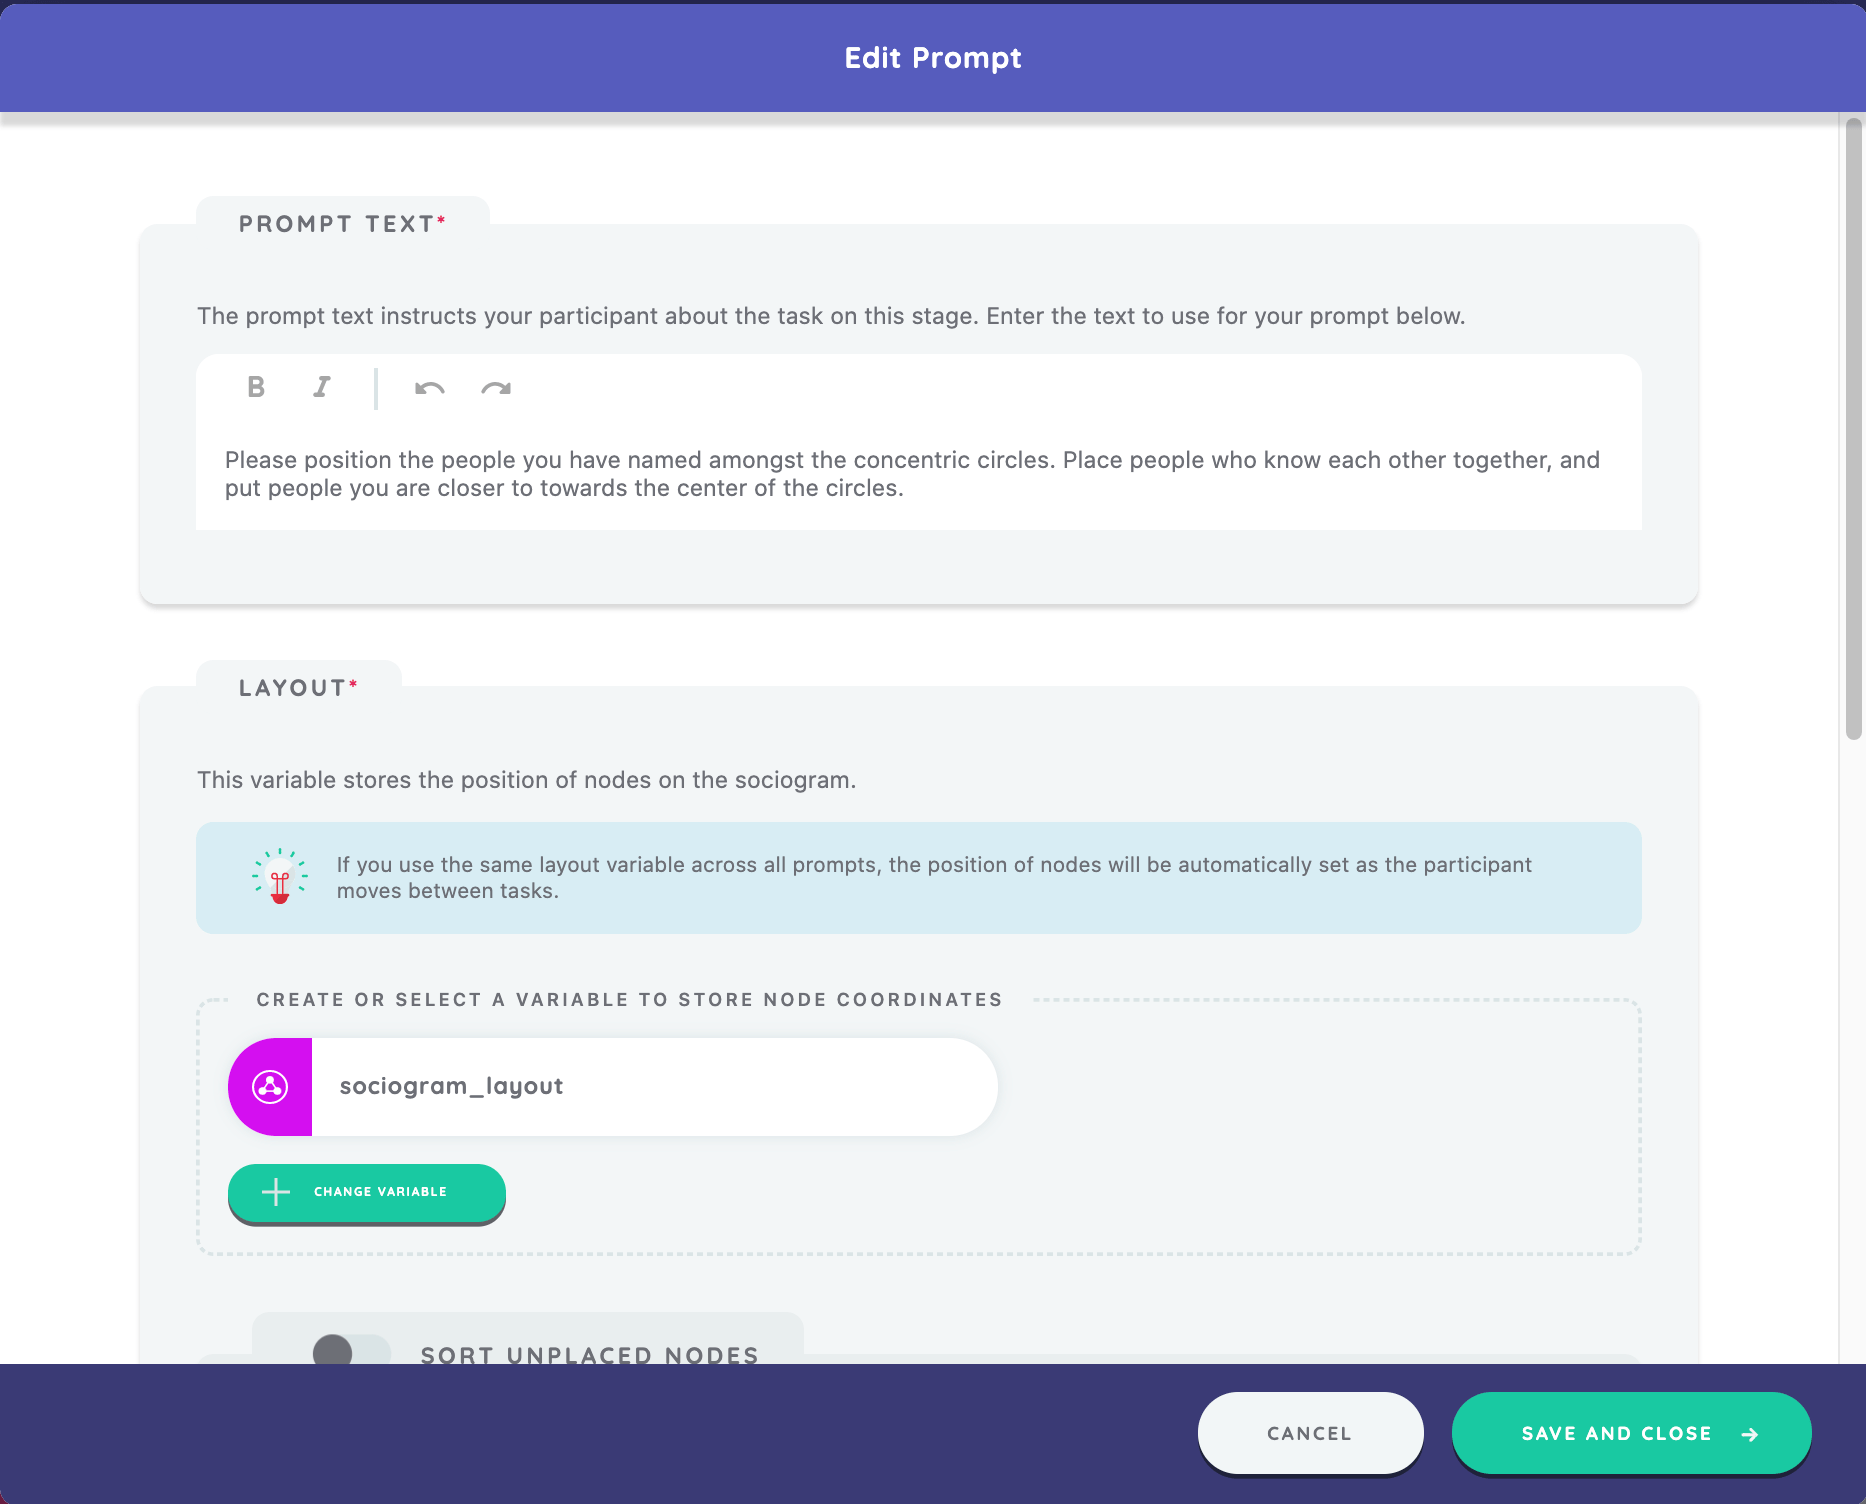
We will add a prompt for the stage that reads, "Please position the people you have named amongst the concentric circles. Place people who know each other together, and put people you are closer to towards the center of the circles."
You will see that when creating a prompt on the Sociogram, you have the option of defining a layout variable.
The layout variable will be used to store the X/Y coordinates of the nodes when the participant positions them on the screen. If you have multiple prompts on your Sociogram, you may wish to use the same variable layout for each (which will keep the nodes positioned as they originally are by the participant) or you may wish to create a new layout variable for each prompt (which would require the participant to reposition the nodes each time). In this example, we will create a "sociogram_layout" variable for this stage.
We finish by clicking "Save and Close" to close the prompt editor, then "Save and Return" to save the stage.
Background Images
Now we'll configure another Sociogram, but this time we'll bring in an image asset to serve as the background. Follow all the previous steps, but now choose an image as the background type instead of using the concentric circles. If you have an image file saved to your resource library you can browse for it, otherwise you can add an image file saved elsewhere on your device. In this case, we designed a quadrant image where we will ask the participant to drag their alters based on the context of the relationship.
As before, we will enter a prompt and not assign a task for the stage. The prompt text is, "Please position the people you have named in the boxes according to which group you feel they most belong to." We save the stage and move on to the next.
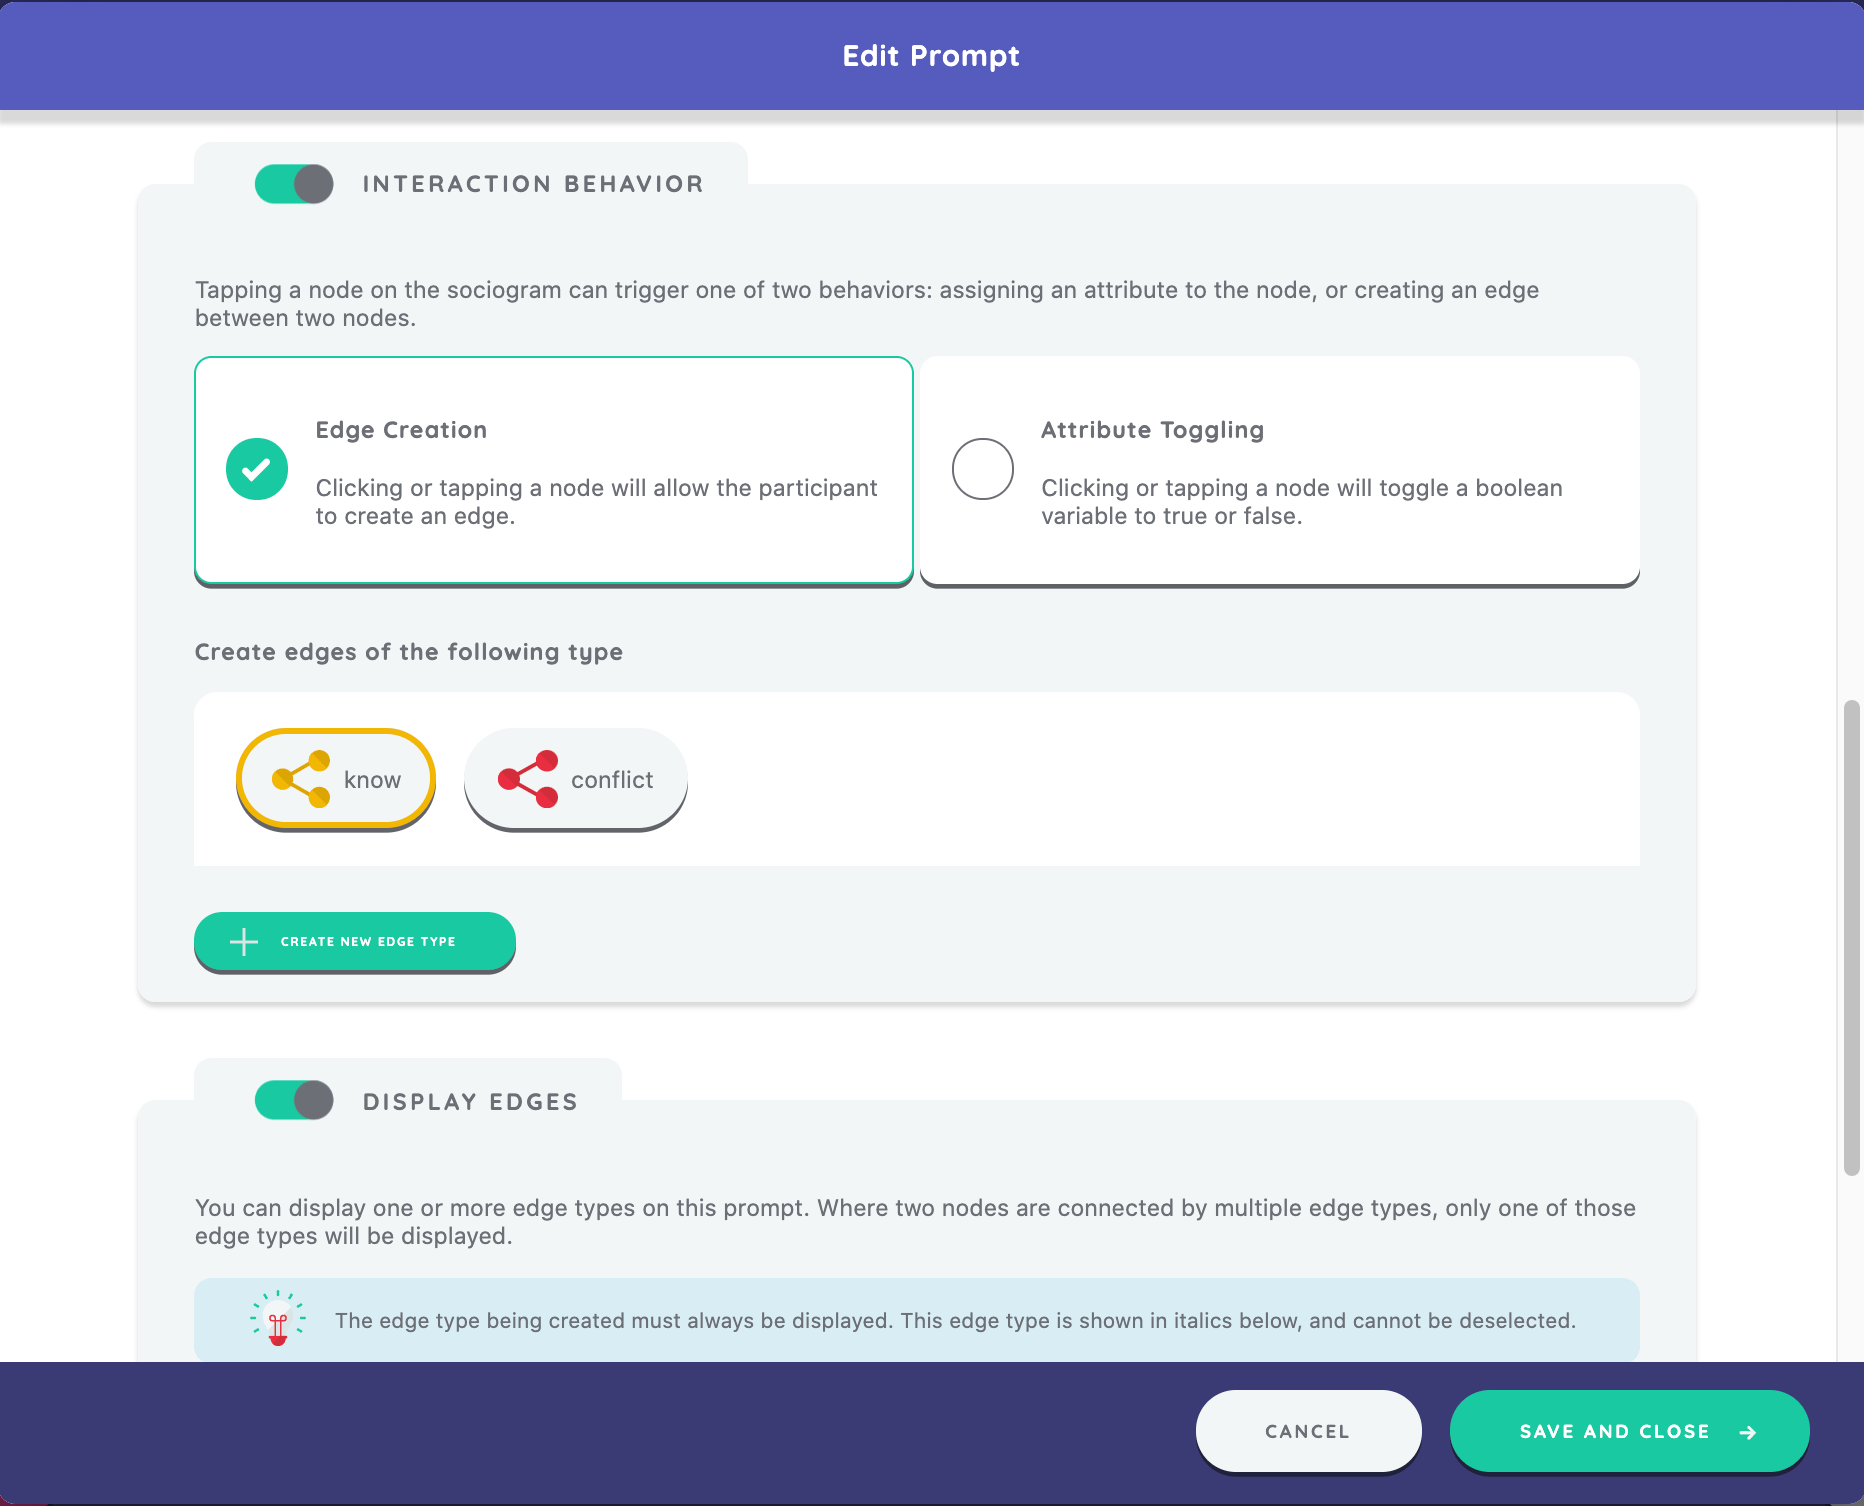
Edge Creation
We will create another Sociogram stage to experiment with creating edges. For this stage we'll use node type "Person" and the concentric circles background with 3 circles skewed.
We create our first prompt, "Please connect any two people who might spend time together without you being there" and we use the sociogram_layout variable we already created.
Now we will enable edge creation on a Sociogram prompt, by toggling the switch "Interaction Behavior" and selecting the "Edge Creation" option, in the "Edge Display and Creation" section.
The sociogram is the primary location within the interview where edges are created. A sociogram prompt can only create a single edge type at a time, but note that it can display several.
In the scenario where multiple edge types are selected for display, creating a new edge that would cover an existing one works simply - the existing edge is visually replaced with the new edge type. Both edges are still stored in the interview network. Removing this new edge will revert the visual display to the previously visible edge type (only one edge type can be created or removed on a prompt).
You may consider using this feature to progressively build up a network, by allowing the participant to use the visual "scaffolding" of existing edges to quickly identify where to create new ones.
In the next box, we will either create a new edge type or select an existing one. Since we have not yet created any edge types, we will create a new type called "know" to correspond with the prompt.
We click "Save and Close" to return to the Sociogram editor.
Next, we add another prompt, "Please connect any two people who have conflict, or who don't get on well with each other" and use the same sociogram_layout variable.
We also choose edge creation as the task for the stage, but create a new edge type of "conflict" as we will now be capturing alter-alter ties that are conflictual.
Implementing the Dyad Census
By now you should have a feel for the process of configuring a stage within Architect. We will continue by adding a Dyad Census Interface stage to our interview, which builds on many of the concepts we have already covered.
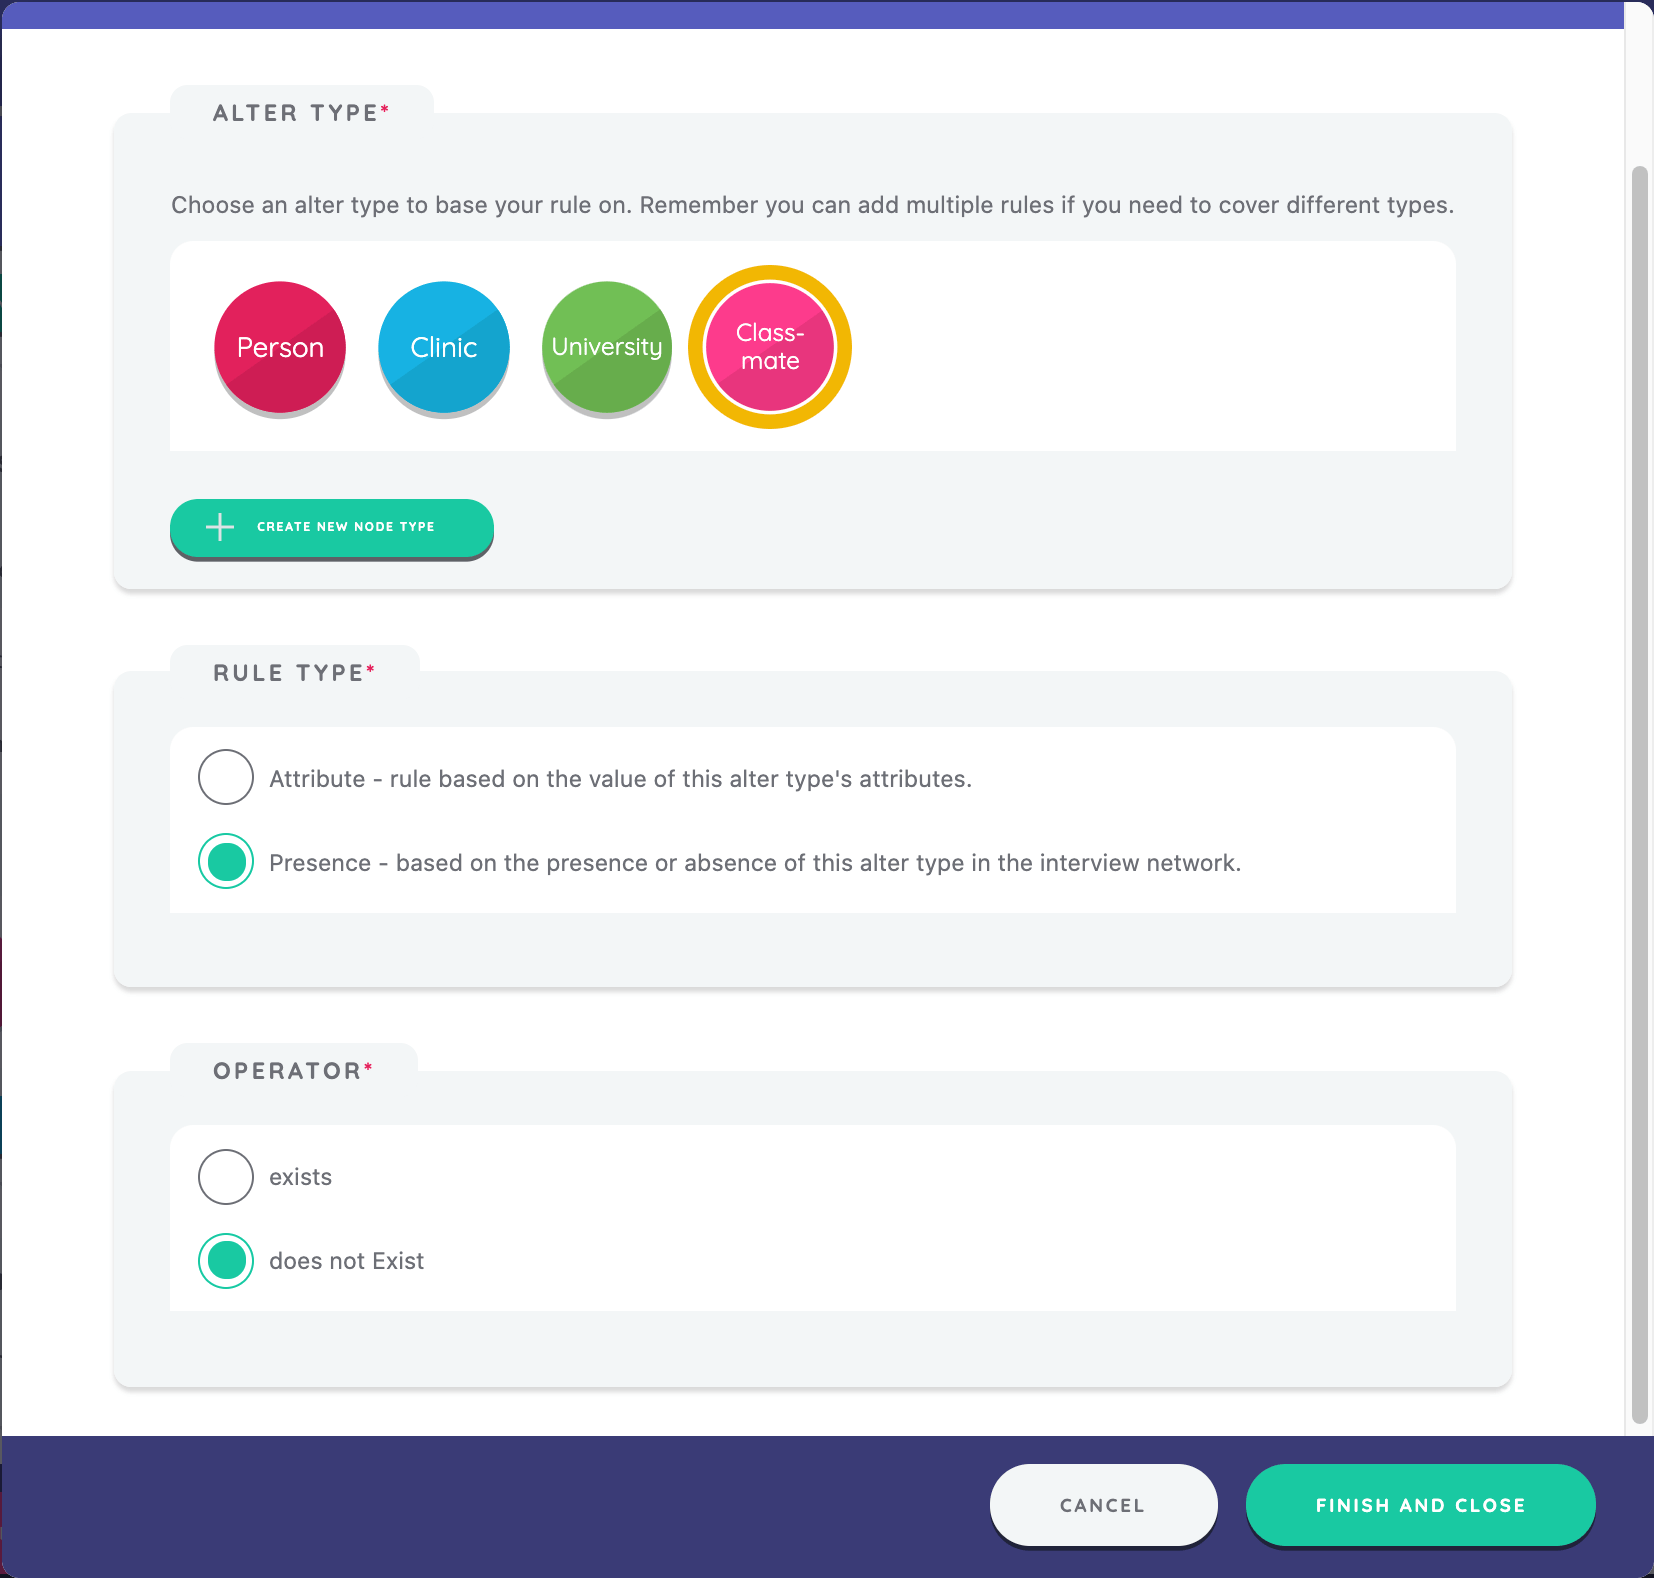
From the timeline overview, click the "Add New Stage" button, and select the Dyad Census interface. Again, we name the stage and this time we select node type "Classmates."
We will next implement skip logic so that the stage will only show for participants who nominate at least two classmates on the small roster name generator implemented previously. We do this by toggling the switch to enable skip logic for the stage, selecting "Skip this stage if", and, then, defining an alter rule by clicking the "Add Alter Rule" button to define the equation.
We define the rule by selecting the alter node type of "Classmate", then selecting rule type of "Presence", and, finally, selecting "Does not Exist."
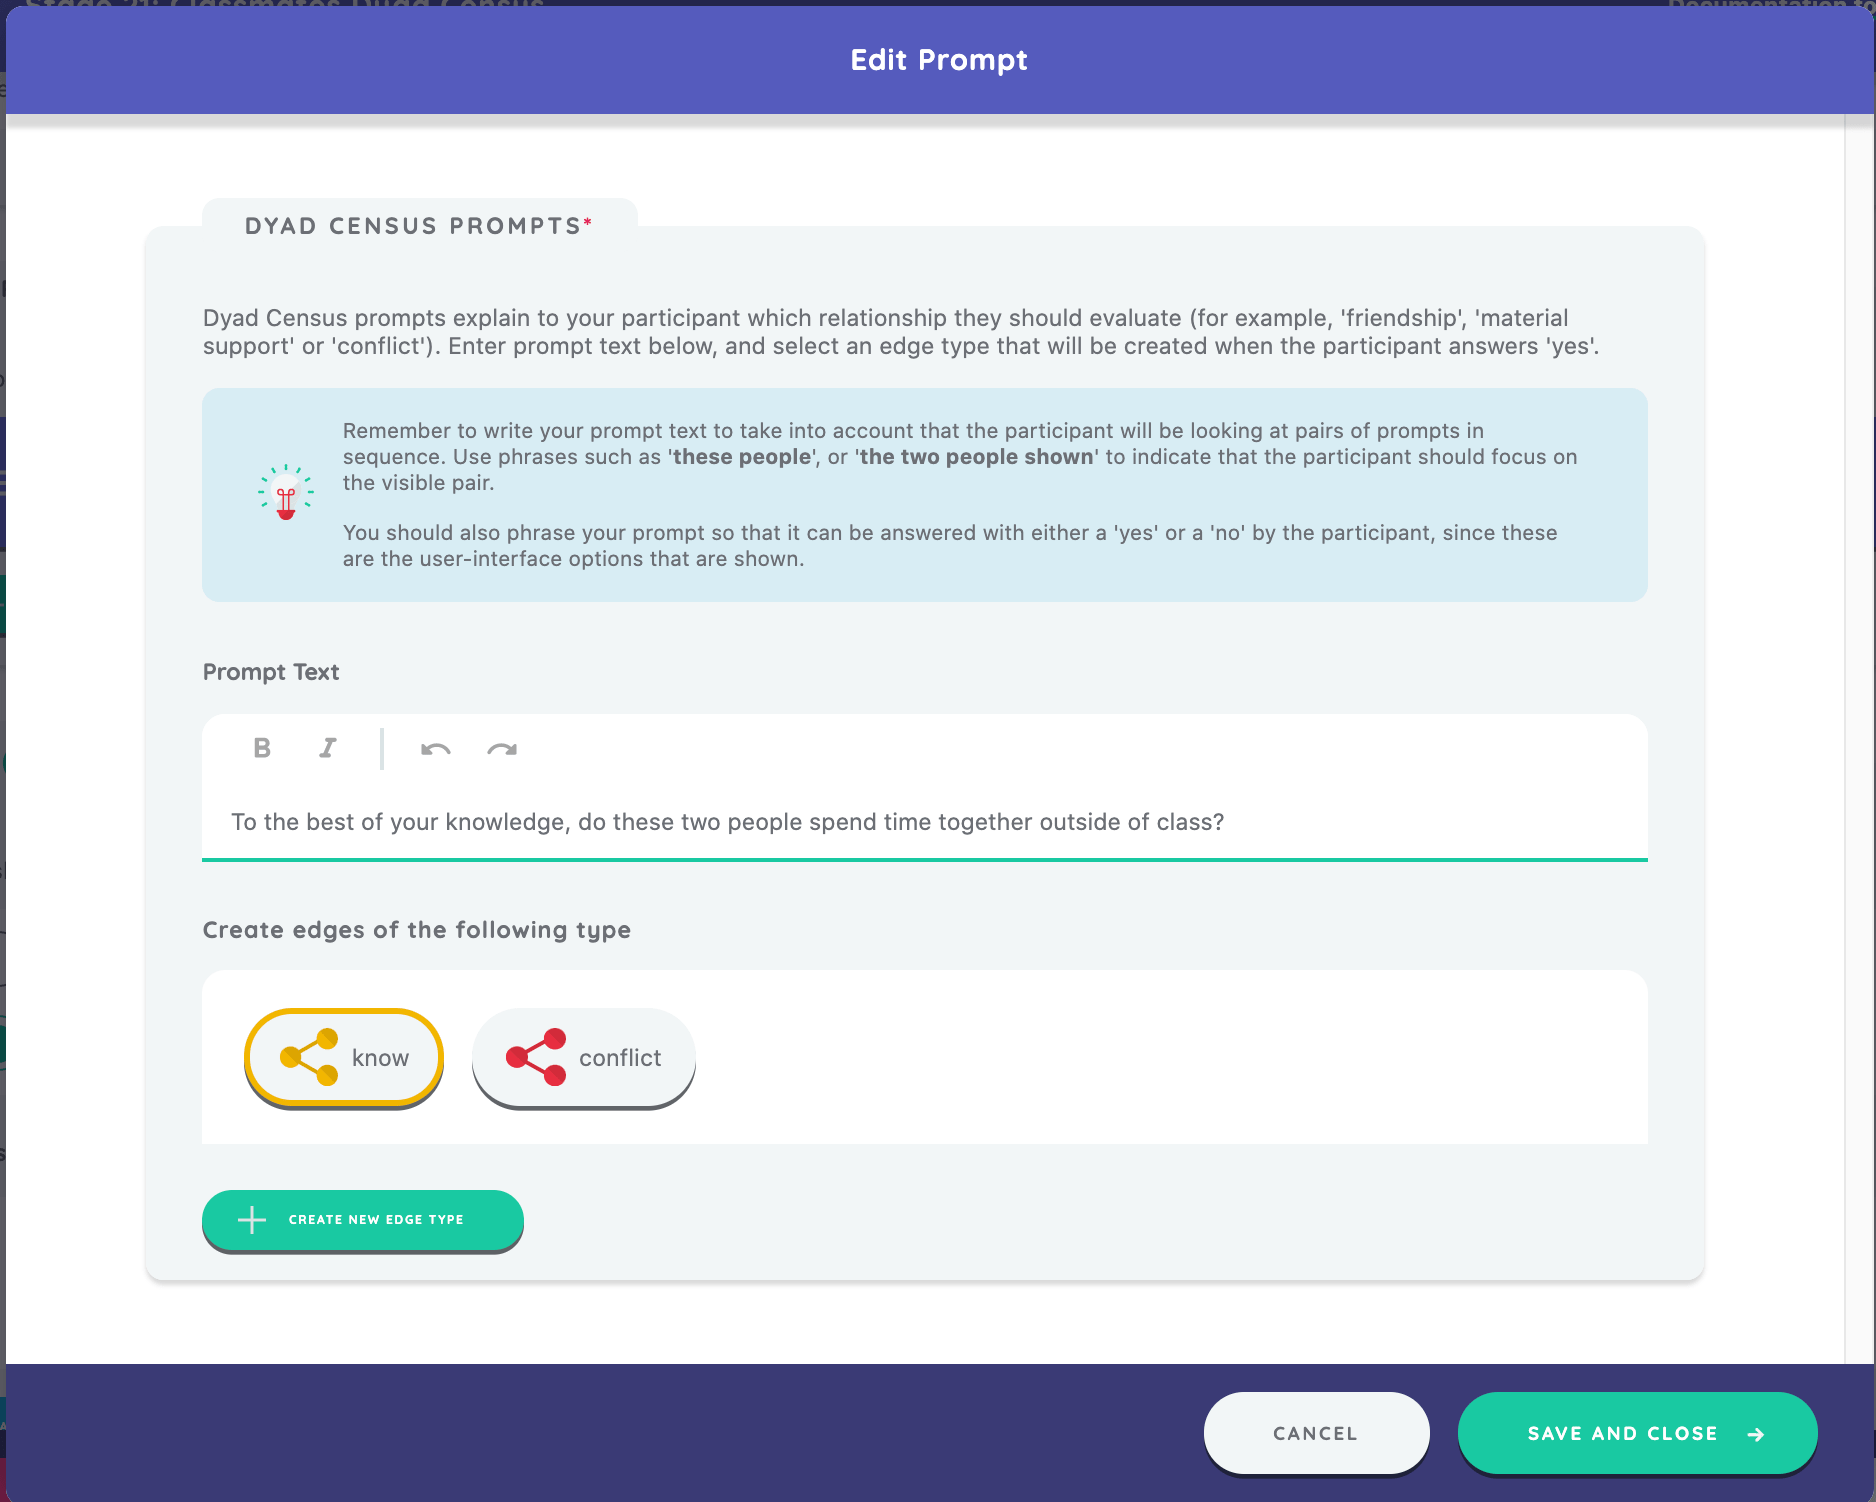
As on other name interpreter interfaces, we will also configure the Introduction Panel and define a prompt. For this stage, we enter the prompt, "To the best of your knowledge, do these two people spend time together outside of class?" We previously created two edge types on the sociogram which appear available for our use on this prompt. We will select the "know" edge type since we are asking the participant whether any two classmates know one another.
Toggling an Attribute
In our final Sociogram stage in this protocol, we will implement attribute toggling - or the action that allows a participant to toggle a boolean variable to "true" or "false" by tapping a note.
Once again, we create the stage, set the stage name, select the "Person" node type, and use the concentric circle background with 3 circles skewed.
Next, we create a new prompt, with the text, "Please select anyone who you have asked for advice within the previous 6 months". Re-use the layout variable ("sociogram_layout") we created previously.
We do not want to enable edge creation on this prompt, as it would disable the attribute toggling function (the two modes are mutually exclusive). However, we can still display edges in order to help the participant locate nodes.
To do this, select "Know" and "Conflict" under "Display edges of the following type(s)".
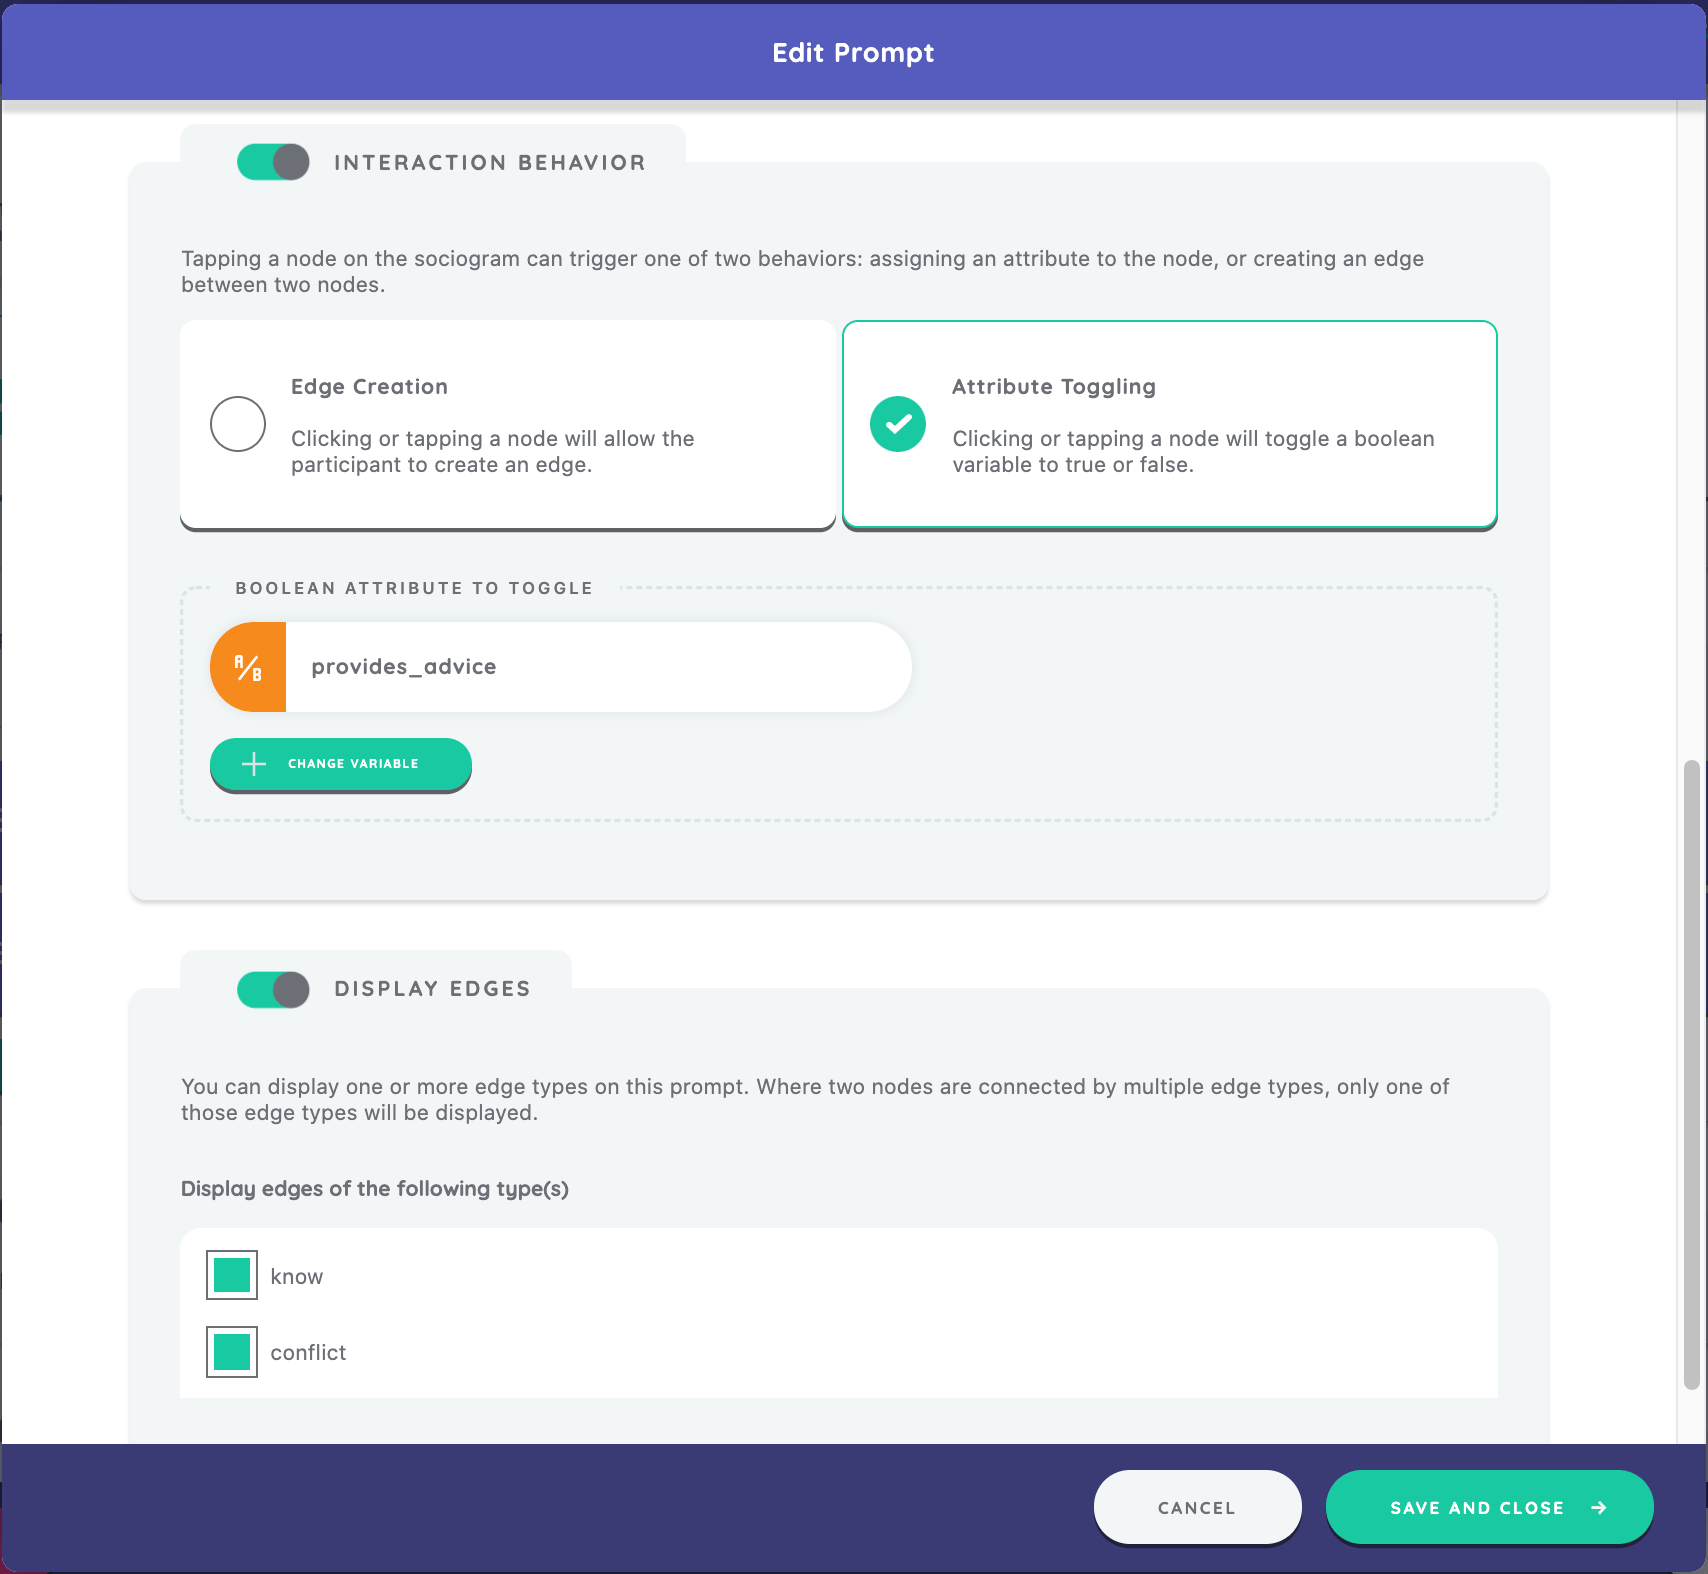
Configuring the sociogram prompt to enable attribute toggling involves three steps: (1) toggle "Interaction Behavior", (2) select "Attribute Toggling", and (3) create (or select) a boolean variable to be assigned in the box that appears below.
In this case of this prompt, using the techniques we have already covered, create a variable called "provides_advice" and press "Save and Close".
We will now complete the exact same steps for the second prompt, which reads, "Please select anyone who has supported you financially within the previous 6 months." This time, we will create a boolean variable of "provides_material_support."
We have now finished configuring this sociogram stage.
Creating an ordinal bin
You now want to create an Ordinal Bin interface to quickly and efficiently ask your participant about the frequency of contact they have with each alter. From the timeline overview, add a new stage using the Ordinal Bin interface.
As with previous interfaces, begin with naming the stage ("Contact Frequency"), and selecting our node type ("Person").
Most of the configuration for this interface happens within the prompt. Create a new prompt, and enter the text, "When was the last time that you communicated with each of the people you named?".
Next, we need to create an ordinal variable. This is fundamentally the same process that we carried out when configuring the language variable in our ego form. Every time we create an ordinal or categorical variable within Architect, we will enter a label and a value. The value is what will be stored in our dataset. Both text and numerical values are allowed. Complete the labels and values as in the screenshot below.
Create a variable named "communication_freq" with the following possible options:
| Label | Value |
| Last 24 hours | 5 |
| Last week | 4 |
| Last six months | 3 |
| Last two years | 2 |
| Over two years ago | -1 |
In the case of our prompt, we will use the default node bin and bucket sort options. Click "Save and Close" to finish editing this prompt, and then click "Save and Return" to return to the timeline view.
Creating a Categorical Bin
You should now be able to create a categorical bin interface using everything that you have learned so far. Add a new stage using the Categorical Bin interface, with the following characteristics:
- Named "Categorical Group Membership", and operating on the "People" node type.
- Using a categorical variable called "group" with the following options:
- Family Member
- Friends
- Work Colleague
- School
- With the prompt text, "Which of these options best describes how you know this person?"
- Toggle "on" the Follow-up "Other" option with bin label "other", question prompt "Which context best describes how you know this person?", and variable "group_other"
 As before, we will "Save and Close" and "Save and Return" to complete and save our edits on the stage.
Skip Logic & Network Filtering on the Categorical Bin
Next we will implement another Categorical Bin Interface. This time, we will create the stage as before, set the stage name to "Relationship Type" and select node type as "Person."
Now we will configure both the network filtering on the stage as well as the skip logic for the stage. First, toggle "Filter" to "on" and press the "Add Alter Rule" button. Next we will configure the rule according to the following: node type "Person", rule type "Attribute", variable query "discuss_network_research", operator "exactly", and attribute value of "True."
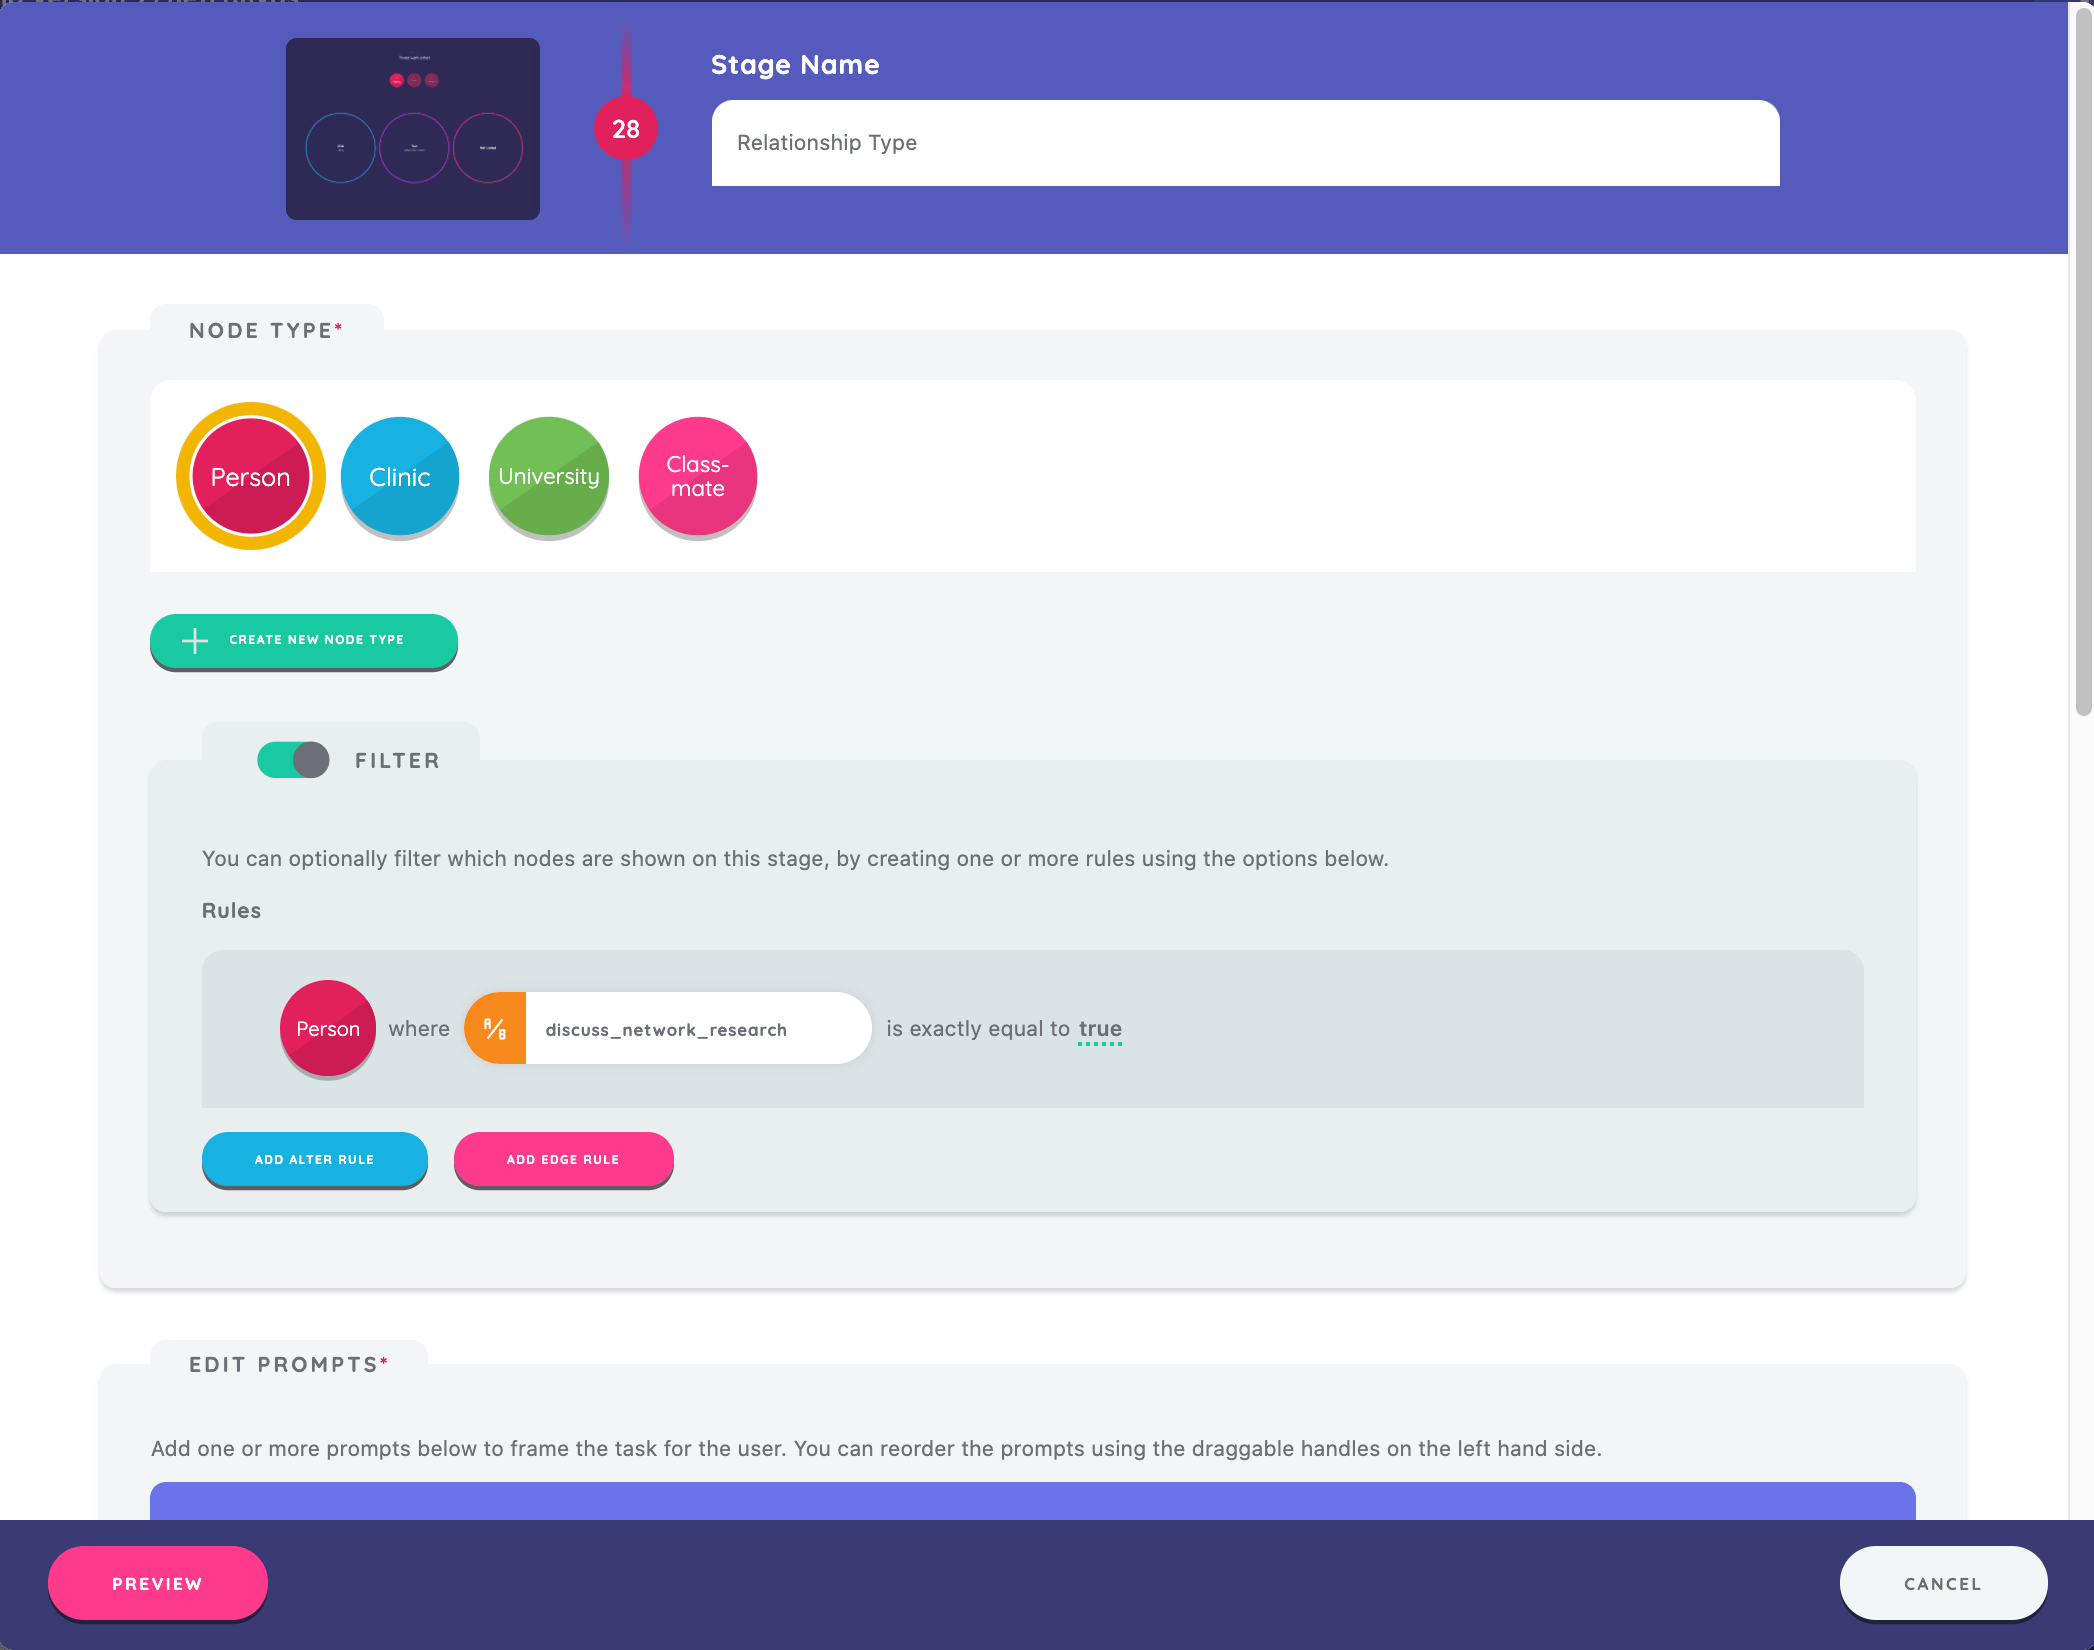
To enable skip logic, we toggle the "Skip Logic" switch to "on." Then we select "Show this stage if" and click the "Add Alter Rule" button. First, we configure the skip logic rule according to the following: node type “Person", rule type “Presence”, and operator “Exists.” Next, we configure a second skip logic rule as follows: node type “Person”, rule type “Attribute, variable query “discuss_network_research”, operator “is exactly”, and attribute value of “True.”.

Once configured, ensure the "must match" setting is "all rules", as above.
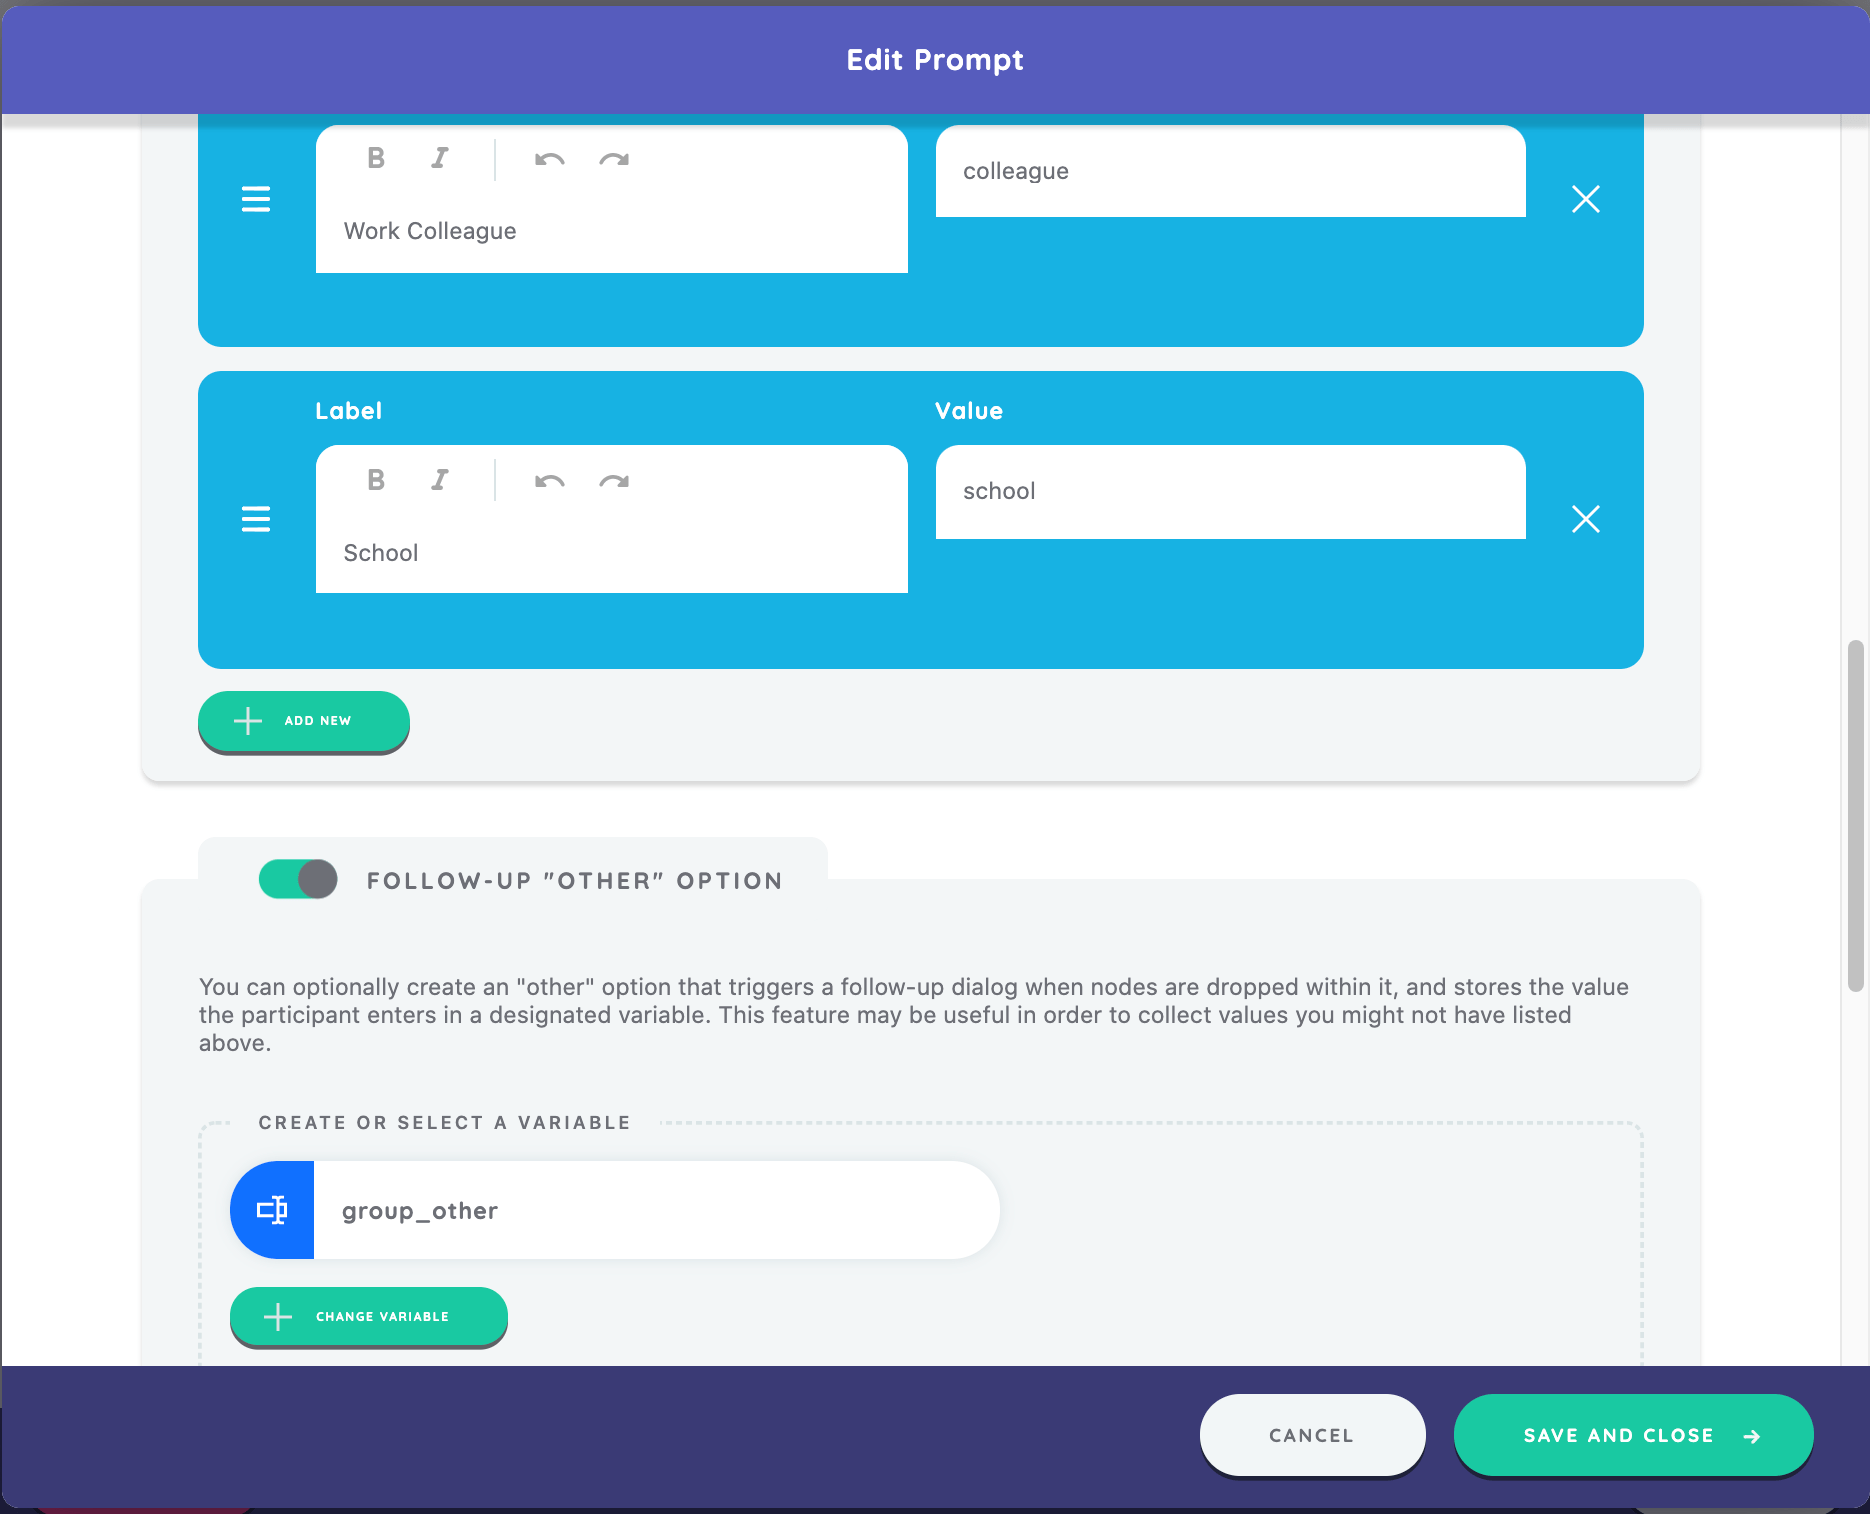
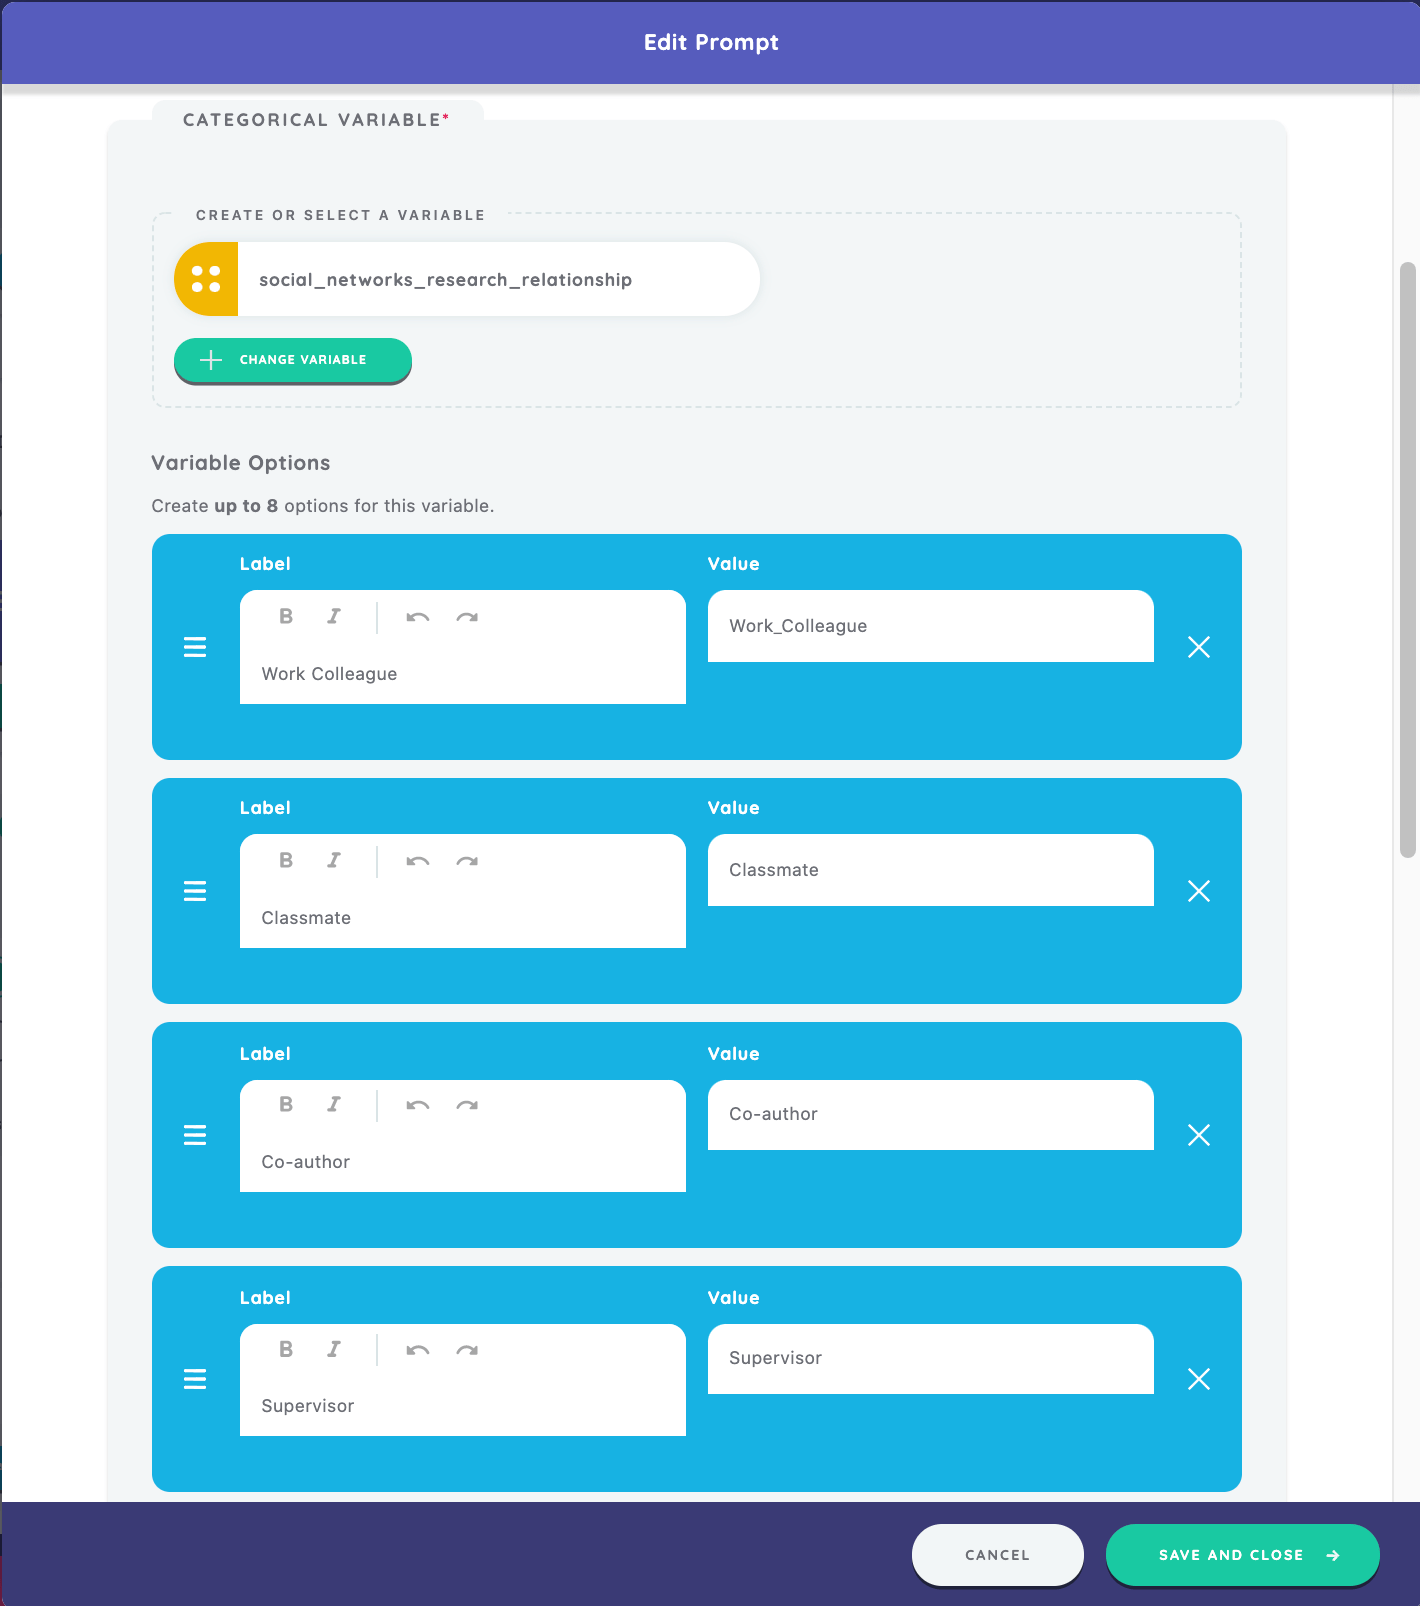
As a final step on this stage, we will create a prompt with the text, "You indicated that you've discussed social networks research with these people. Which category best describes your relationship with each person?" We will assign a categorical variable of "social_networks_research_relationship" with the following labels: Work Colleague, Classmate, Co-author, Supervisor. Type the corresponding values of "Work_Colleague", "Classmate", "Co-author", and "Supervisor."
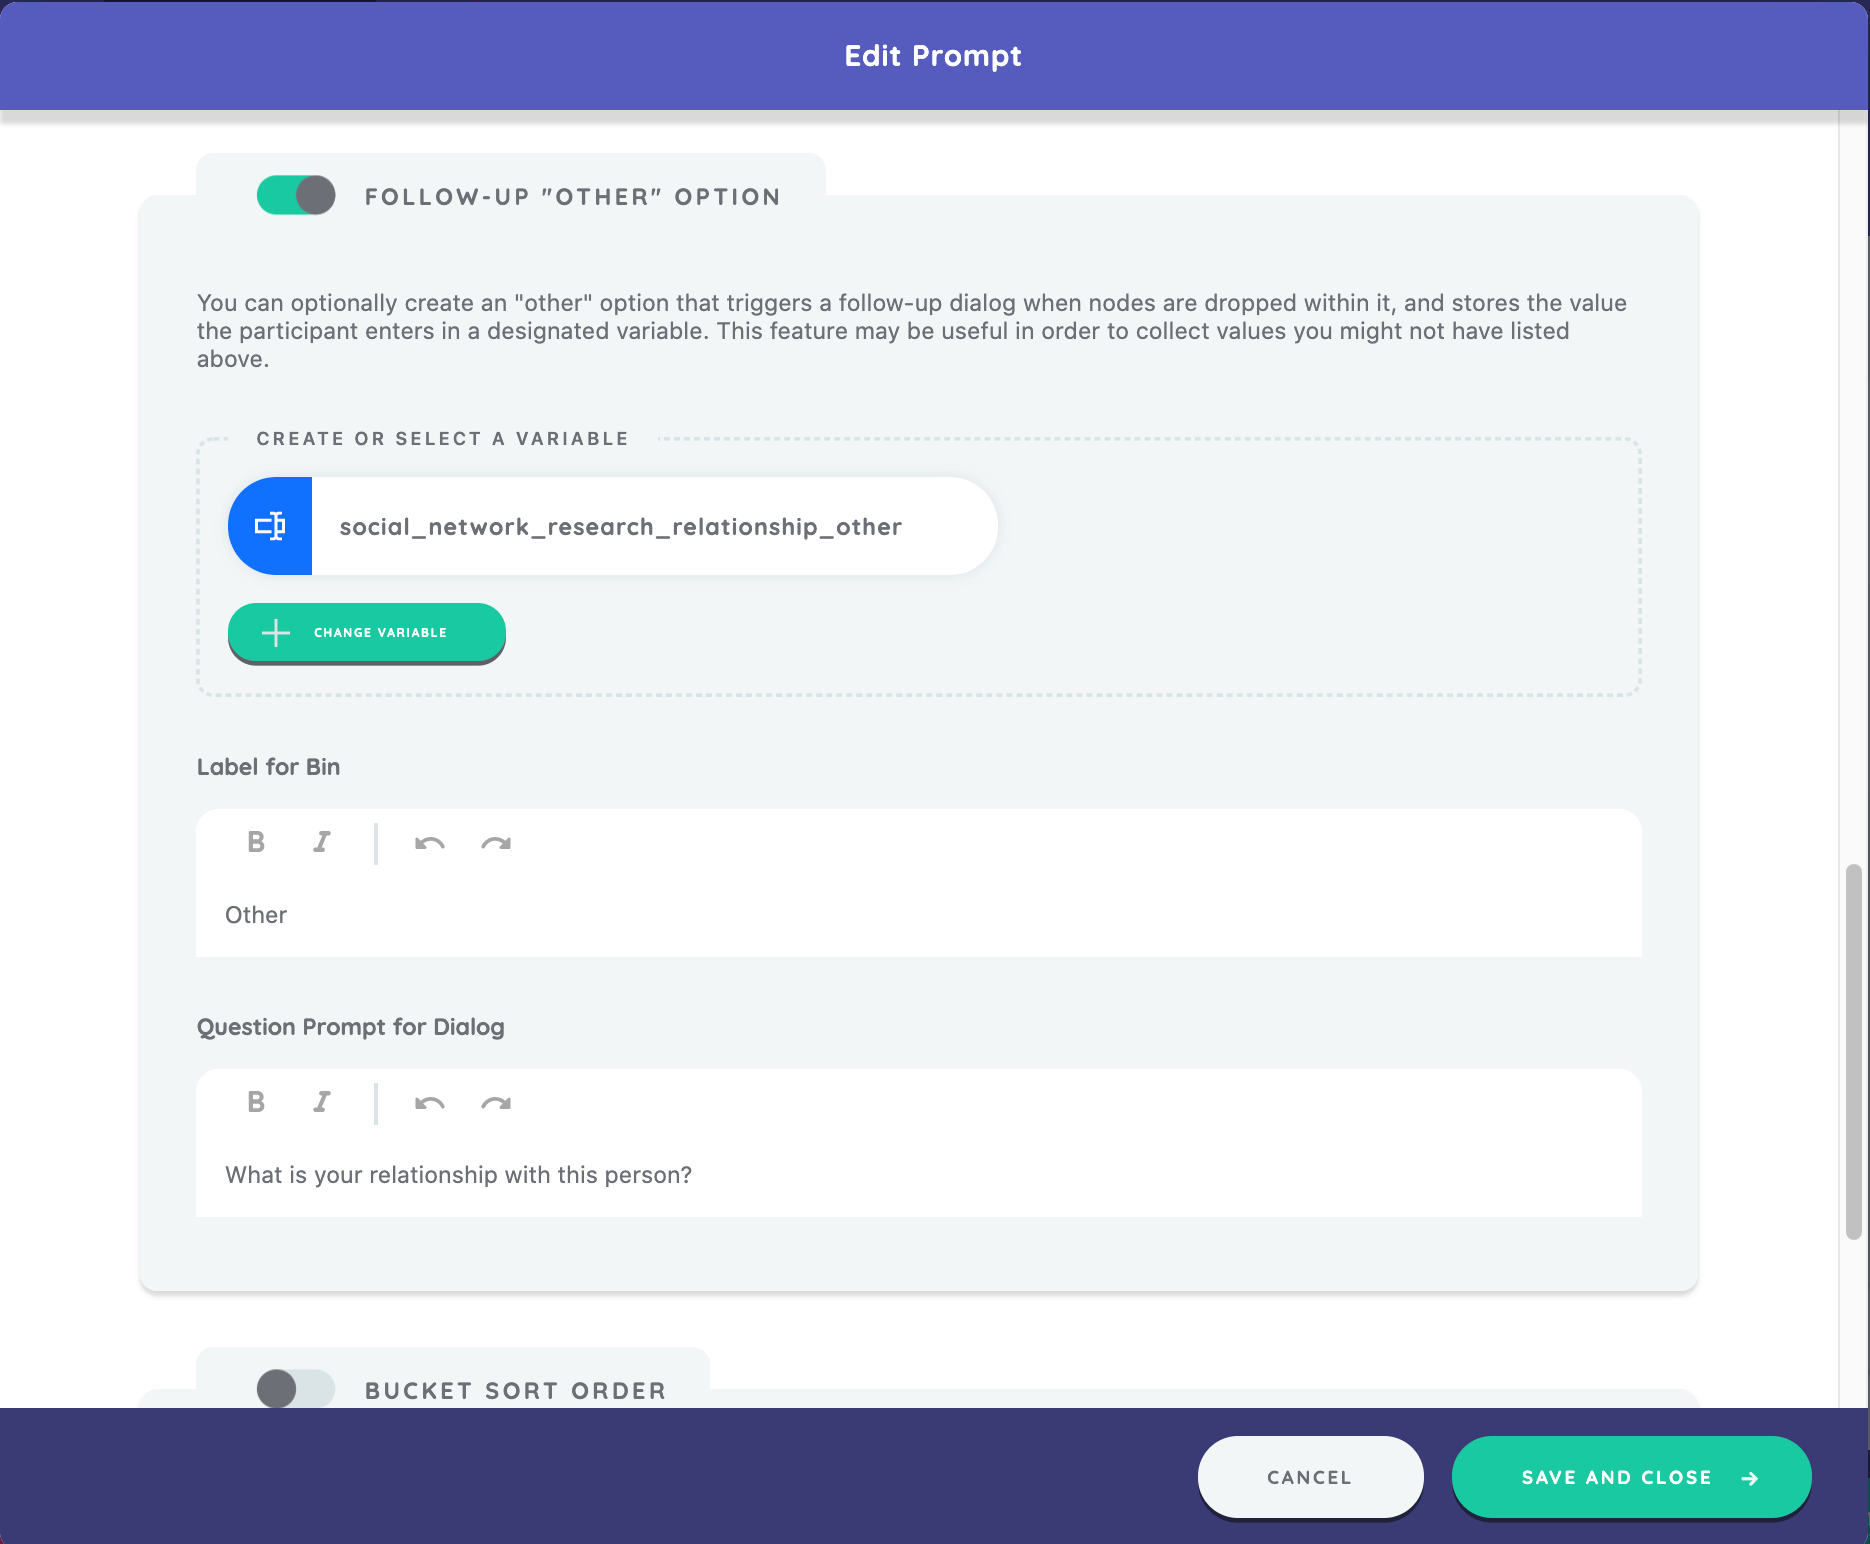
We will also include a "Follow-up "Other" Option" for this prompt. Toggle the switch in the section to "on", type the label for bin of "Other", type question prompt for dialog as "What is your relationship with this person?" and create a new variable to capture this attribute of "social_network_research_relationship_other."
We have now finished configuring this stage. Press "Save and Close" on the bottom right of the prompt editor, and "Return and Close" on the Categorical Bin Interface editor.
Creating the Narrative Interface
The last stage configured in this sample protocol is the Narrative Interface. As you have already learned, we will create a new stage (Narrative Interface), set a stage name ("Narrative Interface"), and select a node type ("Person"). Next we will choose to use the concentric circles background, but this time elect to use just 1 circle.

Configuring Presets
Narrative presets allow you to emphasize specific elements of a participant's network visually, such as nodes grouped by attribute characteristic or alter-alter relationships (edges). Once the presets are configured on this screen, they appear as a menu where each option can be toggled "on" or "off."
Now, let's configure presets for our sample interview protocol. Go to the section in the Narrative stage editor titled "Narrative Presets" and press the "Create New" button. We will give the preset a label of "Sample Preset." This label will appear at the top of the menu visible to the participant on this stage.
Next, we will select a variable to use to position the nodes for this preset in the "Layout Variable" section. We can choose to either create a new layout variable for this screen or use an existing one. In this case, we'll use the "sociogram_layout" variable we created before.
If we have collected data on a categorical variable and the participant has assigned that attribute to at least two nodes, we can visualize this grouping on the Narrative Interface. The "Group Variable" section will show all available categorical variables in our protocol. In this example, we choose the variable "group."
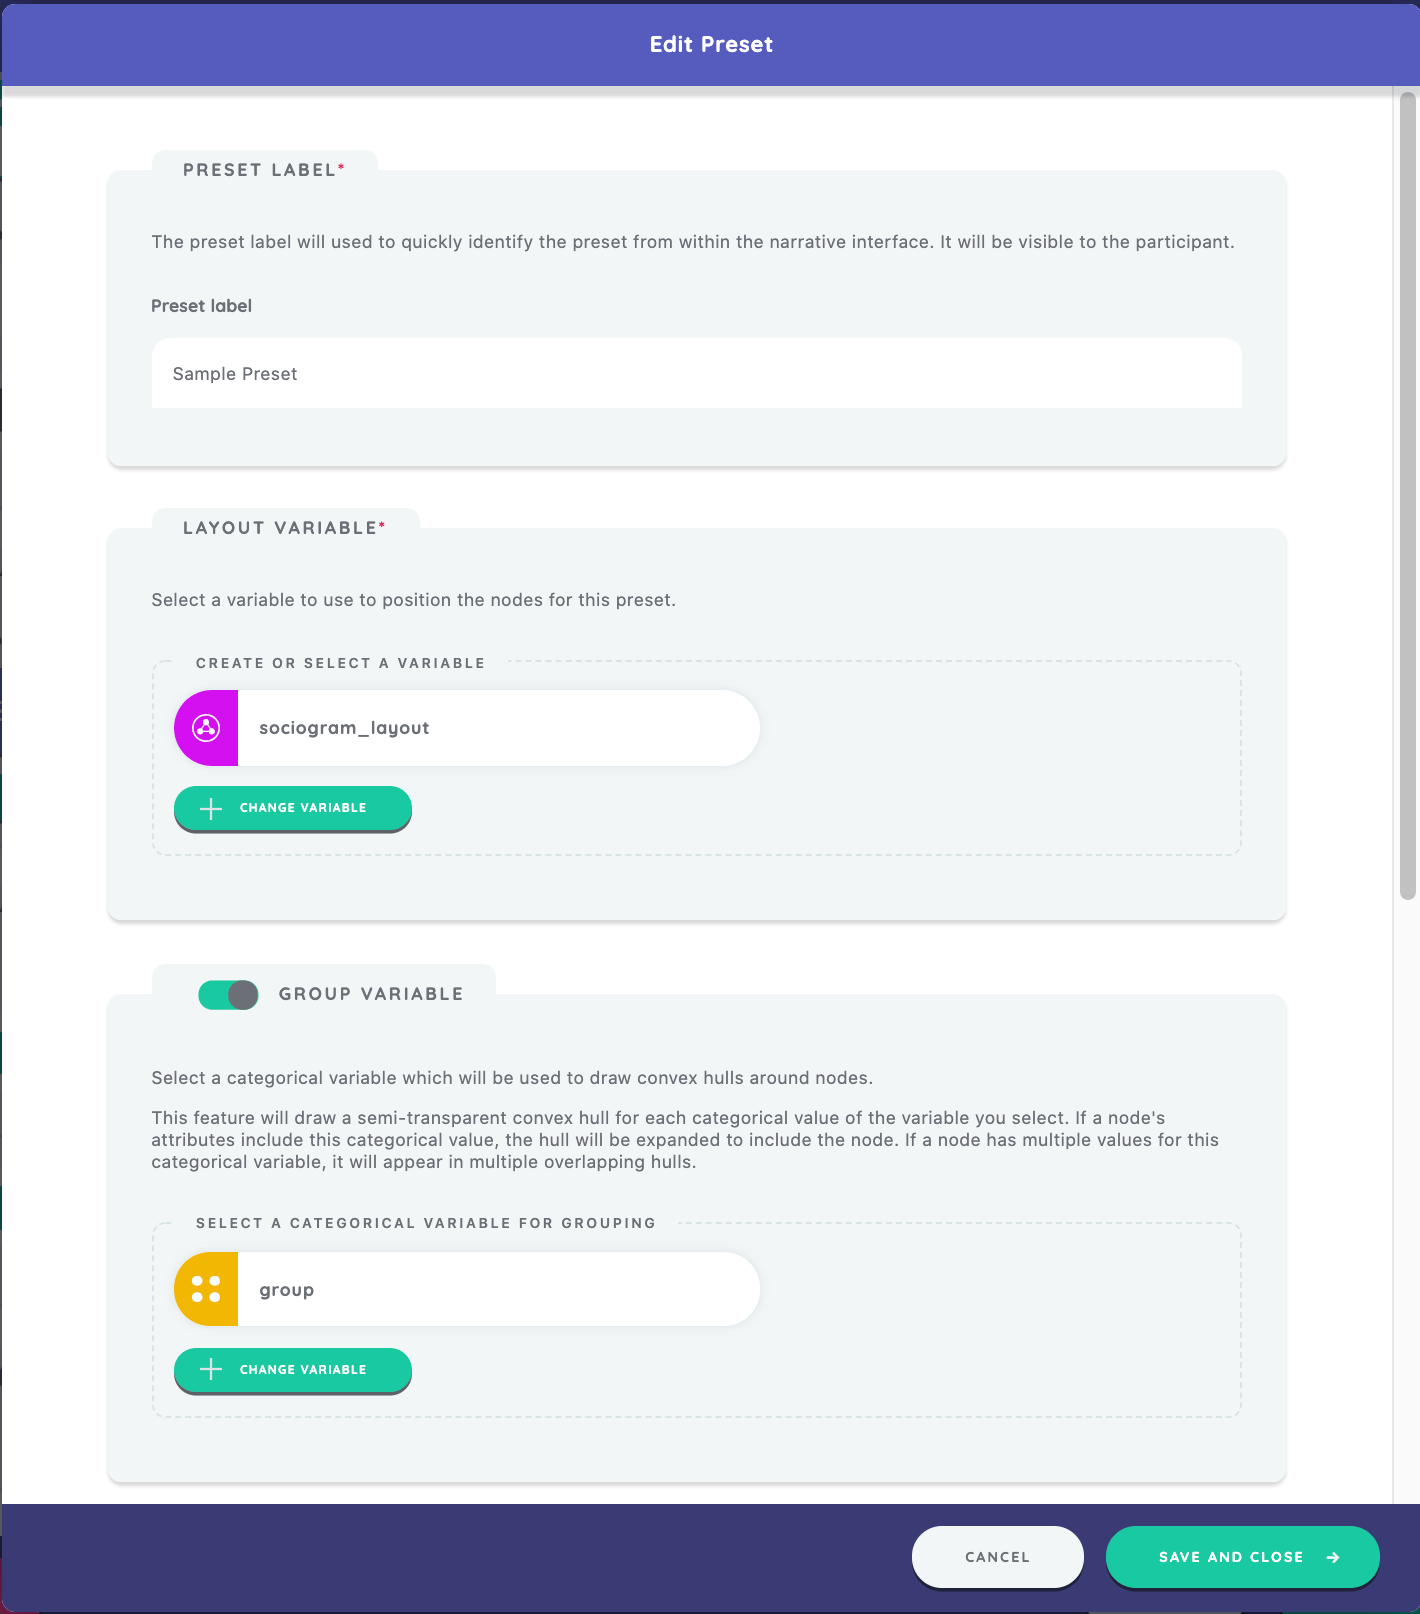
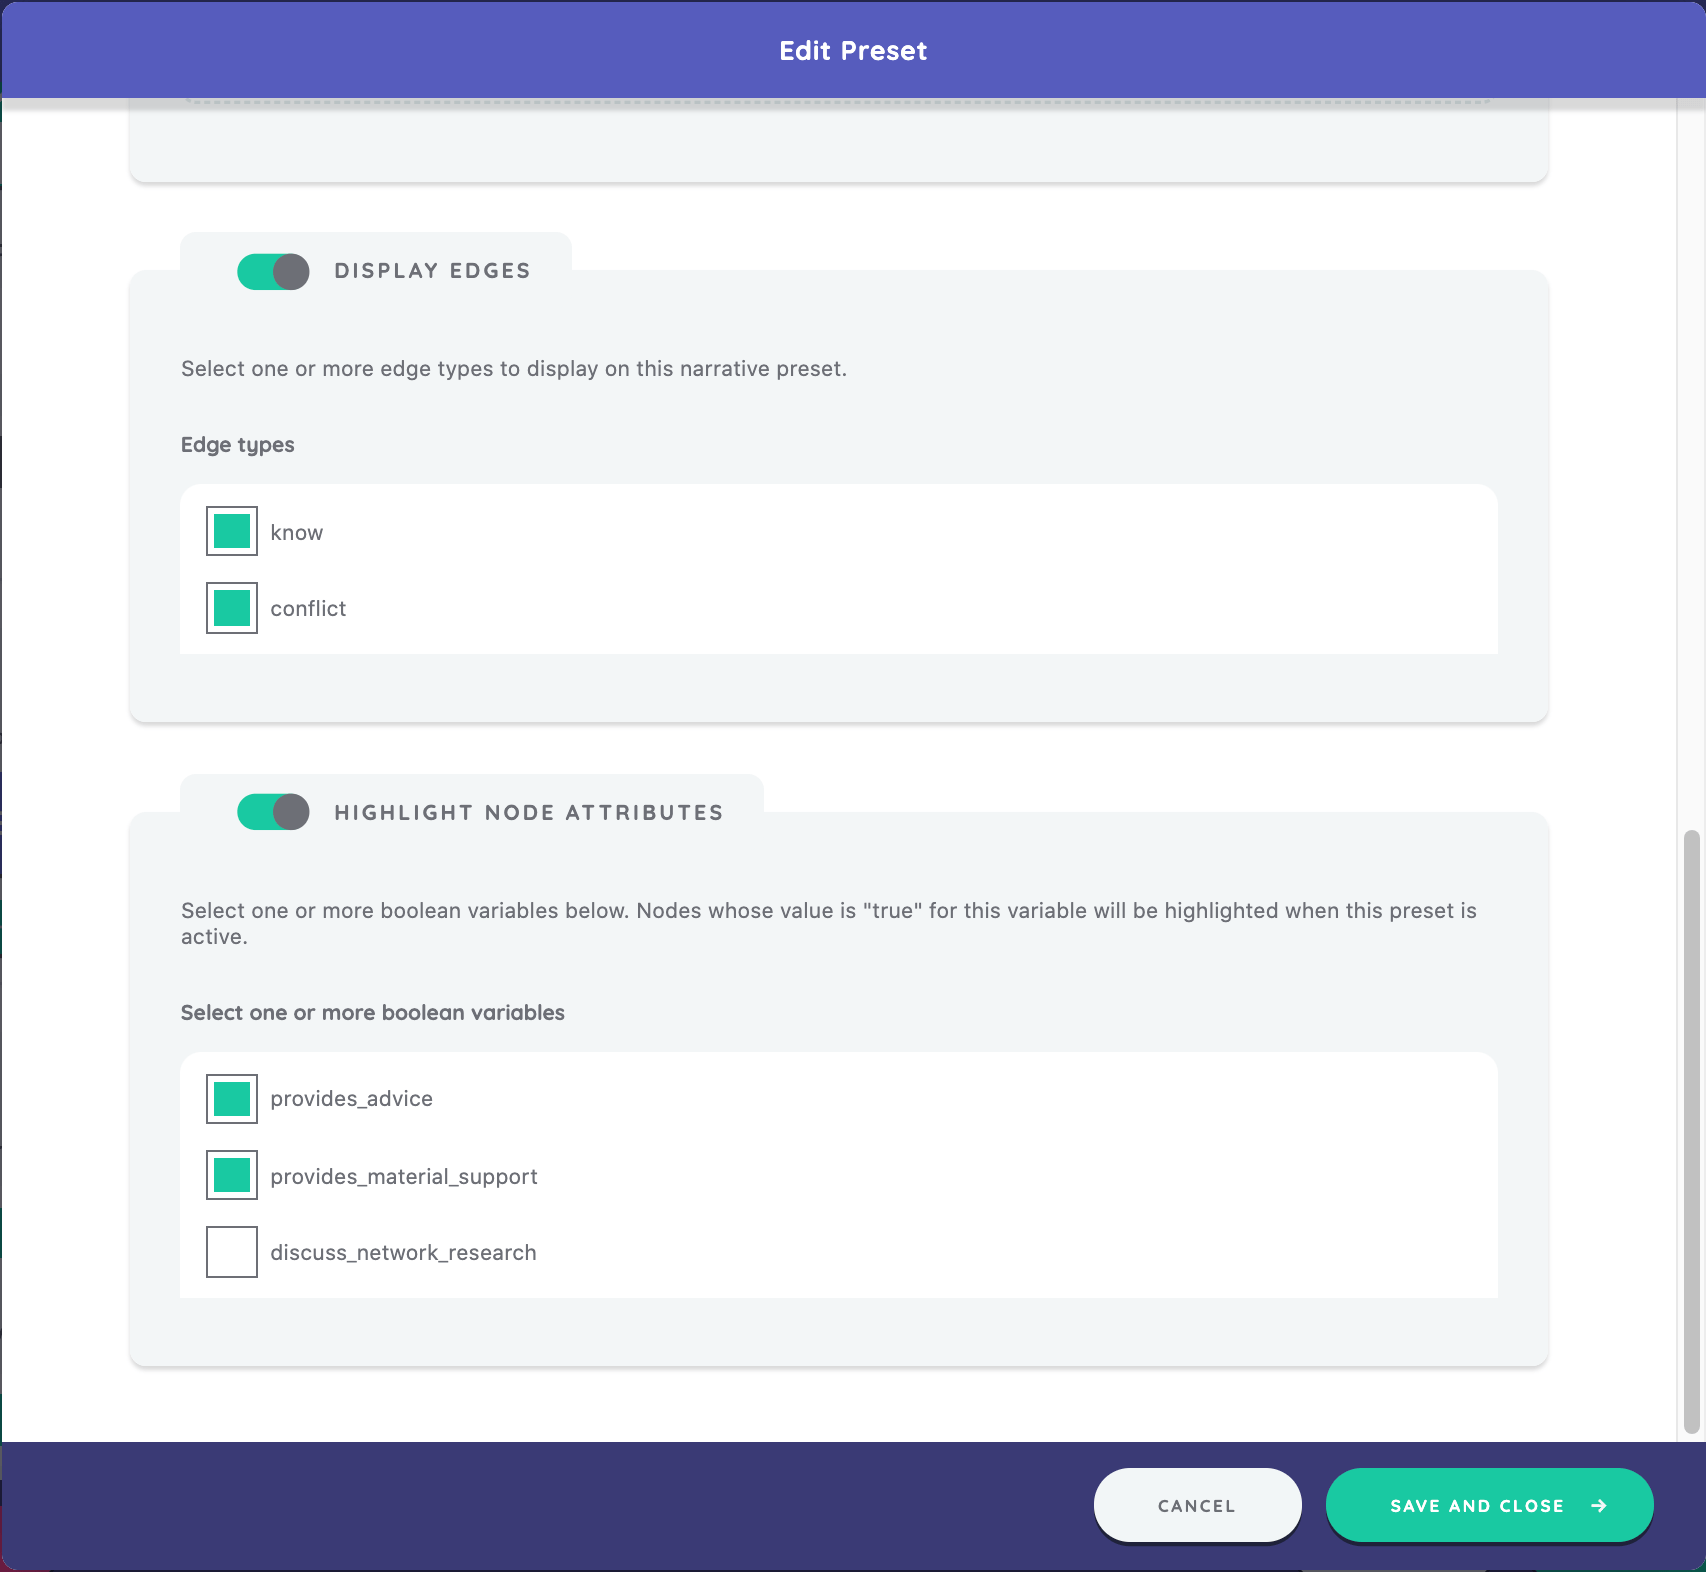
Under "Display Edges", we will see all edge types defined within our protocol. We will select the checkbox next to the edges we want to display ("know" and "conflict").
The last step in the preset editor is to select any boolean variables we want to highlight on the participant's network. All available boolean variables will appear in the "Highlight Node Attributes" section and we can choose which of these we want included in the preset. We will select the checkboxes next to both "provides_advice" and "provides_material_support." To save our work, we click "Save and Close."
Back on our Narrative Interface edit screen, we can see the sample preset we just created. We will move below to the "Narrative Behaviors" section, and toggle both "Free-draw" and "Allow repositioning" to "on." (The latter should already be toggled on by default).
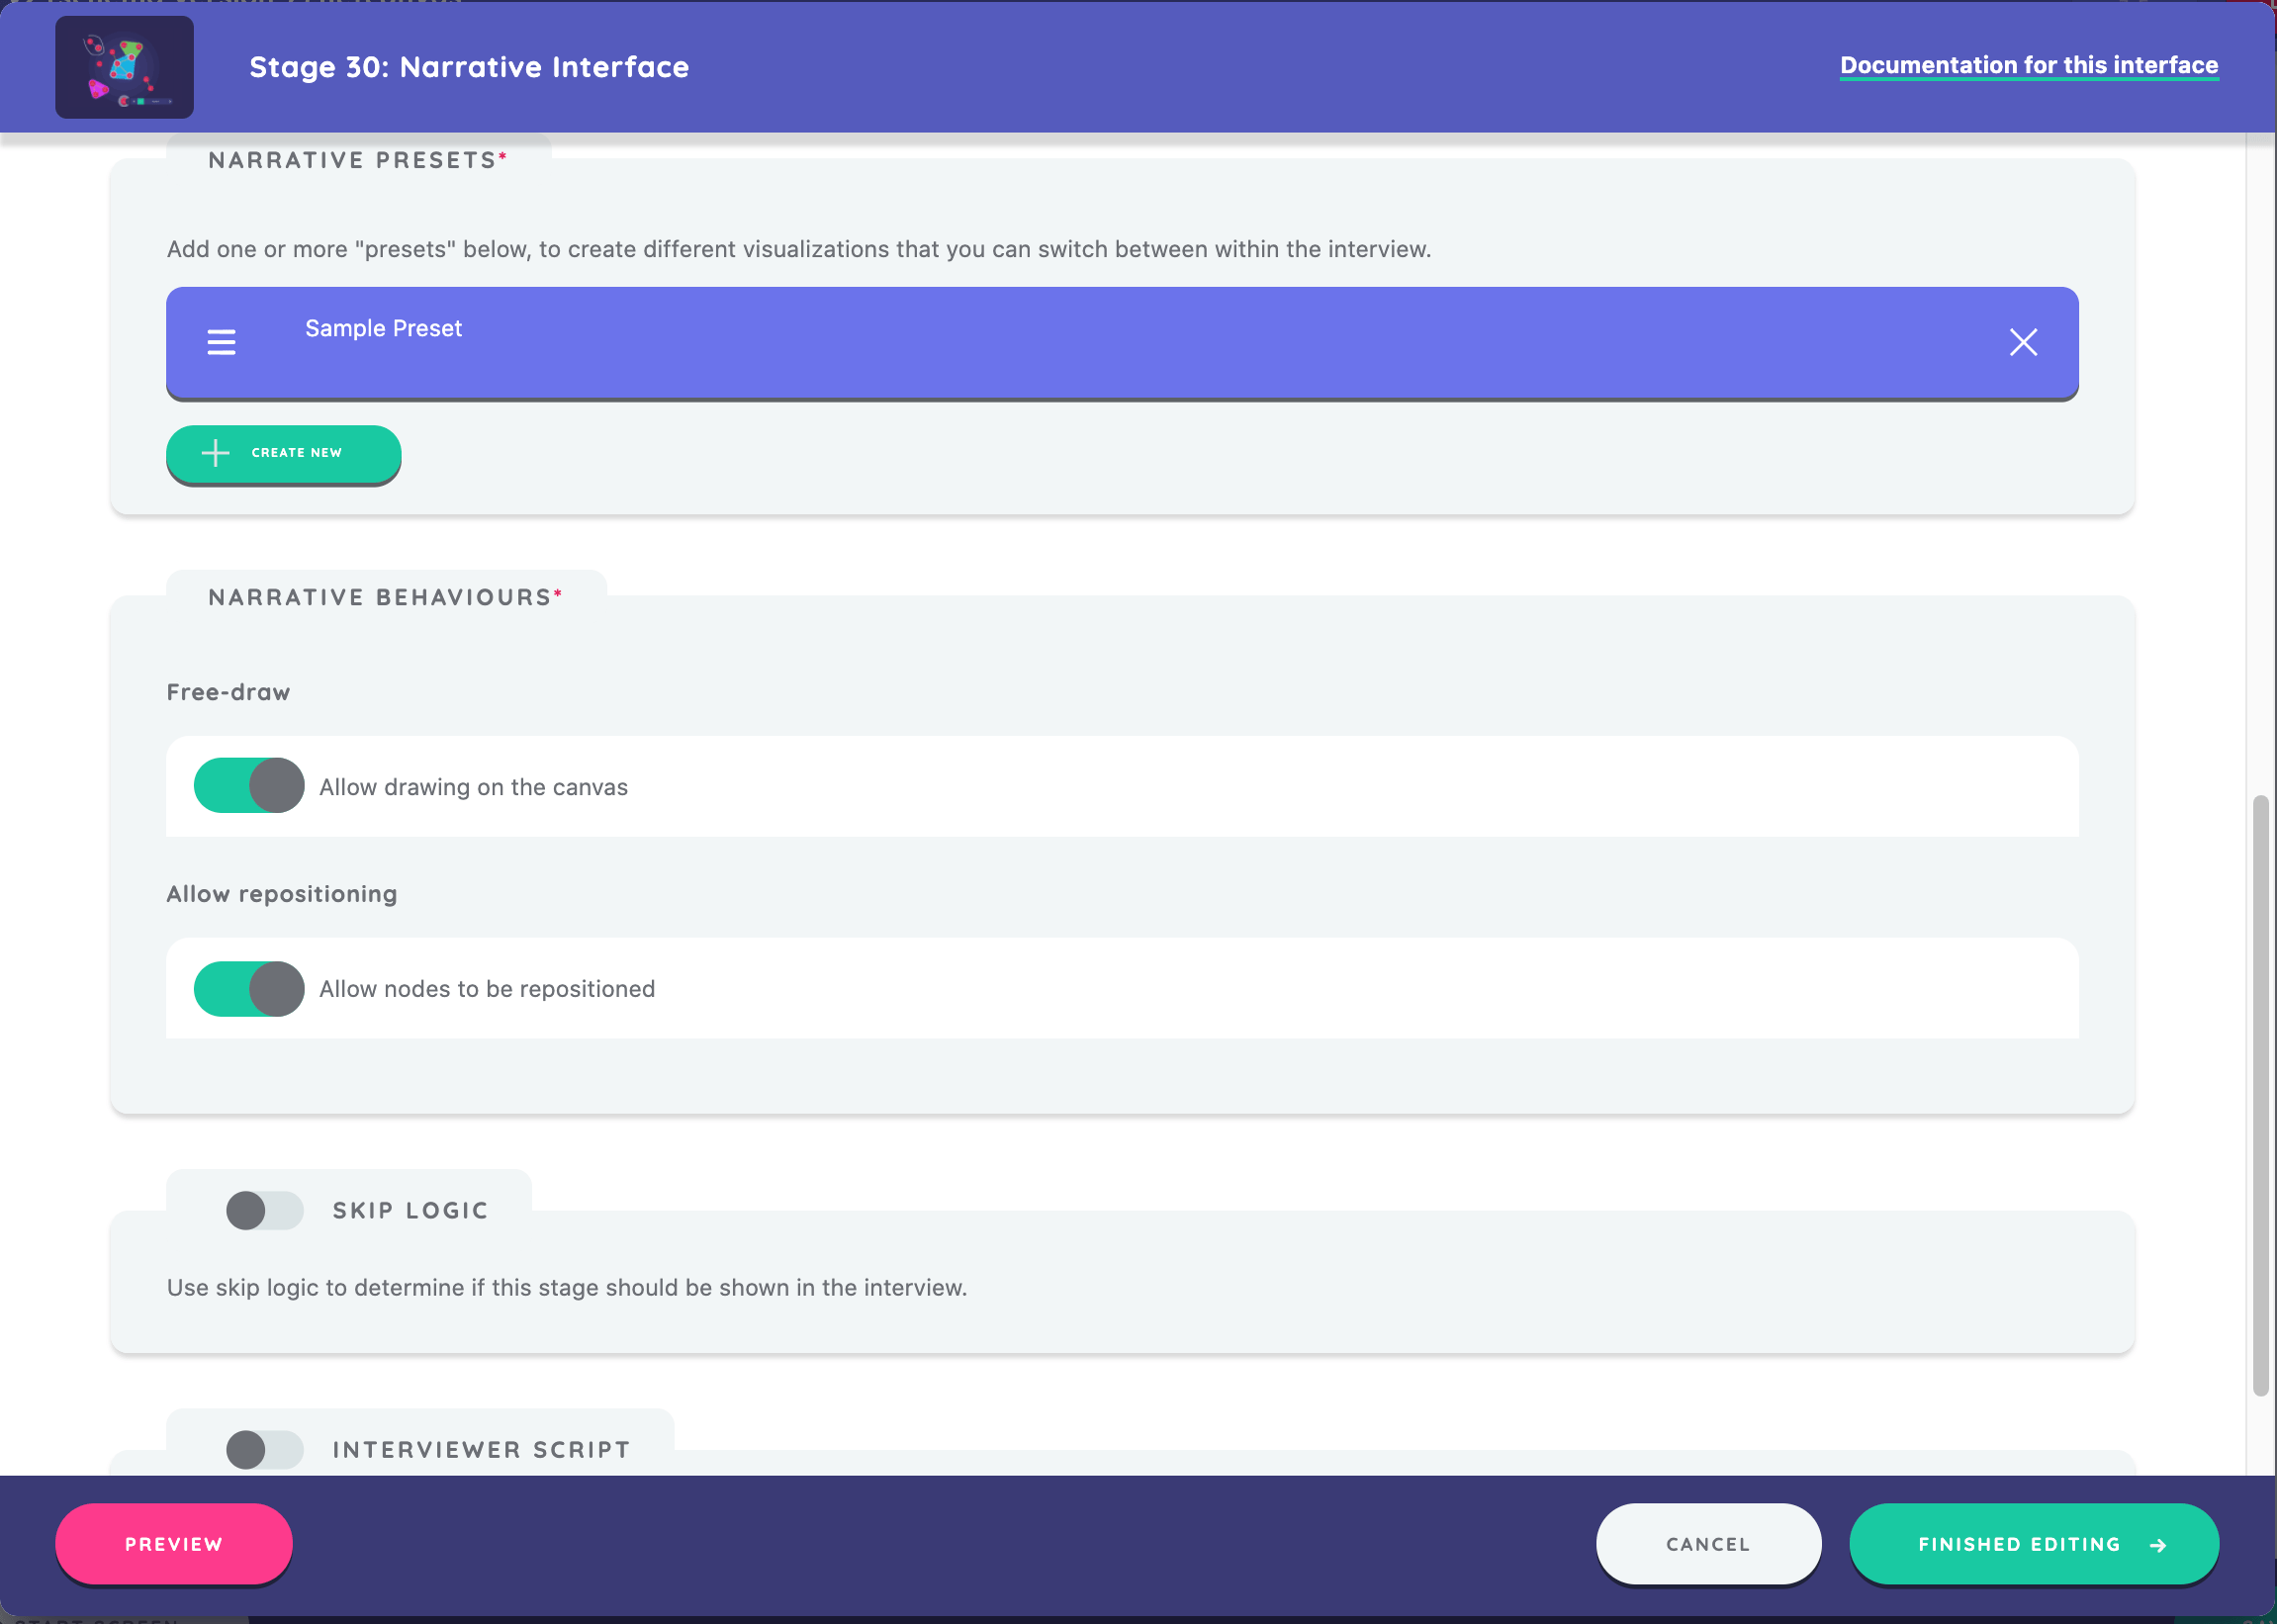
Free-draw is a function on this interface that allows a participant to annotate on the screen by using their mouse. They can draw lines, symbols, or words that help them describe aspects of their network.
Repositioning on the Narrative Interface enables a participant to drag their alters to new positions, keeping the displayed edges intact.
Click "Save and Return" and are now able to view the configured Narrative stage on our timeline.
Finishing Off Your Protocol
Make sure to save your file. The file name of the protocol will uniquely identify it in the Network Canvas Interviewer app and in Fresco.
There are numerous ways to transition from building the protocol within Architect to deployment.
Interviewer
- Within the Interviewer app, import the protocol file directly from a file location on your local computer.
- Host the protocol file on a web server and then within the Interviewer app, import the protocol file from a web URL.
Fresco
- To deploy the protocol in Fresco, see our using fresco tutorial.
In the next tutorial, Protocol and Data Workflows, we will show you how to conduct research using the Network Canvas Interviewer app.