desktop 🠖 tutorials
Using Interviewer
Summary:
This tutorial will introduce you to Interviewer by walking through an example based on our sample protocol. We will explore the participant-facing interview experience, as well as discuss some of the researcher-facing functionality of the app. The sample protocol we will be using demonstrates all the main data collection features of the tool, which we hope will encourage you to imagine the many types of study that can be created using Network Canvas.
Prerequisites:
To get the most from this tutorial, you should have first:
- Read and understood the project overview.
- To follow along using your own computer or device, you should have downloaded and installed Interviewer.
Please note that a separate tutorial article covers how to create a protocol, called building a protocol using Architect. You should continue with the current tutorial before learning the more advanced concepts involved in protocol creation, but you can read these articles in any order you wish.
Duration:
30 minutes
Introducing Interviewer
Network Canvas Interviewer is an interview administration tool that is designed to be simple and intuitive for research participants, and to integrate with the rest of the Network Canvas suite of tools. It is the cornerstone of the Network Canvas project.
Interviewer runs on both tablet devices using touch screens, and desktop computers using either touch or conventional keyboard and mouse inputs. Its interfaces are optimized for the specific needs of network interviews, and are highly flexible and customizable. Interviewer uses Network Canvas protocol files to configure itself to show the screens and stages that you have designed for your study.
Once you have collected data with Interviewer, you can export network datafiles to your device or computer.
The following introduction to the software describes some of its key features and concepts. To follow along, open Interviewer on your own computer or device.
The start screen
After opening Interviewer, the first thing you will see is the 'start screen'. This is a 'back-stage' area of Interviewer, designed to be used by the person conducting the study (not the participant). It allows you to configure the software, launch a new interview, resume an existing interview, and manage your data.
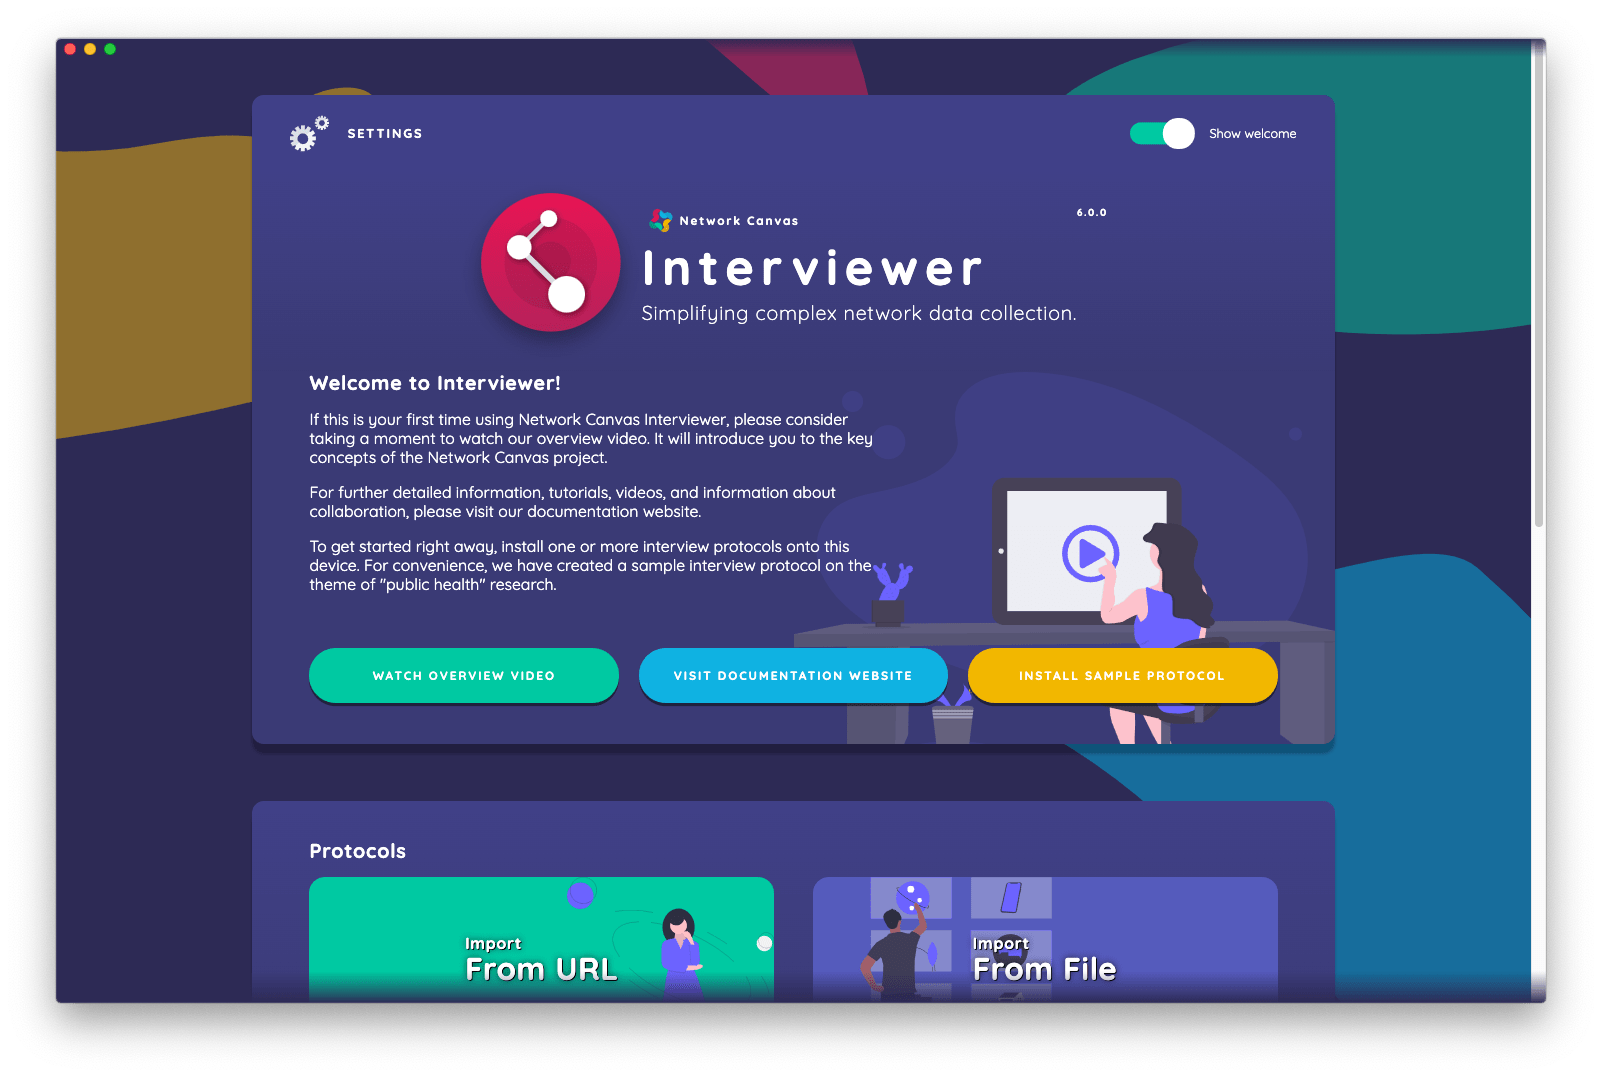
The start screen is divided into sections that group related tasks together, such as "starting an interview" or "exporting and managing interview data". Not all sections are visible all of the time. The start screen intelligently shows options only when they are available to use. For example, the export data section will only become visible once you have conducted one or more interviews.
When opening Interviewer for the first time, you will see three default sections.
The welcome section which contains links to install the sample protocol, visit the documentation website, or watch our overview video.
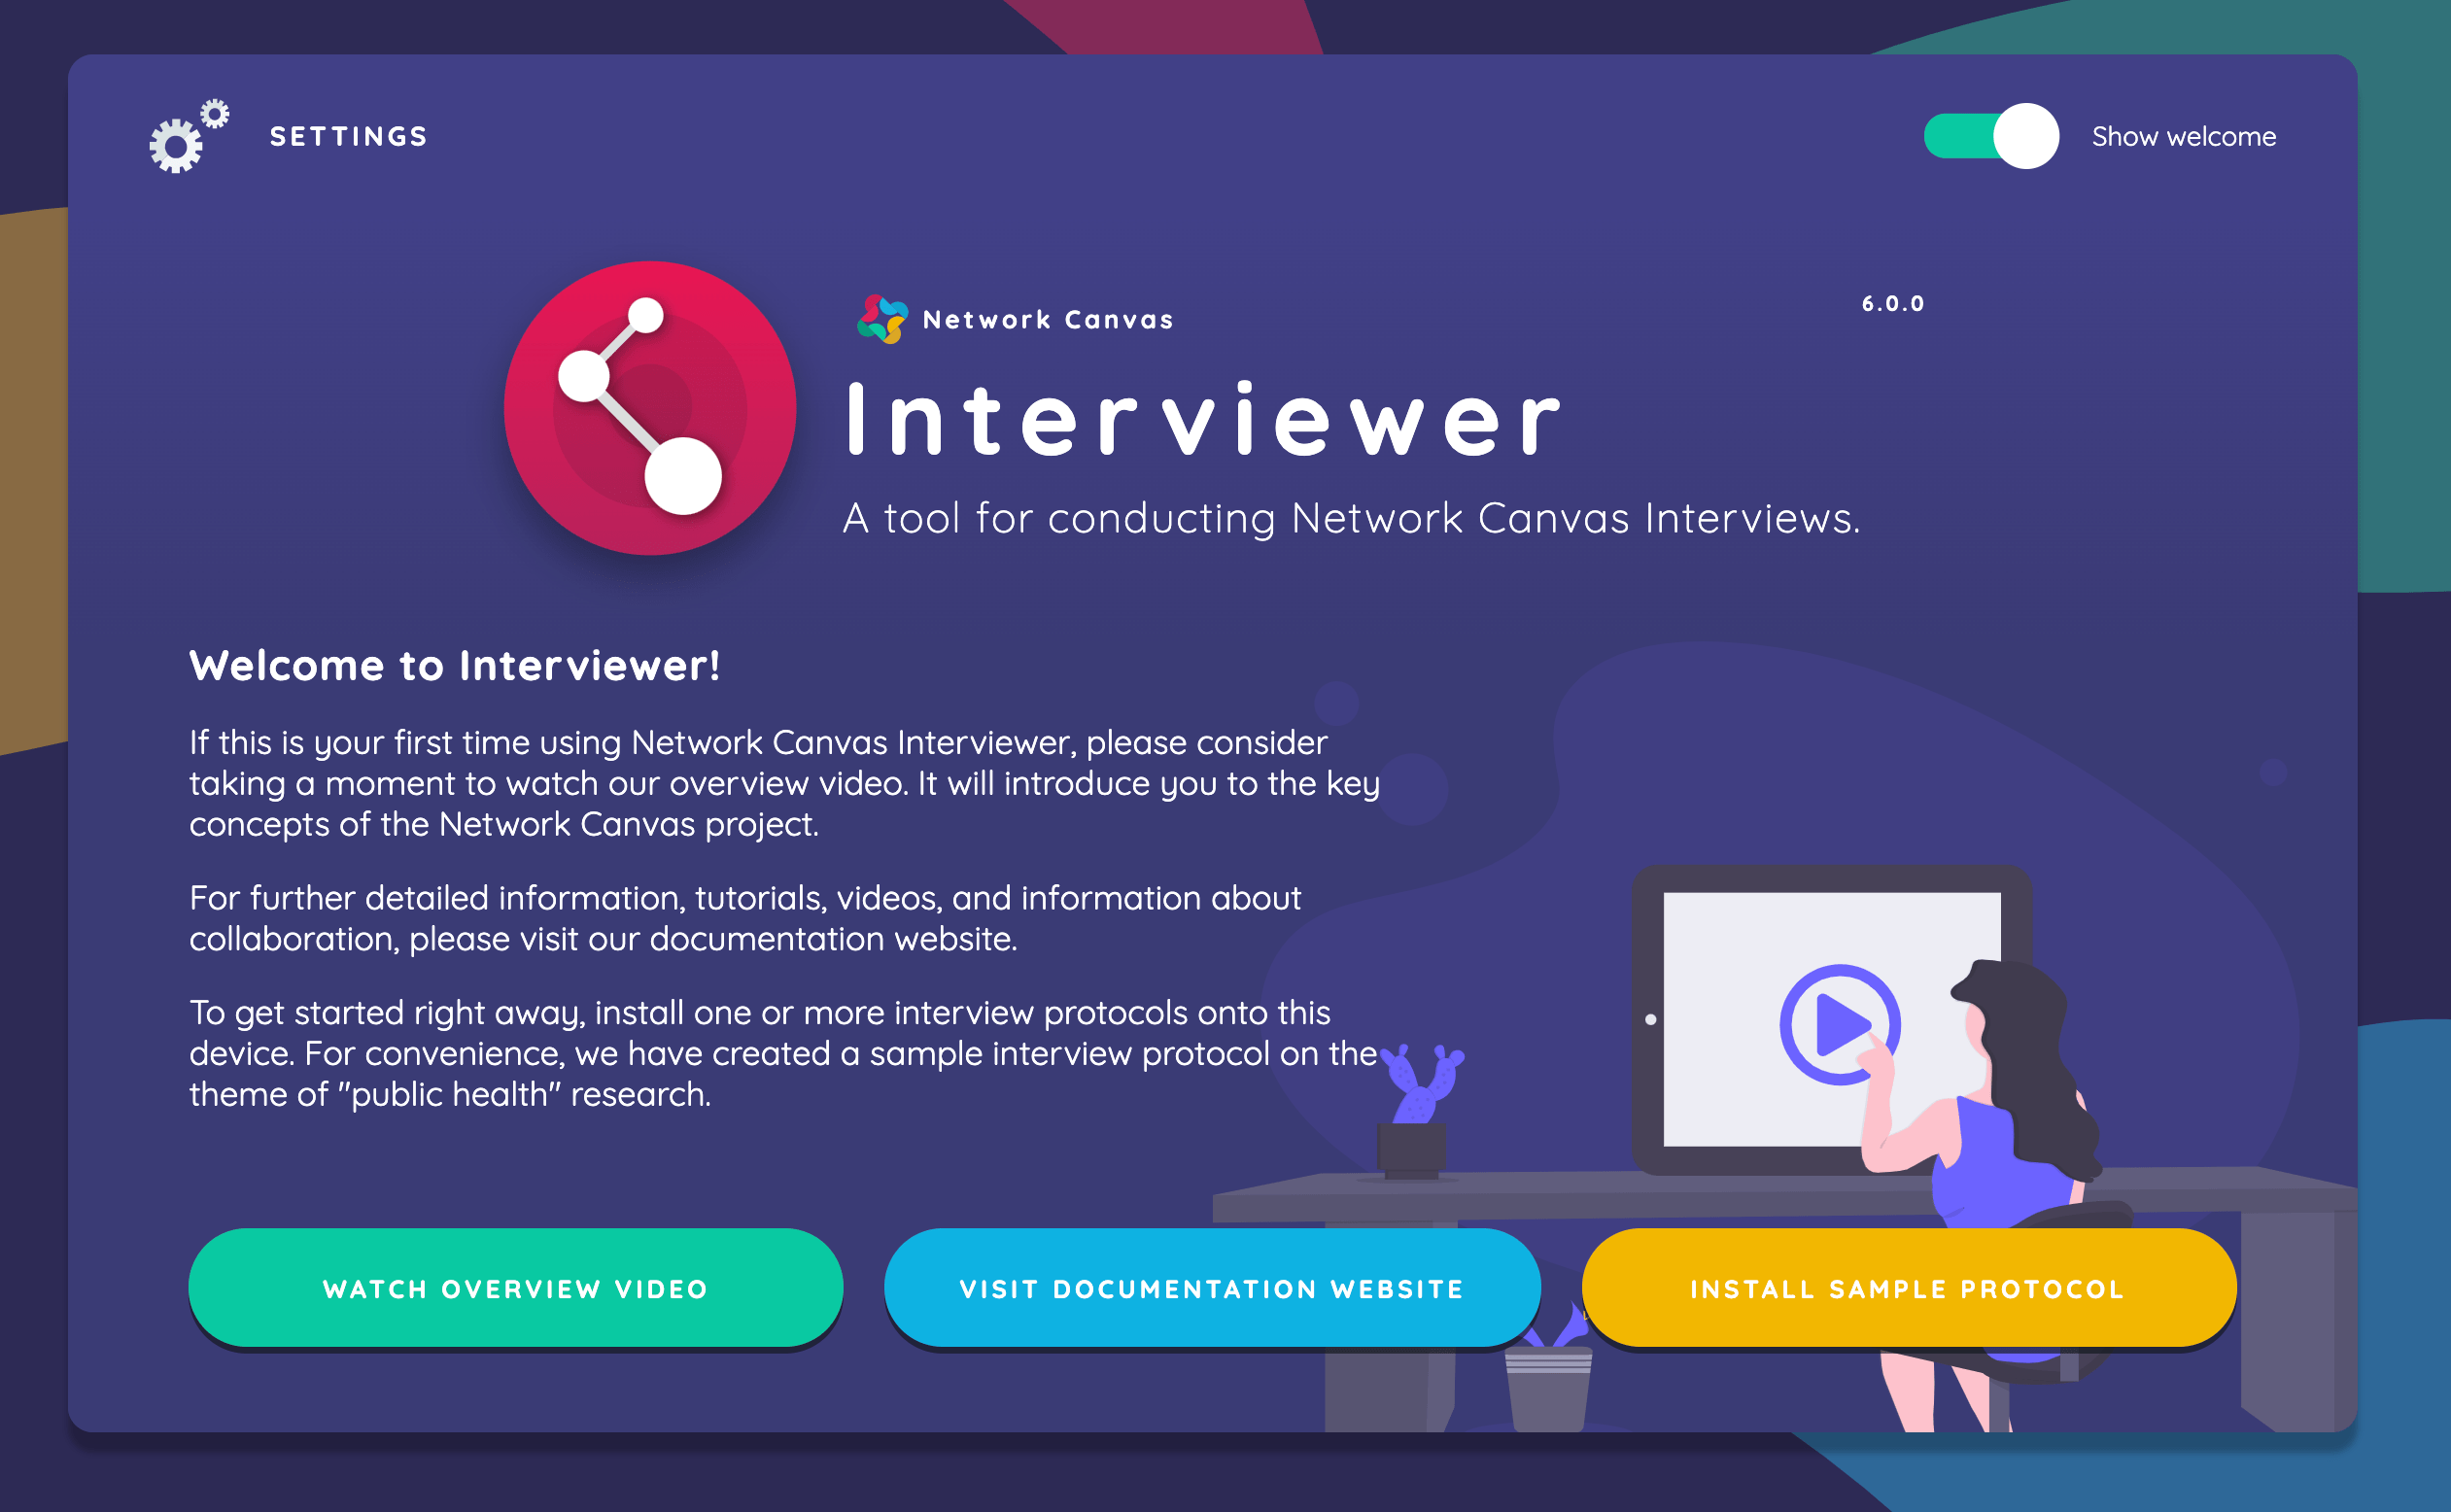
The welcome section also contains a button (the cog icon) that opens the main device settings screen. We encourage you to open the settings screen and explore the various options.
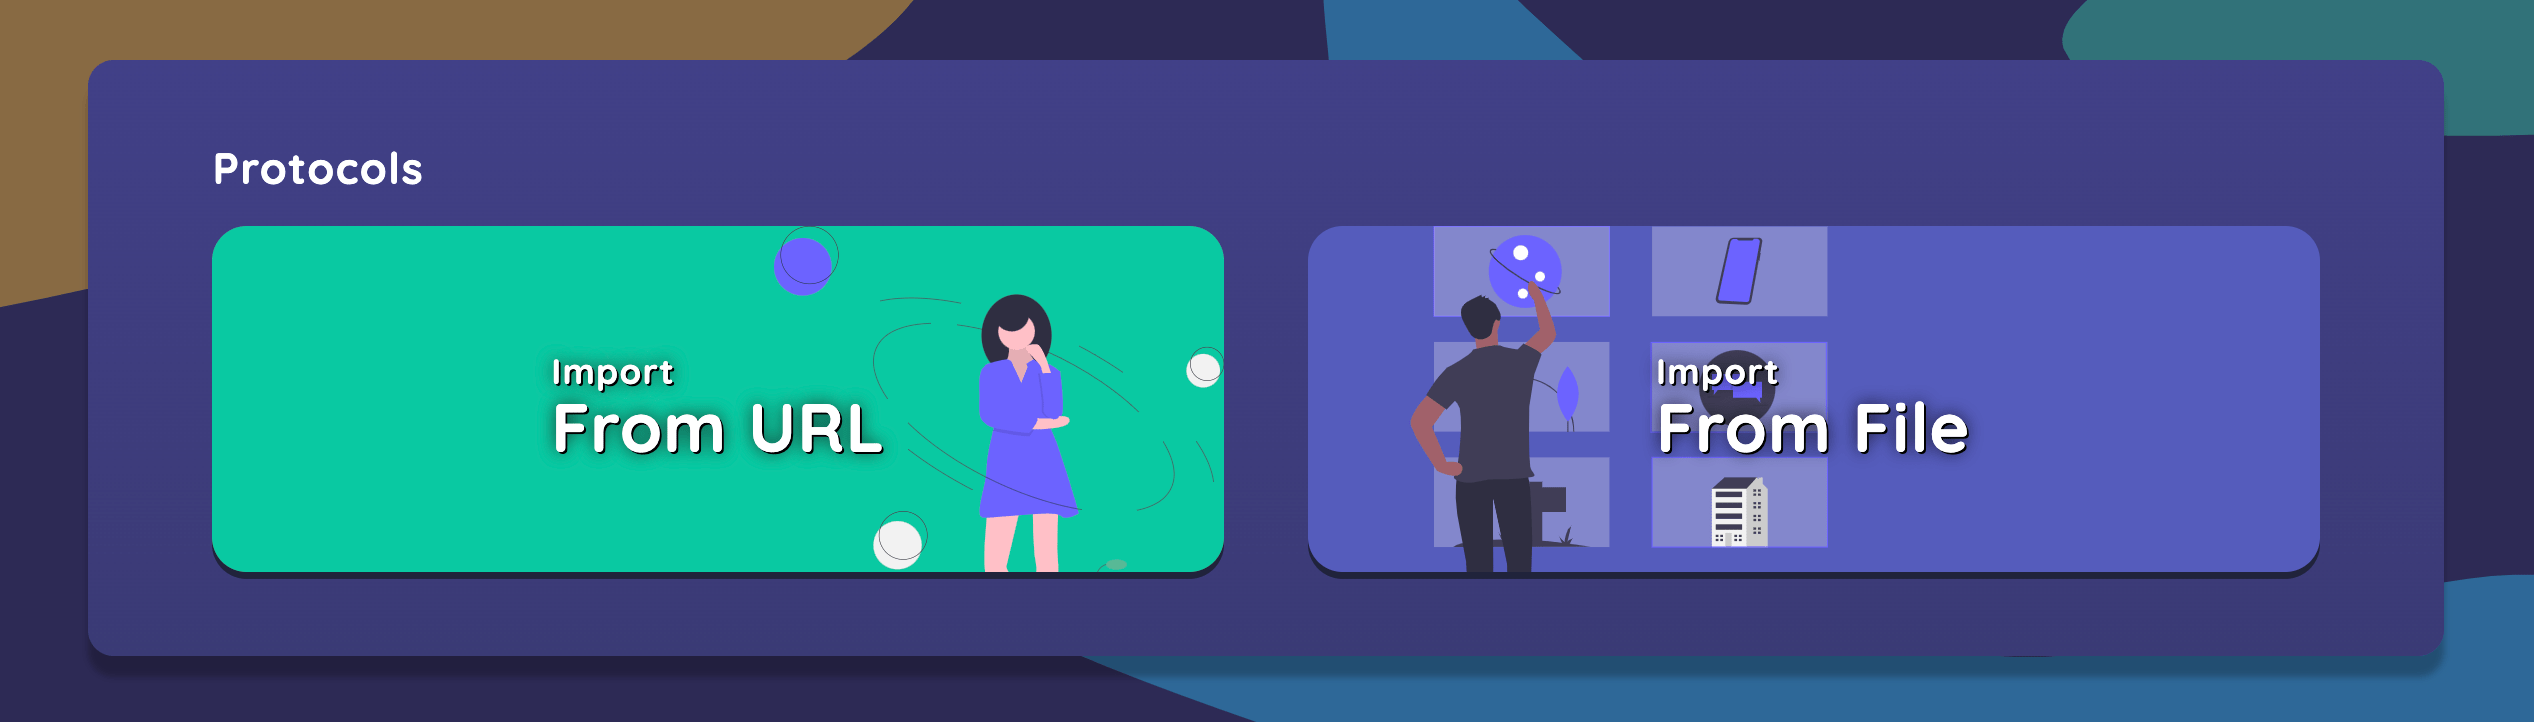
The protocols section which allows you to quickly import a Network Canvas protocol file from a URL, or by choosing a file. Once you have installed one or more protocol files, this section will also allow you to manage your installed protocols.
Installing and managing protocols
Interviewer must be configured using one or more Network Canvas interview protocols before it can be used to collect data. There are two ways to import it into your devices running Interviewer. Which one you choose will depend on the needs of your study.
Importing a file directly
This option provides a simple means to import a protocol file that is already stored on your device. It can be accessed either from the file menu (if running Interviewer on a desktop operating system), or from the protocols section of the start screen.
Importing from a URL
This option allows you to download a protocol file directly from any URL that is accessible from the device running Interviewer. It can be useful in circumstances where you have a study website or internet, and need to quickly install a protocol on a device. It can be accessed from the protocols section of the start screen.
Import the Sample Protocol
For the purposes of this tutorial, we will proceed using the built-in sample protocol. To follow along on your own device, click the "install sample protocol" button in the welcome section of the app to install the protocol that we will be using. Alternatively, click here to download the file, and then import it into Interviewer using the import from file method described above.
Once a protocol has been imported, a new section will appear on the start screen: the new interview section. Inside this section will be a protocol card, representing the protocol you imported.
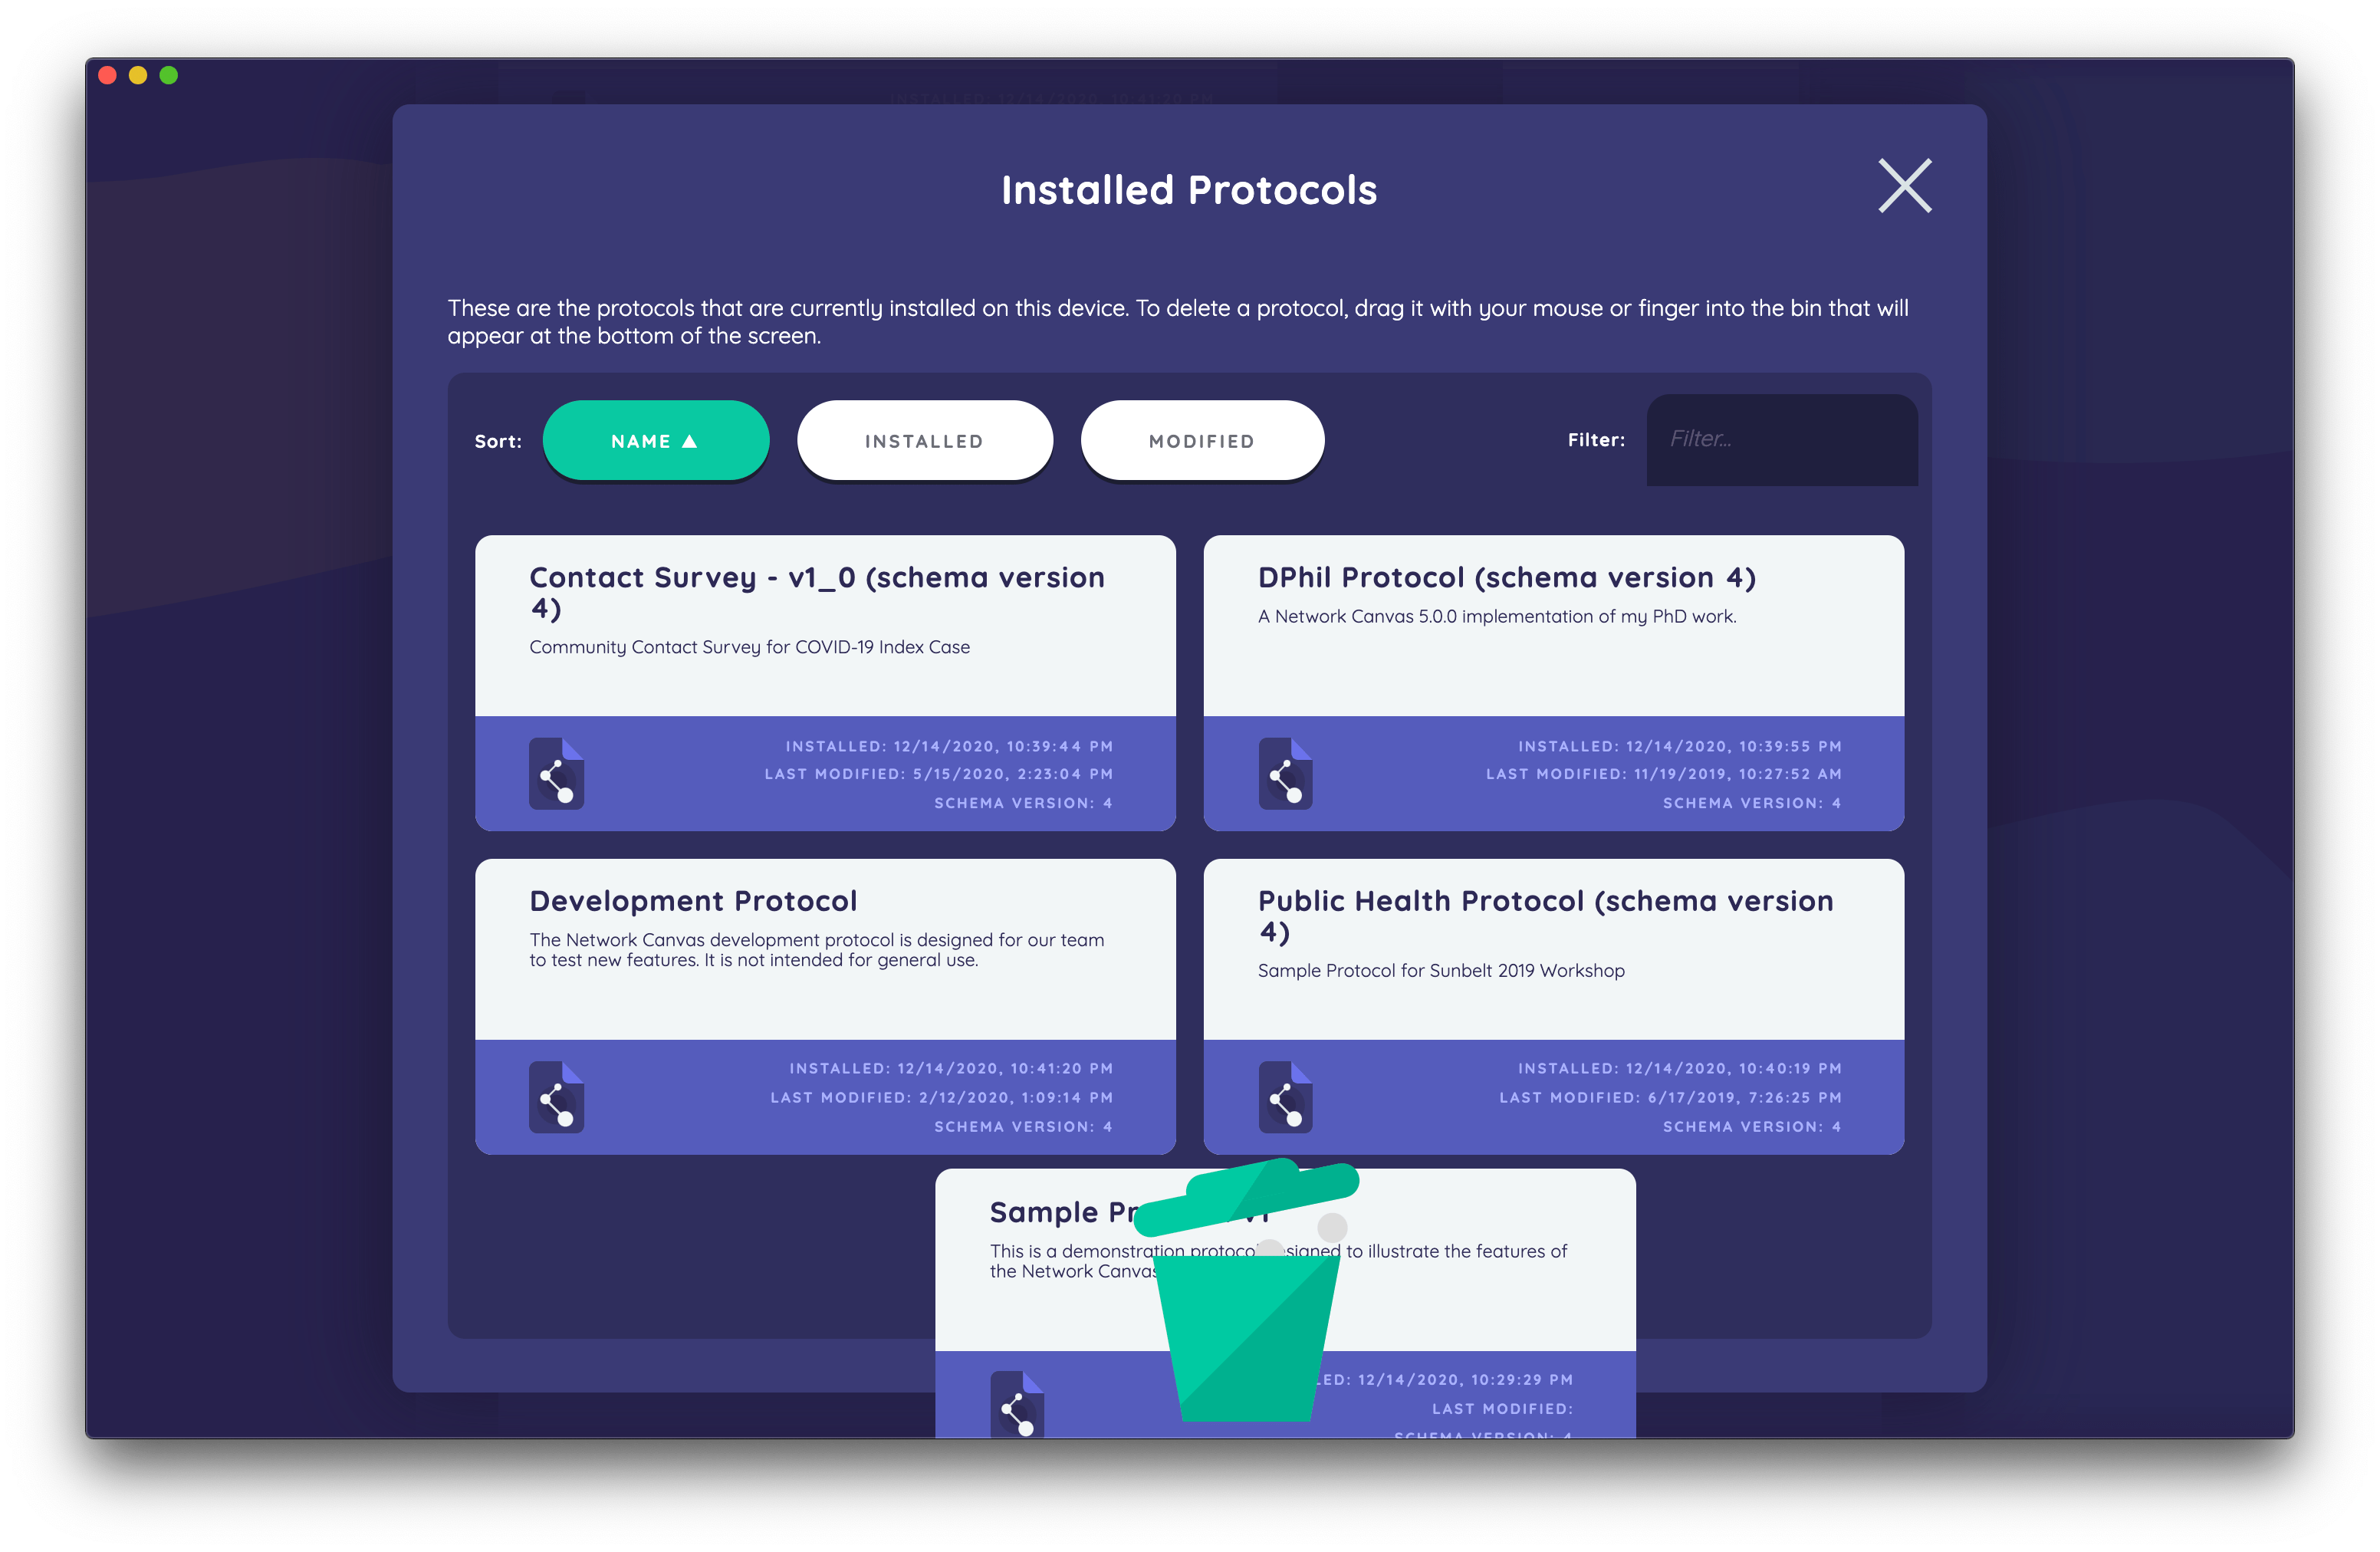
Removing or managing installed protocols
To help you to manage protocols that are installed in Interviewer, there is a dedicated overlay. This can be opened from the protocols section, which will now display a "manage installed protocols" button.
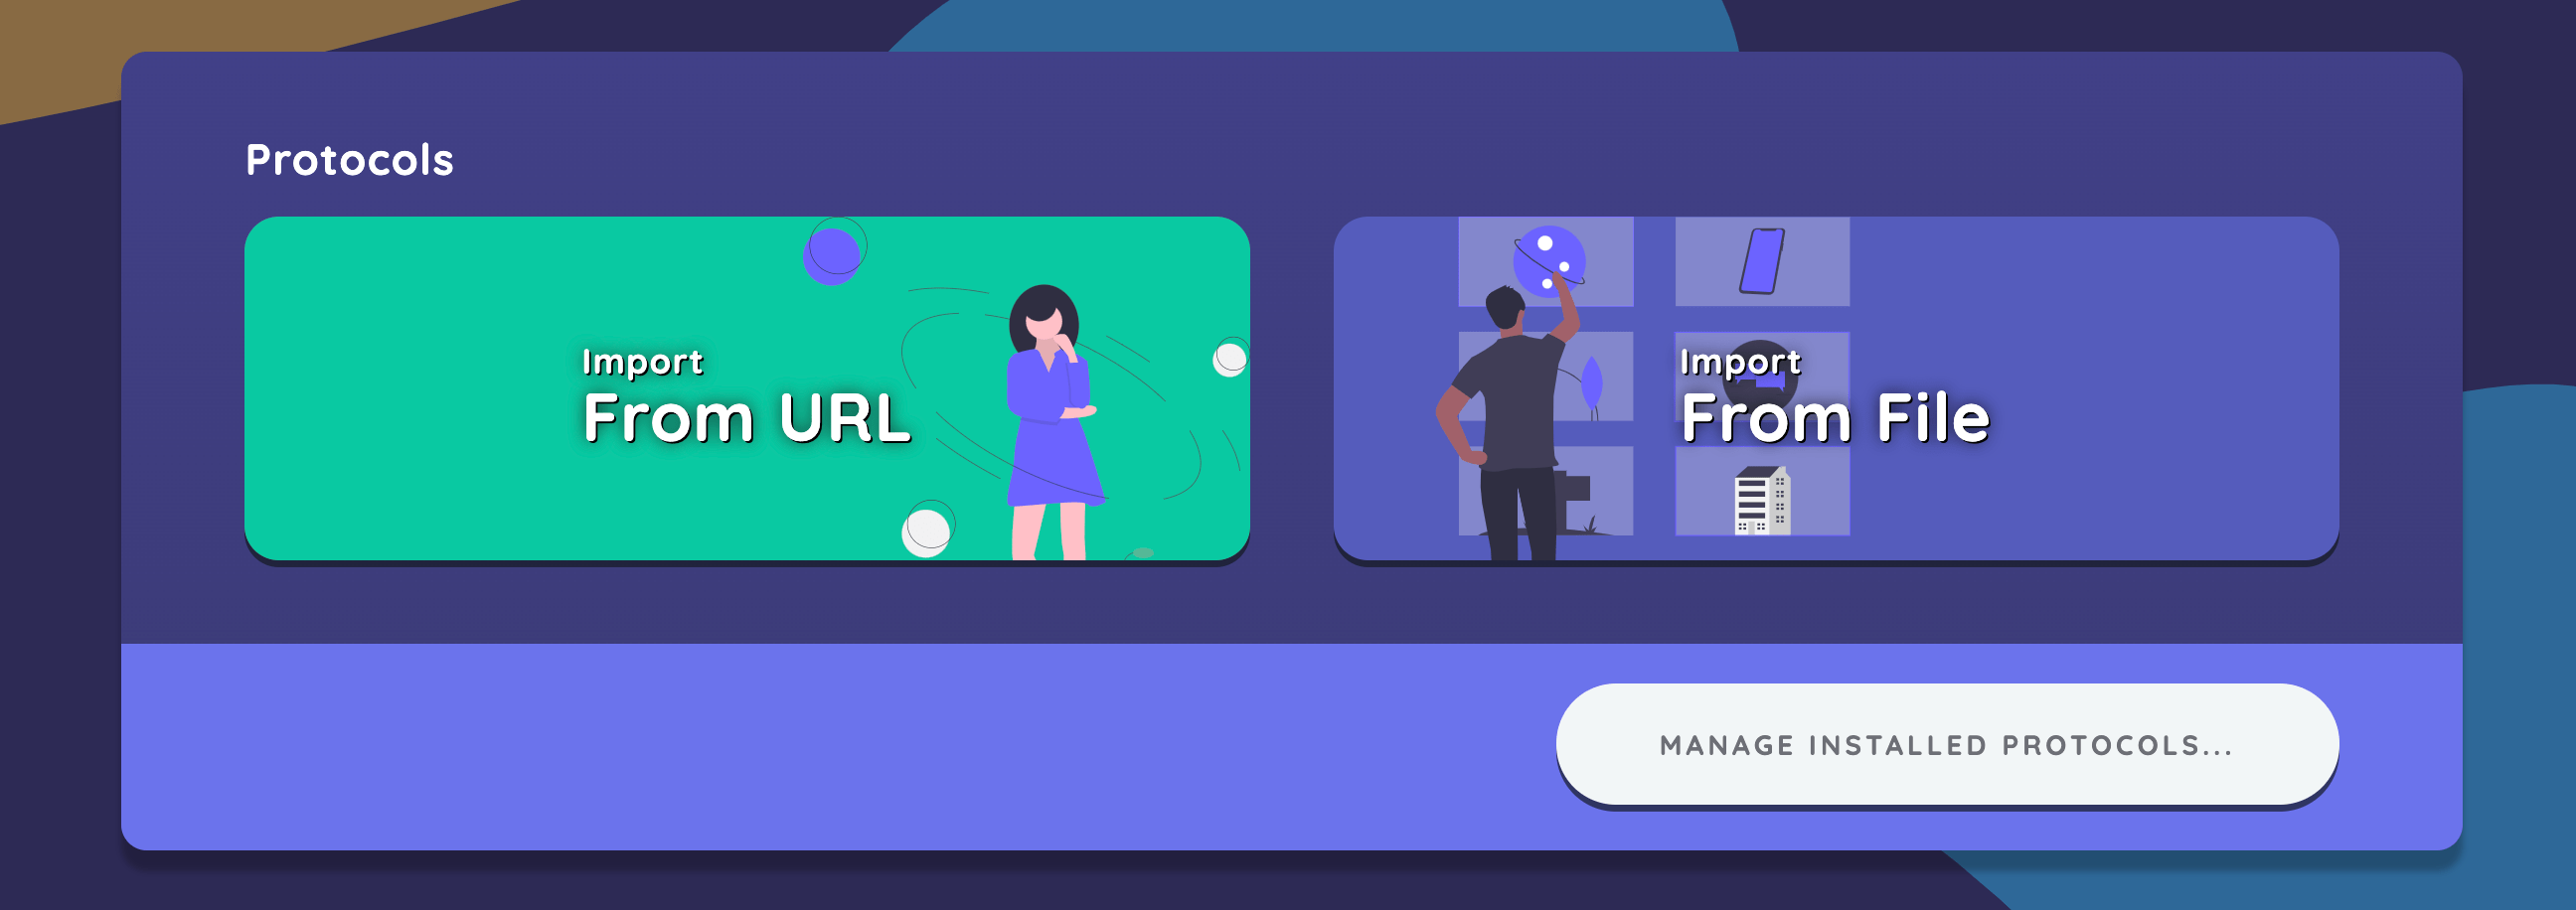
From within this overlay, you can sort your installed protocols, as well as filter them by name. To remove a protocol file from your device, drag its card into the bin that appears at the bottom of the screen.
Starting a new interview
By default, the start a new interview section shows the last protocol you installed (or started an interview with). It can be tapped or clicked to immediately begin an interview.

If you have more than one protocol installed in Interviewer, a card stack will appear to the right side of the start a new interview section. To access all available protocols, tap or click this card stack. An overlay will open with a list of protocols currently stored in the app. Scroll, filter, or sort the protocol card list to locate the protocol you wish to use for your interview, and tap or click it to begin. This protocol will then appear in the start a new interview section for quicker future access.
Entering a case ID
When initiating a new interview, you will immediately be presented with a dialog that asks you to enter a 'case ID'. This is a simple mechanism designed to help you keep track of and identify interview sessions in a way that is meaningful to you and your study. The case ID will be visible in Interviewer anywhere that you see interview sessions, and will also be included in all exported data.
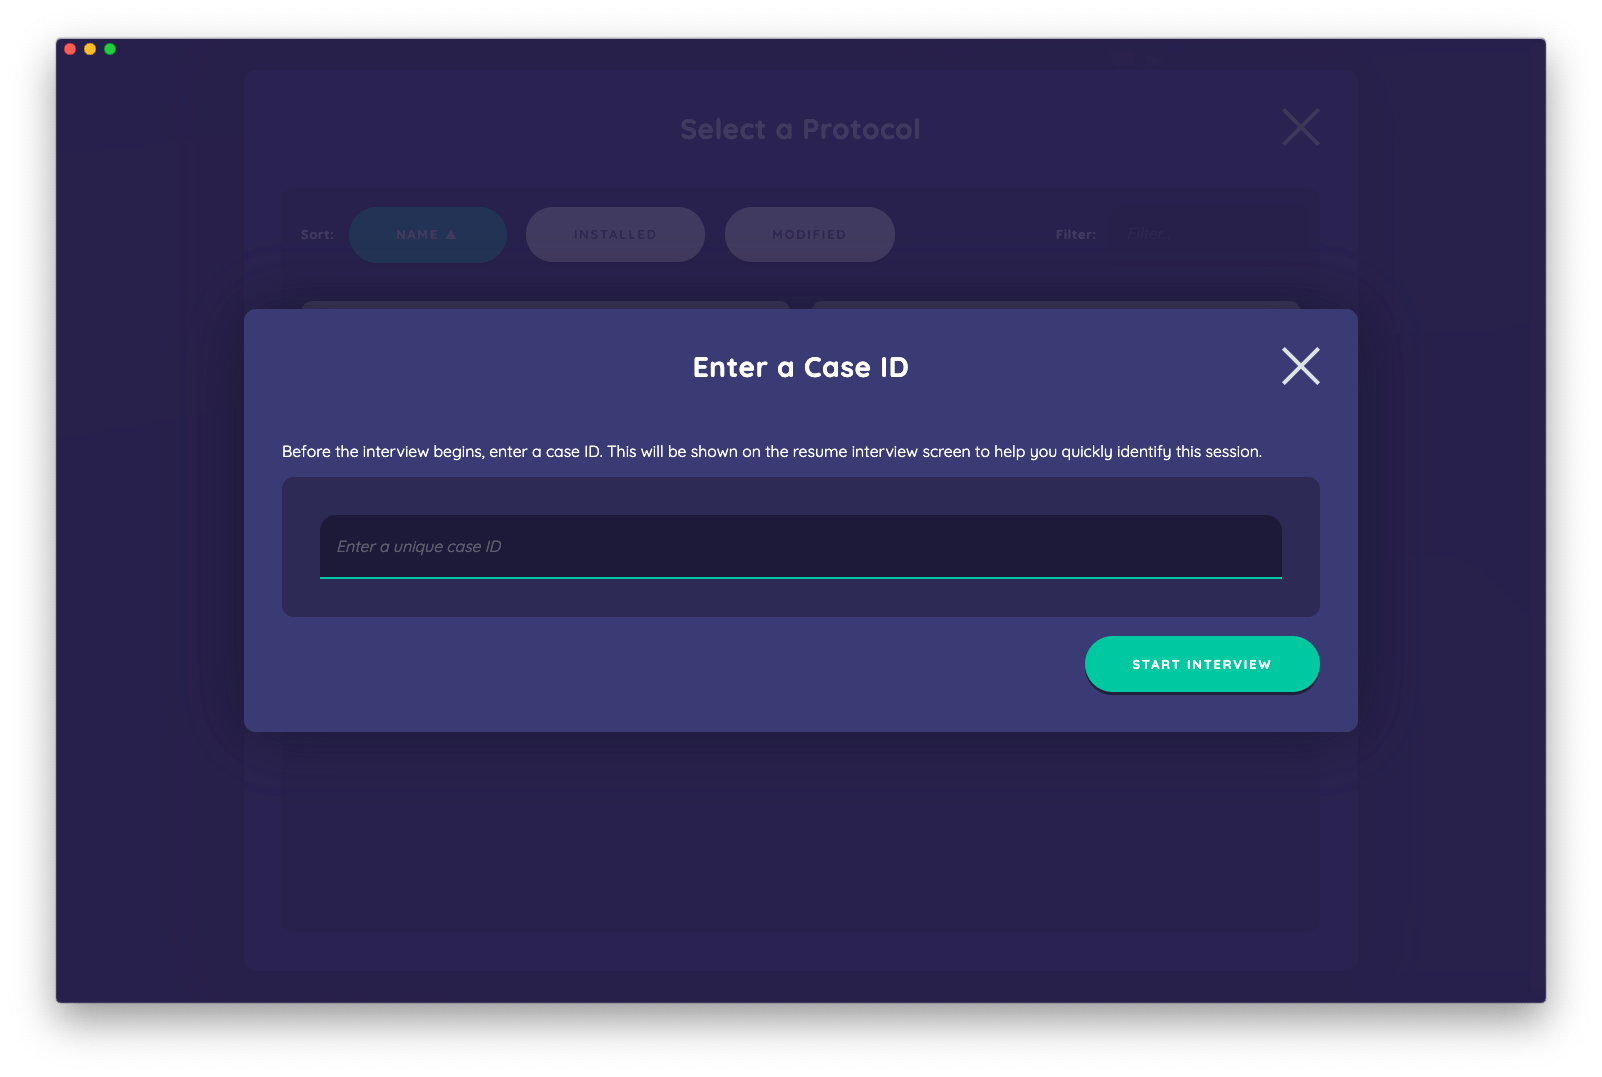
A case ID can contain any combination of numbers and letters (including spaces) up to 30 characters. There is no requirement that a case ID be unique, since this would not be possible to enforce across multiple devices. Nevertheless, you should strongly consider a consistent system for naming cases that allows you to uniquely identify them.
For example, you might consider:
INTERVIEWER_INITIALS PARTICIPANT_ID DATE(e.gJRM 12345 December 5th)STUDY_ID-PARTICIPANT_NAME-VISIT_NUMBER(e.gNetCanvas-Joshua-4)- ...or simply
PARTICIPANT_NAME(e.gJames Montgomery Williams)
Sample interview walkthrough
The remainder of this tutorial will consist of a walkthrough of the sample interview protocol, in order to demonstrate the participant experience of Interviewer.
If you are following along on your own device, make sure you have installed the sample protocol, started a new interview, entered a case ID, and are looking at the first screen.
Interviewer user-interface
The main interview user interface within Interviewer is designed to be simple, unobtrusive, and intuitive for participants. This has two consequences that you should be aware of from the outset:
- Much of the functionality researchers may wish to access is somewhat less discoverable than you might be used to. You should expect to spend time learning and training interviewers so that they understand how to navigate the various functions of the software.
- Very little space is devoted to user interface elements that provide explanations about how to complete a task. This is because we assume that the researcher will be present in the interview, and will therefore be able to guide the participant through the interview process.
Key navigation elements
In terms of the user interface elements that are always visible when within the interview, there are several features of note.
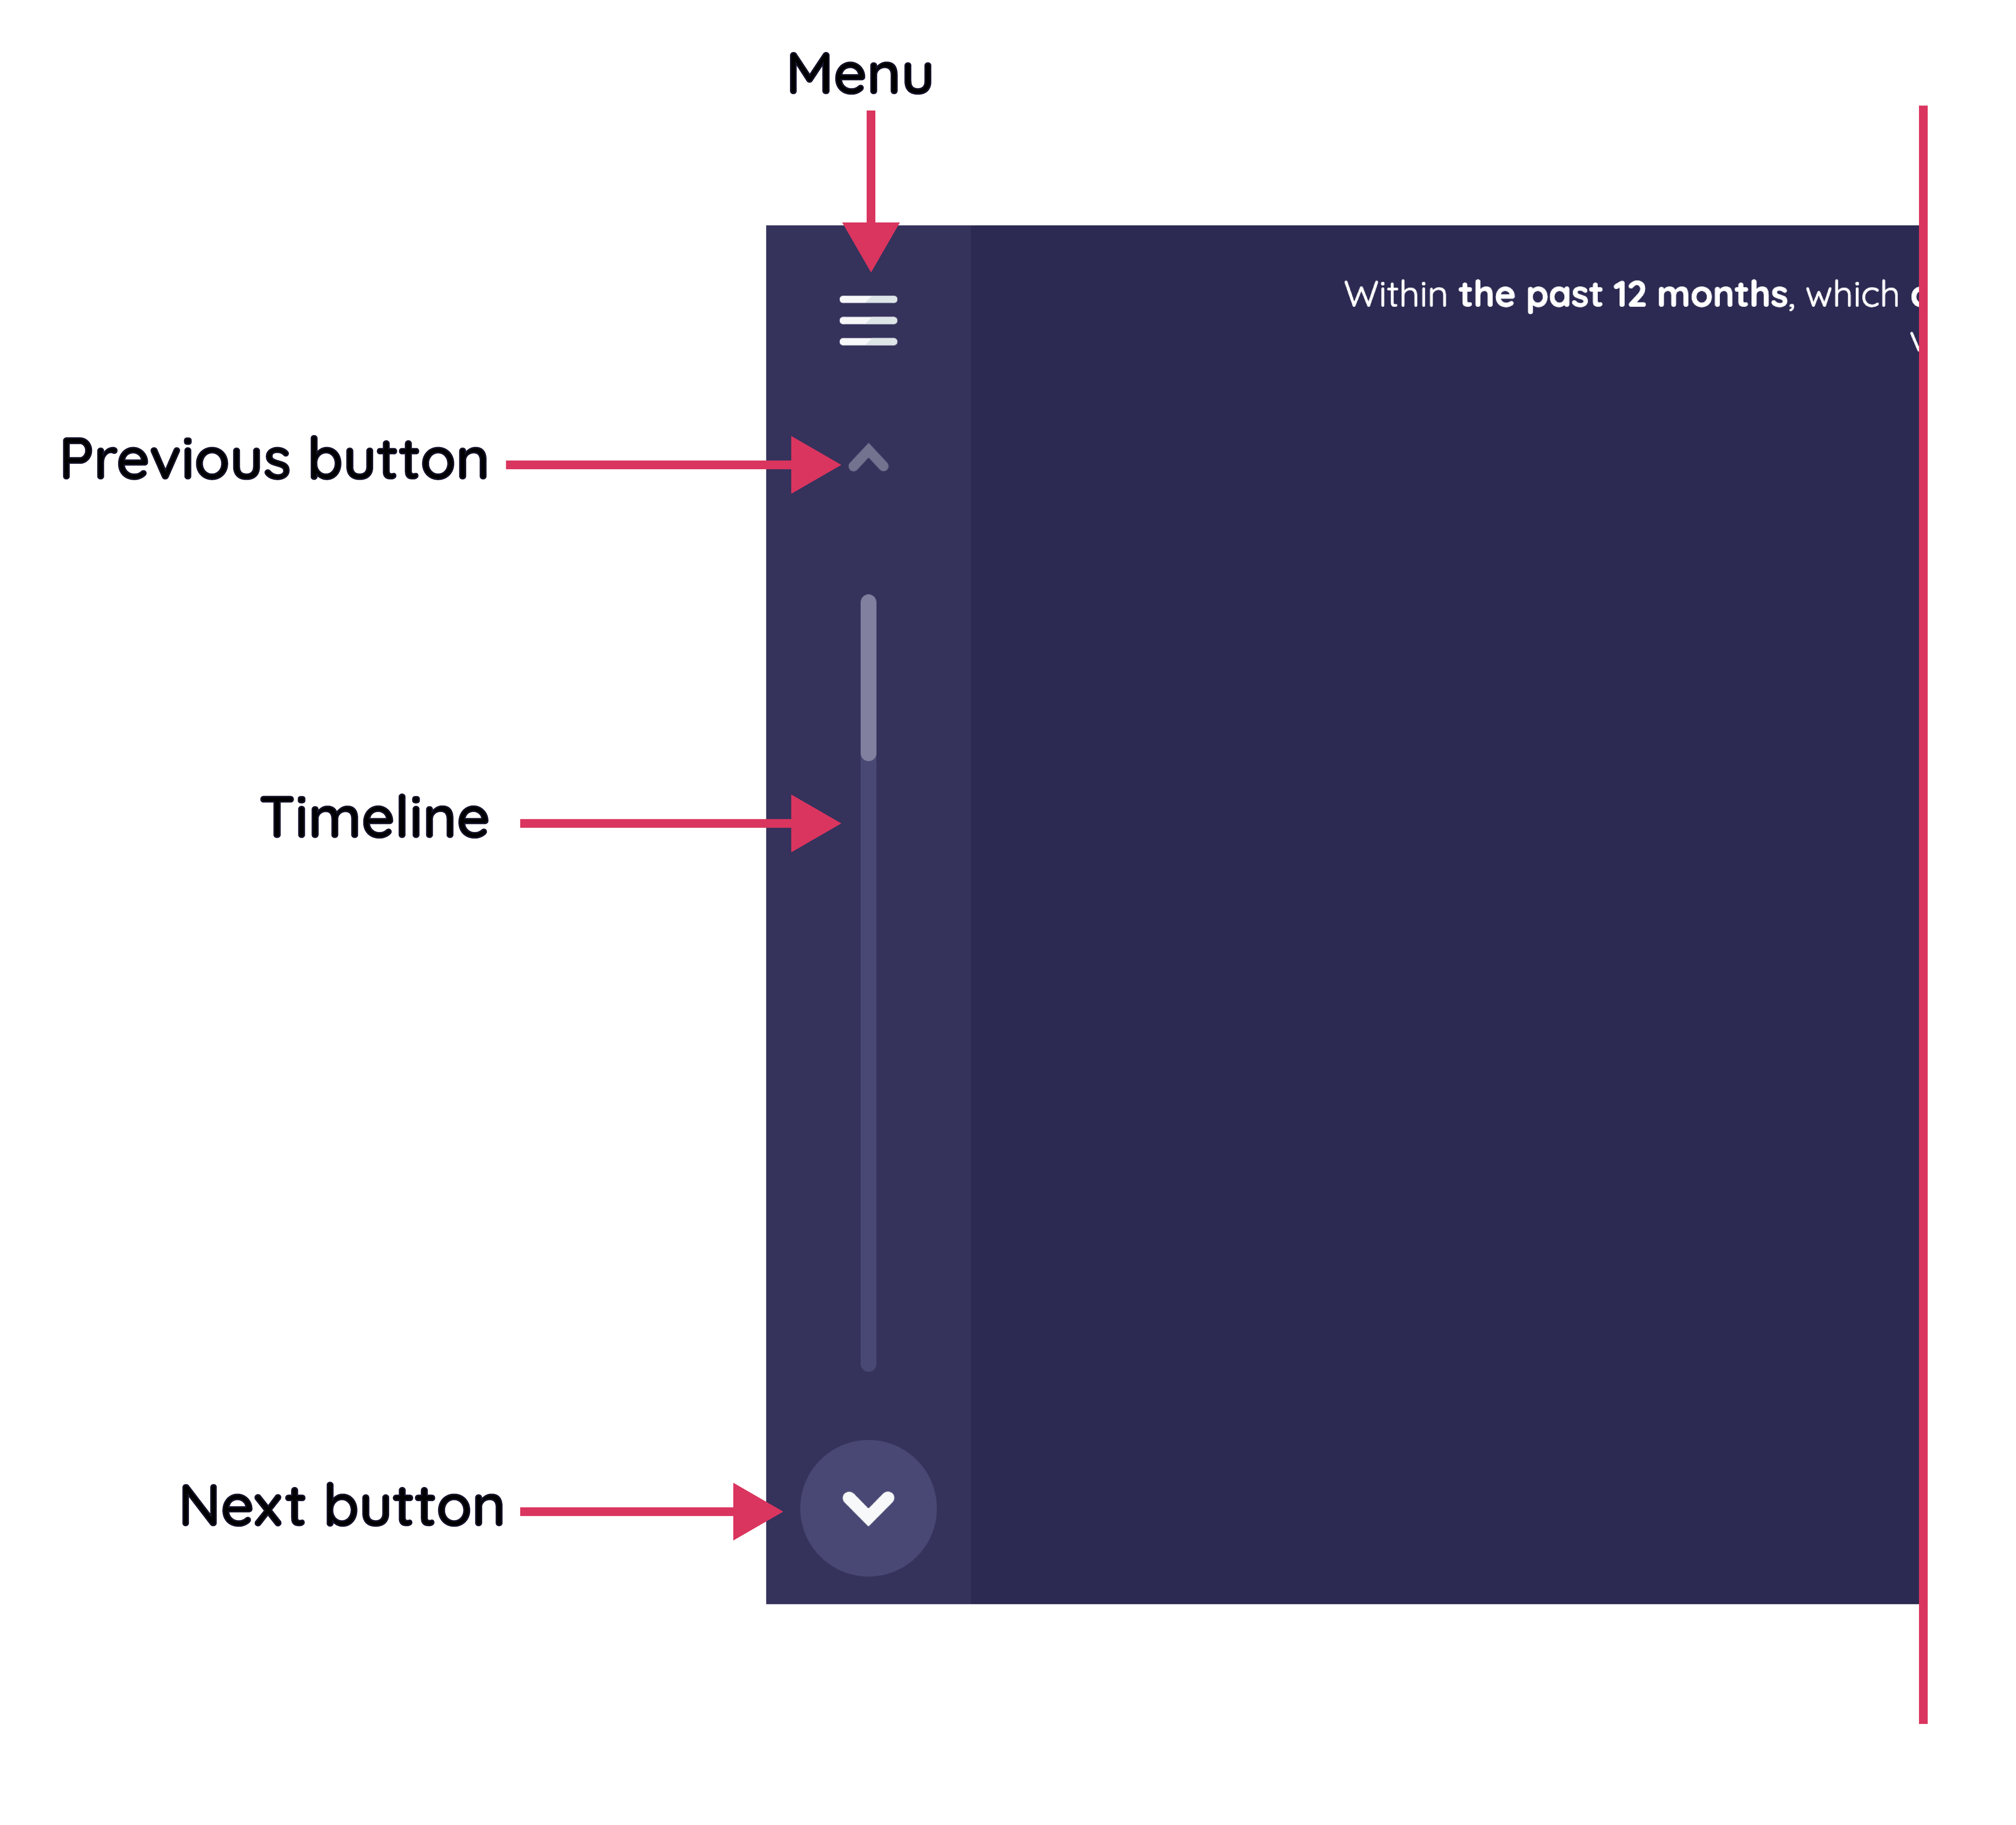
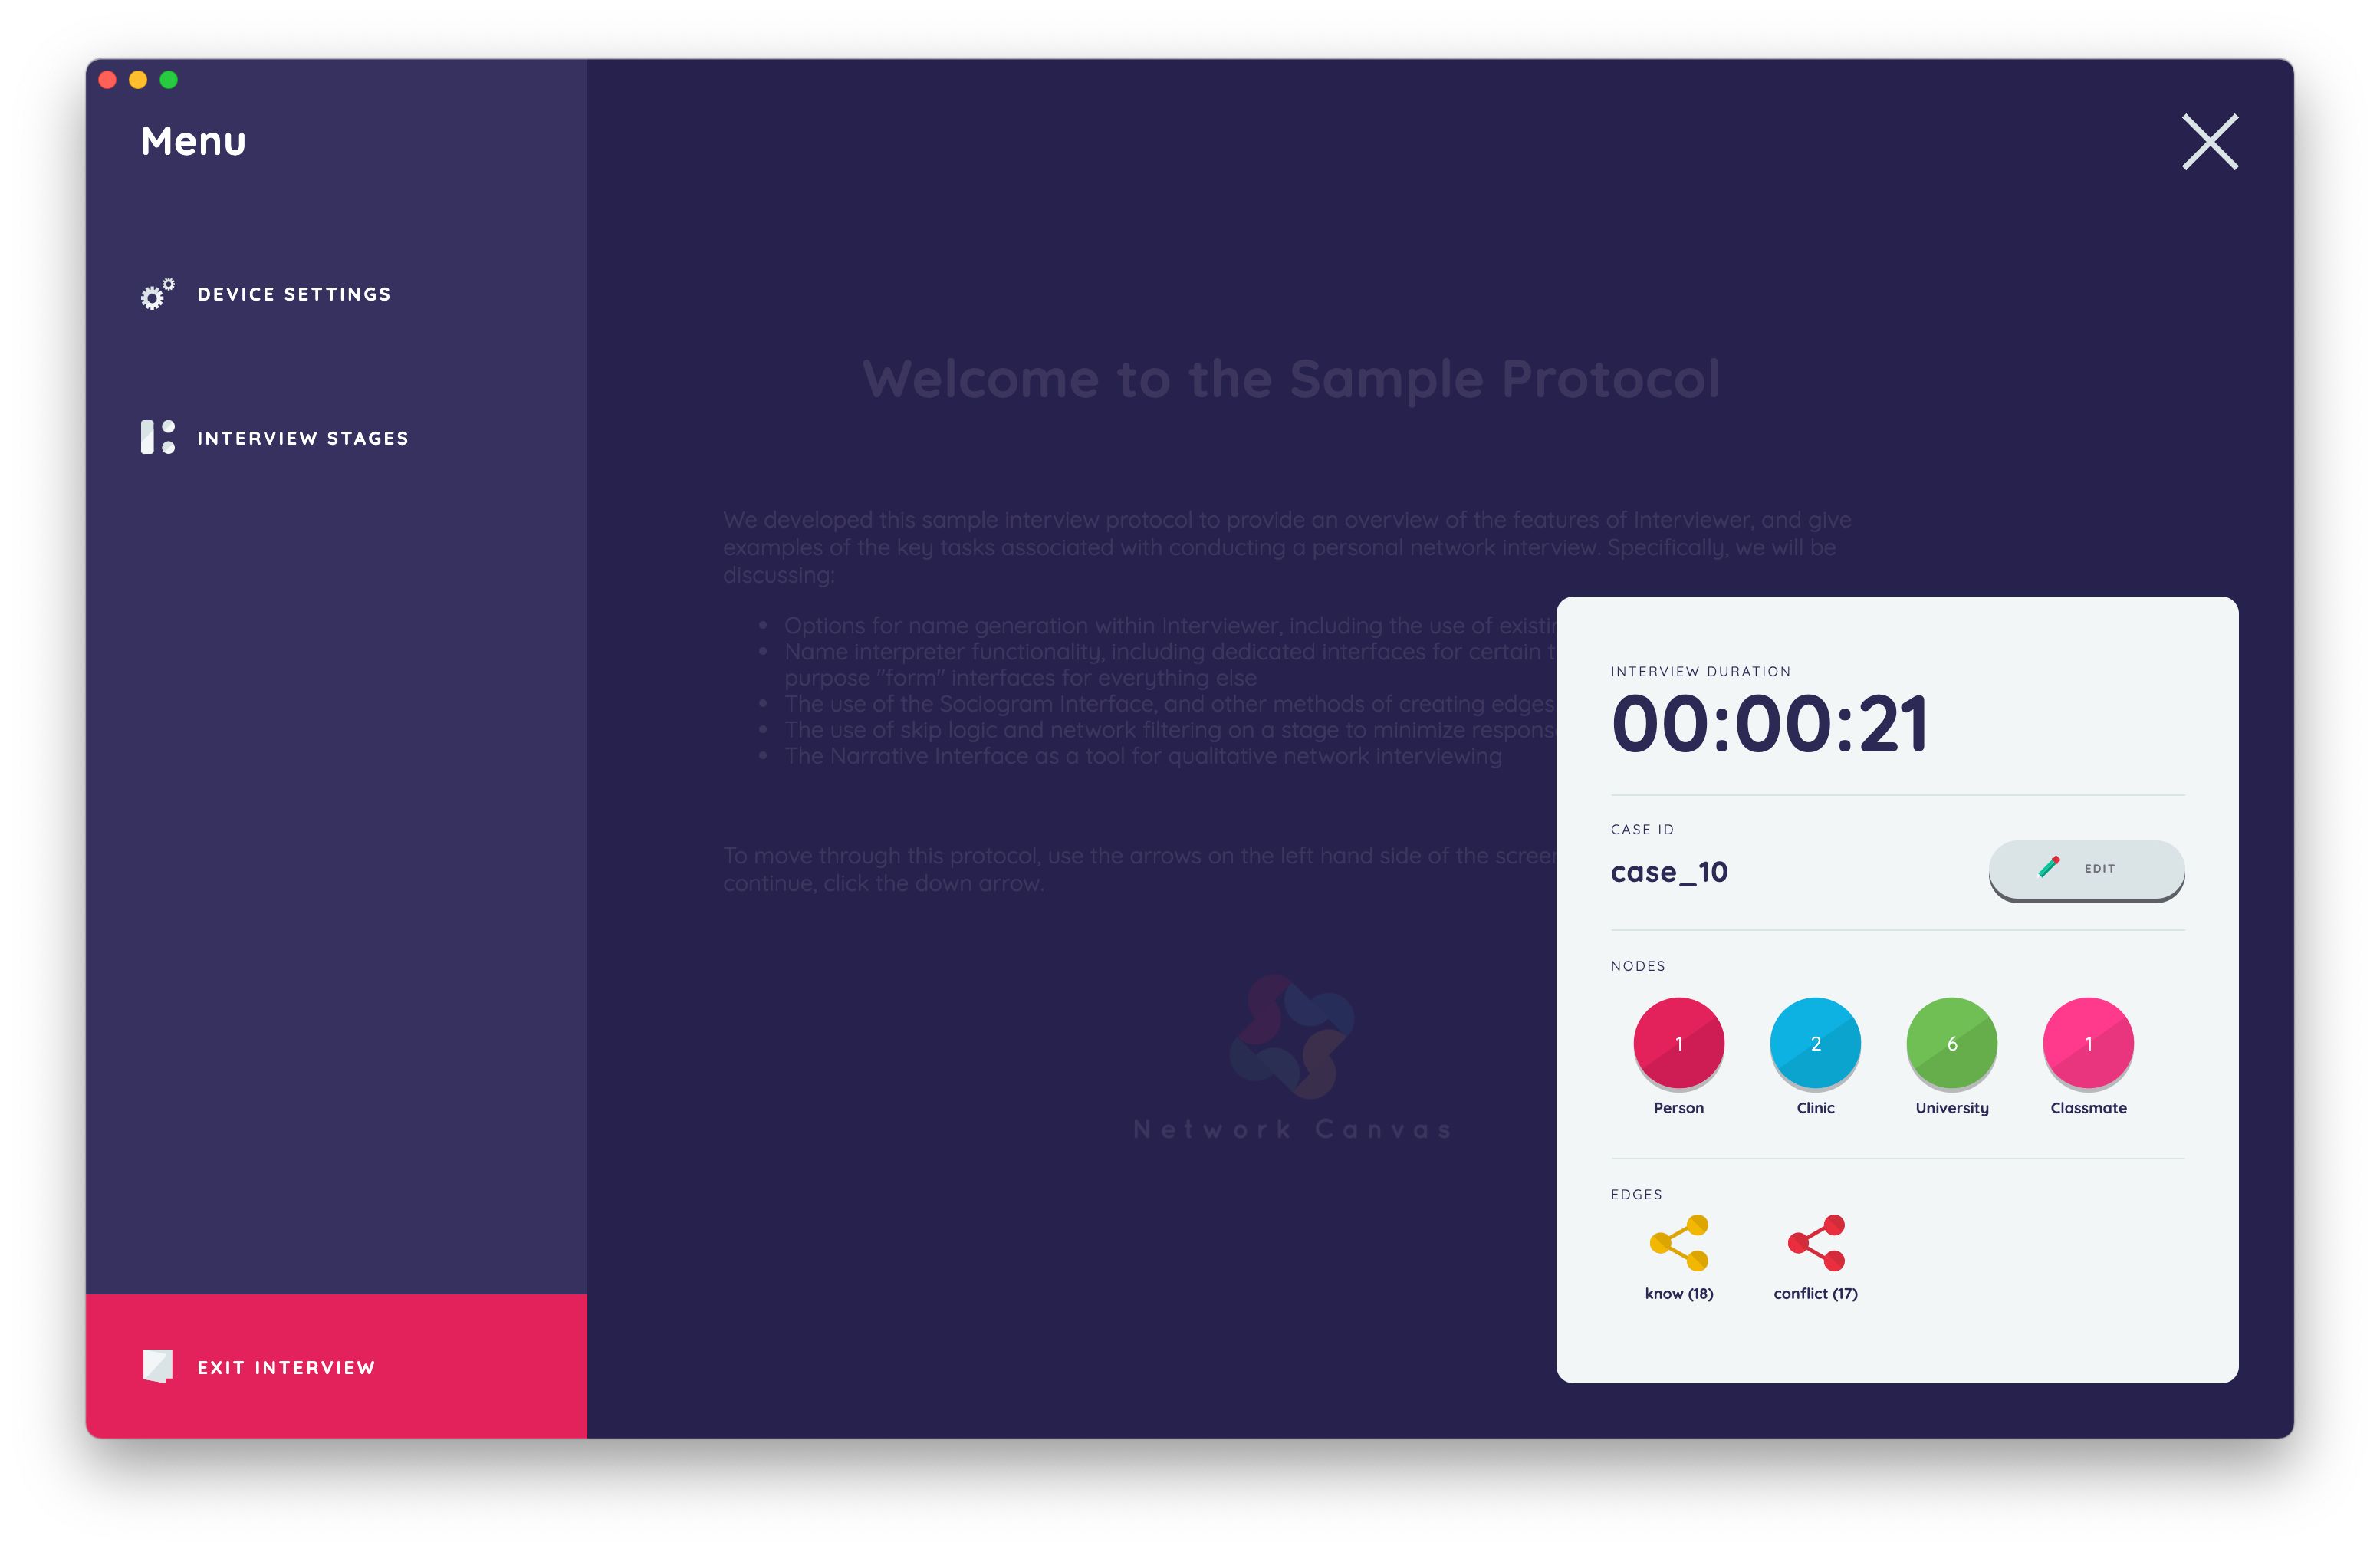
The menu button at the very top of the screen opens the primary app menu, which allows you to:
- Exit the interview
- See a summary of the session, including numbers of nodes and edges and current duration
- Open the device settings menu
- Open the stages menu (see below)
The large vertical bar is the interview timeline, which is a visual indicator of progress through the interview. As the participant progresses forwards the bar will fill up, and eventually turn green when the interview is finished. Tapping the timeline will reveal the "stages menu", which allows the researcher to quickly see precisely where they are within the interview, as well as to move to another location. The stages menu can also be opened from the main app menu.
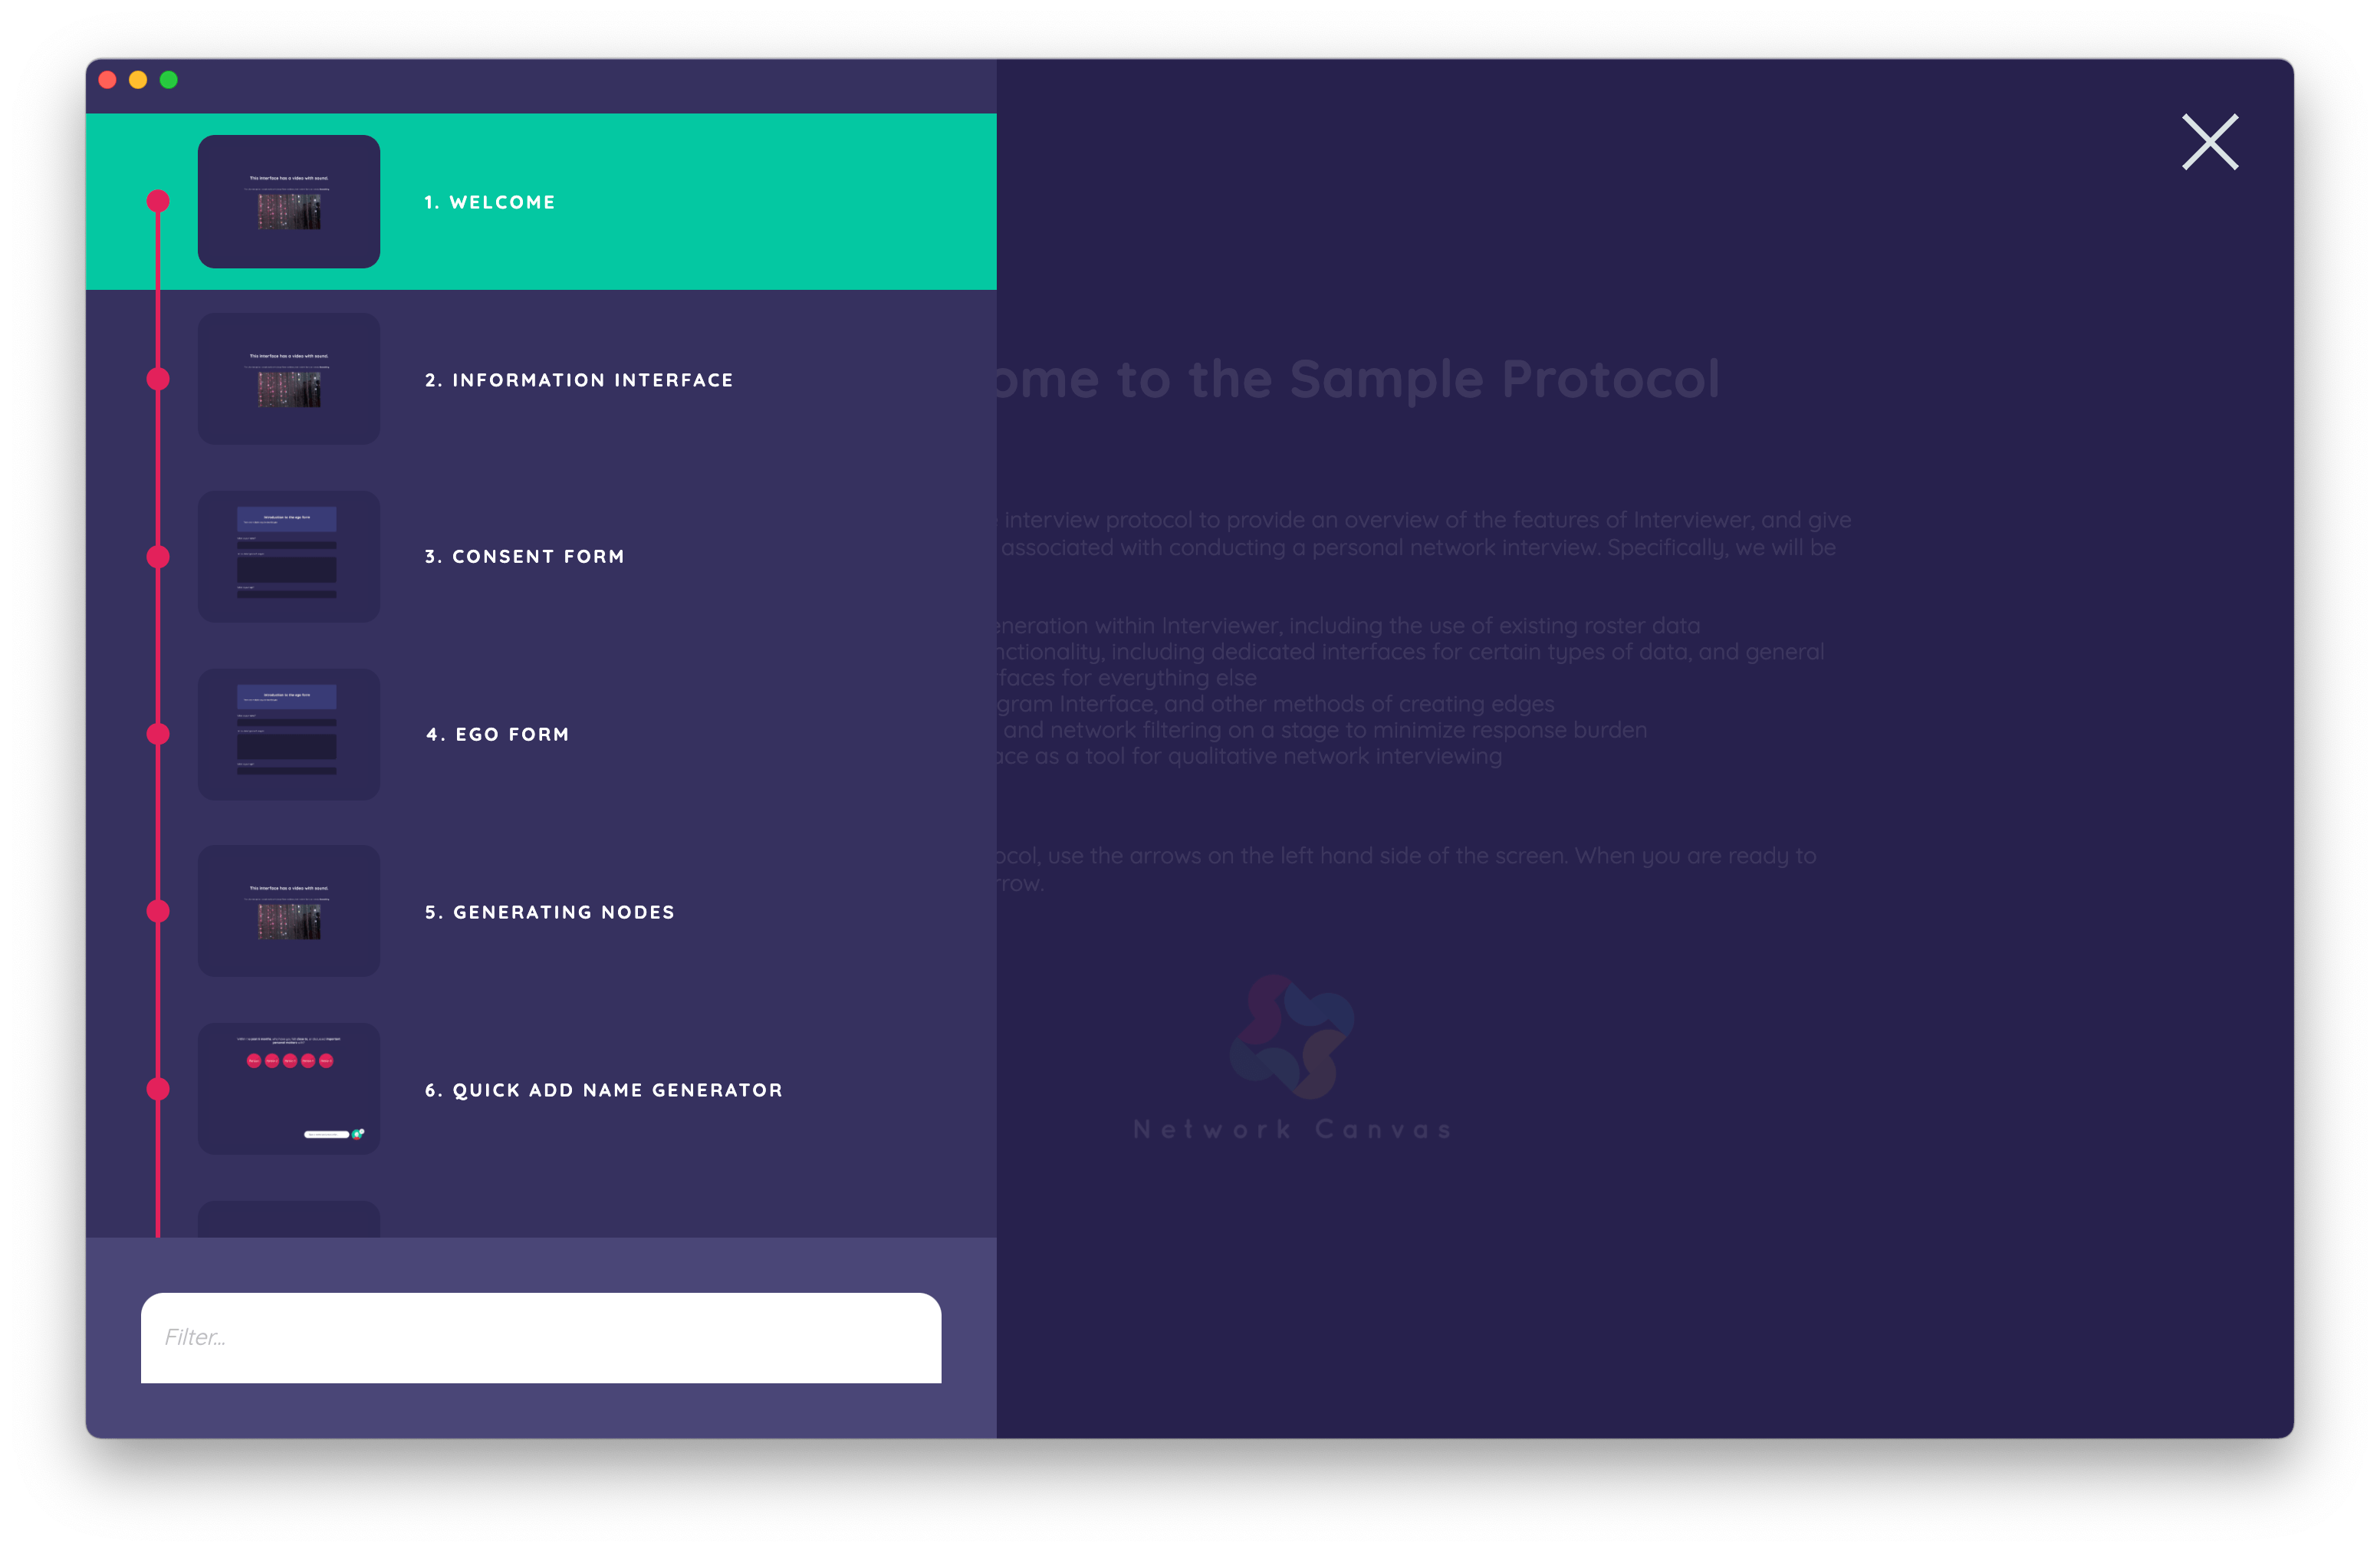
Moving forwards and backwards through the interview is accomplished using the next (down arrow) and previous (up arrow) buttons visible at the top and bottom of the timeline, which can be used by the participant or by the researcher to advance the interview.
Stages and interfaces
With a Network Canvas interview protocol, each interview is made up of a series of screens called "stages", where a specific task is completed. You can have as many stages in your interview as you need, and as you will see in other tutorials, there are many ways to structure your interview using different combinations of screens and different front or back loadings of tasks.
Each stage is an instance of a specialized task-based screen called an "Interface". An Interface is the broad "category" of task, and a stage is the specifically configured version of that task in your interview. Each Interface is designed for a specific data collection task, such as generating names, collecting ordinal data, or showing a form. Each Interface has dedicated documentation (see the "Interface Documentation" section on the left) that explains its features and provides guidance on when and where to use it.
The Information interface
The first screens within the sample interview protocol all use the Information interface, with the very first being the welcome stage.
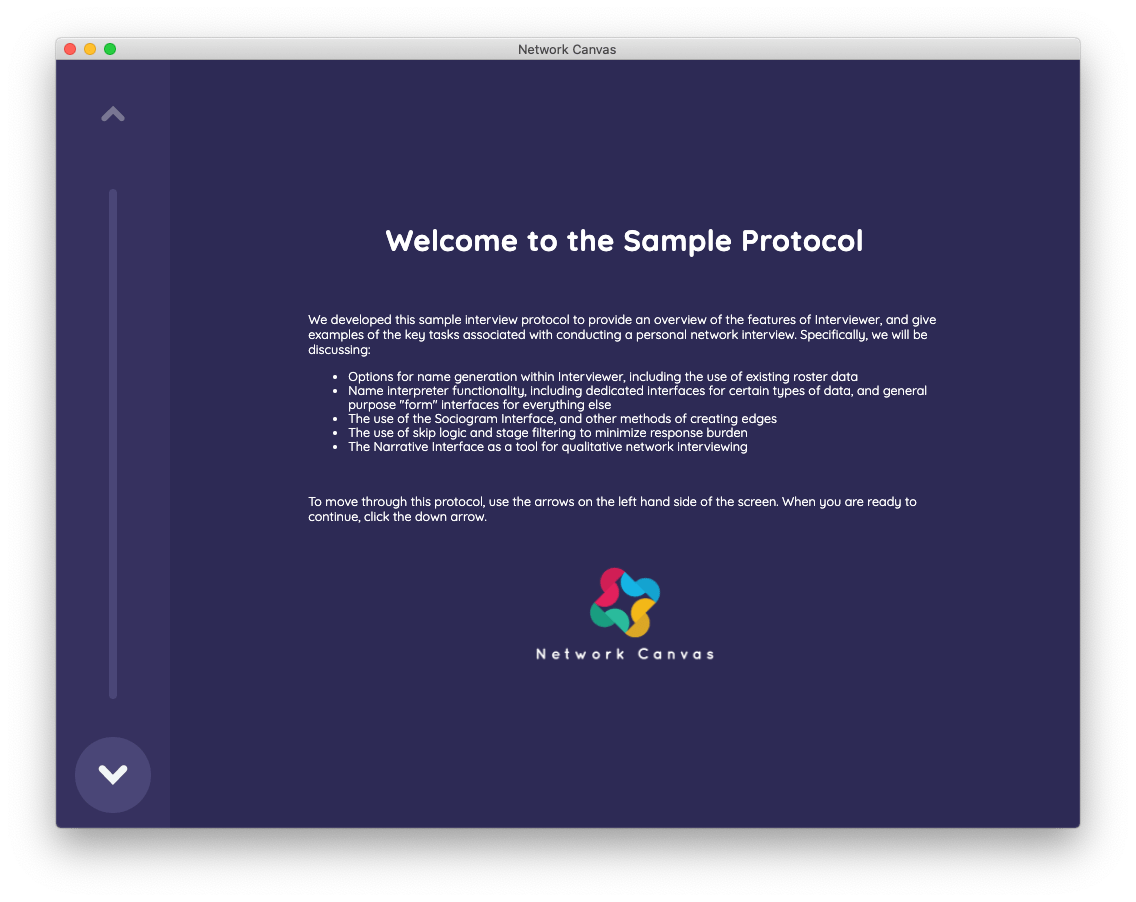
You can use the Information interface to build stages that communicate information to a participant, such as providing a study description or instructions for completing a task on a subsequent screen. It can also contain media, such as audio, images, or video. This sample protocol uses numerous Information interfaces to clarify the primary tasks performed in Interviewer, but this article will not describe them to avoid redundancy.
Ego data collection
After clicking next to pass through two additional Information stages, you will arrive at the first data collection stage in the sample protocol.
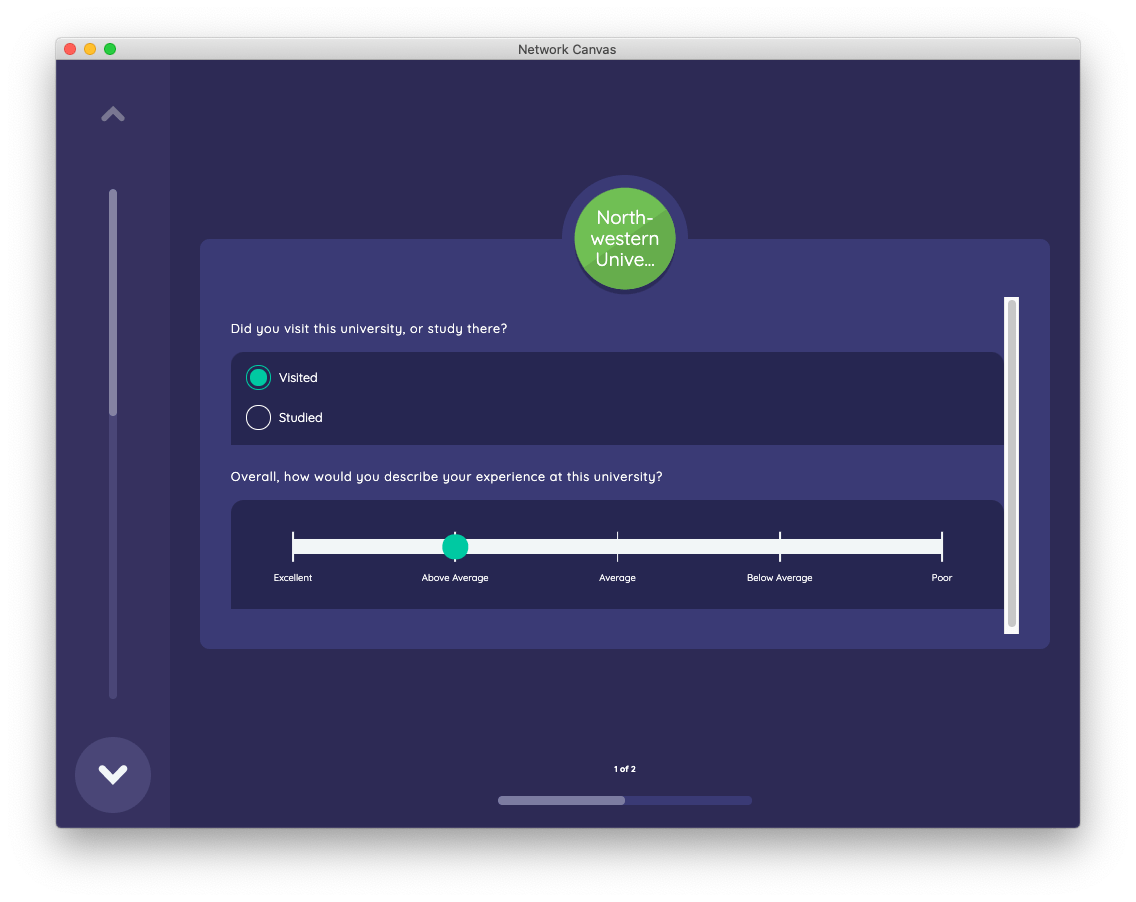
While Interviewer is optimized for collecting data about network members from an ego-centric perspective, it also provides the ability for researchers to capture data about the participant (ego) through the Ego Form interface. This interface allows the researcher to show an arbitrary form to the participant, where responses are stored in a dedicated section of the interview data model devoted to ego data.
The first use-case for ego data collection demonstrated is an example of a participant consent form.
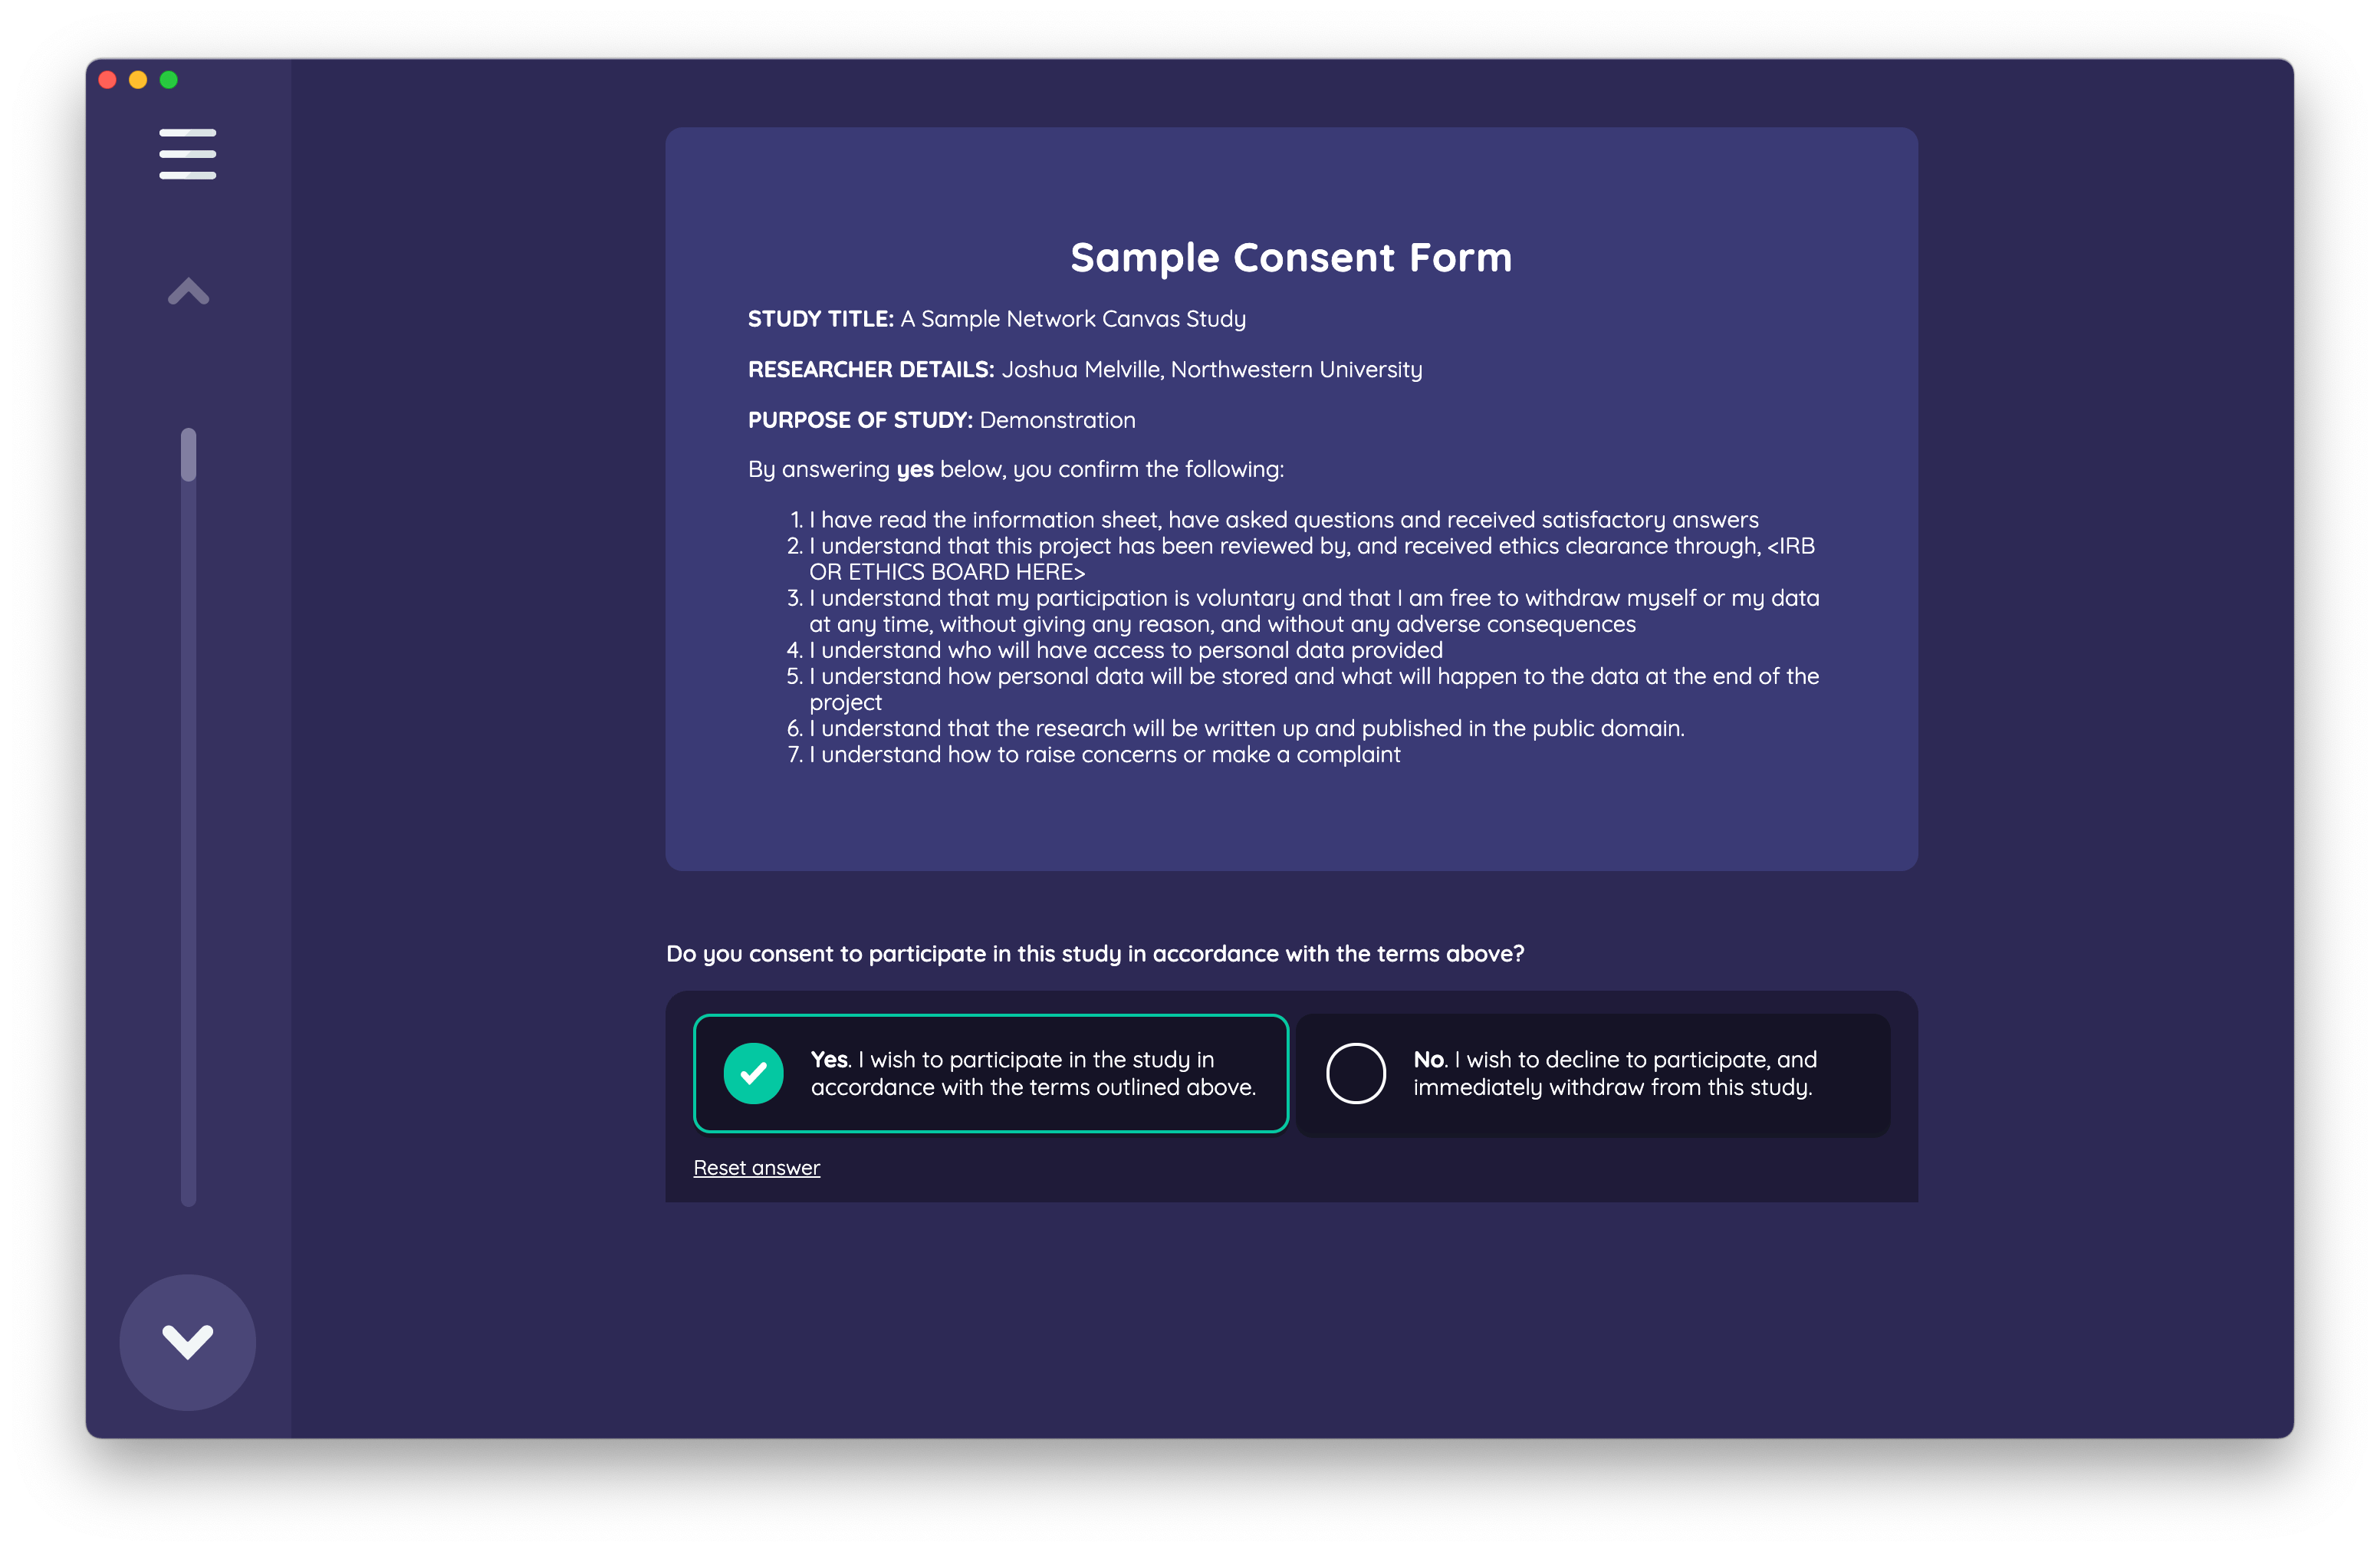
It shows a single form field that represents a boolean attribute corresponding to the consent status of the participant. Once the question is answered, the attribute is included in the network data model and exported along with the interview data. You can use it to direct the flow of the interview using skip logic.
The next Ego Form interface shows a more full-featured example of this interface. In this particular stage, the form asks for a variety of individual level data using numerous input control types.
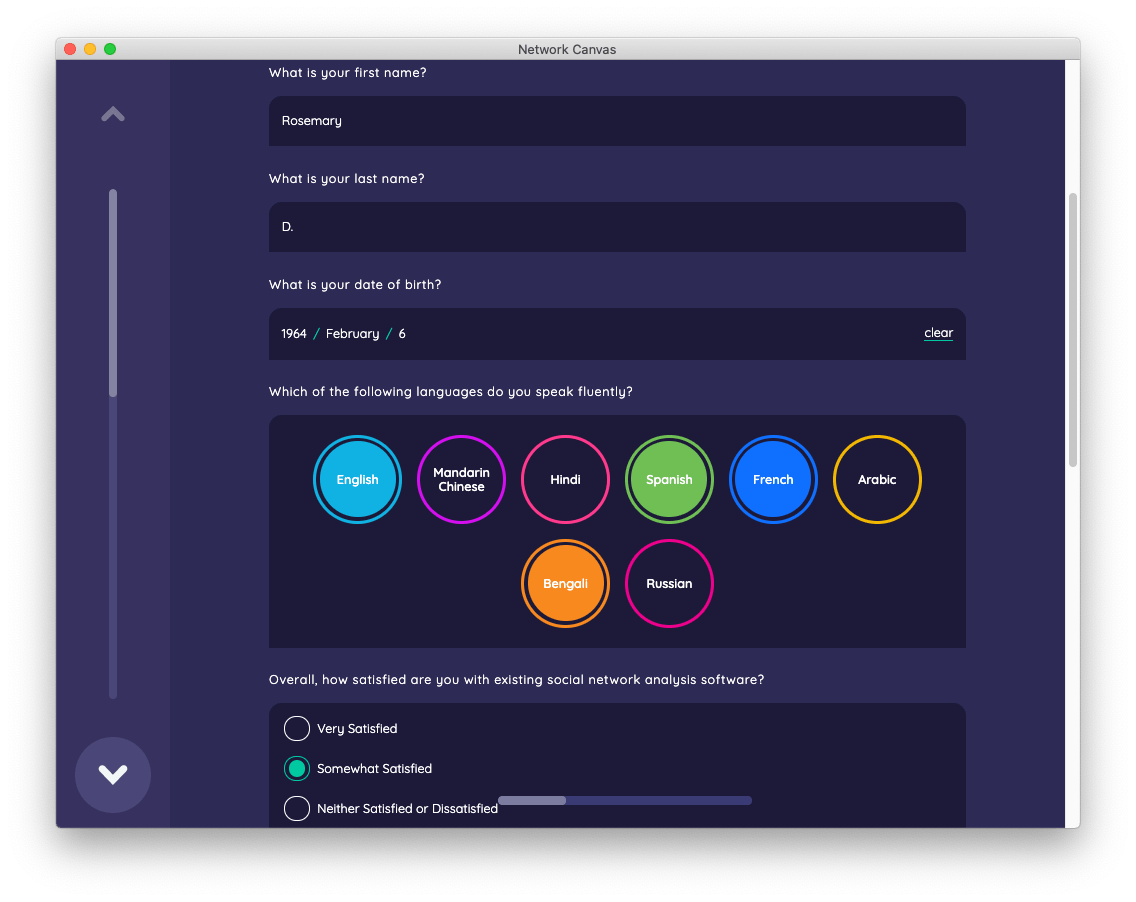
The form includes validation, which requires you to enter the first and last name before proceeding to the next screen.
Name generators
After clicking through a further Information screen, you encounter the first name generator stage of the sample interview. Name generation is a fundamental task in all network interviewing, and the Network Canvas software offers configurable and customizable behaviors to suit different research designs. This section briefly discusses these in turn, in the context of the sample protocol.
Quick Add
The first name generator stage uses the Quick Add Name Generator interface. It is designed to be ultra-low response burden and only requires that a participant provide a name or label to create a node.
To add nodes, click the add button in the bottom right, which reveals the label input. Enter a name and press enter (or click the node icon), and notice that a node appears in the main node list. When you are finished, either click the button again or click away to close the input.
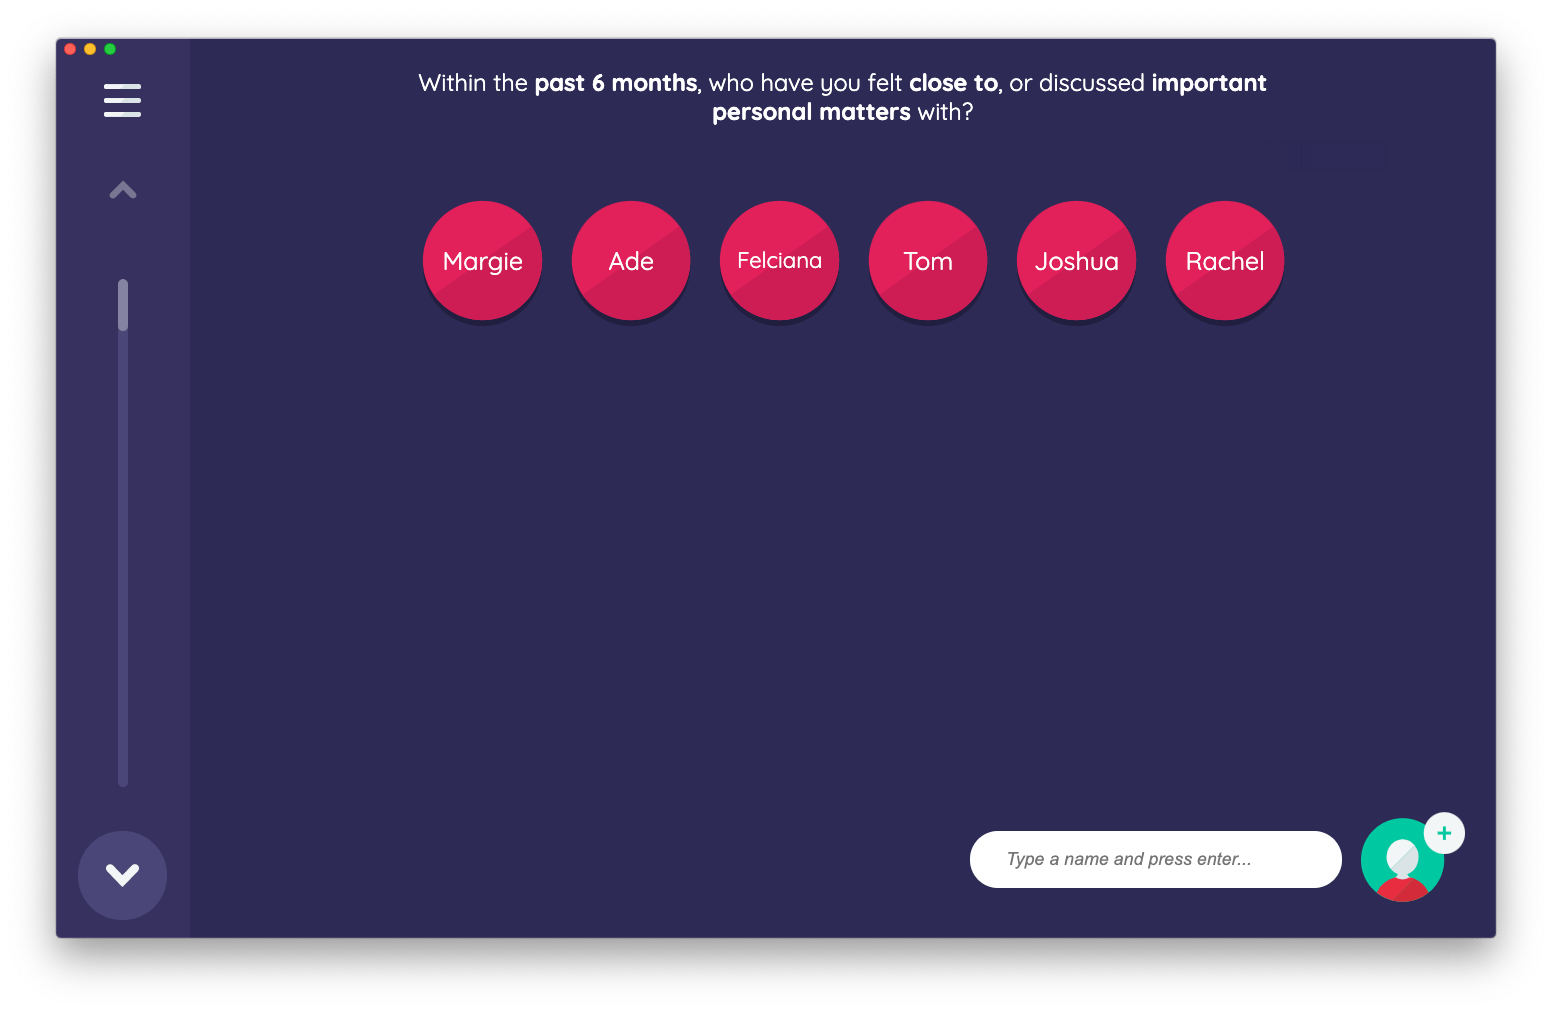
This stage is configured with a single prompt:
Within the past 6 months, who have you felt close to, or discussed important personal matters with?
Prompts are defined by the researcher, and frame the data collection task. Many Interfaces support the use of multiple prompts on a stage. If a stage is configured with multiple prompts, the "next" and "previous" buttons will move between them automatically.
Side panels
Clicking forwards through an information stage and into the next name generator stage, a side panel will appear that contains all of the nodes named on the first stage. We can drag and drop nodes from this side panel into the node list area, or we can create new nodes by clicking on the add button in the bottom right right corner as we did previously.
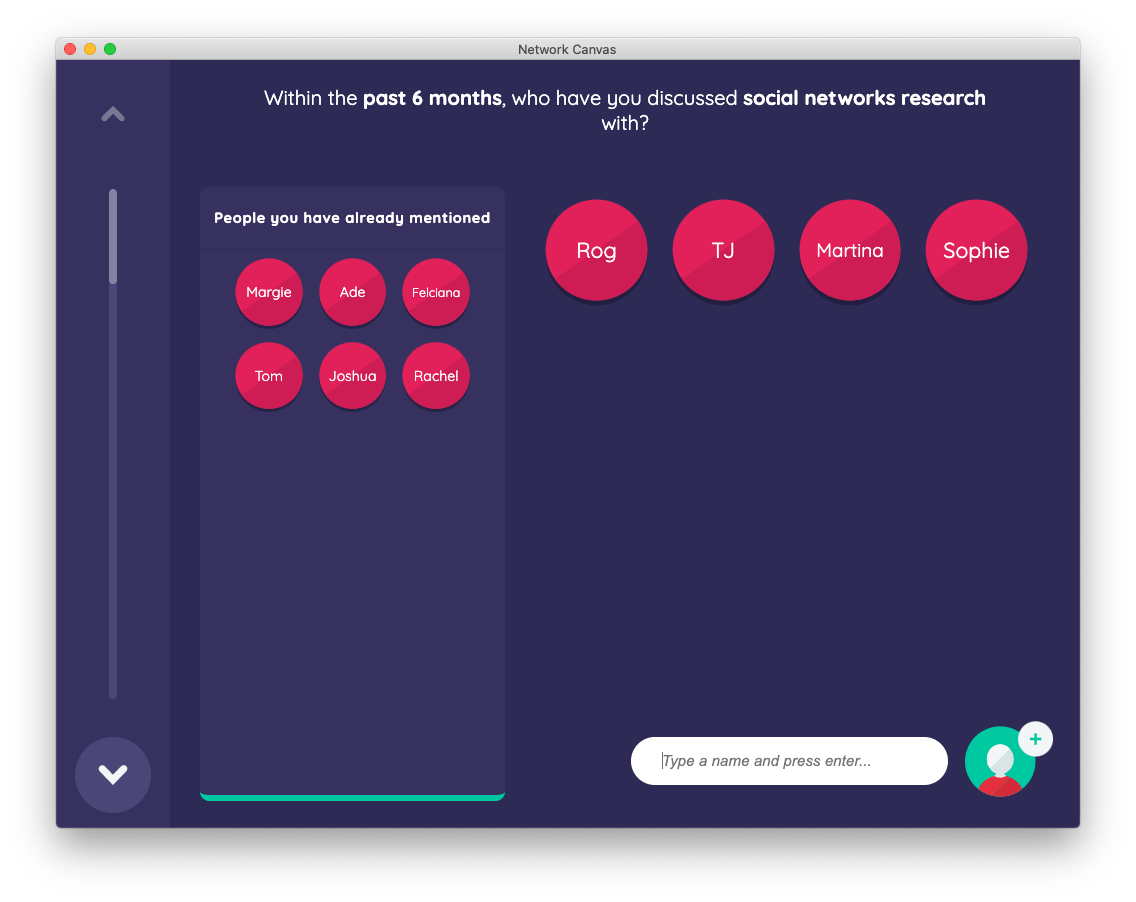
The side panel functionality is available in both of our non-roster specific name generator Interfaces. It is designed for two specific scenarios:
-
To allow participants to nominate alters they have already mentioned again in response to later prompts. For example, if a first prompt asks "Who are you close to?", and second prompt asks "Who are your family members?", the participant may wish to nominate existing close alters as also being family members. This is especially powerful when used in combination with the assign additional variables feature, since it allows you to combine name generation and name interpreting in a single step.
-
As a container for displaying small amounts of roster data, where you still need to retain the ability for the participant to add network members not listed in the roster.
You can display up to two panels on a name generator, with different content in each.
Forms
Moving forwards through an additional information screen, you will arrive at the next name generator, which begins with the following prompt:
Within the past 12 months, which clinics or healthcare providers have you visited?
Although this stage is also a name generator, it uses a separate interface which makes it behave differently. This time, when clicking the add button in the bottom right, you will see that a dialog is triggered. Network Canvas can be configured to collect more in-depth node information at the time of elicitation, using the concept of "forms". In this example, clicking the "add" button shows a form with three fields (name, visit date, and treatment summary).
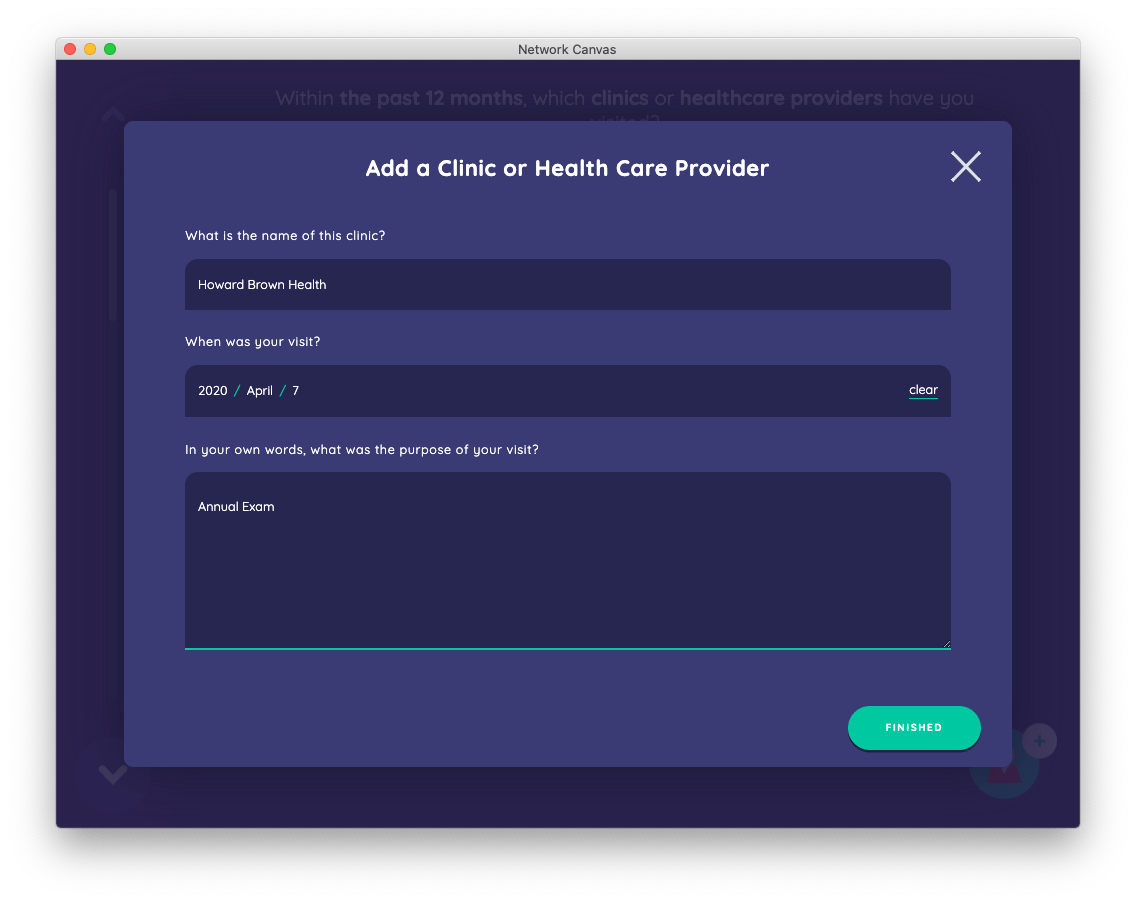
The forms you design can collect whichever attributes you wish. This is one of the key ways that a researcher can vary the front-facing response burden of naming alters. Collecting a large number of attributes as the node is created can allow for fewer overall stages in your interview, but can also condition the participant against naming large numbers of alters.
Experiment with adding alters on this stage, and notice that these nodes are a different color from the ones we created previously. This is because Network Canvas interviews can collect data on as many node types as the researcher desires.
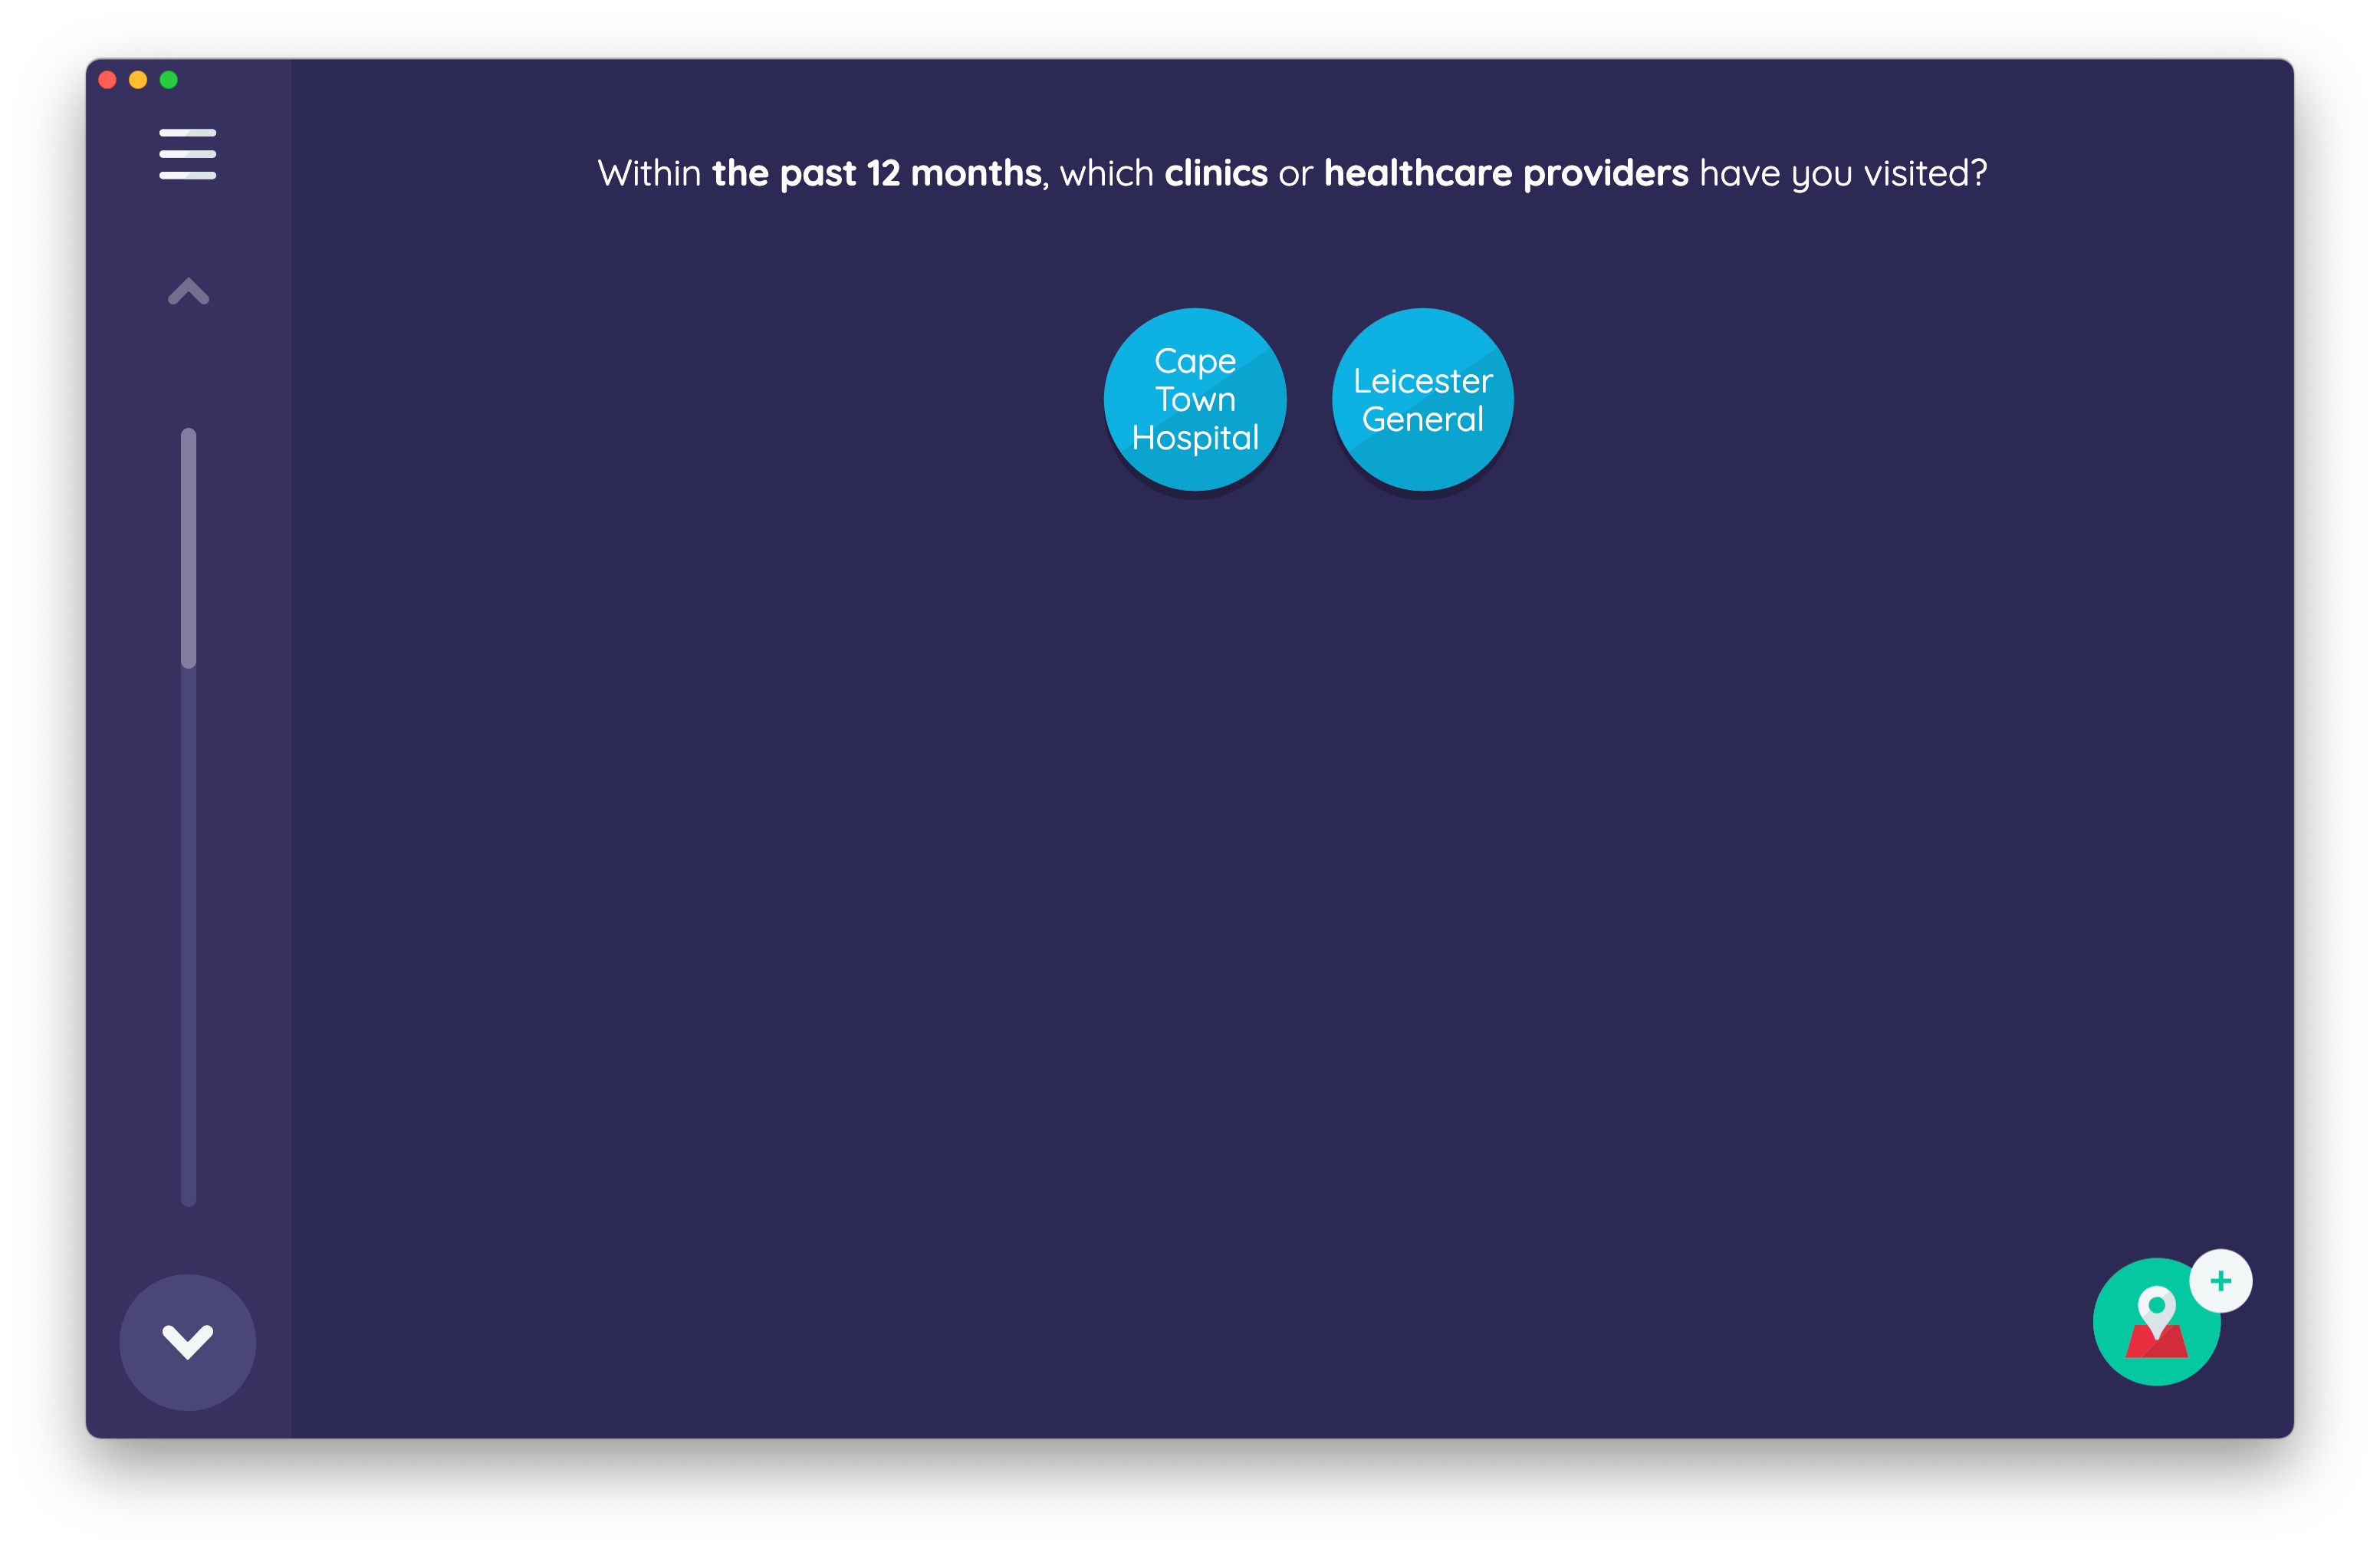
In this case, our name generator will create "clinic" nodes, which are displayed in blue, as opposed to the red "person" nodes we saw previously. This is an element of the ontological flexibility discussed in our project overview, and allows for powerful research designs that model networks in sophisticated ways.
Using roster data
Continue forwards through the sample protocol, until you arrive at a name generator stage with the prompt:
Please select any members of your degree class that you spend time with other than when studying. Tap a card to select, and press the down arrow when you are finished.
This stage once again behaves differently from the previous name generators due to being based on a different interface. It allows a participant to nominate alters from a predetermined list (i.e. a roster). In this case, "classmate" nodes are added by selecting the appropriate "display card" on the scrollable roster. Multiple alters can be added at one time. Note that you are able to filter and sort the list, which helps when trying to locate a specific roster member. The sortable properties, as well as the information to be displayed on the cards, are all fully customizable within Architect.
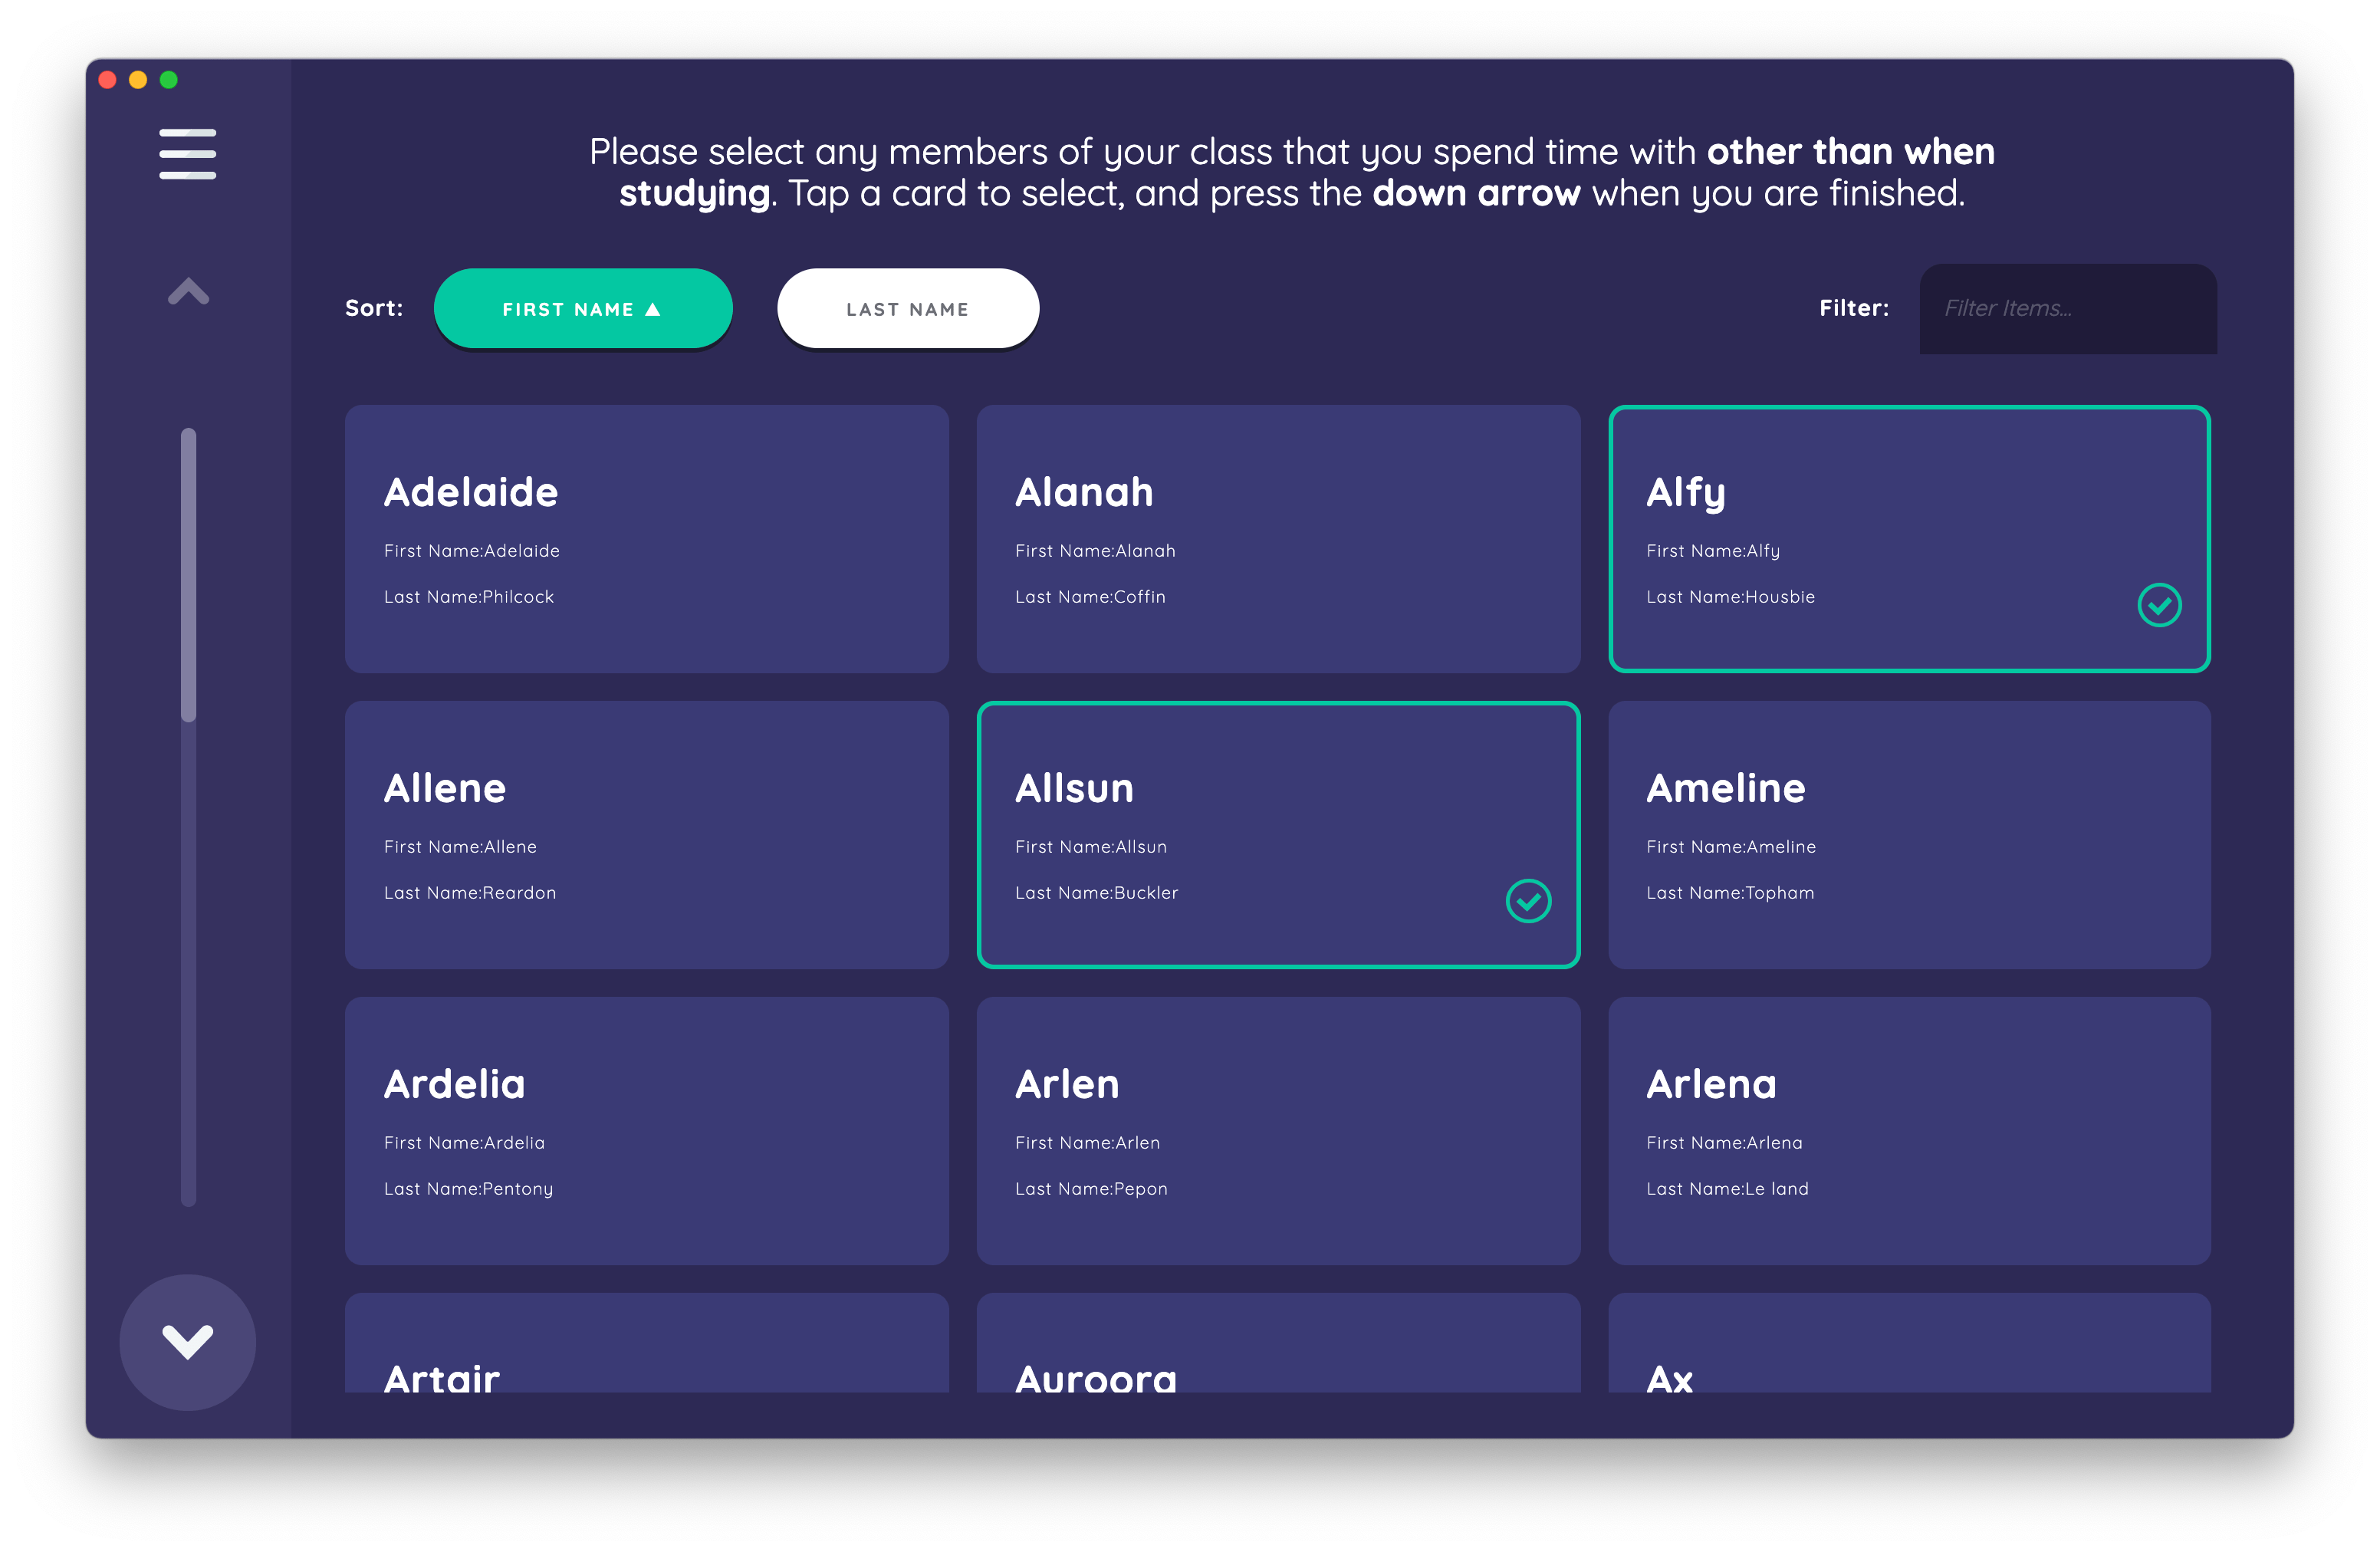
Once a member of the roster has been nominated by selecting its card, Interviewer creates a node in the network model using data from the roster. This results in data files that contain only the nodes that the participant nominated. This stage is an example of the small roster name generator interface.
Clicking next again will take you to a second roster-based name generator Interface, but this time designed to work for extremely large rosters. Here, we ask about universities visited or studied at. Our CSV roster data file contains approximately 9,300 nodes.
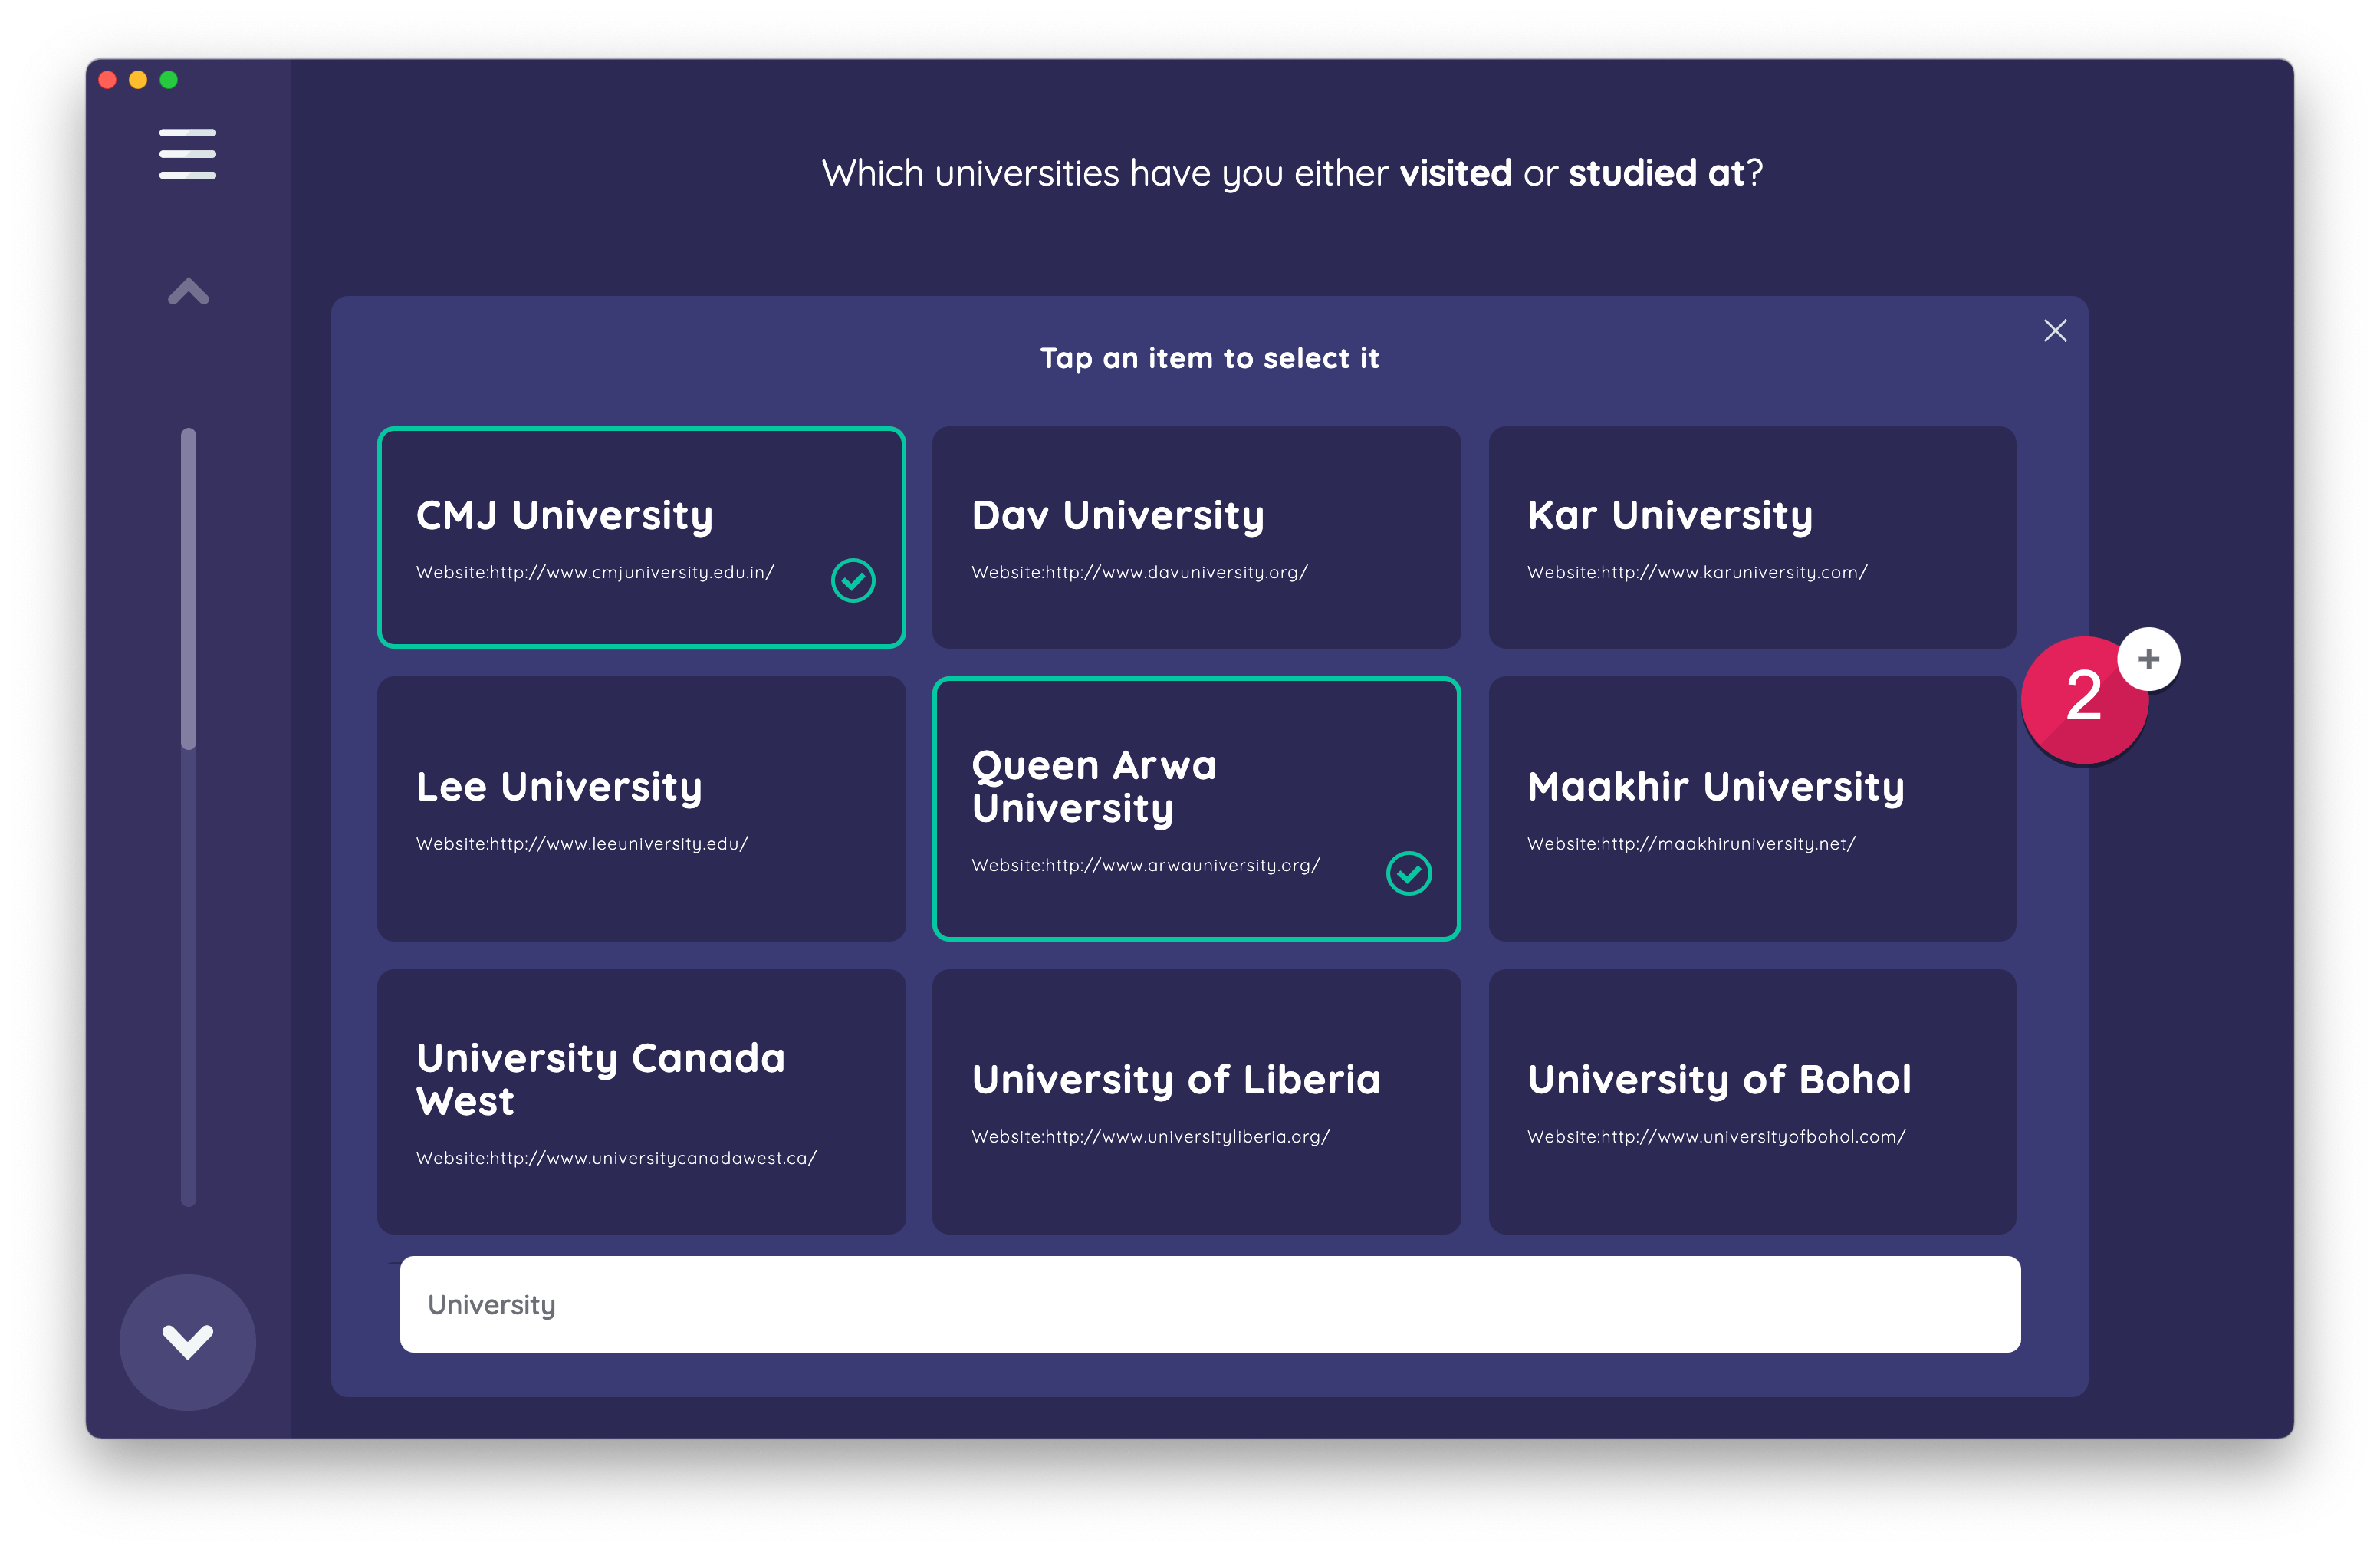
Since this roster is so large, this interface does not display the roster in its entirety. Instead, it offers a search box, and customizable levels of fuzzy matching, in order to help the participant quickly locate the nodes they wish to nominate. This is an example of a stage configured using the large roster name generator interface.
General purpose form interfaces
For situations where general purpose data collection is required, form-based interfaces show a form on a per-alter or per-edge basis.
Clicking next from the university roster stage, you will immediately arrive on a stage that uses the Per-Alter Form interface to ask follow-up name interpreter questions about all alters that were named on the previous screen.
As with all forms used by Interviewer, the Per-Alter Form allows you to capture different types of data in a series of fields utilizing a variety of input controls. Any data in these forms is stored directly on the alter as attributes. The Per-Alter Form stage cycles through all alters of a given type in the interview network, presenting the form for each.
There is also a per-alter edge version of this interface, which is identical except for dealing with edges between alters rather than alters themselves. You can use it to ask edge interpreter questions about the quality of a given relation.
The sociogram interface
After clicking through an information stage, you will next arrive at an example of the sociogram interface.
Network Canvas has been heavily inspired by the long tradition of using visual methods in social networks research, which often feature the sociogram as a means of presenting the network in a way that is intuitive to participants.
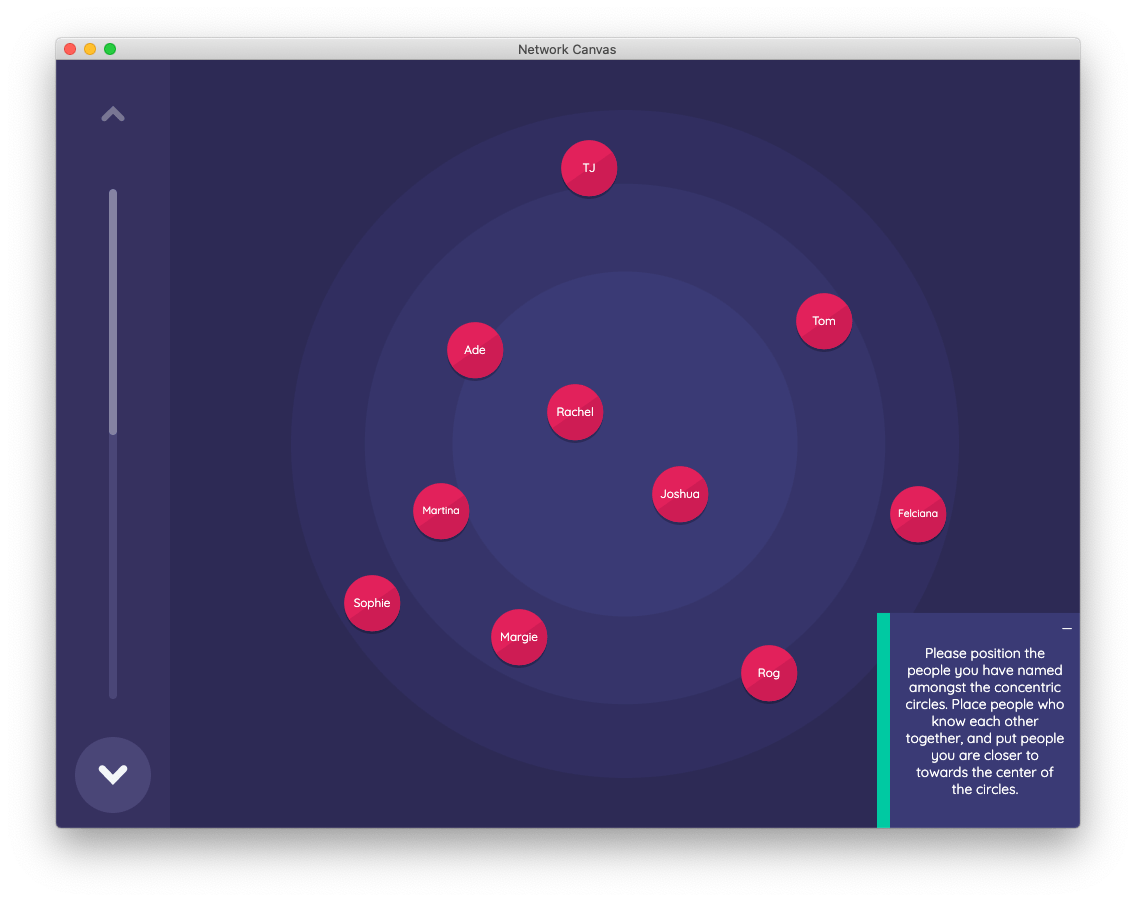
The sociogram interface in Interviewer is capable of three main tasks:
- Positioning nodes spatially - this means allowing the participant to drag (with touch or using a mouse) nodes around the screen, and place them according to some criteria. The sample protocol demonstrates the use of different background types, with the first stage showing concentric circles, and the second using an image of the "political compass".
- Creating edges or links between nodes - by tapping consecutively on one node followed by another, a visual link representing an edge can be created. The sociogram can create and display multiple edge types.
- Nominating nodes as having an attribute - when not in edge creation mode, the sociogram can be configured so that tapping a node toggles the value of a boolean variable. This powerful feature allows you to use the participant-defined spatial and structural dimensions of the network to reduce the response burden of finding and nominating members of the network.
As with other Interfaces, every aspect of theses three behaviours is customized by the researcher in Architect when creating the stage.
Conducting a dyad census
Some research has preferred more systematic approaches to evaluating the presence of alter-alter ties in ego networks. Immediately following the edge creation sociogram stage in the sample protocol is an illustration of the dyad census interface, which has been designed to accommodate these methods.
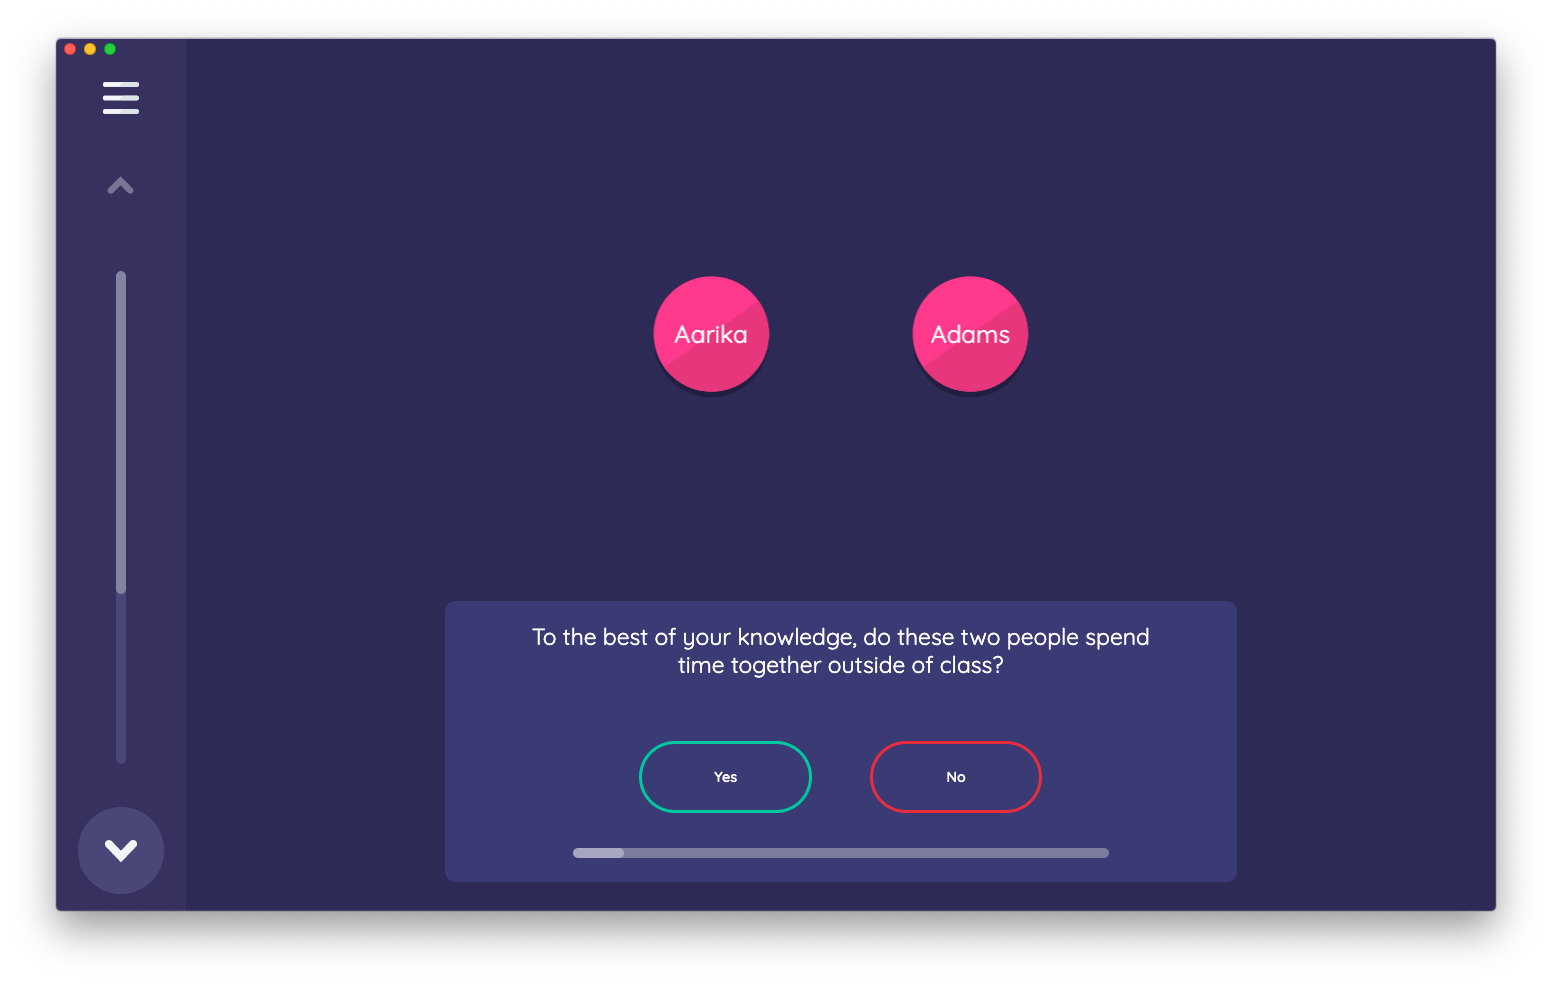
On this stage, all previously named alters are presented under a researcher-defined prompt and a simple "yes"/"no" user interface. By clicking the 'yes' button, a tie between the alters is created. By clicking the 'no' button, no edge is created. All possible pairs within the network for a particular node type will appear. Note that providing an answer immediately advances to the next pair, significantly speeding up the process.
Ordinal and categorical data
Apart from general purpose form interfaces, Interviewer also contains a variety of dedicated name-interpreter interfaces that are designed to improve the experience of collecting a single type of variable on a per-alter basis.
Continuing through the sample protocol to the "contact frequency" stage, you will find an example of the ordinal bin interface, which as the name suggests deals specifically with ordinal variables.
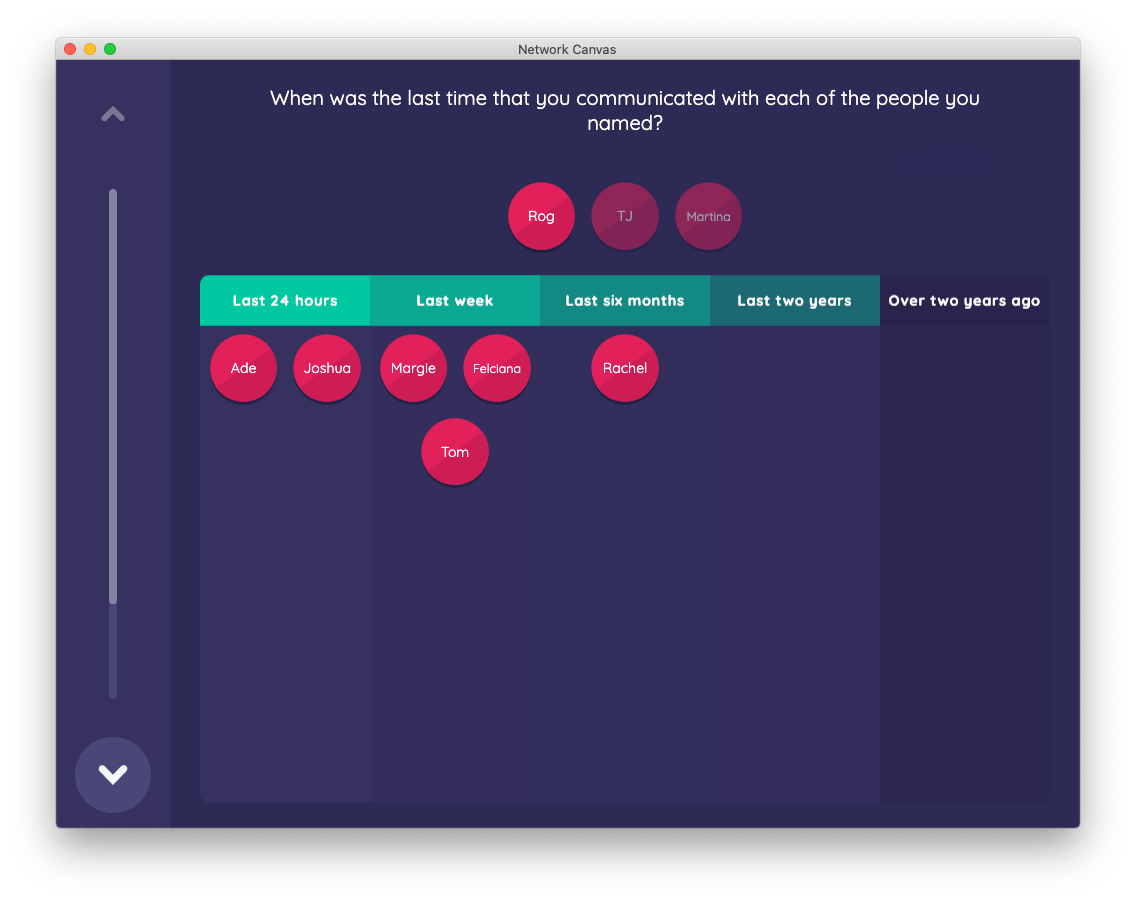
The ordinal bin interface allows you to drag nodes into a "bin" representing an ordinal variable value, thereby assigning that value to the alter. Here, we ask:
When was the last time that you communicated with each of the people you named?
This greatly improves response burden of "matrix type" questions, where the same question is asked for each alter that has been nominated. The visual nature of the user interface also allows the participant to reflect on prior answers, and potentially to improve the quality of answers. If the participant decides that a node was placed incorrectly in a particular bin, they can move it to the appropriate bin with minimal cost.
Once again, the key elements of the Interface are configurable by the researcher, including the alter type, the ordinal variable (and its categories), the color scheme of the bins, and the text for the prompt(s).
The following stage uses the categorical bin interface, which follows a similar pattern but for unordered data.
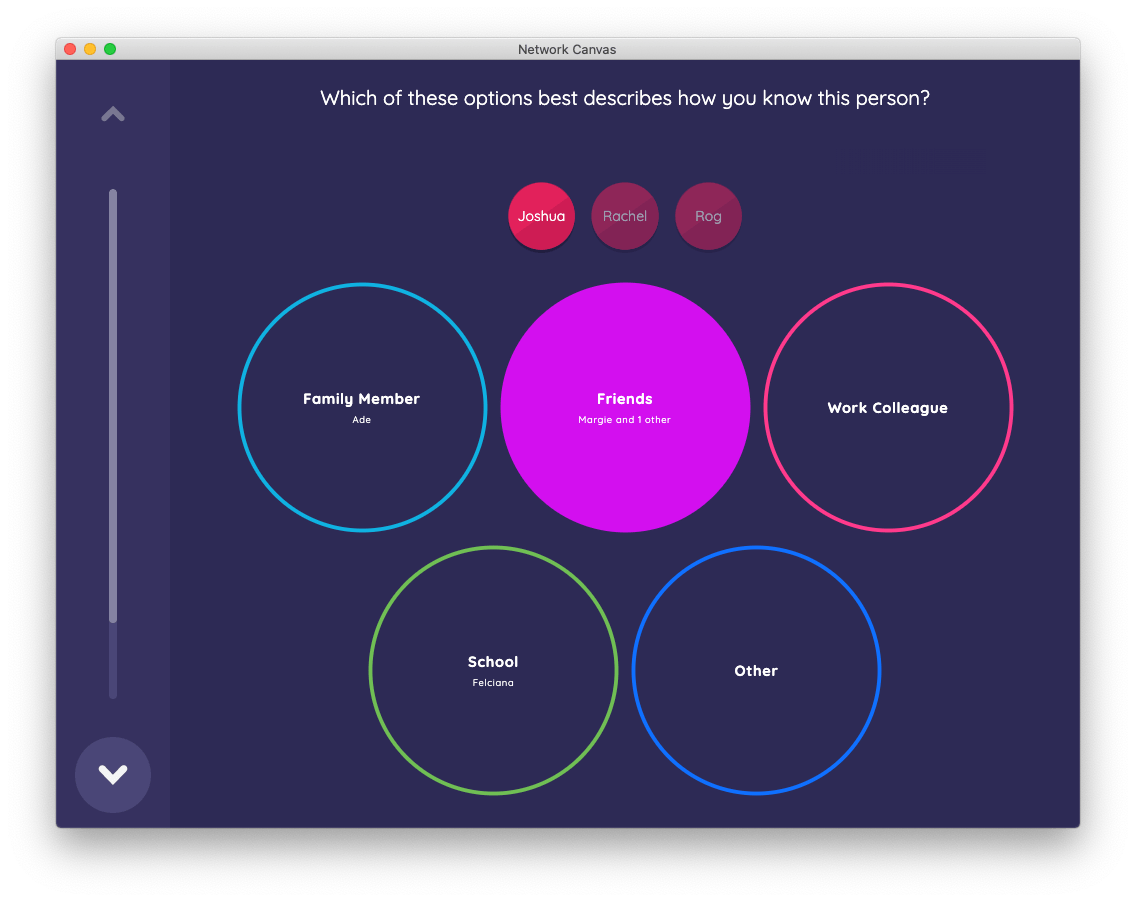
It allows you to drag nodes into colorful circles, each representing a categorical variable value. When a node is placed within a circle the variable value is assigned to that alter. You can view which nodes were placed in which circle by selecting the circle. This action allows you to move nodes from one circle to another, which may be necessary to correct an error.
Managing interview flow with skip logic and network filtering
One of the simplest ways to reduce response burden in an interview is to avoid showing the participant questions that are not applicable (or redundant) based on earlier answers. In conventional survey software, sections of an interview can be skipped based on responses. Interviewer extends this concept and allows the researcher to construct powerful queries built on the structure of the interview network itself, which can then be used to determine the flow of the interview as well as which interview network members should be shown on a stage. You can apply these queries to both skip logic and stage-level network filtering.
Following the Categorical Bin stage above, there is a further Categorical Bin. However, skip logic rules have been defined which direct that the stage should only be shown if a participant has named any alters of type "Person" with whom they discuss social network research. Recall the Quick Add Name Generator earlier in the interview, which asked participants to list any people with whom they have discussed social networks research: nodes nominated on that stage were given an attribute which has been used to create this skip logic query. If no alters were generated on that screen, the next Categorical Bin will be skipped.
Similarly, network filtering is configured using a rule which filters out all alters on this stage except those with whom the participant has discussed social networks research. This minimizes the scope of the task and removes the need to add a "not applicable" category.
You may wish to navigate back and forth between the quick add name generator and this stage to see the skip logic and network filtering in action.
The Narrative interface
The final stage of the sample protocol demonstrates an interface that is designed for qualitative personal networks research. The Narrative interface does not collect any additional data but rather maps data collected elsewhere in the interview to aspects of the visual representation of the network. It aims to represent aspects of the participant's network back to them with the intent to facilitate narrative interrogation of the data in an interview setting.
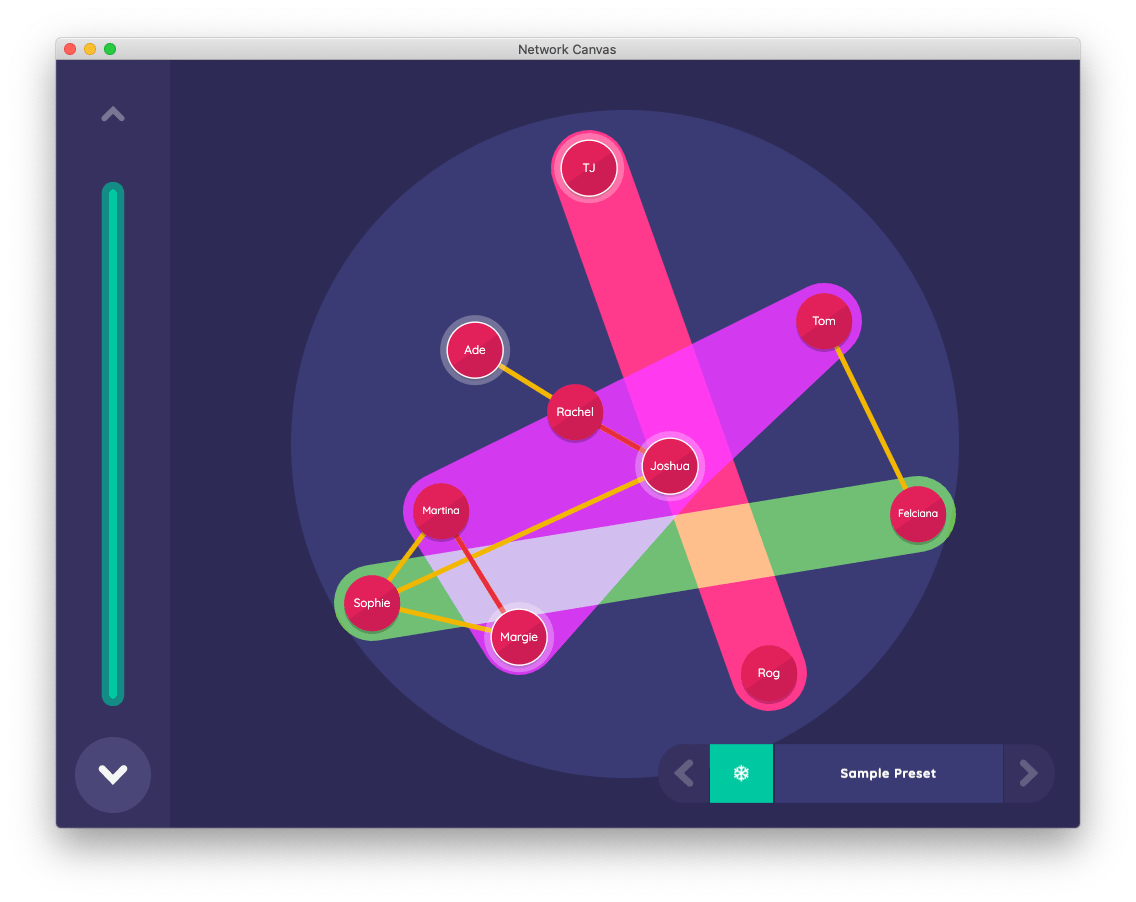
The preset menu in the bottom right allows the researcher or the participant to switch between different predefined visual styles. In this example, you can see the two edge types created previously ("know" and "conflict") and the boolean attributes assigned during the variable toggling task on the Sociogram interface. You can also see the categorical groupings collected on the Categorical Bin interface. Each preset can be toggled on or off by tapping on the attribute or edge in the menu.
The Narrative interface also supports free-form annotation using the mouse, a finger, or a stylus. The annotation will disappear in five seconds unless you click the freeze icon to the left of the preset menu. With the freeze button engaged, all annotations will remain until you disable the freeze function or use the reset annotation button. Although these annotations are not yet recorded by the software, you can optionally use additional screen recording and audio recording software to keep a record of the interactions on this interface.
The Finish Screen
Each interview protocol has a "finish" screen automatically inserted by Interviewer. This screen presents a single button that will exit the interview and return to the start screen. Clicking this button will also set, or update, the "finished at" property of the interview session. This property is exported along with your interview data, and can be used to calculate interview duration.
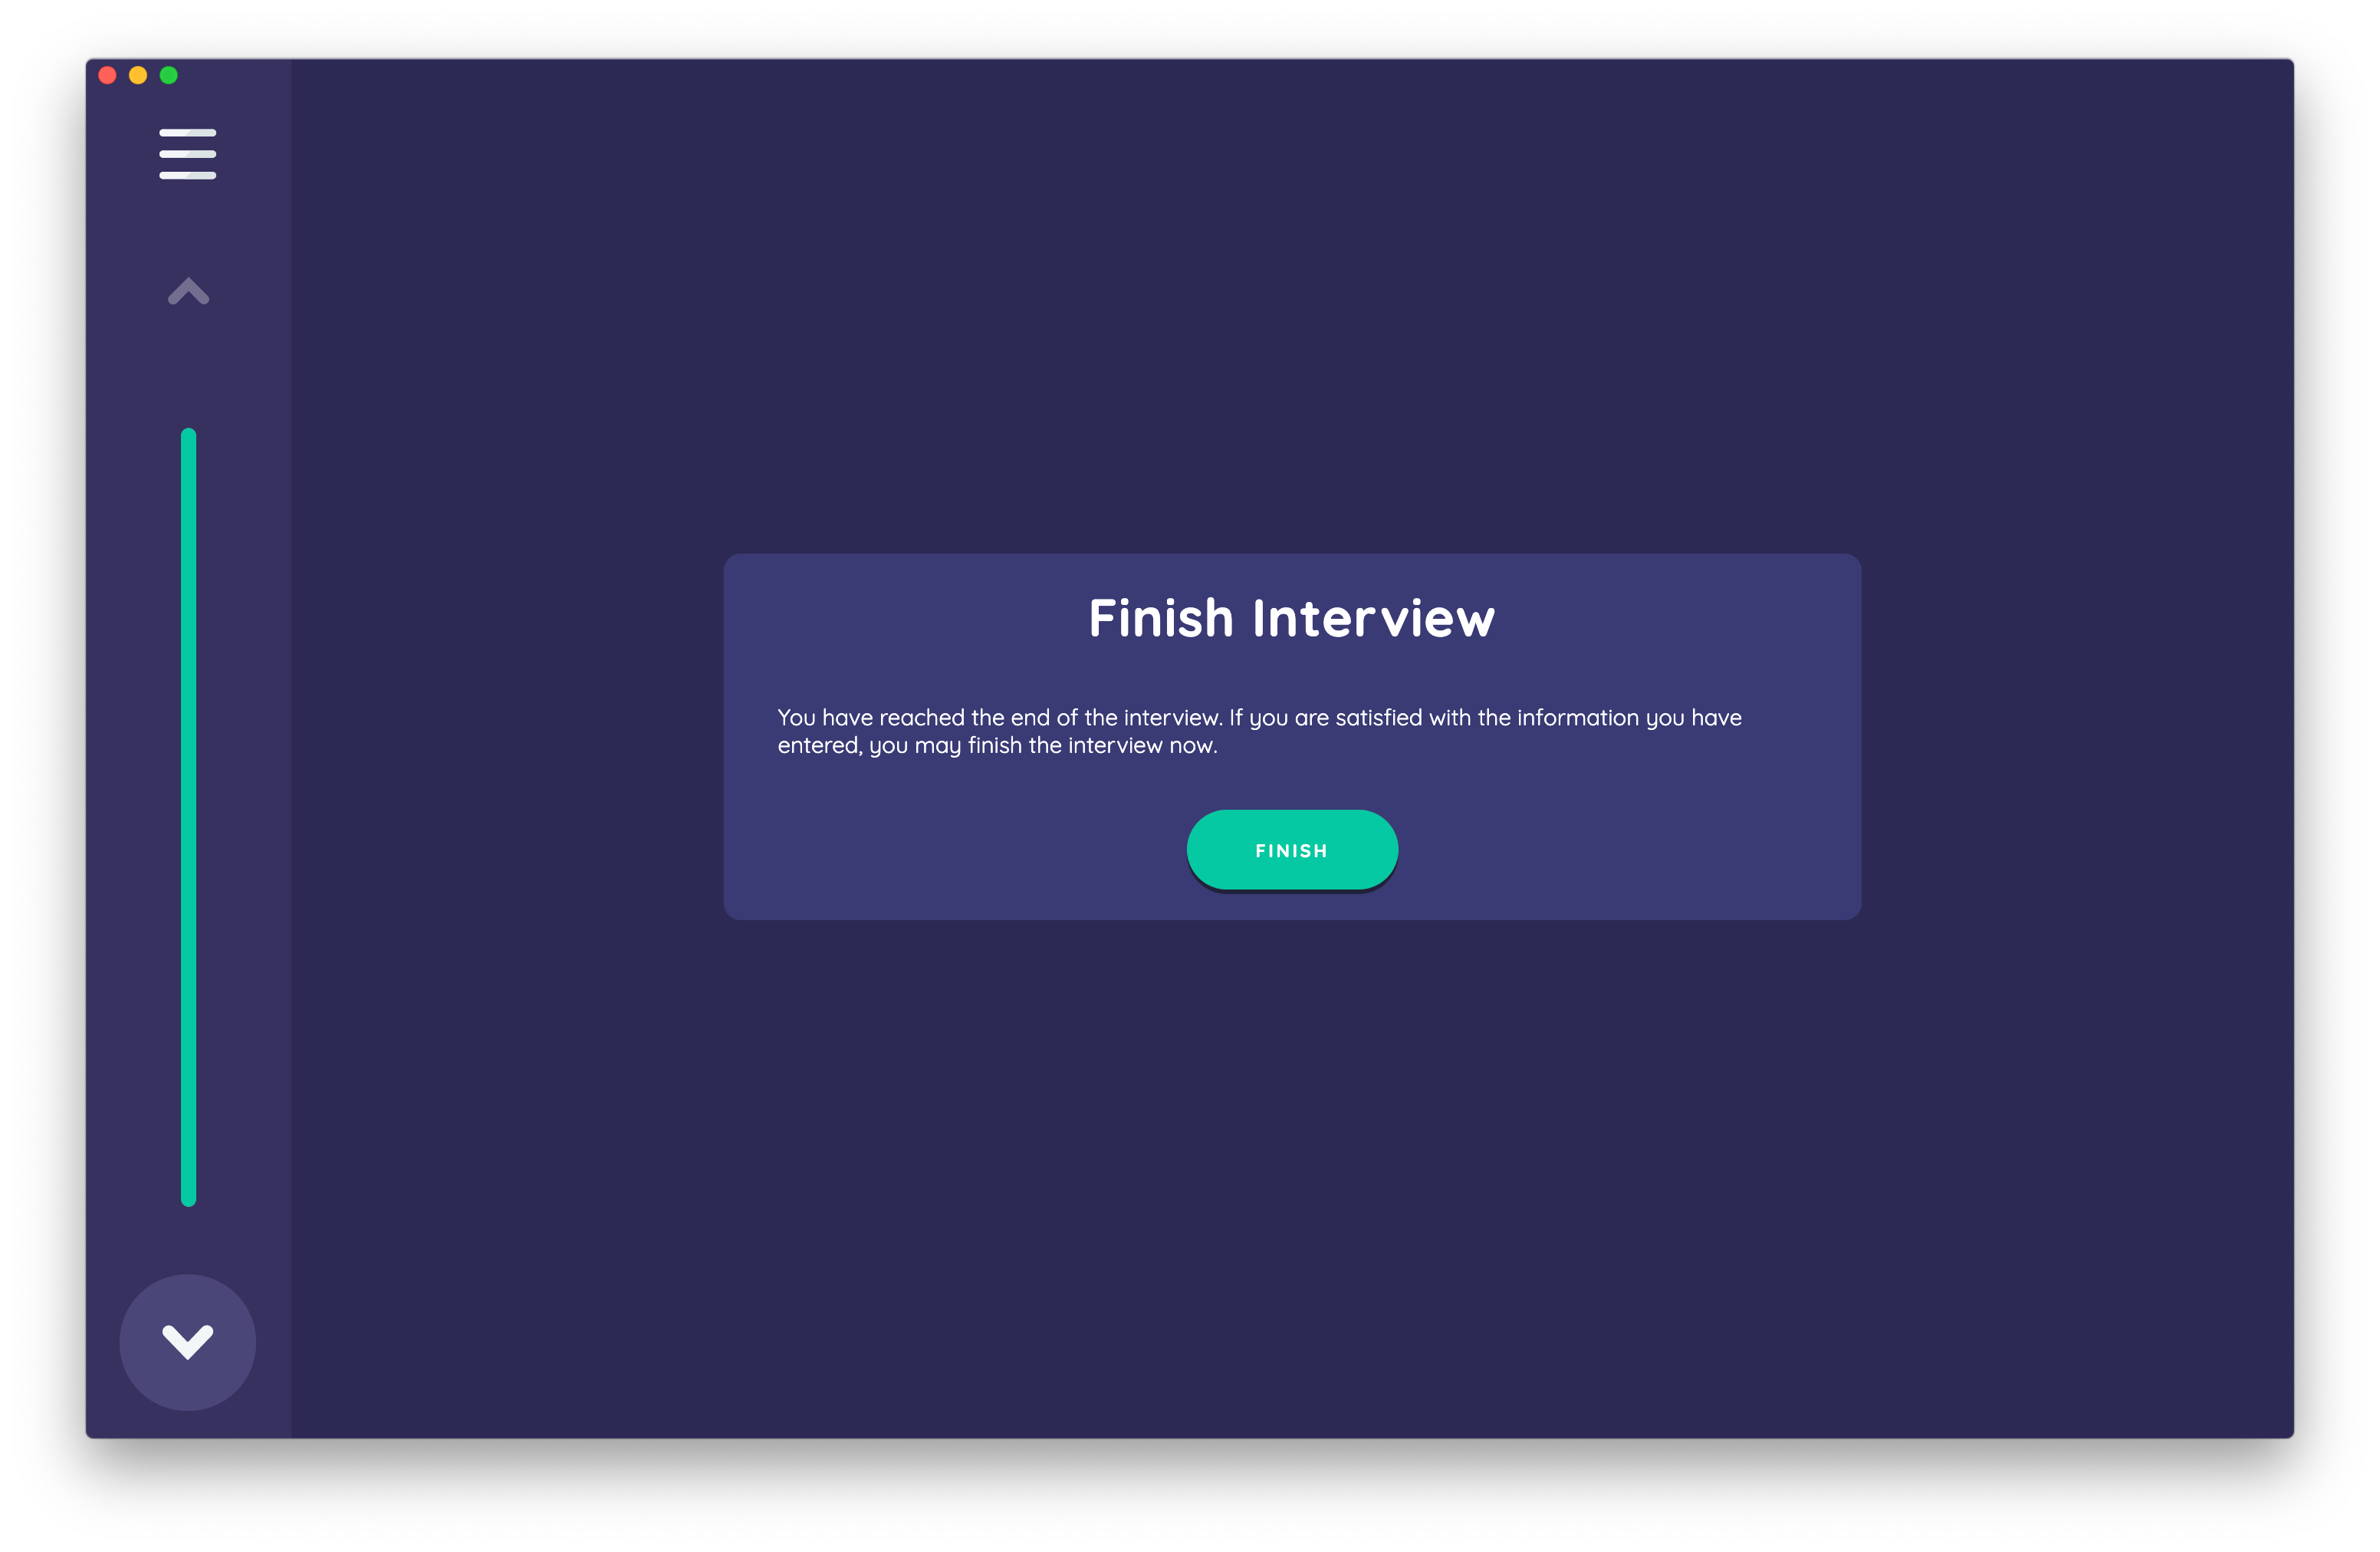
For now click "Finish" to return to the start screen.
Resuming, exporting, and managing interview sessions
Now that you have completed an interview, new sections and options will appear on the start screen for managing and resuming interview sessions.
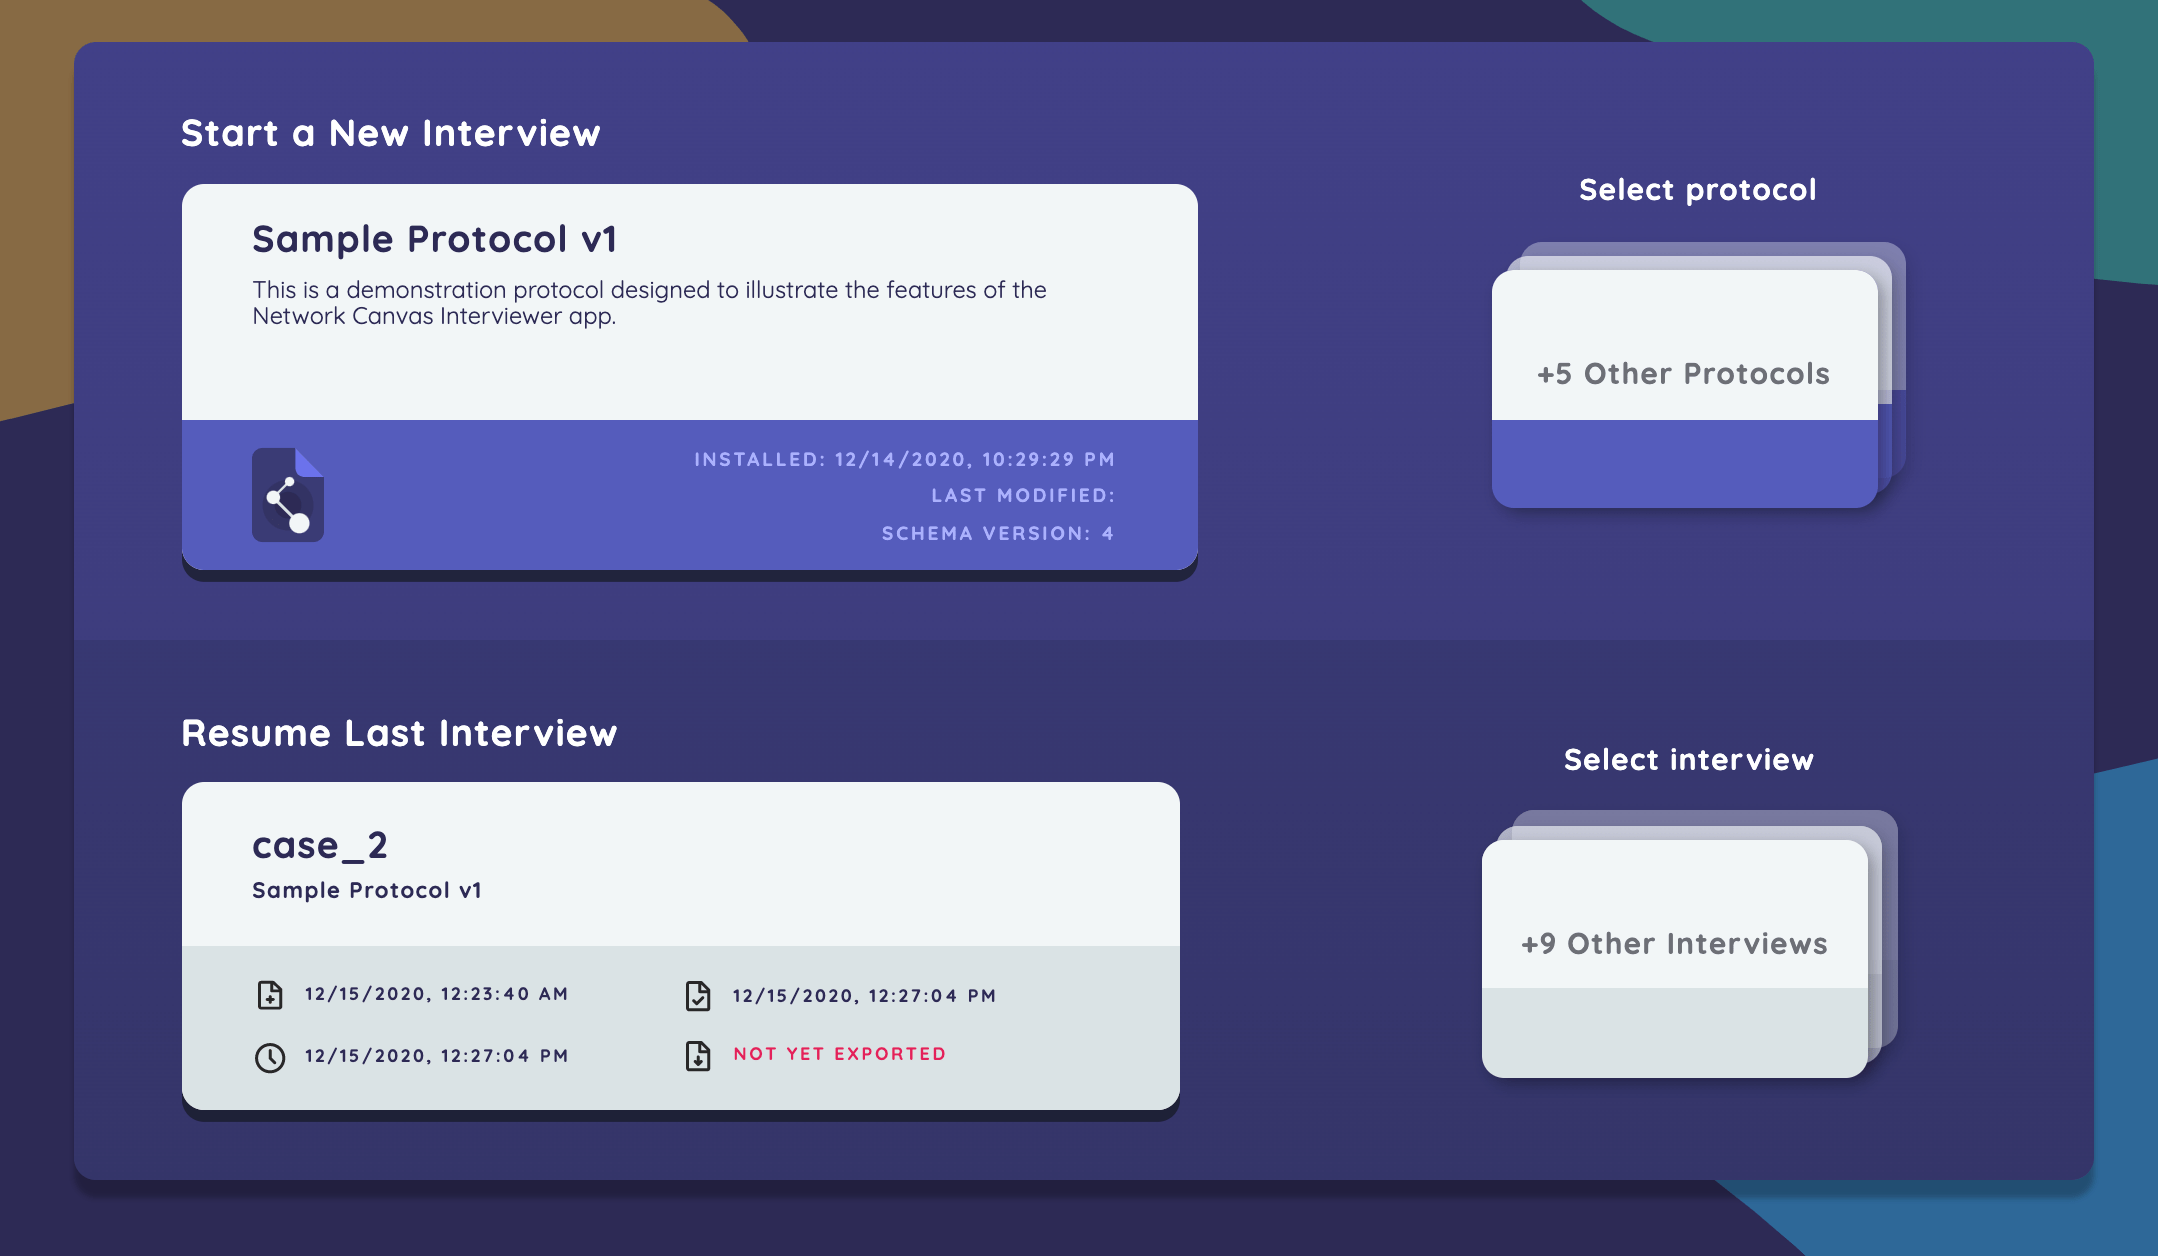
The resume section (above) is displayed immediately below the start new interview section, and works in the same way. Clicking an interview session card will immediately resume the interview at the point that you left off. When multiple existing sessions exist on the device running Interviewer, a card stack icon will appear, that when clicked will allow you to choose between resuming any existing interview session.
Managing and exporting interview data takes place in a dedicated export and manage interview data section (below). To remove an interview session from the device, select it, and click the "delete selected" button.
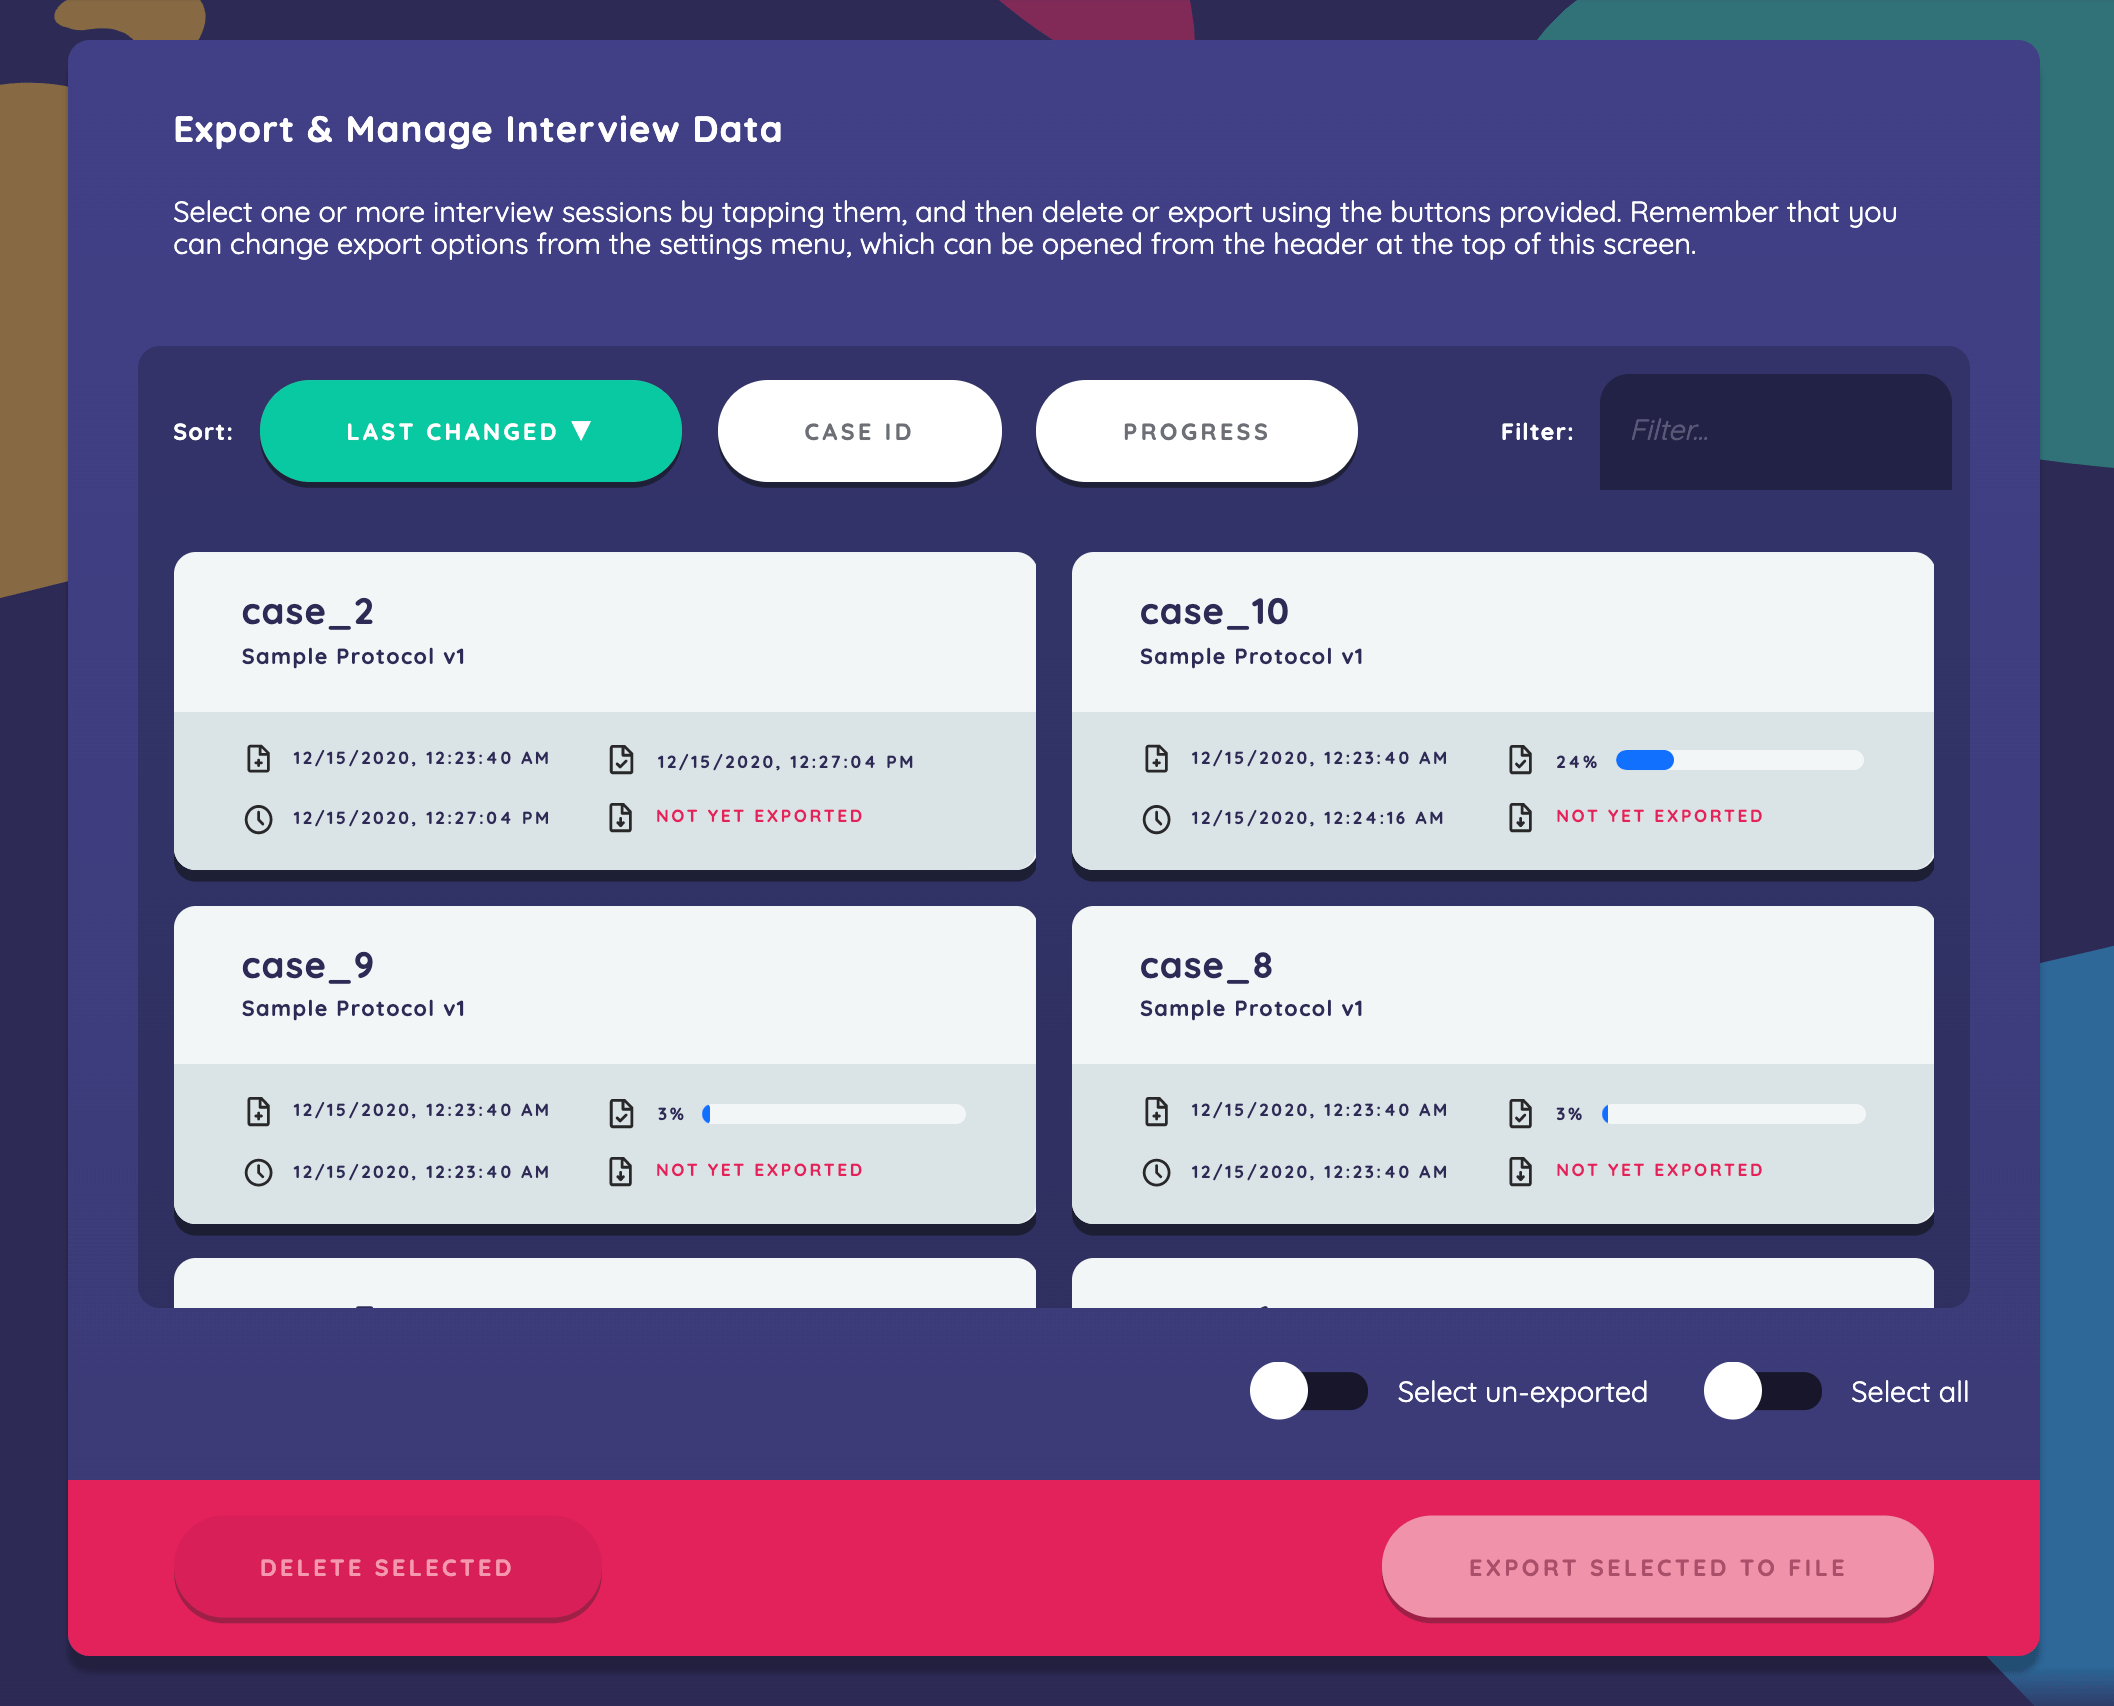
The data export process consists of selecting one or more sessions from this section, and clicking the "export selected to file". Settings for exported data can be found in the device settings in the welcome section.
File types
After clicking "export selected to file," you will be prompted to choose a file type for the export. The two options are:
- CSV. A common format for representing network data. This format is readable as a table (or series of tables) in Excel, LibreOffice, Keynote, and other tabular programs. The CSV version also complies with the
egorpackage standard. Selecting this option will output multiple files, including node and edge lists for each type, and an ego attribute list that also includes session metadata:- Ego attribute list: This file will have one row per ego, with ego-level variables session metadata. The filename will be in the format
caseID_sessionUUID_ego.csv. - Alter attribute list: This file will have one row per alter (i.e. per nominated node). All alters have their own unique ID, as well as an automatically incrementing ID that is only consistent on a per-export basis. The filename will be in the format
caseID_sessionUUID_alterType.csv. - Edge attribute list: This will have one row per relationship, with columns representing edge attributes. Each row will have a key to link to ego (
networkCanvasEgoUUID), as well as source and target columns that reference both the UUID and the automatically incrementing export ID. The filename will be in the formatcaseID_sessionUUID_edgeType.csv.
- Ego attribute list: This file will have one row per ego, with ego-level variables session metadata. The filename will be in the format
- GraphML. An XML based open standard for representing graph data, that is compatible with many social network analysis programs including UCINET, Gephi, NodeXL, Pajek, Visone, and ORA. The filename will be in the format
caseID_sessionUUID.graphml.
Which file type you should choose depends largely on the needs of your analysis tools. We recommend exporting data in both formats, and experimenting with the data you receive to ensure that it needs your needs.
Export Options
You may configure a variety of specialized export options that will impact the data you receive in a variety of ways. These options can be left at their default values unless you know that you need to change them.
Merge sessions by protocol
The option to "Merge Sessions by Protocol" will produce a consolidated file (or files in the case of CSV) that contains all interviews. Although the file(s) will contain all egos, nodes, and edges across all interviews, the ego networks themselves will not be merged in any way.
If this option is left deselected, the export process will produce separate files for each of the interviews completed.
Use screen layout coordinates
Position data from layout variables used on the Sociogram interface in Interviewer is stored on nodes as normalized x/y coordinates, with the origin in the top left of the screen. This allows you to later visualize these layouts on a canvas of arbitrary size, and to compare layouts that were created on screens with different proportions.
Next Steps
Now that you have experienced the general flow of an interview in Network Canvas Interviewer from the participant perspective, you may wish to:
- Learn how to create your own protocol in building a protocol using Architect
- Export your interview data using the Data Export guide
- Explore the full Protocol and Data Workflows for conducting research